To avoid these ads, REGISTER NOW!

Modifications to the HF 4 and 5 drawer service carts - what changes have you made?

To avoid these ads, REGISTER NOW!

baconismidog

Member
Joined
Mar 13, 2016
Messages
17
Location
Austin TX
I finally got my cart for Christmas after stalking this thread for a while. All these ideas were lifted from this thread, I take no credit.

On the lid I arranged magnet bars in a pyramid shape to allow my ratcheting wrenches a place to rest (heavy at the bottom). Note that letting the lid slam down doesn't shake any of the wrenches loose, neither does banging on the lid once closed. Everything that didn't use existing holes I riveted in using tri-grip rivets from Amazon (I removed the rubber grommets for the lid b/c I didn't want extra height) https://amzn.to/39BAB8L

I put magnet bars on the non-handle end to keep all of my really big SAE wrenches 3/4 - 1 1/8.

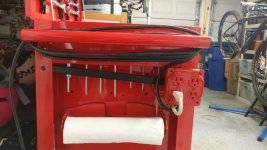
I used an old galvanized electrical box and some old plugs to wire up power to the cart, painted it all to match since it was several different colors. I used 3 command strips to stick a power strip on the other side of the cart and plugged in power bricks for a USB speaker and my cell phone. I'm not anticipating using that power strip much for dynamic needs, mostly static (chargers, etc). The electrical box will be where I plug saws, etc. while working. I used little sticky cable management things to zip tie the wire so it doesn't sag and put a little loop in the power strip wire so I can adjust length w/o having to re-zip-tie it.

I put a cell phone holder under the lid so I can have music, how-to vids, etc. while working.

I put a magnet bar under the handle to keep my screwdrivers from moving around (it doubles to keep little ones from falling through the holes). EDIT: I forgot that I put 4 washers between the magnet bar and the cart b/c w/o the washers the screwdrivers were pulled outwards and ended up sticking out past the profile of the cart, basically over the spray paint can tray. Those rivets were long enough to pass through the electrical box, 4 washers and the magnet bar (for reference).
 

Attachments

  • IMG_20200101_224632.jpg
    IMG_20200101_224632.jpg
    141.7 KB · Views: 889
  • IMG_20200101_224323.jpg
    IMG_20200101_224323.jpg
    43 KB · Views: 766
  • IMG_20200101_224303.jpg
    IMG_20200101_224303.jpg
    53.2 KB · Views: 788
  • IMG_20200101_224542.jpg
    IMG_20200101_224542.jpg
    131.9 KB · Views: 827
  • IMG_20200101_225911.jpg
    IMG_20200101_225911.jpg
    103.2 KB · Views: 825
  • IMG_20200101_230019.jpg
    IMG_20200101_230019.jpg
    92 KB · Views: 772
  • IMG_20200101_230151.jpg
    IMG_20200101_230151.jpg
    72.9 KB · Views: 764
Last edited:

PelicanPines

ALLIANCE MEMBER
Joined
Apr 30, 2014
Messages
38,272
Location
New Jersey, USA, Earth, My own reality
I finally got my cart for Christmas after stalking this thread for a while. All these ideas were lifted from this thread, I take no credit.

-snip-

I enjoyed your images. Your work is impressive.

One question. What do you have plugged into the power strip you have hidden on the inner leg?

I wish I designed my mods to include space for chargers but honestly... I don't have any room. The power strip raised my eyebrows tho… very interested.
 

baconismidog

Member
Joined
Mar 13, 2016
Messages
17
Location
Austin TX
I enjoyed your images. Your work is impressive.

One question. What do you have plugged into the power strip you have hidden on the inner leg?

I wish I designed my mods to include space for chargers but honestly... I don't have any room. The power strip raised my eyebrows tho… very interested.

Thanks PelicanPines, like I said I was just copying everyone else's ideas but I appreciate the compliment.

I plugged in two USB wall warts; a 2.4 (for the speaker) and a 5 for the phone. There is also a charger for my cordless drill batteries that I have sitting on the bottom tray, you can see it in the 4th pic.

The cable routing is still messy for some of the items plugged into the strip, I'm going to use it for a while before I zip tie them in (waste not). These are similar to what I used for cable routing: https://amzn.to/2SOVuri

@ouimetnick, I'll check on the paint when I get home this evening. It was from Walmart, I'm pretty sure it was Rustoleum (one of the reds with a bit more black in it than you'd think) but I'll make sure. Besides using it for the power box I also used it on any holes I drilled before riveting in case they get wet. I dabbed a bit on the heads of each rivet b/c some were black and some (inexplicably) had silver heads which was triggering my OCD a bit.
 

MEDTECH

Well-known member
Joined
Jan 31, 2016
Messages
12,344
Location
Northern NJ
I enjoyed your images. Your work is impressive.

One question. What do you have plugged into the power strip you have hidden on the inner leg?

I wish I designed my mods to include space for chargers but honestly... I don't have any room. The power strip raised my eyebrows tho… very interested.

Have to agree with Pines. Your setup is REALLY impressive. Nice job.
 

Cdcrowell

Well-known member
Joined
Feb 9, 2016
Messages
47
Location
nashville
Went to Lowe’s today on my way home and was looking for that rubber rug runner for a tool box top, saw it mentioned in another thread. Couldn’t find any bit did happen to find a nice rubber mat, 3x4, with a tear on the edge. Got it for $9 out the door after a little haggling (normally $22 and some change).

Cut it up and set it on the top lid and tray. I think this is going to be a nice mod. Now I can rivet through the lid and not have to worry about looking at them.

12871d16e9e97f541dd0881cd9053318.jpg


Did something similar on my side tray (rubber mat found at home depot)
 

Attachments

  • 8DFE3058-4FDB-45B3-B04C-2C3F9FBD3250.jpg
    8DFE3058-4FDB-45B3-B04C-2C3F9FBD3250.jpg
    124.1 KB · Views: 459
  • 12871d16e9e97f541dd0881cd9053318.jpg
    12871d16e9e97f541dd0881cd9053318.jpg
    173.7 KB · Views: 159

dodge610

Well-known member
Joined
Aug 22, 2010
Messages
5,467
Location
North Canton Ohio
0a53ad0b5ffd6633b92f5369d1970cfa.jpgEdge guards for the 5 drawer cabinet found at HD and $5.00 cheaper than the HF set.


Sent from my iPhone using Tapatalk
 

Attachments

  • 0a53ad0b5ffd6633b92f5369d1970cfa.jpg
    0a53ad0b5ffd6633b92f5369d1970cfa.jpg
    89.3 KB · Views: 107

jmhinkle

Well-known member
Joined
Feb 6, 2019
Messages
452
Location
Portland, OR
0a53ad0b5ffd6633b92f5369d1970cfa.jpgEdge guards for the 5 drawer cabinet found at HD and $5.00 cheaper than the HF set.


Sent from my iPhone using Tapatalk

Those are vinyl over foam right? The edge guards from HF and Snap-on are actually rubber. I guess depending on your use those might be ok, but I wouldn't expect them to hold up long in a garage environment and bumping into rough surfaces. One brush against the brick on my house and those would be torn apart. Not sure how those would hold up to chemicals either.
 

Attachments

  • 0a53ad0b5ffd6633b92f5369d1970cfa.jpg
    0a53ad0b5ffd6633b92f5369d1970cfa.jpg
    85.6 KB · Views: 84

dodge610

Well-known member
Joined
Aug 22, 2010
Messages
5,467
Location
North Canton Ohio
Those are vinyl over foam right? The edge guards from HF and Snap-on are actually rubber. I guess depending on your use those might be ok, but I wouldn't expect them to hold up long in a garage environment and bumping into rough surfaces. One brush against the brick on my house and those would be torn apart. Not sure how those would hold up to chemicals either.

They seem to be pretty stout had them out of the box and looked them over will keep you posted.
 

darkzero

Well-known member
Joined
Oct 20, 2011
Messages
3,345
Location
SoCal
Got a pic of them installed? How are they shaped? Doesn't seem like those would be well suited for toolbox bumpers looking at the pic on the box.
 

dodge610

Well-known member
Joined
Aug 22, 2010
Messages
5,467
Location
North Canton Ohio
They will work out fine for my application seem to be pretty thick over the padding i have ran into table saw and rubbed beams in my pole barn shop still holding up very well. If the tear they can be replaced.
 

ptgarcia

Well-known member
Joined
Nov 15, 2016
Messages
1,202
Location
Alta Loma, CA
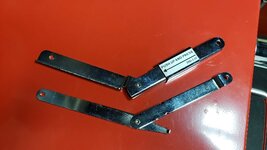
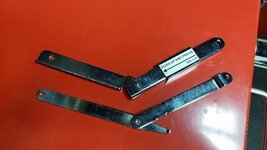
Tried to install the Snap-on hinges this past weekend and they don't work. I followed the dimensioned drawing posted previously to a tee, but when the hinge folds the pivot hits the back wall before the lid closes. When open, though, the lid is vertical. Not sure if I got the wrong hinges or something is different about my box. :dunno:
 

jmhinkle

Well-known member
Joined
Feb 6, 2019
Messages
452
Location
Portland, OR
Tried to install the Snap-on hinges this past weekend and they don't work. I followed the dimensioned drawing posted previously to a tee, but when the hinge folds the pivot hits the back wall before the lid closes. When open, though, the lid is vertical. Not sure if I got the wrong hinges or something is different about my box. :dunno:

Swap them around so they fold to the front? Never messed with those as I didn't see the need, but don't they have some sort of lock to prevent collapse no matter which way they fold?
 

PelicanPines

ALLIANCE MEMBER
Joined
Apr 30, 2014
Messages
38,272
Location
New Jersey, USA, Earth, My own reality
Tried to install the Snap-on hinges this past weekend and they don't work. I followed the dimensioned drawing posted previously to a tee, but when the hinge folds the pivot hits the back wall before the lid closes. When open, though, the lid is vertical. Not sure if I got the wrong hinges or something is different about my box. :dunno:

Questions for you.
You have a Series 1 five drawer box?
What is the part number on those hinges?

Ive done the hinge mode for myself and a friend with no issues... Following the measurements in that drawing. I can snap pictures of mine if needed. I used several spacers to square things up. If you try to do it without spacers/washers... the hinges might bind.
 

fartymarty

Well-known member
Joined
Nov 9, 2012
Messages
1,348
Location
Fort Worth
0a53ad0b5ffd6633b92f5369d1970cfa.jpgEdge guards for the 5 drawer cabinet found at HD and $5.00 cheaper than the HF set.

I don't think that rear tire has many more miles in it, and maybe none in the rain.

Are you sure that foam will be tough enough? It looks like it might tear easily as soon as something hard bumps into it.
 

dodge610

Well-known member
Joined
Aug 22, 2010
Messages
5,467
Location
North Canton Ohio
I don't think that rear tire has many more miles in it, and maybe none in the rain.

Are you sure that foam will be tough enough? It looks like it might tear easily as soon as something hard bumps into it.

That is my sons bike tire was new 2 seasons ago he rides a lot and rides hard. lol
 

darkzero

Well-known member
Joined
Oct 20, 2011
Messages
3,345
Location
SoCal
Tried to install the Snap-on hinges this past weekend and they don't work. I followed the dimensioned drawing posted previously to a tee, but when the hinge folds the pivot hits the back wall before the lid closes. When open, though, the lid is vertical. Not sure if I got the wrong hinges or something is different about my box. :dunno:

I just installed mine a few months ago. Post 3463, maybe the pics might help.

As others mentioned, they only work on the series 1 cart.
 
To avoid these ads, REGISTER NOW!

ptgarcia

Well-known member
Joined
Nov 15, 2016
Messages
1,202
Location
Alta Loma, CA
Questions for you.

You have a Series 1 five drawer box?

What is the part number on those hinges?


Ive done the hinge mode for myself and a friend with no issues... Following the measurements in that drawing. I can snap pictures of mine if needed. I used several spacers to square things up. If you try to do it without spacers/washers... the hinges might bind.
It is a series 1 5-drawer cart. Part number I'm not sure on. I don't have my receipt with me, but here's a pic of the hinges. I have spacers and everything was lined up perfectly, the pivot just hit the back wall.b74cb1399d27f2640a3fb335de8fe4e2.jpg

Sent from my SM-N960U using Tapatalk
 

Attachments

  • b74cb1399d27f2640a3fb335de8fe4e2.jpg
    b74cb1399d27f2640a3fb335de8fe4e2.jpg
    136.4 KB · Views: 79

Slinger646

Well-known member
Joined
Apr 24, 2017
Messages
213
Added another pegboard under the folding tray, a magnetic tool holder for my grease gun, and a magnetic tray that I took the magnets off and riveted to the bottom tray for my hand packer, CV grease, and some funnels. I used one of the magnets from the tray to secure the tip of the grease gun.

Just have to drill holes for the drawer latches, add a prybar rack, and I can call this build finished!

Where are you getting the pegboard at?
 

dsgreen3

Well-known member
Joined
May 18, 2015
Messages
86
Location
Unadilla NY
Motorman55 how do you like those Everlast welders I am thinking of getting the 140 mig machine with gift cards off Amazon. This will basically be a free welder for me gift cards are from work for going above and beyond.
 

dodge610

Well-known member
Joined
Aug 22, 2010
Messages
5,467
Location
North Canton Ohio
aa8cb42ffe19e618fc59d486d7d07c55.jpgGoing to mount some of these on the insides of my drawers to add a little custom lighting to the drawer should look ok I hope.


Sent from my iPhone using Tapatalk
 

Attachments

  • aa8cb42ffe19e618fc59d486d7d07c55.jpg
    aa8cb42ffe19e618fc59d486d7d07c55.jpg
    94.1 KB · Views: 92

tlmartin84

Well-known member
Joined
Apr 23, 2012
Messages
1,085
Location
West Virginia
View media item 100033
View media item 100034
As far as details....

I bent the J Hooks out of aluminum. I used Rivnuts to mount them.

I had a spare chrome handle off of another box so I used because it looks better than the ones that come with it.

TIG rod holders is 1/4" angle. I used a hole saw to cut the holes for the tubes. Again it is rivnutted to the cart.

The factory struts were entirely too weak. I ordered a set of struts from Amazon for 20 bucks (the are 50lbs each). I reversed them and mounted them to the front corner factory holes. You can see the nuts by the handles. They will not open it on their own, but it is very easy for me to open, once open they hold it there. (I don't store items I use often there, I just didn't want to waste the space).

I bent some C channels and rivnutted them to the lid, then mounted the welder and plasma to the top of those so it was stiff enough.

THE BEST PART...

When I went to Harbor Freight to pick up the cart, they said we have an open box for 200.00. I asked to look at it. Well it had been dropped, the bottom drawer was bent and the thumb latch was broken.

When I pointed it out to them they said oh....150.00!

I straightened the drawer out best I could without messing up the paint and spent 4.00 on replacement latches (got a pack of 4). So it was a steal.
 

isb cornbinder

Well-known member
Joined
Nov 3, 2010
Messages
7,072
Location
Pacific South West, BC, Canada

We do not have HF in Canada.
I bought this service box from a guy who used to come around here. I never liked the box the way it was. Since the cart/box was mounted on vertical rails, I moved the drawers to the bottom and placed the open tray at the top. This works better for my needs. I changed out the original casters for German BLICKLE casters.
 

Attachments

  • Nixon box inverted.jpg
    Nixon box inverted.jpg
    73.6 KB · Views: 496

Motorman55

Well-known member
Joined
Apr 10, 2016
Messages
2,700
Location
South Jersey
Motorman55 how do you like those Everlast welders I am thinking of getting the 140 mig machine with gift cards off Amazon. This will basically be a free welder for me gift cards are from work for going above and beyond.

Sorry, not my welders , ask tlmartin84, its his set-up. I just commented on the cart mods.
 

tlmartin84

Well-known member
Joined
Apr 23, 2012
Messages
1,085
Location
West Virginia
Motorman55 how do you like those Everlast welders I am thinking of getting the 140 mig machine with gift cards off Amazon. This will basically be a free welder for me gift cards are from work for going above and beyond.

I like them. The plasma is really nice. The Welder I have is MIG/TIG capable and has a learning curve.

I don't think you can go wrong with them, 5 year warranty......

I would recommend going to a 200 amp machine though.
 

thr3squared

Well-known member
Joined
Oct 4, 2018
Messages
391
Location
CA
As far as details....

I bent the J Hooks out of aluminum. I used Rivnuts to mount them.

I had a spare chrome handle off of another box so I used because it looks better than the ones that come with it.

TIG rod holders is 1/4" angle. I used a hole saw to cut the holes for the tubes. Again it is rivnutted to the cart.

The factory struts were entirely too weak. I ordered a set of struts from Amazon for 20 bucks (the are 50lbs each). I reversed them and mounted them to the front corner factory holes. You can see the nuts by the handles. They will not open it on their own, but it is very easy for me to open, once open they hold it there. (I don't store items I use often there, I just didn't want to waste the space).

I bent some C channels and rivnutted them to the lid, then mounted the welder and plasma to the top of those so it was stiff enough.

THE BEST PART...

When I went to Harbor Freight to pick up the cart, they said we have an open box for 200.00. I asked to look at it. Well it had been dropped, the bottom drawer was bent and the thumb latch was broken.

When I pointed it out to them they said oh....150.00!

I straightened the drawer out best I could without messing up the paint and spent 4.00 on replacement latches (got a pack of 4). So it was a steal.
Sounds like you came up with some solid reinforcements. The struts and the support under the lid is what I was most curious about. great job :thumbup:
 

Slowbra

Well-known member
Joined
Jun 5, 2012
Messages
276
Location
NC
Any creative uses for the bottom of the cart? I find myself using it for storage of things I don't use, but feel like it could be re-purposed for something else. More drawers would have been good as an option. I'm working my way backwards through this thread to see if anyone did something like that.
 

MushCreek

Well-known member
Joined
Jan 14, 2015
Messages
10,030
Location
Upstate South Carolina
So far, I keep my battery charger on the bottom. I use the cart for a service cart out in the driveway; that way, the charger and extension cord are right there when I need them. With a 48 year old truck, and a 55 y/o tractor, the charger gets used a fair amount.
 

PelicanPines

ALLIANCE MEMBER
Joined
Apr 30, 2014
Messages
38,272
Location
New Jersey, USA, Earth, My own reality
Any creative uses for the bottom of the cart? I find myself using it for storage of things I don't use, but feel like it could be re-purposed for something else. More drawers would have been good as an option. I'm working my way backwards through this thread to see if anyone did something like that.

Yes... I trimmed the bottom tray and reinforced it... I then repurposed Dewalt metal tool boxes, seven, to hold things like Glue grub, Heat gun, tire repair, etc. I detailed the mod in this thread... :thumbup:

Pictures Here https://www.garagejournal.com/forum/album.php?albumid=4473

 
To avoid these ads, REGISTER NOW!
Top Bottom