To avoid these ads, REGISTER NOW!

What's going on in my little Garage....

OP
K

Keyblazer

Well-known member
Joined
Jul 30, 2009
Messages
1,471
Location
Irvine, CA
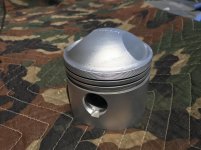
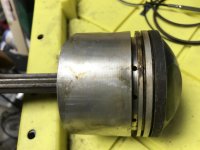
Told the GF if she needed me, I’d be in the garage polishing my piston...

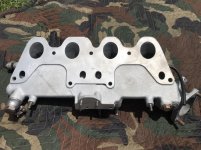
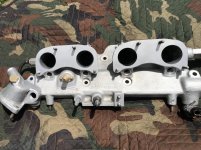
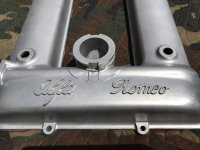
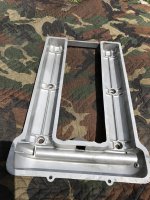
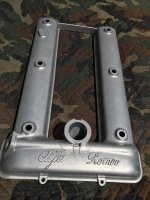
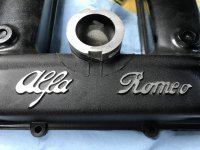
In this case it’s a Borgo High Dome 10.4/1 compression piston for a 2 Liter Alfa Romeo I had laying around for a later build.

attachment.php


attachment.php


attachment.php


attachment.php


attachment.php


attachment.php
 

Attachments

  • 61C666E7-455D-4116-8ED4-0F0311B4C7C0.jpg
    61C666E7-455D-4116-8ED4-0F0311B4C7C0.jpg
    89.3 KB · Views: 914
  • 26C0EA2B-98C4-44E0-8C09-8C4DE5F85BA6.jpg
    26C0EA2B-98C4-44E0-8C09-8C4DE5F85BA6.jpg
    149.7 KB · Views: 918
  • 5D19C9CD-B5C6-491F-AED8-CACA09F087E5.jpg
    5D19C9CD-B5C6-491F-AED8-CACA09F087E5.jpg
    148.6 KB · Views: 910
  • 01773913-1231-44B1-BE73-007026A2EC1F.jpg
    01773913-1231-44B1-BE73-007026A2EC1F.jpg
    77.4 KB · Views: 915
  • 07CBF5F7-4B82-47FF-B5B4-606E4A100BB9.jpg
    07CBF5F7-4B82-47FF-B5B4-606E4A100BB9.jpg
    117.3 KB · Views: 909
  • EE8FF499-8303-4517-AF44-93F3E4DA070F.jpg
    EE8FF499-8303-4517-AF44-93F3E4DA070F.jpg
    150.4 KB · Views: 915
Last edited:
To avoid these ads, REGISTER NOW!

Bigbandguy

Well-known member
Joined
Oct 18, 2014
Messages
1,168
Location
North Carolina
Not that I would ever do so but beware of some of the characters on here who might criticize you for not getting your GF to participate in polishing your piston.
 
OP
K

Keyblazer

Well-known member
Joined
Jul 30, 2009
Messages
1,471
Location
Irvine, CA
To be clear, she has always said:
“What happens in that dirty garage, stays in that dirty garage....”!
 
OP
K

Keyblazer

Well-known member
Joined
Jul 30, 2009
Messages
1,471
Location
Irvine, CA
So, its been a lot of play and testing until now.
Time to get serious.
Found the pair of Mikuni carbs in a box for the Yamaha XS650.
They needed rebuilding, were gummed up and useless.

Started with the Left side Carb.[
Stripped it off.
Removed the float bowl.

attachment.php

024.jpg
attachment.php


attachment.php


attachment.php
 

Attachments

  • 007.jpg
    007.jpg
    122.5 KB · Views: 803
  • 022.jpg
    022.jpg
    148.1 KB · Views: 806
  • 014.jpg
    014.jpg
    114.2 KB · Views: 797
Last edited:
OP
K

Keyblazer

Well-known member
Joined
Jul 30, 2009
Messages
1,471
Location
Irvine, CA
Then I stripped the Carb Body as far apart as I could, and blasted in 3 sessions... its amazing the little spots I missed on each go.

Total blasting time was probably 30 mis or so, plus washing and blowing out all passages.

Happy with end result.

attachment.php


attachment.php


attachment.php


attachment.php


attachment.php


attachment.php
 

Attachments

  • 419A437F-F6CF-4733-B2CB-7ED545B7108C.jpg
    419A437F-F6CF-4733-B2CB-7ED545B7108C.jpg
    135.7 KB · Views: 806
  • 3B54D359-4C1B-4678-B21A-EEBB9CA2F7A6.jpg
    3B54D359-4C1B-4678-B21A-EEBB9CA2F7A6.jpg
    60.7 KB · Views: 807
  • BD3BB9EA-616C-46F3-A2A5-6C58461BDBDA.jpg
    BD3BB9EA-616C-46F3-A2A5-6C58461BDBDA.jpg
    143 KB · Views: 809
  • 3036E7A2-175D-4EC8-84C7-ABF20EFB6FC8.jpg
    3036E7A2-175D-4EC8-84C7-ABF20EFB6FC8.jpg
    84.5 KB · Views: 804
  • BAC2BCCB-0D0F-426A-B38E-3BBFFF21BA9F.jpg
    BAC2BCCB-0D0F-426A-B38E-3BBFFF21BA9F.jpg
    147.2 KB · Views: 812
Last edited:
OP
K

Keyblazer

Well-known member
Joined
Jul 30, 2009
Messages
1,471
Location
Irvine, CA
Yes, it does!
I did this test on a Die cast valve cover that I had previously dry blasted as a prelude to either polishing or powder coating.
Left side is dry blasted, middle area is vapor blasted and RH corner was polished.

attachment.php
 

Attachments

  • C38760DC-C95D-4335-B59A-BA95573B5B83.jpg
    C38760DC-C95D-4335-B59A-BA95573B5B83.jpg
    146.8 KB · Views: 694
Last edited:
OP
K

Keyblazer

Well-known member
Joined
Jul 30, 2009
Messages
1,471
Location
Irvine, CA
You have no idea!
Running an 8mm nozzle, In the gun, but thought a 6mm might work better.
It doesn’t feel like it’s performing as well.
Having some issues with media in the tote not agitating very well.
I’ve tried adjusting the gun/agitation split valve but it didn’t help.
So, opened up the pipework holes more.
It’s still not how I want it yet.
Looking for a “Rolling Boil” effect.

Started carb #2 yesterday.
Stripped it all apart, an made a mental note of the time I put it in the Cabinet.

attachment.php


attachment.php


attachment.php


There is about 15 mins of cabinet time between these two pics.
It’s not quite there yet, but things like this go pretty fast.

attachment.php


attachment.php
 

Attachments

  • BC2C2A8F-B827-4C88-B662-A6CEB8661D0E.jpg
    BC2C2A8F-B827-4C88-B662-A6CEB8661D0E.jpg
    148.6 KB · Views: 645
  • F6D3A3EF-897B-478E-B16F-E71490217919.jpg
    F6D3A3EF-897B-478E-B16F-E71490217919.jpg
    149.1 KB · Views: 651
  • 0166D957-CD1D-40DC-A5C8-61AAEAD5C52B.jpg
    0166D957-CD1D-40DC-A5C8-61AAEAD5C52B.jpg
    143.6 KB · Views: 652
  • B11D8CE1-A915-4529-B4E5-C82236555EA1.jpg
    B11D8CE1-A915-4529-B4E5-C82236555EA1.jpg
    106.2 KB · Views: 652
  • 8EC46E42-67A7-4120-9406-EC5C981A6B46.jpg
    8EC46E42-67A7-4120-9406-EC5C981A6B46.jpg
    147 KB · Views: 651
Last edited:

driftpin

Well-known member
Joined
Dec 22, 2016
Messages
11,220
Location
Miami-Dade/Broward Co. Florida
Yes, it does!
I did this test on a Die cast valve cover that I had previously dry blasted as a prelude to either polishing or powder coating.
Left side is dry blasted, middle area is vapor blasted and RH corner was polished.

C38760DC-C95D-4335-B59A-BA95573B5B83.jpg

Did you dry-blast the entire thing, then vapor-blast that part, and then polish the end?
 
OP
K

Keyblazer

Well-known member
Joined
Jul 30, 2009
Messages
1,471
Location
Irvine, CA
Did you dry-blast the entire thing, then vapor-blast that part, and then polish the end?

Hi,
No, it went something like this:
About 5 years ago I blasted a section of that Valve Cover in my dry blaster with 80g glass bead. Blast area was from middle to end of one piece.
I wanted to see if that was too course, and how it would buff/polish.
I polished one end... it looked ok, but I decided I would prob Powder coat it, so put it aside to do later.
Found it in a box when I was looking for "Test Pieces".
Vapor Blasted the section that was between the two mounting holes...

attachment.php


So, small visible section to left of mounting hole, is as dry blasted.
Area between the mounting holes was Vapor Blasted over the dry blast.
Area to the right of the RH Mounting hole is polished.
 
OP
K

Keyblazer

Well-known member
Joined
Jul 30, 2009
Messages
1,471
Location
Irvine, CA
Did a change of media.
This basically means on my setup I lifted the pump assembly out of the tote with Water and 170/320 grit in and dropped it into another tote with Water and 80grit Media.

I want to document the change as best I can.
This is a pair of throttle bodies I did.
Upper one was done with 170/320G
Lower one was done with 80g and took about 1/2 the time.

I would guess that in person the difference in sheen on the Cast aluminum, is about +10% on the finer media...
I would say that the finish on the brass butterfly is actually better from the 80grit media...

attachment.php


attachment.php


attachment.php


attachment.php
 

Attachments

  • 0FE932EE-4FA0-4B79-B281-BB5E2EEB6919.jpg
    0FE932EE-4FA0-4B79-B281-BB5E2EEB6919.jpg
    149.4 KB · Views: 642
  • 78A9E400-8510-42CE-AE2A-06F541EB63EF.jpg
    78A9E400-8510-42CE-AE2A-06F541EB63EF.jpg
    146.4 KB · Views: 649
  • C5706991-E24A-437A-8A08-54A8425F62B0.jpg
    C5706991-E24A-437A-8A08-54A8425F62B0.jpg
    151.1 KB · Views: 648
  • 601D0ED8-2951-4C18-A1BE-9C0118E51F18.jpg
    601D0ED8-2951-4C18-A1BE-9C0118E51F18.jpg
    148.4 KB · Views: 644
Last edited:
OP
K

Keyblazer

Well-known member
Joined
Jul 30, 2009
Messages
1,471
Location
Irvine, CA
Another test peice:
Here is an pretty normal condition Alfa Valve cover that was not Touched/Polished/Cleaned for probably 45 years....
This is pretty much how they get...

attachment.php


attachment.php


I then popped it in and ripped half of it...

attachment.php


attachment.php


Very pleased with it, and it probably very close to the way it would have looked when the engine was originally built.
 

Attachments

  • F91CE819-7BF4-4D1A-A57D-1204BFB87B23.jpg
    F91CE819-7BF4-4D1A-A57D-1204BFB87B23.jpg
    151.6 KB · Views: 645
  • EF2BD7C0-30AE-4526-997D-8F42C8965F80.jpg
    EF2BD7C0-30AE-4526-997D-8F42C8965F80.jpg
    150.8 KB · Views: 637
  • 926485D6-6755-4A5A-83AE-DFA78BDB5589.jpg
    926485D6-6755-4A5A-83AE-DFA78BDB5589.jpg
    149.9 KB · Views: 640
  • 82E3C67E-8A41-402A-80F2-09DF4672752E.jpg
    82E3C67E-8A41-402A-80F2-09DF4672752E.jpg
    151.4 KB · Views: 640
Last edited:

Pressingonward

Well-known member
Joined
Mar 9, 2016
Messages
522
Location
SW WA
Oh man...every post makes me want a vapor blaster even more...that finish is great! How long would you estimate it took to blast that half of the Alfa valve cover?

Don't remember if you've shared your compressor setup or not yet - how many CFM are you running?
 
OP
K

Keyblazer

Well-known member
Joined
Jul 30, 2009
Messages
1,471
Location
Irvine, CA
Have an older Speedaire 80g Vertical with a 7.5hp.
I think it puts out 24cfm.
That half cover probably took me less than 10 mins.
Keep swapping back and forth between the 6mm and 8 mm nozzle and the 8 seems to blast better.

Not sure what I’m gonna do with the finish yet.
Planned to figure out the finish I like then try clearcoat and clear powder and see what looks best.

Finished up a full pass on the valve cover this afternoon.
Still some detailing to do on the inner with the 80 grit but I think I’ll run a pass on one half with the finer grit and see what it compares like.
This valve cover would need some sanding/detailing around the Alfa badge as there are some deeper ding/dents/Scratches that would need attention if it was going to be exposed.
I might well try Black or Red Crackle Powdercoat on it.

attachment.php


attachment.php


attachment.php


attachment.php


Did this Intake too today that is pretty rough casting...
Came out nice.

attachment.php


attachment.php
 

Attachments

  • 50A83522-EB9F-435E-AFDB-42DD711BAF19.jpg
    50A83522-EB9F-435E-AFDB-42DD711BAF19.jpg
    150.6 KB · Views: 596
  • 17DFC4D6-629F-45A2-886D-5D432BFBE9B6.jpg
    17DFC4D6-629F-45A2-886D-5D432BFBE9B6.jpg
    152 KB · Views: 595
  • 2322D57C-DA0A-4EF3-8E6C-5D1FE9D0C173.jpg
    2322D57C-DA0A-4EF3-8E6C-5D1FE9D0C173.jpg
    147 KB · Views: 594
  • 4FFDE83B-63D7-4209-92C8-1664E1433F8E.jpg
    4FFDE83B-63D7-4209-92C8-1664E1433F8E.jpg
    147.1 KB · Views: 591
  • 57A25D18-CA10-4CE3-8F2F-301D65A45285.jpg
    57A25D18-CA10-4CE3-8F2F-301D65A45285.jpg
    133 KB · Views: 595
  • 1000794D-A044-4D3C-B5E1-779614191E77.jpg
    1000794D-A044-4D3C-B5E1-779614191E77.jpg
    106.1 KB · Views: 595
Last edited:
To avoid these ads, REGISTER NOW!
OP
K

Keyblazer

Well-known member
Joined
Jul 30, 2009
Messages
1,471
Location
Irvine, CA
Wow, those aluminum parts look fantastic.
I’ve got an old set of Eddie Meyer Hollywood 24 bolt Flathead heads that would look great with that finish...

LOL, the Possibilities are endless!

Im working on an Alfa finned Oil pan that is not dissimilar to Flathead finned heads methinks...
Like this...

As they come...
attachment.php


This was blasted...

attachment.php


Wasnt happy with the little core/shrink marks in the casting, so hit them with 380G wet/dry wrapped around a Paint stir stick...
Its a Disease I tell you!

attachment.php
 

Attachments

  • A578E869-77B9-46E4-A95A-C9B5D1603C9B.jpg
    A578E869-77B9-46E4-A95A-C9B5D1603C9B.jpg
    123.5 KB · Views: 923
  • 3A7A7188-FB6E-4C8E-B459-FD8A6798FD67.jpg
    3A7A7188-FB6E-4C8E-B459-FD8A6798FD67.jpg
    148.1 KB · Views: 919
  • 0F60447B-FCB7-424D-B05E-A17CBE7CC0AE.jpg
    0F60447B-FCB7-424D-B05E-A17CBE7CC0AE.jpg
    154.6 KB · Views: 924
Last edited:
OP
K

Keyblazer

Well-known member
Joined
Jul 30, 2009
Messages
1,471
Location
Irvine, CA
That Alfa Cam Cover Got some powder yesterday.
Black Crackle, and the lettering highlighted.

attachment.php
 

Attachments

  • EAD553BF-EC26-4412-9321-171E33074EA4.jpg
    EAD553BF-EC26-4412-9321-171E33074EA4.jpg
    147.1 KB · Views: 921
OP
K

Keyblazer

Well-known member
Joined
Jul 30, 2009
Messages
1,471
Location
Irvine, CA
Struggling with this Alfa oil pan cos it’s too big for my cabinet.... but worth sharing the results.
The one on the left is pretty typical of how they get after 40 plus years..
The one of the right is not quite finished, but close!

attachment.php


attachment.php


attachment.php


attachment.php


attachment.php


attachment.php


attachment.php
 

Attachments

  • E8EF71C1-6EA8-41D0-AF32-96B0A42D8850.jpg
    E8EF71C1-6EA8-41D0-AF32-96B0A42D8850.jpg
    92.1 KB · Views: 833
  • 9238E3A0-A27D-4223-8338-F16B8ABBEE89.jpg
    9238E3A0-A27D-4223-8338-F16B8ABBEE89.jpg
    115.5 KB · Views: 832
  • C4473860-CC8E-49C0-87B4-535B6C05E954.jpg
    C4473860-CC8E-49C0-87B4-535B6C05E954.jpg
    156.2 KB · Views: 836
  • 623B4422-D60B-4146-9142-832C3F2FED44.jpg
    623B4422-D60B-4146-9142-832C3F2FED44.jpg
    151.1 KB · Views: 831
  • 1DB9A08F-A17A-4F0E-8007-4C097924909D.jpg
    1DB9A08F-A17A-4F0E-8007-4C097924909D.jpg
    106.4 KB · Views: 825
  • 1B20909D-965B-4363-B07A-32D2E9A4ACB7.jpg
    1B20909D-965B-4363-B07A-32D2E9A4ACB7.jpg
    154.6 KB · Views: 829
  • EBF3BCFD-DFDA-40F9-BDA4-9694C7CCF728.jpg
    EBF3BCFD-DFDA-40F9-BDA4-9694C7CCF728.jpg
    161.3 KB · Views: 834
Last edited:

CudaChick1968

Member Emeritus
Joined
Jul 1, 2011
Messages
1,800
Location
Northwest Tennessee (38230)
Check out the ceramic clear coats from NICIndustries.com in the Cerakote section for polished metals. It will seal those uncoated logos and the other bare parts forever so you won't have to touch up the polishing/machining. I don't do a ton of polishing and buffing here -- too much powder work lol -- but it has completely replaced the clear powder I used to use on them.

All you need is an HVLP gun with a .8 mm tip. It dries/cures in the open air, is available in different heat ranges (under and over 500 degrees), is marketed as "The World's Strongest Clear Coat," doesn't yellow over time, and is so clear that all you see is the beautiful metal underneath. A little bit goes a LONG way (the tester size is like $35 and lasts forever it seems), it cleans up with paint thinner, and you can even pour the leftovers back in the bottle.

You'll dig it.

Before, After, and installed on the famous Golden Commando Barracuda known as GoldFish. It was the only one with a 273.

20200114_162347.jpg

20190328_160352.jpg

Screenshot_2020-04-03-12-42-27.jpg
 

csp

Well-known member
Joined
Mar 23, 2010
Messages
5,719
Location
Franktown, CO
You have to change the air venturi in the gun to 6mm as well, not just the tip, to get any efficiency from the smaller size.
 

CudaChick1968

Member Emeritus
Joined
Jul 1, 2011
Messages
1,800
Location
Northwest Tennessee (38230)
You have to change the air venturi in the gun to 6mm as well, not just the tip, to get any efficiency from the smaller size.


Wow, good to know! The only "painting" I dare to do -- after years of sucking at it LOL -- is that clear ceramic. Though it took a lot of searching, I snagged a .8 mm tip gun off ebay for $17.99 (the only one I own) and it's served me well. I'll check out that venturi the next time I have it apart for cleaning. I have some headlight bezels that will be getting sprayed as soon as it quits %$#@ raining. Thanks @csp!
 
OP
K

Keyblazer

Well-known member
Joined
Jul 30, 2009
Messages
1,471
Location
Irvine, CA
New gun should be here in a day or so.
Ordered a new batch of 170/320 grit.
Been busy on other stuff, but found something really ugly in my junk pile to test.
Really rusty BBC head someone gave me for scrap.
Used the 80 grit. Came out ok for 15 mins work but it’s still ugly. Lol

attachment.php


attachment.php


attachment.php


attachment.php
 

Attachments

  • A2ED180A-2790-41D9-8107-24AC5E2B11B4.jpg
    A2ED180A-2790-41D9-8107-24AC5E2B11B4.jpg
    154.6 KB · Views: 591
  • 8B8909FC-62D2-4640-9CD1-61936A28C8EF.jpg
    8B8909FC-62D2-4640-9CD1-61936A28C8EF.jpg
    156.5 KB · Views: 597
  • 8FA627B7-2D3B-4683-AD8C-244741E1D181.jpg
    8FA627B7-2D3B-4683-AD8C-244741E1D181.jpg
    152.6 KB · Views: 595
  • 8501A38A-A6B8-4D1A-AFE3-7246CC726652.jpg
    8501A38A-A6B8-4D1A-AFE3-7246CC726652.jpg
    142.5 KB · Views: 591
Last edited:
OP
K

Keyblazer

Well-known member
Joined
Jul 30, 2009
Messages
1,471
Location
Irvine, CA
Couple of questions today!

1/ I thought I saw a post about “Coupling Fluid” for Ultrasonic Thickness testers the other day. Can’t find it now.
Just picked up a Used Check-Line Ti25 MMX for some projects and need to know The story.

2/ What’s the best rod to use for TiG welding aluminum castings?
 
OP
K

Keyblazer

Well-known member
Joined
Jul 30, 2009
Messages
1,471
Location
Irvine, CA
Found the thread on coupling fluid, and posted.

Did a carb adaptor for a buddy.

attachment.php


attachment.php


Actually they were quick and easy.

attachment.php


attachment.php


Popped them out in the UV rays for him to Pick up safely.

attachment.php


New 6mm gun arrived....
But I was disappointed to note that whilst it has a 6mm nozzle, the air jet appears to be fixed and the same size.
Guess you get what you pay for! Ha.
What is interesting is the “Feel” of the 6mm nozzle compared to the 8mm on my setup.
The 8mm seems to output more slurry(logical), but I can feel the increased output as a vibration somehow.
The 6mm nozzle on the other hand outputs the slurry more as a vapor, and to prove that point the visibility in the cabinet is obscured by mist. When I lift the lid, it’s like a sauna in the cabinet!
I have 2 identical aluminum brake calipers to do today.
Plan to do one With the 6mm and one with the 8 as a definitive test of speed/efficiency.

attachment.php
 

Attachments

  • 96552986-B844-411F-9DD1-BDD7983E12F2.jpg
    96552986-B844-411F-9DD1-BDD7983E12F2.jpg
    145.7 KB · Views: 580
  • 00063907-E7A0-40EE-915E-1B0E81F114E8.jpg
    00063907-E7A0-40EE-915E-1B0E81F114E8.jpg
    148.5 KB · Views: 580
  • 5C71B24D-5D96-4B52-93E1-FF83D0A1F5FD.jpg
    5C71B24D-5D96-4B52-93E1-FF83D0A1F5FD.jpg
    149.9 KB · Views: 579
  • A53E1DC7-E3FF-418A-85DB-63B1AC600F1E.jpg
    A53E1DC7-E3FF-418A-85DB-63B1AC600F1E.jpg
    148.7 KB · Views: 579
  • 2C2683DE-5C2E-4F15-9C7E-C3815CD788DE.jpg
    2C2683DE-5C2E-4F15-9C7E-C3815CD788DE.jpg
    151.5 KB · Views: 577
  • A34358EE-D8A2-41D2-8432-6962EDCE253C.jpg
    A34358EE-D8A2-41D2-8432-6962EDCE253C.jpg
    153.3 KB · Views: 578
Last edited:

Monza Harry

Well-known member
Joined
Dec 29, 2018
Messages
1,433
Location
Windsor ON
Couple of questions today!
2/ What’s the best rod to use for TiG welding aluminum castings?
That depends on the material it is cast from, and I don't have a way to differentiate the materials. I do the neither good or approved method of guess which rod first and keep trying others until one doesn't fight back too hard.
Grind out and do a clean re-weld all one rod type right through. Eager to find some tips from other "listeners"
Harry
I did read a post on this [here or on Home Shop Machinist] but I guess I didn't add to Fav's!:(:mad:
 
OP
K

Keyblazer

Well-known member
Joined
Jul 30, 2009
Messages
1,471
Location
Irvine, CA
Thanks for the info!

Rightly or wrongly I TiG welded shut some unwanted holes in my Alfa Romeo Valve Cover yesterday, again with ER1100 Rod.

2F54F8DE-55EC-44A6-8BA6-FBD389D942B6.jpg
After Cleaned with a SS wire brush and acetone.

Started on the inside, watched the edges of the hole “Wet out” then dabbed some rod in there then kept the heat on until I saw it sink in then tapered out.
Looked like this.

F6583FBF-BB87-4168-ACB4-E95F57A1211A.jpg

From outside it looked like this after.

FF35C636-601E-4266-B442-F3D9951E8844.jpg

Just repeated the same from the outside.

5F931226-3804-41A7-A3C2-86CBEAAB8CE2.jpg

After some grinding and sanding, it was looking good.

2F6EBACB-5598-4CD7-99DB-0DEB66357077.jpg
 
Last edited:
OP
K

Keyblazer

Well-known member
Joined
Jul 30, 2009
Messages
1,471
Location
Irvine, CA
On another note, the slurry pump died yesterday.
It was a cheap $65 Chinesium unit anyway, and I went cheap because I just wanted to do a “Proof of Concept”, to see if my build would be functional!
It refused to start yesterday morning.
I stripped it apart, cleaned the screen and impeller, and got it working but felt gritty when it spins, so obviously the bearings are compromised...
Imagine that! Ha!

Ordered the tried and tested Tsurami HS4 pump yesterday. Guess $300 is the price of reliability.
Tsurumi HS2.4S; semi-Vortex Submersible Trash Pump w/Agitator, 1/2hp, 115V, 2" Discharge https://www.amazon.com/dp/B000PDU9EY/?tag=atomicindus08-20

Will have to revise the plumbing in the sump to suit the larger 2” discharge.
 

larry4406

Well-known member
Joined
Jan 27, 2006
Messages
19,137
Location
Northern Virginia
On another note, the slurry pump died yesterday.
It was a cheap $65 Chinesium unit anyway, and I went cheap because I just wanted to do a “Proof of Concept”, to see if my build would be functional!
It refused to start yesterday morning.
I stripped it apart, cleaned the screen and impeller, and got it working but felt gritty when it spins, so obviously the bearings are compromised...
Imagine that! Ha!

Ordered the tried and tested Tsurami HS4 pump yesterday. Guess $300 is the price of reliability.
Tsurumi HS2.4S; semi-Vortex Submersible Trash Pump w/Agitator, 1/2hp, 115V, 2" Discharge https://www.amazon.com/dp/B000PDU9EY/?tag=atomicindus08-20

Will have to revise the plumbing in the sump to suit the larger 2” discharge.
I clicked on the link and read the pump reviews. Seems many use it for vapor blasting just as you intend too. Good find!
 
Last edited:
To avoid these ads, REGISTER NOW!
Top Bottom