To avoid these ads, REGISTER NOW!

Setting up air dryer/filters

scott37300

Well-known member
Joined
May 5, 2010
Messages
3,450
Location
Wisconsin
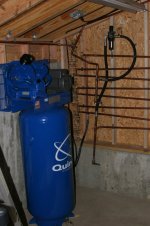
I am going to be setting up my 15 CFM 175 PSI two stage rolair compressor and trying to get the details of the plumbing worked out. I am going to get a desiccant dryer from HF this week to see how that works. This one http://www.harborfreight.com/desiccant-air-dryer-97686.html for 32 bucks after coupon.

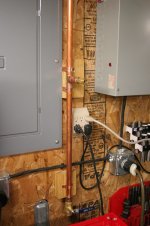
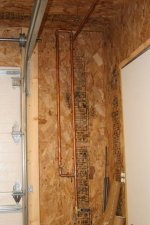
Right now my idea is to re route the line from the compressor to the tank. I want to run a line out of the compressor to a home made 3/4" copper pipe "maze" to cool the air down. This is just going to be some 4-5' lengths of copper pipe verticle with tees on the bottom and top to connect them all. And I will angle this just a little and put a drain valve on the lowest corner. I've read that this will help cool the air right out of the compressor and get ride of some of the moisture. If needed I will try to run a fan across these pipes to cool it even more.

Then from the copper pipes I will run a line into the tank. This should be relatively cool air in the tank. Then run a line out of the tank to my smaller filter, I know this filter isn't the best but it does trap some air. Then will plumb a copper line to my main air hook up. This is where I am going to put my desiccant filter. I figure the air will be cooled down by the time it gets to the filter and I should have nice filtered air coming out.

I think this is the best "cheap" filter system I can think off. If anyone has any advice or thoughts please share them. I need to do something fairly cheap but want to get the best results I can for the money. I will be using my compressor for normal air tools mostly but have a pressure sandblaster and a HVLP conversion paint gun I use once in a while.
 
To avoid these ads, REGISTER NOW!

MichaelP

Well-known member
Joined
Jul 27, 2009
Messages
918
Location
IL/WI border
Scott,

I'm in the process of completing a similar setup. I read and consulted other people extensively and gave it a lot of thought myself. That's what I came to so far.

I have a 5HP 175psi 60 gal Quincy. A 1/2" hydraulic hose connects its tank to a cooling run made of 40' (a major overkill, I'm sure) of zigzaged 3/4" copper pipe. The cooler is fed from the top, so the condensed water drips down both due to gravitation and active air movement. The run has its own drip leg with a valve. Then I raised the output of the cooler to the highest point and branched it from there (everything is 3/4" type L copper pipe soldered with 95/5 hard solder). Each branch descends slightly and has a drip leg at the end. All dropdowns start as a loop above the main line, go down and have their own drip legs with valves below the outlets. See http://www.tptools.com/StaticText/airline-piping-diagram.pdf

At this point I'm going to install simple regulators into some outlets and filter/regulators into the rest of them.

I plan on dropping the max pressure in the tank/lines to 150 psi and further dropping it to the operational range at each outlet. Lower system pressure will allow you to find less expensive regulators/filters. Higher pressure would compress a bit more air and allow for a better condensation, but the gains should be minimal.

When I need extremely dry air for plasma or painting, I could add dessicators or coalescing filters at the outlets.

To tell you the truth, I feel that the cooler alone will dry the air sufficiently enough for air tools, and, most likely, even for the sandblaster. So, the simple filters installation is, mostly, an additional insurance. However, I haven't done any serious testing, so it's a bit too early for me to draw any conclusions. By the way, my homeshop is in WI too (Lake Geneva area), and it's very humid here.

As for the cooler design, theoretically, it would be better to make it out of a large pipe (let's say, 1 1/2" or 2"). The sudden air expansion when it enters the large pipe will condense water more efficiently. Besides, you'll have a large surface for condensation and less resistance to the air flow. Also, there is no need to make the run as long as I did it. I feel that 15'-20' should be plenty. The problem is that the large pipe is quite expensive. However, if you make it shorter...

If you want to save some money and don't mind inconveniences, you can have a portable filter/regulator setup with a quick connector that you can move from one outlet to another as needed.

I'm posting a few photos of my setup. Please note that some elements of the cooler design have evolved on the fly, so the construction may not be very well groomed. Originally, I decided to drain the cooling run back into the tank, but later switched the input and output points and added a drip leg.
 

Attachments

  • Cooling run.jpg
    Cooling run.jpg
    67.3 KB · Views: 1,846
  • Simple dropdown.jpg
    Simple dropdown.jpg
    141.3 KB · Views: 1,200
  • Dropdown.jpg
    Dropdown.jpg
    59.2 KB · Views: 1,121
Last edited:
OP
S

scott37300

Well-known member
Joined
May 5, 2010
Messages
3,450
Location
Wisconsin
Thanks for that reply Michael. Looks like a really nice setup you have.

That is exactly what I was thinking for the copper pipe cooler. I wasn't sure if I should do it like you did or make like a ladder setup where the pipes are connected on both ends. I read somewhere that doing it like you did might push any condinsation threw the line. This is still pretty new to me so don't know what's better. I also read that it is better to run straight out of your compressor pump to the cooler and then into your compressor tank? This cools the air before going into the tank so will keep moisture out of the tank. Sounds like a good idea but I don't really know if it would help that much. Any thoughts on if the cooler would be better before or after the tank?

I am going to go get a HF desiccant filter today and take a look at it. I'm thinking I will use these at the point of use air outlets. I am going to take it apart and see what all is involved with them and might be better to make some bigger home made ones depending on how it works.
 
OP
S

scott37300

Well-known member
Joined
May 5, 2010
Messages
3,450
Location
Wisconsin
Wow did copper go up in price! Checked HD today and the type L was 19 bucks a stick. Type M was only 13 bucks a stick. This was for 3/4". Going to take about 5 sticks plus fittings so this will be close to 150 bucks by the time I get this built! I'll have to see if my local menards has any sales, sometimes they have sales on copper sticks.

Otherwise I may have to come up with another plan. I picked up a HF diseccant dryer today and it looks pretty nice. Will have to wait and see how that works.

Are there any opinions on putting the "copper cooler" in between the pump and tank or after the tank. I have read some opinions on both ways so not really sure which would be better. It makes sense to cool the air before it gets to the tank, this would put relatively cool air in the tank which would keep some moisture in there instead of having warm air in the tank and then sending warm air out of the tank.
 

MichaelP

Well-known member
Joined
Jul 27, 2009
Messages
918
Location
IL/WI border
Yes, it costs quite a bit these days. Not only the pipe, but all those bushings, adapters, connectors, etc.

Think it over. You can make only the cooler at this time and run regular rubber hoses. When you have an opportunity (and if you really need it), you can always add to this. I'm just afraid it'll be cheaper to run gold pipes at that time.:)
 
Last edited:
OP
S

scott37300

Well-known member
Joined
May 5, 2010
Messages
3,450
Location
Wisconsin
I'm just afraid it'll be cheaper to run gold pipes at that time.:)

Isn't that the truth!

I was reading in the link you posted above and they say not to use copper pipe. They say to use regular black piping. I will look at how much that costs today at HD. The copper would be easier for me since I have worked with it before and have the tools to solder it all together. And from what I know it will transfer the heat better. TPTools says that copper is easy to dent and there is a chance the joints may blow over time with high pressure.

I know HD will cut and thread black pipe for me. I have pipe dope and some big pipe wrenches. I will look into the price of black pipe and see how it compares to copper. I like the idea of the stronger black pipe so I don't have to worry about "protecting" the copper.

Guess you have to spend money to do things right!
 

Iseman

Well-known member
Joined
Dec 5, 2008
Messages
48
Location
Kerrville, TX
Scott37300, I did a simple set-up like MichaelP, but I used 3/4 black pipe. I went to the Habitat for Humanity recycle and bought most of my pipe. I did have to go to the box stores for some fittings and valves. I did alot of research and also used TPTools as a guide. Main line is 3/4 with each drop reduced to 1/2. Addtionally when I built my shop I added an outside shed to the back of my shop to cover my compressor and dust collection system. Keeps the noise down. The cooler works OK but I can't sandblast or use a plasma cutter without an additional dryer. I live in Texas and the air is fairly dry but still produces alot of moisture so I place a dryer on the outlet I'm using. I have installed 8 outlets with a hose real overhead. I'm considering installing a dryer after the cooler piping but havent't pulled the trigger yet. I'd like to know how yours turns out. Here are some poor pictures of my setup.
 

Attachments

  • DSC00980.JPG
    DSC00980.JPG
    75.8 KB · Views: 745
  • DSC00982.JPG
    DSC00982.JPG
    118 KB · Views: 704
  • DSC00988.JPG
    DSC00988.JPG
    125.5 KB · Views: 710
  • DSC00991.JPG
    DSC00991.JPG
    84.1 KB · Views: 600
Last edited:

MichaelP

Well-known member
Joined
Jul 27, 2009
Messages
918
Location
IL/WI border
Nice work, Iseman! What type of dryer do you use? Do you have a photo of it?

As for the black pipe, I'm very happy I didn't go with it. First of all, unless you have a very straight forward setup, you've got to have cutting and threading equipment on hand. Later modifications will be very time consuming. Hard pipe is too rigid to provide for an easy fine tuning of its position or slope(notice, for example, that my cooling runs are not parallel: each of them has a slope to the right direction which will be next to impossible to do with a thick and rigid steel pipe). Finally, steel will rust. Yes, the vast majority of shops is plumbed with black wall pipe, yet for me it's a way easier and more pleasant to work with copper. But if you go with copper, do not use type M or a regular lead solder.

Naturally, if you expect banging your pipes hard with heavy objects, go with a steel one or hide the copper behind your walls.
 
Last edited:

tcianci

Well-known member
Joined
Feb 7, 2009
Messages
4,242
Location
Walpole, Ma
I really like the idea of that HF dryer. Years ago, I was setting up equipment that utilized air bearings with stupid-close tolerances (down in the micron range). This equipment required air that was dry and clean. I used a desiccant dryer and a coalescing filter. We found that a standard microwave oven was perfect for drying out the desiccant when it became saturated. We kept a spare charge on hand and then just swapped as needed so we were never without dry air. I suspect that the HF unit, since it has replaceable media could be used the same way.
 
OP
S

scott37300

Well-known member
Joined
May 5, 2010
Messages
3,450
Location
Wisconsin
Well I'm going to try the 3/4" black pipe. Only 8.39 a stick vs. 19 bucks a stick for copper. I will see how things work out with this and the HF diseccant filter and I also have another HF water filter I will put next to the diseccant filter. I only need one drop in my garage because it is only a 2 1/2 car garage so a hose will reach everywhere. I have a sandblasting project coming up and this is the main reason for trying to get the moisture out of the lines. So I will see how things go for that and make improvements if needed.

If this doesn't get the moisture out I am thinking about putting a 30' copper cooler driectly after the pump and before the tank.
 

Doc

Well-known member
Joined
Feb 19, 2005
Messages
195
Location
St Johns, Forida
Scott37300,

Watch those HF dryers. I installed 2 of them and both leaked, I took them both back to swap and the next 2 leaked as well around the gaskets of the regulators and would drain my airlines overnight. I took them back as well. I ended up using the ones from Northen tools and those are good to go. I may have just been in a bad batch of them but I was tired of the leaks.
 
OP
S

scott37300

Well-known member
Joined
May 5, 2010
Messages
3,450
Location
Wisconsin
Scott37300,

Watch those HF dryers. I installed 2 of them and both leaked, I took them both back to swap and the next 2 leaked as well around the gaskets of the regulators and would drain my airlines overnight. I took them back as well. I ended up using the ones from Northen tools and those are good to go. I may have just been in a bad batch of them but I was tired of the leaks.

Thanks for the heads up. The water seperator/filter I bought a year ago had a bad oring so I went threw and replaced all the orings with quality ones, I had them at home. The diseccant dryer doesn't have any seals, just threaded connections that I will use some pipe dope on to make sure they seal.

Thanks for that link Mike.
 

Iseman

Well-known member
Joined
Dec 5, 2008
Messages
48
Location
Kerrville, TX
I don't know the make of my dryer, I think it is Northern Tools. The 3/4 pipe has enough flex that each leg of the dryer is sloped down. Not as exagerated as yours but enough to flow moisture to the bottom water drain. If properly installed you should not have any rust problems. I thought the black pipe was fairly easy to install. I had the entire system planned out with each of the 8 drops having a drain valve and the large supply line sloped in the attic so there are no low points for water to settle. Each drop has a 4" rise to prevent water from the main line entering the drop. My shop is 28x40, each end wall has a drop, the front and back wall have 2 drops, my pit has an outlet and one overhead hose-real outlet. When jointing the pipes I found the teflon pipe dope sealed the best. I didn't have much luck with teflon tape. My system is tight enough that my compressor never has to run unless I'm using it, and I leave it on all the time. The TPtools diagrams and plans were a big help.
 

Keep

Well-known member
Joined
Jan 1, 2009
Messages
1,398
Location
Oshawa, Ontario
Okay I have to ask. I have read that having 90's in an air run will hurt CFM at the outlets, how bad has your airflow been affected by having all those 90's on the output side?

I can see running the air straight from the pump through those and then into the tank, but from the tank, through all those 90's has to hurt the flow.

Or have I missed a connection somewhere and you are running the air through the cooler before it hits the tank?
 

Iseman

Well-known member
Joined
Dec 5, 2008
Messages
48
Location
Kerrville, TX
I don't know the make of my dryer, I think it is Northern Tools. The 3/4 pipe has enough flex that each leg of the dryer is sloped down. Not as exagerated as yours but enough to flow moisture to the bottom water drain. If properly installed you should not have any rust problems. I thought the black pipe was fairly easy to install. I had the entire system planned out with each of the 8 drops having a drain valve and the large supply line sloped in the attic so there are no low points for water to settle. Each drop has a 4" rise to prevent water from the main line entering the drop. My shop is 28x40, each end wall has a drop, the front and back wall have 2 drops, my pit has an outlet and one overhead hose-real outlet. When jointing the pipes I found the teflon pipe dope sealed the best. I didn't have much luck with teflon tape. My system is tight enough that my compressor never has to run unless I'm using it, and I leave it on all the time. The TPtools diagrams and plans were a big help.
 

z28toz06

Well-known member
Joined
Nov 30, 2005
Messages
1,012
Location
Connecticut
Scott37300,

Watch those HF dryers. I installed 2 of them and both leaked, I took them both back to swap and the next 2 leaked as well around the gaskets of the regulators and would drain my airlines overnight. I took them back as well. I ended up using the ones from Northen tools and those are good to go. I may have just been in a bad batch of them but I was tired of the leaks.

I bought a HF filter/regulator/lubricator and it leaked like a sieve. I returned it and picked up a filter only unit from sears.
 
To avoid these ads, REGISTER NOW!

ket-tek

Well-known member
Joined
Jan 28, 2009
Messages
1,289
I bought a HF filter/regulator/lubricator and it leaked like a sieve. I returned it and picked up a filter only unit from sears.

Same here, I had the HF filter/lube combo a few years back. It was junk, leaked all the time, and the plastic dome cracked on the luber. My dad had the same one in his garage and it was junk too..

I've been done with using a self lubricator. All it did was make a mess, and you really need to plumb lubed and dry outlets.. Shooting oil out a blowgun tip is nasty. I just clean and oil my air tools by hand and am trying to build the driest air system I can now.
 
OP
S

scott37300

Well-known member
Joined
May 5, 2010
Messages
3,450
Location
Wisconsin
This is t one that I have, http://www.harborfreight.com/industrial-air-filter-regulator-unit-98904.html. It has worked pretty good so far. When I first got it I took it apart to see how it worked. The orings were garbage. I replaced them with quality ones and it hasn't leaked. I don't know how well it works but it does collect some water in it. It's all metal so don't have to worry about plastic breaking, just the cheap metal breaking.

I will use this right before the diseccant dryer. Not sure how effective this will be but the nicer diseccant dryers have a filter coupled with them. And since I only need one air outlet I figure I will put the filter and the dryer together to get the dryest air possible.

I am going to plan my setup out and go get some black pipe and start this sometime this week. I am thinking about getting a pipe threader just to have. Always nice to have an excuse to buy a new tool. This will put my price close to the price of using copper but will have the threader in the end and I'm sure I will use it to make changes down the road.
 

z28toz06

Well-known member
Joined
Nov 30, 2005
Messages
1,012
Location
Connecticut
Which is the better copper pipe to use? "L" or "M"? After reading about how bad an enemy rust is, I can't see myself using black pipe.
 
OP
S

scott37300

Well-known member
Joined
May 5, 2010
Messages
3,450
Location
Wisconsin
Which is the better copper pipe to use? "L" or "M"? After reading about how bad an enemy rust is, I can't see myself using black pipe.

There are 3 types of copper, K,L, and M. K is the thickest and highest rated, then L, then M. Type M is actually rated for 408.5 max psi. http://www.airproducts.com/Products/fastfacts/charts_n_tables/pressurerating/index.asp. But everything I have read says to use type L.

I have decided on black pipe for a couple of reasons. The first being cost, if I had money I would probably go with type L copper. The second is that most commercial/industrial use black pipe and not copper. I THINK(Hope!!) that black pipe will be fine for the runs. I am debating on making a small, 3 sticks of 3/4" copper cooler for in between the pump and tank. Or making an oil cooler with fan cooler to go between the pump and tank. I guess I"m going to just start piping and see what works and make improvements as needed. Who knows, maybe the black pipe won't work to cool at all and I will end up biting the bullet and paying the big bucks for the copper. But I think worst case scenario will be adding about 30 ft of copper in between the pump and tank to cool the air and then black pipe threw out the shop. I think I have read enough different ways to do it and am just going to start doing and see what happens. I really like the black pipe for the runs threw out the shop due to it's strength. After writing this and thinking about it(it's amazing how much it helps to write things down on here for planning!) I will go ahead and buy 3 sticks of 3/4" copper to build a small cooler for between the pump and tank. I really think this will cool the air down a lot before the tank and this take care of a lot of the moisture issues. And this would solve a lot of the rust issues in the black pipe. Then the filter and dryer will take any other air out of the system right before the hose. I can always start peicing together an oil filter with fan cooler if this doesn't work.

Another question, does anyone know what a 2005 Ford 6.0 diesel intercooler is rated for as far as pressure? I have one laying around and if that would work for an air cooler I could use that. I bought it for my 03 7.3 diesel because it was bigger but never ended up installing it before I sold my truck. Does anyone know if this would make a good air cooler?

Thanks for all your help everyone.
 
OP
S

scott37300

Well-known member
Joined
May 5, 2010
Messages
3,450
Location
Wisconsin
Well I can't find a for sure answer but seems most stock intercoolers can only handle 75-100 PSI so that idea is out. MIght have to start looking into the oil cooler that was talked about in one of the links above.
 

e-tek

Well-known member
Joined
Dec 19, 2007
Messages
10,690
Location
Saskatoon, SK
I used black pipe and would do so again. I also wouldn't bother with a cooling "run" or a dryer. The black pipe alone will condensate the air enough for air tools (with a filter at the end of course). For my sandbalster/painting runs I use a dessicant dryer with filters after. Perfectly dry air. I've made 2 or 3 changes to my set up over the last few years and just had to unscrew the black pipe, sort through a bucket of fittings and change it up. Easy-peasy!
 
OP
S

scott37300

Well-known member
Joined
May 5, 2010
Messages
3,450
Location
Wisconsin
Thanks for the advice e-tek. Think that I started to over think this project! I am going to pick up some 3/4" black pipe tomorrow and start piping. I am going to get a ridgid pipe cutter and threader. HD will cut and thread pipe for free but I think it will save time and trips back and forth to just get my own for custom lengths. I always like a new excuse to get some new tools.

And if I'm not happy I will come back and start looking at other setups mentioned in this thread.
 
OP
S

scott37300

Well-known member
Joined
May 5, 2010
Messages
3,450
Location
Wisconsin
Just bought a ridgid #1 pipe cutter, 1/8"-1 1/4" pipe on ebay. Figured my smaller ones for copper wouldn't be the best on 3/4" black pipe. Got this for 24 bucks shipped. Also got a ridgid ratcheting threading kit with 1/2, 3/4, and 1" dies of ebay for 29 bucks shipped. I will pick some pipe up tomorrow and start laying things out. Once I have things laid out I will go get the fittings I need and then once the cutter and threader get here I will put everything together and see how things work out.
 

onewaydave

Well-known member
Joined
Sep 28, 2009
Messages
961
Location
Down the road from Dorothy and Toto
Scott, I built a ladder like run for cooling. I don't think it worked. I never had any water in the system. I'd look at Michael's zig-zag like system as a better idea than the ladder. I think on th ladder, the air just goes through the path of least resistance and not the whole run. Just my experience.

Dave.
 

nonhog

Well-known member
Joined
Nov 6, 2007
Messages
2,449
Location
Arizona (Tucson)
Last edited:

e-tek

Well-known member
Joined
Dec 19, 2007
Messages
10,690
Location
Saskatoon, SK
A dryer is a must for painting!! Again, although I really don't think you need to run and ladders or zig-zags, though if you did, fine, it won't hurt anything. Although I prefer steel for the aforementioned resons, if you used 3/4" copper pipe it'd be OK - you just won't get quite the same cooling/condensation as black pipe. I'd bet the difference is somewhat minimal however, meaning you will still need the dryer at the end of either pipe system. A dessicant dryer is the best/least expensive option, while a heater dryer is the best/most expensive option!
We have had MANY copper vs blackpipe vs PVC (don't!) threads here. Guys like either for different reasons. Both are good for different reasons as stated, plus what you're used to, money, if you're a plumber, etc....
That Northern tool dessicant dryer is the cats-***, but a HF/PA unit works well and is a quarter the cost. Just make sure you put a micron filter after it.
 

z28toz06

Well-known member
Joined
Nov 30, 2005
Messages
1,012
Location
Connecticut
I thought copper would cool faster, which is why it's so hard to get it evenly hot enough to solder. Iron is heavier and retains heat longer, hence cast iron's use in cooking utensils. Plus copper doesn't rust, another tool killer and filter clogger.
 

aqr81

Well-known member
Joined
Jul 20, 2010
Messages
1,127
Location
Central Valley, Ca.
Great information and discussion everyone, thank you. I will definitely be coming back to this thread in the weeks ahead as I get closer to having to make the final decision :thumbup:
 

MichaelP

Well-known member
Joined
Jul 27, 2009
Messages
918
Location
IL/WI border
Thank you for the nice words Speed-Racer.

I further modified the setup by adding a filter/regulator AFTER the cooling run. It drops pressure from 175psi to 100psi for further distribution. This helps avoid additional regulators at some of the outputs, yet allows to keep extra air in the tank and efficient moisture precipitation in the cooling run. Besides, lower pressure in the lines equals less chance of threaded joints leaks (I'm sick and tired of the chinese quality of those).
 

Attachments

  • Air compressor and cooling run.jpg
    Air compressor and cooling run.jpg
    142.2 KB · Views: 264
Last edited:

akdiesel

Well-known member
Joined
Aug 8, 2008
Messages
2,617
Location
Wasilla, AK
I think the use of the copper zig zag system is over rated.
If you simply use a some large copper pipe (2" or 3") in a two foot verticle set up with ability to enter this pipe from middle and exit out the top to the main run. the large copper pipe would come just after the air left the compressor tank. This air will be warm and with the pressure drop into the large copper pipe it will cool down thus dropping out liquids into the bottom of the pipe. cooler dry air will exit out the top and into the main run. Have a drain on the bottom of the larger pipe to remove liquids periodicaly.
I this set up and it works great. Simple, effective, and less space.
 

PurdueSD

Well-known member
Joined
Mar 25, 2006
Messages
1,577
Location
Indiana
Here is how i set up mine: I have used it for 6 months with zero condensate issues.

All of my run slopes back to the compressor. Hope it gives you another perspective. I too agree the zig-zag copper to be a waste of time and money. Either copper or black pipe should serve you very well for your entire life!
I decided to use black iron after giving it a bunch of thought. I went with a 3/4" mainline with 1/2" drop legs. I picked up a couple smc filter regulators of the bay for 13 bucks. This hose reel has been sitting around since my birthday this past spring.

I put a lot of thought into how to keep water out of my air. Notice the T's come vertical out of the main line. Same goes for the T's going to the regulators. Hopefully this will pay dividends for me It sure made putting everything together more of a pain in the you know what. Ive got three different ball valves at the bottom of each drip legs for easy condensate removal. I also used a 3' section of 3/4" hydrualic hose for the flexline. It worked great and was only $10 from the local rural king.

On to the pics...

garagex001.jpg


garagex002.jpg


garagex004.jpg


garagex005.jpg
 
To avoid these ads, REGISTER NOW!
Top Bottom