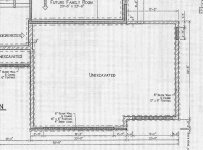
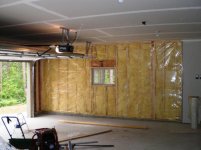
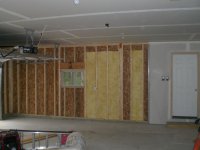
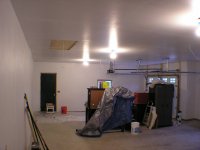
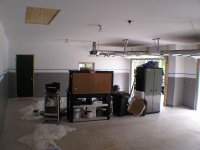
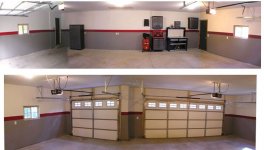
To avoid these ads, REGISTER NOW!

JCCHEVY's Garage - True Chevy/Craftsman Garage 34x24

jcchevy

Member
Joined
Feb 11, 2011
Messages
21
Overview of Garage
Size: 34W x 24D x 9H
Style: Attached Garage Stick Built Framed
Doors: (1)16x7 and (1)9x7 (1)32" Service Entry Door
Floor: Concrete sloped for drainage
Purpose: use will be for Storage / maintenance / cleaning / misc of vehicles/powersports toys and my man cave sort of speak.
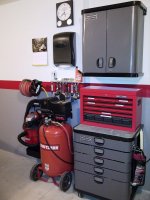
Cabinets/Storage: Craftsman (Sears)


Hey gang,
I been on here for sometime and been reading up on many of your garage builds and other sections of this nice forum. Learned a lot of tips and tricks and ideas for mine. So I figured in return I will show you my build and hope you enjoy it.
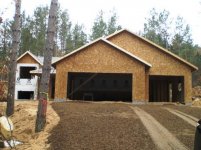
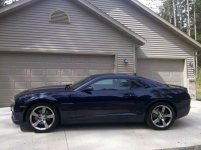
I will be soon posting some pics of the garage build soon. Here is one of the vehicles that deserves a roof over its head ;)

sigtruck500.jpg
 
Last edited:
To avoid these ads, REGISTER NOW!
OP
J

jcchevy

Member
Joined
Feb 11, 2011
Messages
21
This garage build was part of our new house construction. Below are some pictures of the framed construction and the blue print. Plans for the attic include a drop down ladder and making some storage for misc items. The center section is 6 feet wide and the middle is high enough to walk through no problem. I had started insullation already during the attic pic.
 

Attachments

  • construction.jpg
    construction.jpg
    76.5 KB · Views: 230
  • garageplan.jpg
    garageplan.jpg
    138.8 KB · Views: 305
  • exterior2.jpg
    exterior2.jpg
    59.6 KB · Views: 207
  • exterior1.jpg
    exterior1.jpg
    58.7 KB · Views: 247
Last edited:
OP
J

jcchevy

Member
Joined
Feb 11, 2011
Messages
21
The Contractor's hung drywall per code for the sections of the garage that connected to the house along with the ceiling. The rest of the garage interior will be finished entirely by me including insulation, hanging rest of drywall, taping, mudding, painting, adding 240 electric along with additional outlets etc...
I started insulation at this point.
 

Attachments

  • insulation (4).jpg
    insulation (4).jpg
    58.9 KB · Views: 121
  • insulation (3).jpg
    insulation (3).jpg
    59.1 KB · Views: 122
  • insulation (2).jpg
    insulation (2).jpg
    53.9 KB · Views: 130
  • insulation (1).jpg
    insulation (1).jpg
    58.3 KB · Views: 131
  • drywallhungwallsfacinghome.jpg
    drywallhungwallsfacinghome.jpg
    139.4 KB · Views: 134
Last edited:
OP
J

jcchevy

Member
Joined
Feb 11, 2011
Messages
21
Drywall Time, all hung and 1st coat of tape/mud at this point.
 

Attachments

  • drywallmud-tape.jpg
    drywallmud-tape.jpg
    110.6 KB · Views: 145
  • drwallmud-tape.jpg
    drwallmud-tape.jpg
    97.8 KB · Views: 135
  • drywallmudtap.jpg
    drywallmudtap.jpg
    72.5 KB · Views: 117
Last edited:
OP
J

jcchevy

Member
Joined
Feb 11, 2011
Messages
21
Putting drywall texture on walls, using 24" knockdown trowel. Leaving the ceiling smooth. Lots of work thats for sure for a garage this size and that much drywall :)
Read a lot about the best primer to use on this forum, I ended up choosing Zinsser Bullseye 123 Primer. Used about 4+ gallons to cover the entire drywall one coat. Stuff smells bad, make sure to use good mask if you choose to use it.
Can't wait to the final painting coats. It will be several colors. Can you guess? :)
 

Attachments

  • Drwall Primer Bullseye123.jpg
    Drwall Primer Bullseye123.jpg
    33.9 KB · Views: 89
  • Drywal Wall knockdown.jpg
    Drywal Wall knockdown.jpg
    25.7 KB · Views: 90
OP
J

jcchevy

Member
Joined
Feb 11, 2011
Messages
21
Update!
I have the painting complete. It consisted of the following:
Color: White (cheap Walmart paint). Type: Flat.

Color:Red (s-g-160 California Poppy Red ), Type: Eggshell. Purpose: for 6" border on walls, used Behr Premium paint.

Color:Gray (780f-5 Anonymous), Type: Eggshell. Purpose: for bottom 4 feet of walls.

Those were the colors used. I painted the ceiling and the top portion of the walls with white flat paint, helps hide imperfections and to prevent any shine reflecting off of ceiling lights.
The Gray was used for the bottom of the walls, about 4 feet up and finally the deep red was used as a border. I could have done the painting differently, but ended up painting the white first, then the gray and finally the red border completed it. Below are some pictures of the progress.
 

Attachments

  • painting (1).JPG
    painting (1).JPG
    90.3 KB · Views: 132
  • painting (2).JPG
    painting (2).JPG
    100.4 KB · Views: 126
  • painting (3).JPG
    painting (3).JPG
    95.8 KB · Views: 132
  • paintfinal (4).JPG
    paintfinal (4).JPG
    99.5 KB · Views: 148
  • paintfinal (3).JPG
    paintfinal (3).JPG
    95.6 KB · Views: 134
  • paintfinal (2).JPG
    paintfinal (2).JPG
    99.4 KB · Views: 138
  • paintfinal (1).JPG
    paintfinal (1).JPG
    103.7 KB · Views: 141
Last edited:
OP
J

jcchevy

Member
Joined
Feb 11, 2011
Messages
21
Here is a picture of what the actual drywall knockdown looked like before painting.
 

Attachments

  • drywall_knockdown.jpg
    drywall_knockdown.jpg
    59.5 KB · Views: 111
OP
J

jcchevy

Member
Joined
Feb 11, 2011
Messages
21
I stitched together multiple pictures so you can get a better idea of what it looks like. Its truly amazing the difference of before and after. The Craftsman garage storage is moved as well.
 

Attachments

  • finalInteriorPaint-stitched.jpg
    finalInteriorPaint-stitched.jpg
    59.3 KB · Views: 244
To avoid these ads, REGISTER NOW!

tenorplayer23

Well-known member
Joined
Oct 28, 2009
Messages
222
Location
Rochester, NY
Nice job and the standard garage depth will be a bonus. Because of the lot lines where I live, the depth of my 3-car is a little over 21 feet. That extra 3 feet you have made a BIG difference in where I store/work/shelve things in mine. Like your paint, as well. Used eggshell Behr myself.....

See ya :hellobye:
 
OP
J

jcchevy

Member
Joined
Feb 11, 2011
Messages
21
Finished the shelving inbetween the garage doors. Its adjustable and if you notice the bottom one is cut angled so when the big truck is in there I can still walk around it without having that shelf in my way. Nice heavy duty 3/4" shelving board was used and works great. Pretty much can hold anything.
 

Attachments

  • garageCornerShelving.jpg
    garageCornerShelving.jpg
    87.2 KB · Views: 141
OP
J

jcchevy

Member
Joined
Feb 11, 2011
Messages
21
Some exterior shots of the accent brick added and the exterior lights.
 

Attachments

  • garageExteriorLights.jpg
    garageExteriorLights.jpg
    67.9 KB · Views: 42
  • garageExteriorBrick.JPG
    garageExteriorBrick.JPG
    144.7 KB · Views: 70

tenorplayer23

Well-known member
Joined
Oct 28, 2009
Messages
222
Location
Rochester, NY
Nice idea - thanks for the post...I can probably use that extra storage myself. Might as well use all the nooks and crannies. Our garages are quite similar....but, as I said, wish my depth could have been built to the same as yours. I think I'll do similar with the pinstripe.

See ya, :hellobye:

Finished the shelving inbetween the garage doors. Its adjustable and if you notice the bottom one is cut angled so when the big truck is in there I can still walk around it without having that shelf in my way. Nice heavy duty 3/4" shelving board was used and works great. Pretty much can hold anything.
 
OP
J

jcchevy

Member
Joined
Feb 11, 2011
Messages
21
Access to the attic to the garage is always helpful. I wanted it to be easy to access it as there will be room for 6'w by 24'l of storage of items not used frequently and to give more room to the interior of the garage for more useful things used freuently.

I reviewed the attic ladders and ended up purchasing and installing a Louisville Ladder Elite 10 ft. x 54 in. 22-1/2 in. Aluminum Attic Ladder (holds 350lbs) for easy access to and from the attic. Let me tell you, this thing was worth the money. Super easy to pull down when needed to use and has a auto retract (gas struts) when closing it up. Its also pretty stable considering a 10' ceiling drop.

Here is a link to the one I purchased. http://www.homedepot.com/Building-Materials-Ladders-Attic/h_d1/N-aqfhZ5yc1v/R-100661773/h_d2/ProductDisplay?langId=-1&storeId=10051&catalogId=10053
 

Attachments

  • attic-ladder (3).jpg
    attic-ladder (3).jpg
    68.4 KB · Views: 59
  • attic-ladder (2).jpg
    attic-ladder (2).jpg
    65.3 KB · Views: 53
  • attic-ladder (1).jpg
    attic-ladder (1).jpg
    66.6 KB · Views: 47
OP
J

jcchevy

Member
Joined
Feb 11, 2011
Messages
21
Your welcome :) an idea is only good if it can be shared and benefited by others :)

Nice idea - thanks for the post...I can probably use that extra storage myself. Might as well use all the nooks and crannies. Our garages are quite similar....but, as I said, wish my depth could have been built to the same as yours. I think I'll do similar with the pinstripe.

See ya, :hellobye:
 

e-tek

Well-known member
Joined
Dec 19, 2007
Messages
10,690
Location
Saskatoon, SK
Great work! One question - did you ever paint out the 2x4's beside the garage doors?

Also looking forward to the details that make the name.....
 
OP
J

jcchevy

Member
Joined
Feb 11, 2011
Messages
21
These should work:) I am still working on the Chevy themed interior yet. Pics of the Craftsman storage, tools and such is coming yet.
Nice job, I think your going to enjoy the space. Where are all the Chevy's.
 

Attachments

  • chevys (1).jpg
    chevys (1).jpg
    103.8 KB · Views: 33
  • chevys (2).jpg
    chevys (2).jpg
    78.5 KB · Views: 27
  • chevys (3).jpg
    chevys (3).jpg
    69.5 KB · Views: 35

jasonreck71

Well-known member
Joined
Dec 30, 2011
Messages
129
Location
Newnan,GA
Finished the shelving inbetween the garage doors. Its adjustable and if you notice the bottom one is cut angled so when the big truck is in there I can still walk around it without having that shelf in my way. Nice heavy duty 3/4" shelving board was used and works great. Pretty much can hold anything.

Great use of space!!! Nice job
 
OP
J

jcchevy

Member
Joined
Feb 11, 2011
Messages
21
Not yet, I view them as a border trim and still need to complete the window trim and I may match them. I am either going with all white window trim or oak. Thoughts?

Great work! One question - did you ever paint out the 2x4's beside the garage doors?
 
Last edited:
OP
J

jcchevy

Member
Joined
Feb 11, 2011
Messages
21
Thanks @e-tek . I am actually finishing the trim now. $84 in prefinished oak trim. Will post pics when I'm done.

Sent from my BlackBerry 9850 using Tapatalk
 
OP
J

jcchevy

Member
Joined
Feb 11, 2011
Messages
21
Finished the Window Trim:rocker:
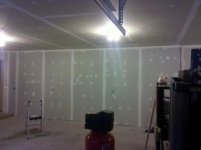
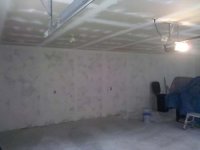
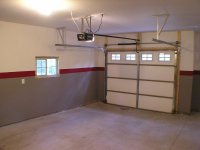
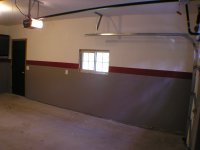
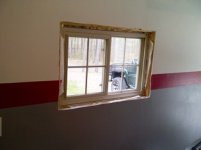
, amazing how much cleaner and nicer it looks with simple trim. Before and after pictures attached.
 

Attachments

  • windowTrimAfter.jpg
    windowTrimAfter.jpg
    22.1 KB · Views: 28
  • windowTrimBefore.jpg
    windowTrimBefore.jpg
    20.1 KB · Views: 20
OP
J

jcchevy

Member
Joined
Feb 11, 2011
Messages
21
Here are some pics of the "Craftsman Workshop". Its not completely done yet, but figured I would get some pictures up here as is. Let me know what you think.
Its laid out so every item is relevent to each other and for easy access and workability (if thats a word).
 

Attachments

  • craftsmanWorkshop1.jpg
    craftsmanWorkshop1.jpg
    133.1 KB · Views: 58
  • craftsmanWorkshop2.jpg
    craftsmanWorkshop2.jpg
    115 KB · Views: 44
  • craftsmanWorkshop3.jpg
    craftsmanWorkshop3.jpg
    102.6 KB · Views: 50
  • craftsmanWorkshop4.jpg
    craftsmanWorkshop4.jpg
    137 KB · Views: 52
To avoid these ads, REGISTER NOW!
Top Bottom