That is a really cool picture.

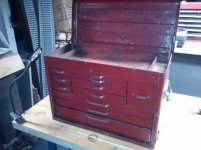
As for comparing the boxes, you need to realize those are two drastically different boxes. The kennedy is a metal version of the timeless 20" wide, 7 drawer machinist chest. I'd be willing to bet a similar version was used to construct ark. It was designed for machinist tools, to be easily carried and thus needed a balance between size, weight and capacity.
The Huot is a 26" style top chest for mechanics tools. Pretty small compared to today's standards, but again a classic design of 3 small drawers atop 3 long drawers, 26" wide x 12" deep.
Both box styles are still being made today, and will probably be made till the end of time. They are just classic designs, each suited for a different application. Comparing the two would be like comparing a truck to a motorcycle, different applications.
The snap on middle is just cool, one of the first intermediate boxes. Technically Huot made a middle box to match that top box, same dimensions as that snap on one. Though the years tool boxes have pretty much been made to a standard size of 20" and 26"x12" then there are the larger boxes.
IMHO kennedy has some of, if not the best friction slides out. The problem with their small boxes is two fold, one the drawer pulls are tiny and 2nd when you have 2 pulls per drawer you really need to pull on both of them otherwise the drawer will cant and you will have side drag on the slide.


")


 I don't know what the factory tool looks like, but the curve I put in mine seems to make all the difference. I did file the very tip so there was no gap where it would touch and it's pretty thin, probably almost tin can thin.