BellyUpFish
Well-known member
What are Matt's plier racks?

What are Matt's plier racks?
Thanks sdavis622... you beat me to it. I should get mine tomorrow, pictures to follow.
No prob! Your cart turned out awesome! I've got a 169 coupon good til sept so I'll be getting one soon and I'm definitely doing the bottom shelf mod. That's the best mod I've seen!
My Garage:
http://www.garagejournal.com/forum/showthread.php?t=243729

Holy **** - this thread makes me want to go back to being a shop based tech again!
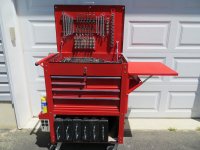
I'm surprised to see no one has put peg board on the inside of the lid of any of these carts, so as to clip the most used/quick grab tools to, kind of like this;
<snipped image>
But simply fixed, rather than sliding when the lid closes. There's quite a lot of real estate on the inside of the cart lids, so you could get quite a bit on it with a large enough piece of peg board...

The Hoffman shelf is taking a bit longer to paint. I have all the pictures and will post them tomorrow. The shelf was white and the surface was a bit smooth so I topped the shelf with paintable rubber under coat, then painted that red to match the box and the rest. The shelf can hold 150 pounds and is the most solid folding shelf I have come across. It's a bit pricey if you get stuck with retail, it actually costs more than the HF box. I got lucky, I snagged a $40 dollar deal on eBay + $15 shipping. The thing is heavy.
Haha, it's the KRA63B. When I first started doing what I do, some 11 years ago now, the resident shop tech had that box (I believe he still does) with a step up box under it, and I fell in love with it. He had his most used "go to" items on it, which is about a dozen or so items, and the drawers took everything else, with just a few more "essentials" in the tote tray in the top.
I'd still love to have that box if I had the room for an opening lid!

I remember when those boxes were more common. Early-mid 90s. Doesn't have to be right now or in this thread, but I'd like to see what you've got in each one.The brace is overkill but the dewalt boxes I store down there are heavy. I modified them with that handle and store all kinds of other stuff in them. Letter punches, hole saw sets, trim router, etc. It holds 7 dewalt boxes perfectly.
What paint are you using to match the cart?
Finally got time to work on the cart again. Today was the day to put my plan for the prybars and big screwdriver into motion. I considered getting the Sunex prybar side box but after much thought I decided that I would cut out a portion of the area on the handle side of the cart and make my own piece to solve the problem. This cart is specifically for my race trailer so I only need to make room for the 3 biggest prybars and 1 big screwdriver since I only take part of my tools to the track.
I began by laying out where the cut would be. I actually used a 2" hole saw to punch out most of the material and then trimmed it up with my little HF air recip saw. I taped up the inside of the compartment to minimize the paint damage.
Where I needed to start the hole saw there where holes already in the metal so I cut a piece of 1/4" hardboard and put it in the bottom of the compartment so I could drill through that first so the holesaw had a pilot hole.
<a href="http://www.flickr.com/photos/93396776@N06/8500508021/" title="004 by TerryHatfield, on Flickr"><img src="http://farm9.staticflickr.com/8227/8500508021_af35d30cb2.jpg" width="500" height="375" alt="004"></a>
Here's a shot from the bottom of the hole all trimmed up.
<a href="http://www.flickr.com/photos/93396776@N06/8500483049/" title="006 by TerryHatfield, on Flickr"><img src="http://farm9.staticflickr.com/8508/8500483049_06196321c9.jpg" width="500" height="375" alt="006"></a>
I'm using a piece of 2 x 2 x 1/8" angle 18 5/8" long.
<a href="http://www.flickr.com/photos/93396776@N06/8501624972/" title="034 by TerryHatfield, on Flickr"><img src="http://farm9.staticflickr.com/8088/8501624972_415c494b19.jpg" width="500" height="375" alt="034"></a>
I marked and drilled the necessary holes in the angle. Here is the test fit.
<a href="http://www.flickr.com/photos/93396776@N06/8501590468/" title="008 by TerryHatfield, on Flickr"><img src="http://farm9.staticflickr.com/8366/8501590468_5ec1b42204.jpg" width="500" height="375" alt="008"></a>
I sprayed a few coats of Seymour MRO Safety Red on it which is almost a dead on match to the HF color. I used the same to touch up the hole in the box as well.
<a href="http://www.flickr.com/photos/93396776@N06/8500508001/" title="032 by TerryHatfield, on Flickr"><img src="http://farm9.staticflickr.com/8250/8500508001_60abd2d80a.jpg" width="500" height="375" alt="032"></a>
I put some door edge guard on the ends of the hole to make sure that the handles didn't get beat up when the trailer is going down the road.
<a href="http://www.flickr.com/photos/93396776@N06/8500747851/" title="036 by TerryHatfield, on Flickr"><img src="http://farm9.staticflickr.com/8511/8500747851_5ecc3c0c29.jpg" width="500" height="375" alt="036"></a>
Here is the new piece mounted with 2 - 5/16" x 3/4" stainless button heads. It was quite a trick to get the nut on the one on the right. Took me about 30 mintues of fishing through the hole for the prybars with the nut taped to the open end of a 1/2" wrench with vise grips chomped on the box end but I finally got it. It was worth the hassle. I realized after it was too late that I could have just drilled the hole in the angle bigger in that end and just went through that hole. Oh well. Live and learn.
<a href="http://www.flickr.com/photos/93396776@N06/8500747805/" title="041 by TerryHatfield, on Flickr"><img src="http://farm9.staticflickr.com/8091/8500747805_38ea713a2a.jpg" width="500" height="375" alt="041"></a>
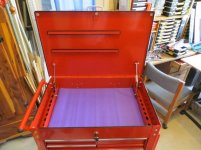
Everything fits perfectly under the lid now. I'm super happy with how this turned out!!!
<a href="http://www.flickr.com/photos/93396776@N06/8501855546/" title="039 by TerryHatfield, on Flickr"><img src="http://farm9.staticflickr.com/8247/8501855546_26183b9eed.jpg" width="500" height="375" alt="039"></a>
<a href="http://www.flickr.com/photos/93396776@N06/8500747829/" title="038 by TerryHatfield, on Flickr"><img src="http://farm9.staticflickr.com/8372/8500747829_f37133dd5c.jpg" width="500" height="375" alt="038"></a>
Even the question was so far back... was excited about my changes... wanted to show the end product. Thought yourz were cool too. Thanks for showing them "again".Seymour MRO safety red is nearly a perfect match. You can see it on my cart about 176,456 pages back.
Even the question was so far back... was excited about my changes... wanted to show the end product. Thought yourz were cool too. Thanks for showing them "again".
Look terribleWhat would it look like if you painted the DeWalt boxes red?
Can we see the back of the power strip?
The dewalt boxes came to me in tough shape. I masked the "Dewalt" off and painted them flat black (several of them).Originally Posted by alpinewhite
What would it look like if you painted the DeWalt boxes red?
Can we see the back of the power strip?
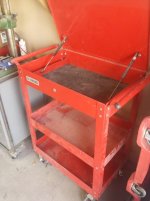
Anyway I am intrigued with some of these shelves you guys have put on yours. How much weight can you put on them? I definitely need to figure out something for the top so I can use that to haul stuff like fans for installation out to the plant. Anyone thought about plasti dipping the lid?
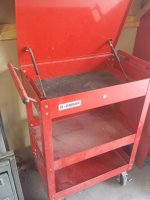
Those casters should install just fine. That said there are some pretty large expansion joints in our plant and this guy rolls across them quite well with no issues.
My only gripe is that all 4 casters swivel. Fine for a small area but not the greatest when you are pushing the thing from one end of the plant to another.
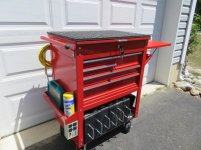
Don't mind the mess I'm in the middle of unpacking from a 1k mile move! Top is a "stall mat" for horses bolted down for a non slip work surface, sides are yoga mat strips glued on to keep me from bumping into cars and scratching them.
https://scontent-a-iad.**.fbcdn.net/hphotos-xaf1/t1.0-9/10441246_10153212864494897_1680876348751609464_n.jpg

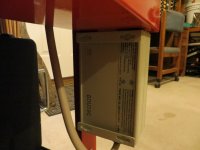
The electric outlets... I really wanted to be able to plug stuff in on my cart. I figured a power strip would be simple but I wanted something that is all metal. I happened to have an all metal surge protector with a switch and fuse that can handle 12 amps...
I took the box apart and its full of "stuff" you don't want to run a screw into... I considered just attaching the outlet box with 3M tape but that would not have been solid enough from my OCD.
I took off the end panel and drilled holes for "nutserts", I used 2 x 1/4-20tpi. I then realized i had to thread a screw into this and wanted to protect the insides a bit more. I had these red rubber caps from something, so I epoxied them over the nutserts on the inside of the box.
I reassembled the box and attached it to the bottom of that side thing on the cart. I also stuck some 3M tape in there to soften the connection.
I ran the cord under the box and installed hooks on the back of the box, which allowed me to hang an extention cord too.
Trust me... when i had the outlet apart... i said... ok tape this off... tape that off... paint. The original front was too full of stuff I either wanted to see original or would be too much of a pain to "paint around". If I could have gotten the switch out without mauling it...Nice mods on the cart. I have a TrippLite unit just like that so you've got me thinking.
Your OCD sounds like me - I'm surprised you didn't paint the outlet box to match since you had it apart anyway?