To avoid these ads, REGISTER NOW!

G73 Electric Heater-Adding a Remote Thermostat?

Stargeezer

Well-known member
Joined
Jan 12, 2009
Messages
347
Location
Central Nevada, USA
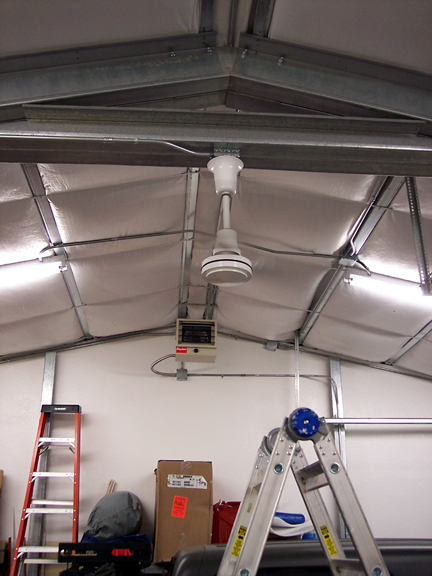
Added pics of installed G73 below 2/24/09:

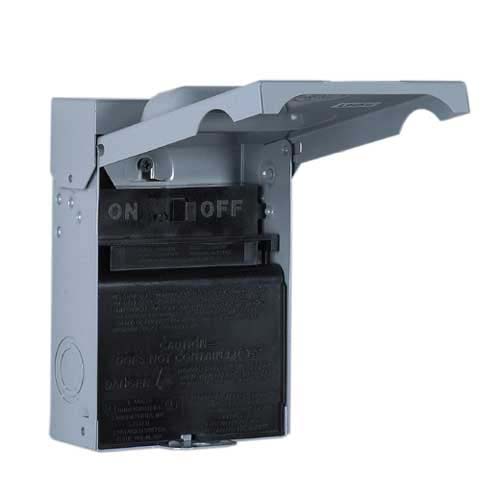
Has anyone added a remote thermostat (line voltage type I assume) to your G73 electric garage utility heater. This popular Dayton model comes with a built-in thermostat & control knob. It looks like adding a remote thermostat to this model would be a modification to the internal board; and that voids the warranty.

The Dayton F79 is the same 5KW heater output-has a slightly bigger fan and comes all set-up to wire-in a line voltage thermostat. However the F79 is $200+ more and doesn't come with a mounting bracket either. If I could buy the F79 at a hefty discount, then I would get this model in a snap and install a nice digital thermostat. Anyone have a source for this model @ less than $479 plus freight (another $20)?

Right now I am leaning towards adding a remote On/Off switch at shoulder level on the wall below a G73 heater. This way, once I get the internal thermostat dialed-in, I can easliy switch it on and off without climbing a ladder. Set and forget. I want that.

Input appreciated. Thanks
 
Last edited:
To avoid these ads, REGISTER NOW!

timgr

Well-known member
Joined
Dec 19, 2006
Messages
544
Location
Medford, MA USA
We have covered the remote thermostat issue for the G73 before. IIRC it's a common item. You turn the built-in themostat all the way up and control the line voltage with the remote thermostat. Search for "Dayton + thermostat" and you'll find the threads.

I have wall switches for my G73s. Same form factor as a residential wall switch, but rated for 30A at 240V. They are very convenient. This too has been covered - I bought my switches through MSC Direct, but your local electrical supply should have them.
 

redsky49

Well-known member
Joined
Jan 21, 2009
Messages
582
Location
near the coast in eastern North Carolina
Don't discount the danger from a line voltage thermostat. The snap-action type thermostat also frequently will cause noise in televisions, radios, etc.

I would always recommend a transformer/thermostat accessory package from the manufacturer.

Offered only as an opinion.
 
OP
S

Stargeezer

Well-known member
Joined
Jan 12, 2009
Messages
347
Location
Central Nevada, USA
OK Here is what I have done after reading all of the great info linked above (Thanks timgr).

Also interesting comments on the danger and using a low voltage system redsky49. Granger has no available options on the G73 heater. I am running dedicated isolated ground circuits that will power radios/tvs/computers. So hopefully that will be clean. I also have two ceiling fans that would likely hum a little.

I spoke with Granger Tech service twice. The recommendation was to disconnect the internal SPST thermostat and wire in a remote Dayton 4PU49 thermostat-also a SPST model. Then use a HD commercial/industrial grade DP 30 AMP switch to break the 220 completely. My electrician feels better about breaking both hot legs too.

I'll mount side by side handy boxes for the Thermostat and ON/OFF switch. Going to use #10 wire to the thermostat terminals in the G73 and use #8 THHN for the power run to the switch and back. Sounds like a lot of trouble, but I feel this will be a safe way to go.

So what danger lurks in using line voltage thermostats? Sparks? Gas fume explosions?

Thanks
 
Last edited:

timgr

Well-known member
Joined
Dec 19, 2006
Messages
544
Location
Medford, MA USA
So, does the Dayton internal thermostat operate on low voltage or line voltage? If there's no internal contactor (low voltage relay controlled by the thermostat) I see no advantage to bringing the thermostat wires out of the G73 cabinet and running them to a remote line voltage thermostat. In this case, I'd leave the internal thermostat alone and set it to its highest setting, then put the line level thernostat in series with your on-off switch (or in place of the switch).

At least one of those external thermostats in the earlier threads has double pole operation (ie breaks both power wires), and has an off setting. If you use that, you're just adding more parts to the mix with no new functionality by adding the rest otf the stuff you've described. Your choice though ... what you've described will work, but seems a little complex for the functionality you're getting. :thumbup:

I think the objection to the remote line level thermostat comes from the possibility of higher electrocution hazard. To me, this seems no greater hazard than having a wall switch to manually enable the heater. Maybe someone will assume that the thermostat is low voltage and poke around inside the box? :headscrat
 
OP
S

Stargeezer

Well-known member
Joined
Jan 12, 2009
Messages
347
Location
Central Nevada, USA
So, does the Dayton internal thermostat operate on low voltage or line voltage?

Can you tell from the schematic in the manual? I'm assuming Line Voltage..

If you use that, you're just adding more parts to the mix with no new functionality by adding the rest otf the stuff you've described. Your choice though ... what you've described will work, but seems a little complex for the functionality you're getting.

Well when it is rigged via my current plan, I'll have one thermostat, one on/off switch and the hot pair off. That seems basic-but yes a little more work for the sparkie!

I think the objection to the remote line level thermostat comes from the possibility of higher electrocution hazard. To me, this seems no greater hazard than having a wall switch to manually enable the heater. Maybe someone will assume that the thermostat is low voltage and poke around inside the box? :headscrat

I'll have everything inside EMT and boxes. Guess I could add some labels to the box saying "caution 220 volts" .

Thanks for weighing in. I may call Granger again before I committ to this scheme. Ha Ha
 

PoorOwner

Well-known member
Joined
Feb 10, 2007
Messages
5,032
Location
CA
So much work.. can you just remove the knob and relocate it lower in it's own box? Or is it not controlling the temperature good enough for you?

I have got a question since you guys know so much about this heater. I am hoping to to change it to a dryer plug to free up one 220V circuit. So I plug it in when I need it, with the built in thermostat turned to on position, am I going to get a nasty spark when plugging it in? So would be best to turn the knob off before plugging it in?
 

timgr

Well-known member
Joined
Dec 19, 2006
Messages
544
Location
Medford, MA USA
Can you tell from the schematic in the manual? I'm assuming Line Voltage..
...

No, there's nothing but a connection diagram in the manual, showing how to connect power. From the parts list, there is no contactor or transformer, so I presume the thermostat operates at line voltage. I'd guess the internal thermostat is basically the same as the wall-mounted line voltage types.
 
Last edited:
OP
S

Stargeezer

Well-known member
Joined
Jan 12, 2009
Messages
347
Location
Central Nevada, USA
No, there's nothing but a connection diagram in the manual, showing how to connect power. From the parts list, there is no contactor or transformer, so I presume the thermostat operates at line voltage. I'd guess the internal thermostat is basically the same as the wall-mounted line voltage types.

Good info timgr

I found the manufacturer's site; called tech service and they were very helpful. Told me I could remove the internal thermostat completely and wire-in the Dayton remote thermostat in its place. This way the fan control circuit maintains full function etc.

Here is the direct link to this heater model at the NC factory:http://www.marleymep.com/Develop/products/unitheat/HUH524TA.htm

There are both the instructions manual and a product bulletin that you can download there.


Marley Engineered Products-http://www.marleymeh.com/

Looks like this heater is branded as: Berko, Qmark, Fahrenheat and Dayton; each with a different part number/ ID code. Same basic heater specs on all of these.

Interesting too that in the bulletin that a wall mount bracket and also a 3-Pole "Positive-Off" rotaty switch is listed.

........and just a note to say:

Control heater with thermostat. Chop the power to the unit via a remote on/off switch only when unit is not in use. You don't want to control the heater with a remote on/off switch. You have to wait until the heater has run it's fan and ended it's cool down cycle before inturrupting the power. Otherwise-the heating element life could be shortened. Hope I said that correctly/understandably.
 
Last edited:
OP
S

Stargeezer

Well-known member
Joined
Jan 12, 2009
Messages
347
Location
Central Nevada, USA
Update-

043481400112.jpg


I am not going to use the expensive DP 30 Amp toggle switch afterall. Instead I will use a Disconnect Box rated up to 60 amps & 1-ought wire. It is a GE brand from Lowe's and is item# 82230 60 Amp, 220 vlt non-fused switch box. It is a little gray box with a lockable flip cover and a single slider switch inside. Since I am already breaker-protected on this circuit-this switch will be just right for a true disconnect on the heater. Only $12.57. The HD DP toggle was $46.00 plus handy box!
 
Last edited:

squatch

Well-known member
Joined
Apr 6, 2007
Messages
67
Location
O'boro, KY
I wanted to use an external thermostat on my G73 but I didn't want to have to buy 100ft of #10 wire ($$) to put the thermostat on the other side of the barn. Here's what I did.

I used a 30amp, 2-pole contactor with a 24VAC coil. I had an old 24VAC blister pack lying around from a door bell system and a free battery powered thermostat that my parents gave me.

Here's a diagram:

Thermostat.jpg


Some notes...

Wire sizes: #18 for transformer to thermostat
#10 for 240V from panel to contactor and contactor to heater
#12 (or #14) for 24VAC transformer

Most thermostats have a two wire heat system wiring option. Use that diagram to connect the two wires to the thermostat.

Here's the contactor I used: http://cgi.ebay.com/ws/eBayISAPI.dll?ViewItem&item=350134046129

Here's the transformer I used:http://cgi.ebay.com/ws/eBayISAPI.dll?ViewItem&item=170301156295

Standard Disclaimer:
I'm not an electrician. I didn't even stay at a Holiday Inn Express last night. If you do this and burn down your house, I'm not responsible. Do this at your own risk.

With that said, this set up has worked perfectly for me for the last two months. That's not quite enough of a track record to say that it is a foolproof solution but I'm very happy with the results.

-casey
 
OP
S

Stargeezer

Well-known member
Joined
Jan 12, 2009
Messages
347
Location
Central Nevada, USA
casey-
did you go inside the G73 and remove the factory thermostat? Or did you run them in series with the factory thermosat fully on?

Good schematic.

Thanks for posting this.
 

squatch

Well-known member
Joined
Apr 6, 2007
Messages
67
Location
O'boro, KY
SG,

I just crank the dial on the front of the heater all the way up.

casey-
did you go inside the G73 and remove the factory thermostat? Or did you run them in series with the factory thermosat fully on?

Good schematic.

Thanks for posting this.
 
To avoid these ads, REGISTER NOW!
OP
S

Stargeezer

Well-known member
Joined
Jan 12, 2009
Messages
347
Location
Central Nevada, USA
Thought I'd post the install per my findings above:

G73-1.jpg


Above: The G73 was mounted up high at the roof peak -which is approx. 12' 2" high. The Dayton G73 heater is mounted straight to the roof peak beams (drilled two holes in factory bracket) and the heater is spaced about 2 feet from the end-wall. Hot air travels 11 feet over to center-mounted Agrifan with downward curved blades (downdraft fan). The fan's overall 60" span with triple blades are spinning so fast in this image that you can barely see a blurr near the hub.

G73-2.jpg


We mounted a Dayton remote line voltage Thermostat at shoulder level and a small GE disconnect box to provide positive off for the heater. Dig the fancy skip-troweled dry wall finish. The entire 1200 sq foot garage is like this. Long story.

G73-3.jpg


Above: View looking up at G73 heater from thermostat mount. It sure works nicely installed this way. I can stand all the way accross the shop 26 feet from this wall and feel nice warm air at shoulder level. The fan is the key I am sure. It distributes the heat and does not allow hot air to stack-up in the ceiling. After the fan runs a bit builds-up a circulation pattern which evenly distributes air to the whole room.

Hopefully I'll get away with having only this one G73 in this 780 Sq. Ft. garage space (26X30). If not, then I have another 30 Amp circuit on a different wall to use; in case another G73 is called for. Won't know til next dec./Jan.-as that is when it can dip to below zero here in the high desert. It was 30 deg. F outside and I got the garage to 58 degrees on the opposite wall in a short time-maybe 30 minutes-measured by a digi-thermometer. Both the fan and heater make some sound-but not objectionable at all. Nothing a radio wouldn't drown out.

I'll be putting another Agrifan in the adjoining and seperated 13 X 30 workshop portion of the building too. This other room will be getting a baseboard heater and an infrared heater.

So just another way to not climb a ladder to control the G73. The thermostat in the G73 was bypassed all together. My electrician did the wiring.
 
Last edited:

structures282

Active member
Joined
Mar 19, 2009
Messages
44
Location
Oklahoma
I found the manufacturer's site; called tech service and they were very helpful. Told me I could remove the internal thermostat completely and wire-in the Dayton remote thermostat in its place. This way the fan control circuit maintains full function etc.

Can you explain how it's wired? Did you use the two red wires going into the thermostat and run them to the remote thermostat?

........and just a note to say:

Control heater with thermostat. Chop the power to the unit via a remote on/off switch only when unit is not in use. You don't want to control the heater with a remote on/off switch. You have to wait until the heater has run it's fan and ended it's cool down cycle before inturrupting the power. Otherwise-the heating element life could be shortened. Hope I said that correctly/understandably.

I think this statement is true even for line voltage thermostats. I got my Dayton G73 last night opened it up and it appears if you install a line thermostat you'll loose the cool down feature. I don't see how a line thermostat is any different then a remote on/off switch.
 
Last edited:

Falcon67

Well-known member
Joined
Jun 11, 2009
Messages
18,371
Location
Merkel, TX
I pulled up the G73 manual and had a look at the wiring diagram. If I'm reading this right, the t-stat IS an on/off unit, placed in the L1 power leg. The fan control t-stat (which I would assume controls fan power down after element shut off) is tied between L2 and the fan motor, which pulls its L1 power from the field wiring block - before the t-stat.

Bottom line - any t-stat that will switch the line voltage will work with this heater, just tie it in at the existing t-stat and turn that all the way up, or disconnect it.

I can reach my heater standing on the floor LOL, so my shutoff is the breaker.

http://www.broan.com/display/router.asp?ProductID=2255 - $16 Lowes
 
Last edited:

Falcon67

Well-known member
Joined
Jun 11, 2009
Messages
18,371
Location
Merkel, TX
But you agree if a person was to cut power to the L1 leg the entire unit would shut down?

No, not the way it's wired internally. The t-stat breaks L1 and that kills the heater element only. Fan is 220V, uses L1 and L2 and picks up L1 before the t-stat. Fan circuit uses a small surface mount t-stat switch (like a clothes dryer) that is clipped on the heating element. When the element cools, that little t-stat opens and shuts off the fan. I know how it's in there because it all came loose when I dropped the damn thing.

edit - wiring diagram on page 5: http://www.air-n-water.com/manuals/G73.pdf

Biggest hassle I see with a remote full voltage t-stat is the 20A draw on that leg at 5kW. I'd rig up a 24v transformer and and relay of some kind. But - a run of 10 gauge is probably still cheaper.
 
Last edited:

royalton10

Well-known member
Joined
Oct 19, 2007
Messages
247
Location
Lancaster, Ohio
How to wire this is using thermostat and the disconnect mentioned above?

Would it be #10 wire from electric panel to heater, #10 wire from heater back to thermostat, then #10 wire from thermostat to the disconnect?

Is this the right order?

Thanks!!

Doug
 

Falcon67

Well-known member
Joined
Jun 11, 2009
Messages
18,371
Location
Merkel, TX
Sorta - #10 to disconnect, #10 from disconnect to heater, #10 from t-stat wires in unit to remote t-stat. Since it pull 20A per leg #10 out and back to the t-stat. Make sure the t-stat is rated for the current as I saw some that were not rated for over 20A. Squatch's diagram above is a better method - low voltage, cheaper wire. Contactor would cost a few $.
 

Cebby

Well-known member
Joined
Jul 17, 2005
Messages
310
Location
Pittsburgh, PA
Here's the wiring out of the link posted above.

I plan to do the same setup as Stargeezer for the most part. I'm curious why the use of #8 THHN instead of #10? Is this due to the length of your run? In the pics it doesn't look too far.

Due to where my box is, I'm planning to go #10 from the panel to the GE switch to the G73 heater then a separate run down to/back from the Dayton thermostat (centrally located in the room since the heater will be by the man door), removing the internal thermostat on L1. This sound correct?

Garage is only approx. 20' x 20'
 

Attachments

  • Copy of G73_Page_5.jpg
    Copy of G73_Page_5.jpg
    81.7 KB · Views: 435
Last edited:

Cebby

Well-known member
Joined
Jul 17, 2005
Messages
310
Location
Pittsburgh, PA
Thanks Stargeezer for the parts list and inspiration. Did mine earlier this week and am enjoying my heated garage now!
 

ttrest

New member
Joined
Jan 9, 2012
Messages
1
Bringing this from the dead. I just finished a custom thermostat hookup to my G73.

I used the information posted in this thread (thanks everyone) and went the route of a 7-day thermostat, a 120v-to-24vAC transformer, a single pole contactor, some 10-3 wire as well.

Here is how I hooked it up:

1) 120vAC to the 120v transformer (I created a 120v outlet with cord).
2) One leg of the 24vac on the 120v transformer directly into the coil of the contactor.
3) The other leg of the 24vac wired through some wall to my thermostat (R terminal). I used 18awg thermostat wire (only pulls 1 amp for the contactor coil anyway).
4) Out of the W terminal from the thermostat back through the 18awg thermostat wire (the wire has two conductors) and back to the other side of the 24vac contactor coil.

I tested the thermostat and was able to energize the contactor, so it works.

5) I then brought THREE legs of 120v to the G73. I used L1 and L2 straight from the 220v breaker box. I connected a second L1 into the contactor. This is why I ran 10-3.
6) At the G73, I have four wires to connect: L1 for the thermostat, L1 for the Fan, L2, and Ground.

When you look inside the G73, you can easily see the thermostat module. There are three tabs on the module: L1 connects to one tab, which splits back out. You'll see a second tab that is the "output" from the thermostat switch. When the thermostat switch closes, this wire carries L1 to the heater element / fan switch.

Very easy to connect. I can now control my heater for different hours of the day, cooler at night (save some $), and the heater still maintains it's cooling function where it runs the fan on it's own to cool off the heater element.

The only thing I'm trying to fix now is the large temperature gradient in my garage. It is 70deg at the ceiling, and 55 at the floor (it is 15deg outside). I have a overhead fan moving air to the floor, but the gradient still exists nonetheless.

Anyway, thanks everyone for the tips on this board. :beer:
 

tom_day73

Member
Joined
Aug 7, 2012
Messages
6
Bringing this from the dead. I just finished a custom thermostat hookup to my G73.

I used the information posted in this thread (thanks everyone) and went the route of a 7-day thermostat, a 120v-to-24vAC transformer, a single pole contactor, some 10-3 wire as well.

Here is how I hooked it up:

1) 120vAC to the 120v transformer (I created a 120v outlet with cord).
2) One leg of the 24vac on the 120v transformer directly into the coil of the contactor.
3) The other leg of the 24vac wired through some wall to my thermostat (R terminal). I used 18awg thermostat wire (only pulls 1 amp for the contactor coil anyway).
4) Out of the W terminal from the thermostat back through the 18awg thermostat wire (the wire has two conductors) and back to the other side of the 24vac contactor coil.

I tested the thermostat and was able to energize the contactor, so it works.

5) I then brought THREE legs of 120v to the G73. I used L1 and L2 straight from the 220v breaker box. I connected a second L1 into the contactor. This is why I ran 10-3.
6) At the G73, I have four wires to connect: L1 for the thermostat, L1 for the Fan, L2, and Ground.

When you look inside the G73, you can easily see the thermostat module. There are three tabs on the module: L1 connects to one tab, which splits back out. You'll see a second tab that is the "output" from the thermostat switch. When the thermostat switch closes, this wire carries L1 to the heater element / fan switch.

Very easy to connect. I can now control my heater for different hours of the day, cooler at night (save some $), and the heater still maintains it's cooling function where it runs the fan on it's own to cool off the heater element.

The only thing I'm trying to fix now is the large temperature gradient in my garage. It is 70deg at the ceiling, and 55 at the floor (it is 15deg outside). I have a overhead fan moving air to the floor, but the gradient still exists nonetheless.

Anyway, thanks everyone for the tips on this board. :beer:


Hi:Did you install a Dayton G73 or another manufacturers?
If it's a Dayton, where did you find it?
Been looking for one.
Thanks, Tom
 
To avoid these ads, REGISTER NOW!
Top Bottom