To avoid these ads, REGISTER NOW!

'47 Montgomery Ward jointer restoration

Scimonetti

Well-known member
Joined
Aug 25, 2014
Messages
431
Location
VT
Well I picked up another machine today, a 47 Montgomery Ward 5 inch jointer. It came with a 2 hp 220v motor and was 50 bucks. The plan was to clean up the motor and sell that for over $50 on ebay as I don't have 220. My plans might change though, but you'll see about that tomorrow.:evil: It was being sold by a very nice older gentleman who had more careers than I could remember. He showed me his whole solar powered shop and we exchanged contact info because he had a few other machines he was considering selling. Also got a couple really cool forest service handbooks and lumber calculators

Here it is


The tables aren't pitted but the whole thing is pretty well "seasoned" with crud. Can't tell if there is any paint on it or what color it was. It's taking a bath in the electrolysis tank as we speak. Fingers crossed it doesn't freeze in the unheated garage with the parts in it.:lol_hitti

Motor looks to be from a chicom tablesaw or something.


It spins very nicely surprisingly and ran when the plug was cut

I think I'll probably drill out the blind rivets or use vise grips, there's no access from the back on either of them.

according to the model number prefix it was made by duro metal products. Pretty funny that I disassembled it with a duro socket set.

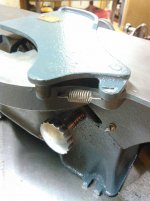
This is all thats wrong with it.


This bracket got mashed somehow along it's life. I'll heat and bend it back, but might have to fabricate one. The angle gauge will not be used or trusted anyway. It appears all the pot metal parts were painted, not sure if from factory.


After taking both of the tables off I have access to the cutterhead. I'll order 6 inch blades for $13 and grind them shorter. The original blades have some pitting and I couldn't get them sharpened for that amount.


Some ignition wrenches were needed to access the nuts that wedge the gibs/chipbreakers against the blades to hold them in place.

After removing the pulley, screw and setscrews in the cutterhead holding it to the shaft you can pound the spindle through.

Then you can shake your head and wonder why it isn't moving.

Then you can realize that there are 2 same sized setscrews in each hole to keep it from vibrating loose and remove both of them.


Plenty of crud to clean off.

More to come, but as of right now everything is apart and all the hardware is cleaned up.
 
To avoid these ads, REGISTER NOW!

404

Well-known member
Joined
Aug 23, 2014
Messages
3,463
Location
Mass
That will be a nice unit when done.

You may know this already, but there is a bit of a trick to putting jointer blades back when they are all removed at once.. Be careful not to over tighten the first knife and spread the slot in the head.. Slots should all be exactly the same dimension when everything is installed and tight.

Someday China will figure out how to use normal fonts on the labels... maybe. Till then it is a dead give away.
 
OP
S

Scimonetti

Well-known member
Joined
Aug 25, 2014
Messages
431
Location
VT
The electrolysis tank isn't doing so well.
I need to melt it and keep it going so the bubbles keep it from freezing
 

404

Well-known member
Joined
Aug 23, 2014
Messages
3,463
Location
Mass
Hmmmm. The blind drive screws are proving to be a hassle. So far I've tried diagonal cutters to get underneath, screwdrivers, filing a groove to twist out, using a razor blade and hammer and punching and drilling. Didn't get far drilling. The smaller plate is pretty dinged up, any suggestions? Get cobalt bits?

Don't know what those are? :dunno:
 

Tireman

Well-known member
Joined
Mar 7, 2013
Messages
169
Location
Detached
Cool rebuild I have a jointer like that in the garage I got from an auction. I haven't got to work it yet. Good luck looking good so far.


Sent using Tapatalk
 

404

Well-known member
Joined
Aug 23, 2014
Messages
3,463
Location
Mass
I see those drive screws are on the guard. If one was reealy careful drill holes from the back side directly exactly under the drive screws till the tail lend is exposed and punch it out.


If this goes all to hell please don't blame me.:beer::willy_nil
 
OP
S

Scimonetti

Well-known member
Joined
Aug 25, 2014
Messages
431
Location
VT
Here's a quick update.
I was able to get the guard tag off by drilling from the back and tapping out
All the hardware has been wire wheeled and polished up a bit. I think I'll leave the die cast knobs as is.
After chipping out the electrolysis tank I put it to work on one of the table castings. a toothbrush and wire wheel in a drill cleaned it right up. The machined table got some scotch brite
 

404

Well-known member
Joined
Aug 23, 2014
Messages
3,463
Location
Mass
Wow that all went a lot better than it would have for me.. The fresh castings always look so beautiful. Great job on the tag.

What is in the bath with the water, washing soda?

If you were closer I would try to hire you to clean up my "classic" stuff. :thumbup:
 
OP
S

Scimonetti

Well-known member
Joined
Aug 25, 2014
Messages
431
Location
VT
All of the hardware cleaned up nicely. I used a wire wheel, many grits of sandpaper and mothers polish. That stuff rocks. the lathe is very very helpful.
 

jakemac

Well-known member
Joined
May 21, 2013
Messages
9,035
Location
New England
I have these two motors I'm thinking about. one is a power kraft 1/4 that claims to draw 5.5 amps. the other a general electric delco general motors division 1/3 HP that draws 5 amps. It's more period correct but I need to figure out the wiring and be paint.

I think the 1/4hp motor would look better on the machine, but go with the higher HP motor. Hardwoods will bog the blades down, the higher HP will help keep the blades spinning. It's the same thing with the planer you're working on. Use the highest hp you have available to keep it from stalling.
 

Squashfest81

Well-known member
Joined
Jan 14, 2012
Messages
1,483
Location
MA
Liking the 2 horse to the Shopsmith. Cleaned up along with the speed reducer, I'm envious.
 
To avoid these ads, REGISTER NOW!
OP
S

Scimonetti

Well-known member
Joined
Aug 25, 2014
Messages
431
Location
VT
Here's the second table cleaned up with electrolysis. They come out with the paint flaking and no rust. Immediately after scrubbing and drying everything flashes to black oxide and powdery rust and I clean that up with a drill wire wheel. pretty soon I'll have to start painting. Hopefully some warmer weather comes along again. -15 tomorrow and negatives most this week but Sunday almost hit 50. It might be time for a makeshift paint booth and an appropriate cartridge for my respirator.
 
OP
S

Scimonetti

Well-known member
Joined
Aug 25, 2014
Messages
431
Location
VT
Some progress and even more problems today. the fence cleaned up today in about 15 minutes. Wd40 I use in excess whenever I use scotchbrite. It really makes a world of a difference in how it cuts, as well as a mess. the castings look amazing.

I finally just gave up on the rivets and ground them off. I'll drill larger, tap and replace with stainless screws. The badge I'll repaint and touch up. The screws should cover most of my grinding slip.
 
Last edited:
OP
S

Scimonetti

Well-known member
Joined
Aug 25, 2014
Messages
431
Location
VT
Update time!

I drilled a small hole in the pin and threaded a self tapping screw.
Aaaaand the screw sheared I drilled it out again and tried again. It was stuck in there so I just drilled out the pin. a 15/16 socket and rubber mallet got the bearing and cap out no problem.
I guess I drilled out the pin too far
The crack does go past the pin hole if you look closely. The casting there is super thin. I don't think it will be a problem. I also don't think I can repair it and keep everything not distorted. Not that worried but I'll keep it in mind when installing new bearings.
 
Last edited:

404

Well-known member
Joined
Aug 23, 2014
Messages
3,463
Location
Mass
N D is new departure bearing which sadly submerged beneath the waves some time ago.
Apologize for the pesky questions from the start :willy_nil:lol::lol_hitti

Any chance that first character on the bearing number is a C instead of a 0 ?

Does the screw in the pin go into a body dent pulling slide hammer to yank it out?

To cross ref the bearing, might call
http://www.ebatmus.com/
and
http://www.actionbearing.com

for starters.

The project is coming along great. :thumbup:
 
OP
S

Scimonetti

Well-known member
Joined
Aug 25, 2014
Messages
431
Location
VT
I got some more work in tonight. I scrubbed the brass plate with a brass brush and mineral spirits. I'll give you a hint on how they'll get restored. It doesn't involve a tiny paintbrush!

I also got the second bushing and bearing out. I couldn't pound them out as a pair but tapping a screwdriver between them freed up the outer bushing. Once that pried out the bearing pounded out with a socket. into the "parts washer" they go. This one is an enclosed bearing. C 87115. It appears the one with the pulley is designed to take more load and the other one to spin better.
 
OP
S

Scimonetti

Well-known member
Joined
Aug 25, 2014
Messages
431
Location
VT
I went to sand off the top paint and messed up. I decided to start over a grabbed a cloth and paint thinner. I accidentally did this when I tried to wipe it off! I think I found a better way, I'll try it on purpose tomorrow.
 
OP
S

Scimonetti

Well-known member
Joined
Aug 25, 2014
Messages
431
Location
VT
It worked! I started out with a light coat of paint. I let it cure 15 hours. Then I grabbed a computer heat sink. It seemed pretty flat and smooth to me. I put a cloth soaked in mineral spirits on top and rubbed the tag on it. That took the paint off of the raised letters. Sandpaper didn't really work. they look much better and brighter in person, the pics **** for some reason
 
OP
S

Scimonetti

Well-known member
Joined
Aug 25, 2014
Messages
431
Location
VT
Did you wipe them while the paint was wet, or dry ?

They came out great, BTW.
Thanks! I let them dry around 14 hours so that my fingerprints wouldn't get on them but it would be soft enough to remove. With the autobody sandpaper if you touched a valley it scratched it up and made it look dirty. With the mineral spirits it "smeared" some of the top layer and dried perfectly.
 

404

Well-known member
Joined
Aug 23, 2014
Messages
3,463
Location
Mass
Labels look great! Thanks for the mineral spirits trick, never heard of it.

:rocker:
 
OP
S

Scimonetti

Well-known member
Joined
Aug 25, 2014
Messages
431
Location
VT
I'm doing like 8 different projects right now, but here's some more updates. out of the electrolysis bath, the last part after some wire wheeling then oil. Hopefully this keeps black oxide from flashing onto the surface. I am debating if I should reinforce the cracked edge of the bearing race. I think I'll do the epoxy and bolt if there's clearance.

Pieces masked and ready to prime and paint. Minus the fingerprints lol... aaand after priming, finding a good blue and shaking the can for 2.5 minutes it comes out like this. I tried inside after also. Maybe a bad batch, but either way I'll return it for something darker.
 
OP
S

Scimonetti

Well-known member
Joined
Aug 25, 2014
Messages
431
Location
VT
Almost all the castings painted and I took the hardware to the buffer some more.

This is where it gets interesting. I've been having a hard time finding replacement bearings and I decided to try to make the ones I have work first. I worked on the non shielded one first. I blasted it and soaked it in brake cleaner for a little bit then took it to the kitchen sink. There I ran water and blasted some more. That didn't flush it well enough so I took some dawn dish soap and poured it in.

After running them across my hand vigorously for a couple minutes upside down I rinsed. The foaming action and grease cutting of the dawn flushed all the crud from them in 2 cycles.

I immediately soaked them in wd-40 and then applied gear oil and ran them.
They run like absolute silk right now, no noise or feel. The other shielded bearing is more worn and hard to clean so I will try to find a replacement.
 
OP
S

Scimonetti

Well-known member
Joined
Aug 25, 2014
Messages
431
Location
VT
uploadfromtaptalk1424810625288.jpguploadfromtaptalk1424810671809.jpguploadfromtaptalk1424810707752.jpguploadfromtaptalk1424810751495.jpg shop kitty approves

Still need to make the bracket, drill out a rivet and add knives
uploadfromtaptalk1424810885139.jpg Here's a tip, use wheel bearing grease and smear it all over machined surfaces before painting. Much easier than masking these tough surfaces. After spraying, everything wipes off
 
OP
S

Scimonetti

Well-known member
Joined
Aug 25, 2014
Messages
431
Location
VT
Here it is


according to the model number prefix it was made by duro metal products. Pretty funny that I disassembled it with a duro socket set.

This is all thats wrong with it.


Plenty of crud to clean off.

Well, here is the almost final installment. I was in the middle of a drill press motor upgrade and ended up making the bracket with a hand drill. I used some curved picks to lay out the holes in awkward places over marking dye. I hate center punching and drilling with a milwaukee magnum, but I made it work before my DP and I can still If I am careful. The bottom 9/16" hole for the locking carriage bolt I drilled and slightly ovalized with a round file. I checked it every few strokes and got it so that the fence just bottoms out it's rotation at 90 degrees. I tried many times and all I have to do it turn the fence all the way to the left and lock down. Every time I could fit feeler gauges of less than a few thou between the fence and a square. I can't believe it worked! hopefully wear doesn't throw it off.

Note, this is not the lufkin square I used lol...


It is actually the same color I painted my 10" saw, cobalt cannon, and as my unrestored 8" Craftsman.
With flash
Without(more accurate)

It also matches the Montgomery Ward Powr-Kraft Motor I am going to put on it.

I am getting 10 more motors next week to rebuild and will find a spare for my lathe. I can't wait for my jointer knives to come in to test it!
 
To avoid these ads, REGISTER NOW!
Top Bottom