To avoid these ads, REGISTER NOW!

Underground Lair of the Squankum

OP
S

Squankum

Well-known member
Joined
Mar 28, 2011
Messages
7,903
Location
Southeast
Jack Olsen says you can never have enough clamps. I try to be more like Jack -- and shouldn't we all? (Other than trying to race a car with its engine in the wrong place.)

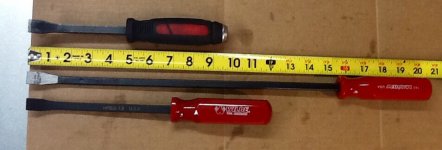
I also think you can never have enough pry bars. Having taken part in yet another Harry J. Epstein's 4th of July extravaganza (on July 11th), I ordered the 12" Wilde pry bar. It looked so cute and nimble in the pictures.

It turned out to be slightly more burly, but that's okay. Here's how it compared to my 10 inch Dominator (heh heh... Domi-na-tor) and a larger Mayhew I got many moons ago.

As you can see, the 10" Mayhew turns out to be 10" long, and the 12" Wilde... 12" long.
 

Attachments

  • image.jpg
    image.jpg
    102.3 KB · Views: 54
Last edited:
To avoid these ads, REGISTER NOW!
OP
S

Squankum

Well-known member
Joined
Mar 28, 2011
Messages
7,903
Location
Southeast
In profile. Lots of optical illusions going on here. The square stock on the 10" Dominator looks bigger, it's not. The blade seem wider and burlier, and... nope. Pretty much the same.

The plastic handle on the long Mayhew (I think I got that from Eastwood but it could have been from HJE in recent years) felt a little smaller, the Wilde red handle felt a little beefier. I broke out the calipers and here's how they stacked up:

Wilde 1.25"
Mayhew 1.22"

Shrinkage?

That was a surprise. In every other way, the handles seem identical... and on that longer pry bar, that handle seems delicate. On this new foot-long pry bar, it seems beefy and almost out of place.

But to paraphrase Sir Mix-A-Lot, I like fat grips and I cannot lie!

The Wilde, at HJE for $6.75 before shipping, was hard to pass up. Made in 'Merica, specifically, Kansas.

Of course, the rubbery grip Mayhew Dominator is great, but then again, I like these red plastic handles, and they clean up well.
 

Attachments

  • image.jpg
    image.jpg
    54.1 KB · Views: 29
Last edited:
OP
S

Squankum

Well-known member
Joined
Mar 28, 2011
Messages
7,903
Location
Southeast
Hmmm... an idea for a corny Saturday night 8 pm network crime show:

A well-dressed, well-mannered, retired English mechanical engineer (Michael Caine?) roams the big city, answering Craigslist ads from people in distress. People alone in the cold, cruel world, who need to get something heavy off of something else, or to just move one thing away from another thing.

The Leverager


In very special episodes, he gets into a jam and has to visit Mr. Archimedes' pry bar shop at Fulcrum Commons to get something special.

Of course, he travels the city wearing a sturdy overcoat, the inside lining holding a variety of pry bars.

Oh, and just to guarantee there are some ratings, he occasionally bludgeons a mugger to death. (Harry Brown never went to jail, you know...)

Catchphrase: "Give me a place to stand from, mate, and I'll clean up this town."

Wry comment to his friend Mr. Archimedes about the crisis of the Euro and austerity in Greece: "I regret to inform you that my talents lay solely in leveraging -- not deleveraging."

And, of course, each episode ends with him knocking back a pint with his buddies at his favorite pub, The Crow Bar.


_
 
Last edited:
OP
S

Squankum

Well-known member
Joined
Mar 28, 2011
Messages
7,903
Location
Southeast
Oh, and he needs a long-term nemesis who he can never quite catch up to. A burglar named... Jimmy.

"I didn't think it was possible, but that bloke's giving crowbars a bad name."
 
OP
S

Squankum

Well-known member
Joined
Mar 28, 2011
Messages
7,903
Location
Southeast
Did you know where old ships go to be recycled?

They are un-manufactured, piece by piece by piece. Hammers and torches.

http://www.theatlantic.com/photo/2014/11/the-ship-breakers/100859/

There are other long articles full of words, but that photo essay is a good start.

Lots of bare feet in these pics. Hey, you try climbing an anchor chain with boots on!


EDIT: See also post #1033, 11/21/16, for links to lots of pictures.
 
Last edited:
OP
S

Squankum

Well-known member
Joined
Mar 28, 2011
Messages
7,903
Location
Southeast
To paraphrase Cicero, there is nothing so absurd that it has not been said by some philosopher, or has appeared in collector car ads.

People are now "barn-finding" replica Duesenbergs.:dunno:

http://www.auburnspeedsters.com/classifieds_victorycars_49.htm

The Duesenberg II was made between 1978 and 2000:

https://en.wikipedia.org/wiki/Duesenberg#Revivals

Tonight I also learned that it is not at all clear that the term, "it's a doozy", is based on the American luxury car, the Duesenberg.

https://en.wikipedia.org/wiki/Duesenberg#Etymological_note
 
OP
S

Squankum

Well-known member
Joined
Mar 28, 2011
Messages
7,903
Location
Southeast
This weekend’s minor project: installing a Wheelskins leather steering wheel cover on the ol’ Ford van steering wheel. The Ford steering wheel rim was plastic (okay with me) and very thick and soft, which I also like, but then the plastic just degraded over the years and was kinda gross, even for me, and I’m rarely grossed out by anything.

http://wheelskins.com/

http://amzn.com/B009ZG8UE8

It came out a lot better than I expected! Some said one hour, some said two, so I timed it: 1 hr 15 min. And a sore left trapezius muscle. It comes with one leather piece sized to fit your wheel, and one big needle, and one sturdy waxed thread. One LONG, sturdy, waxed thread.

When I first sized up the leather vs. the wheel a week or two ago, my gut reaction was, “This thing will NEVER fit!” It’s sewn shut into a loop at the factory, and you stretch it over and get to sewing. It comes with good directions and there are some decent videos on youtube:


After worrying about the fit and making sure what I ordered should really fit the wheel I had – including some measuring of overall diameter and rim circumference my my tire stagger tape (OK, it’s just a wee ¼” wide tape measure) – I concluded that yes, they really DO want me to stretch this thing over this steering wheel.

On the internet somewhere, maybe a Corvette forum, I found this handy hint: soak it in water first. I gave it 30 minutes in a bucket, and it was very pliable and stretched onto the wheel with no problem.

I’m very pleased with the results. Next weekend, I’ll have another gander at it and see how it looks after the leather has dried.

This steering wheel has two spokes, and they're wide. The cover is not perfectly tight there, but that's the way it goes with an aftermarket job like this, I suspect. One guy on the internet said to use double-sided tape, and I kinda wanted to there, but didn't. We'll see. If I don't like the results I can always... bah, I'm not doing this one again. I'll just file it away under "next time" if I do another car.
 

Attachments

  • wheelskins.jpg
    wheelskins.jpg
    138 KB · Views: 38
Last edited:
OP
S

Squankum

Well-known member
Joined
Mar 28, 2011
Messages
7,903
Location
Southeast
I recently got the bright idea (that’s a pun, just wait…) to upgrade the lighting on the Ford van. It’s a work van, so it comes with mundane H6054 sealed beam headlamp units, one big rectangle per side doing both low beam and high beam. When I was a boy, there were only so many headlight sizes and shapes an American car could have! Let’s just say that American automotive lighting was overregulated at the behest of manufacturers who had invested in one kind of technology and didn’t want to change their production facilities, or compete with newer, better concepts from other places.

That all changed in the mid 80’s. A little. But not too much. “Aero” style lamps of any shape became permitted, and so did replaceable bulbs. (But only certain bulbs! <wag finger>)

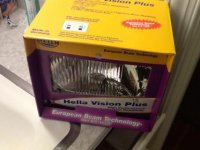
Now, I’m just an unfrozen caveman, so imagine my surprise when I started reading up on the Sylvania XtraVision or GE Nighthawk type plug-n-play sealed beam upgrades, and stumbled across US DOT-legal Hella units that swap in just as easily. Non-sealed beam, H4 bulbs. So I ordered them, and I’m glad I did.

I’m not sure what makes them DOT legal, other than the DOT pulling the stick out of their *** about the whole subject, and also, these have the three little ******* to mount a headlight aimer on them, a traditional US requirement. I found that this caveman, your humble narrator, must have been the last one in the glacier to be unfrozen*, because the internet’s full of guys with older American SUV’s who have already done this swap. I've also found out that H4 bulbs are no longer rarities only found at the local eurofoofoo parts store, too.


http://www.myhellalights.com/

http://www.myhellalights.com/index....on-headlamps/vision-plus-conversion-headlamp/

http://amzn.com/B0002M9QRE


This fellow does the Hella swap to his older Toyota pickup headlight, and takes before and after video:


Our experience with them matches that video. Very nice!

Made in Germany, and therefore, not priced like something made in China. Price does include a bulb, 60W/55W.

The units have some metal tabs on the back edges of the perimeter that might need removing; I used diagonal cutters and mashed down the remnants with pliers, but I might take it apart again and grind the remnants down more.

Just as easy as changing a sealed beam: remove chrome retainer frame, pull lamp forward, unplug. Headlight connectors… I_I shape … in the wiring harness fit onto the bulb, no problem.

If you have an older car, it’s an easy upgrade.
 

Attachments

  • hellalight.jpg
    hellalight.jpg
    17.3 KB · Views: 25
Last edited:
OP
S

Squankum

Well-known member
Joined
Mar 28, 2011
Messages
7,903
Location
Southeast
More than I ever wanted to know about 9003 bulb vs. H4 bulb:


Originally Posted by CandlePowerInc.com

H4, HB2, and 9003 bulbs

9003 and HB2 are different names for the same bulb, so these numbers apply to just two kinds of bulb: H4 and 9003/HB2.

9003 and H4 bulbs look alike, fit in all the same headlamps, have the same wattage rating and seem to be completely interchangeable, but in some places, the law says that only one or the other type must be used.

In 1971, the H4 bulb was introduced in Europe as the world's first halogen headlamp bulb that could produce both low and high beam from a single bulb. It quickly became the world's most popular headlight bulb except in the USA, where cars had to have sealed beam headlamps with non-replaceable bulbs. Motorcycles in the USA have never been required to use sealed beam headlamps, and so the H4 bulbs became popular for motorcycles in the US and worldwide. It is widely used to this day.

In 1983, the US Department of Transportation (DOT) first permitted cars in the US to use non-sealed-beam headlamps with replaceable bulbs, but DOT requirements differ from those in force outside the USA. On of the US requirement is that the beam aim must not change when the bulb is replaced. This can happen is a low quality replacement bulb is installed, because in a poorly made bulbs, the filament is often improperly positioned. Headlamps are optical instruments, and they depend on the filament being very precisely placed. If the filament is not precisely where it's meant to be, the beam pattern will be shifted or changed.

Like all engineered products, headlight bulbs are built to a technical standard which specifies all mechanical, electrical and dimensional aspects of the bulb. This blueprint makes sure all bulbs of a given type are interchangeable, and provides allowable ranges, or manufacturing tolerances, for each aspect.

In 1991, automakers wanted to use H4 headlights bulbs on cars in the US, but the DOT decided engineering blueprints for H4 bulbs allow too much variance in the position of the filaments within the bulb. So a new blueprint was made, with all the electrical and dimensional properties the same, but with stricter limits on filament placement variance. Because of the limits in the US on beam intensity in effect in 1991, the maximum allowable light output tolerance was also reduced. This new bulb specification was called "9003/HB2", because at the time, two numbering conventions were in use. Many 9003/HB2 bulbs also carry the "H4" marking, and vice versa, because it is possible to meet the specifications in both blueprints at the same time. The first headlamps with 9003 bulbs were on 1992 model cars.

Filament placement variance is not a problem with high quality bulbs made by reputable companies. At Candlepower, we make sure all our bulbs are better than the law requires. Our filaments are all precision focused inside watch bulb to ensure a properly placed, properly formed beam in any headlamp. In areas where there is no legal preference for 9003 bulbs over H4 bulbs in cars, any Candlepower H4 or 9003 bulb can be used with confidence in any headlamp.

Technical bulletin:
H4, HB2, & 9003 bulbs.

Who may use HB2 or 9003 bulbs?
9003 or HB2 bulbs marked "DOT" may be used in the US and Canada in any car headlamp that is marked "DOT HB2," and in any motorcycle headlamp designed to take an H4, 9003 or HB2 bulb. They can also be used in any car headlamp designed to take an H4 bulb.

Who must use HB2 or 9003 bulbs?
Automakers must install only 9003/HB2 bulbs marked "DOT" in the USA in headlamps marked "DOT HB2." To make sure such headlamps remain in compliance with Federal standards in the USA, use only replacement 9003 or HB2 bulbs marked "DOT." This is especially important in areas where headlamp bulbs are checked for "DOT" markings as part of a state vehicle inspection program.

Who may use H4 bulbs?
H4 bulbs may be used in H4 headlamps, in any country where such headlamps are permitted on cars or motorcycles. Outside the USA, thy may be used in headlamps designed to take HB2/9003 bulbs in areas where there is no requirement or inspection for bulbs marked "DOT."

Who must use H4 bulbs?
H4 bulbs with a circle-E mark are required in many countries outside of North America.

Copyright 2003 Candlepower Inc.
 
OP
S

Squankum

Well-known member
Joined
Mar 28, 2011
Messages
7,903
Location
Southeast
In our modern age of rationalized design, stiff competition, low prices, and of course, throwaway consumerism, there’s something much worse than McPherson struts on a Ford cargo van, there’s plastic cat litter scoops. I have found a lifetime-quality poop scoop.

On the left is a plastic one. Possibly Hartz brand, don’t know. Has it cracked? No. Will it? I don’t know. Someday, I’m sure. I’m also sure it cost $1.99 or $3.99, max. But you and I know another one will have to be bought someday.
 

Attachments

  • scoop 2.jpg
    scoop 2.jpg
    144.9 KB · Views: 38
OP
S

Squankum

Well-known member
Joined
Mar 28, 2011
Messages
7,903
Location
Southeast
Duranimals DuraScoop Cat Litter Scoop (colors may vary)
http://amzn.com/B001DCAAP4

$12.99 – Reviews are five solid stars after 2,455 reviews.

I’ve ordered this twice now, and the color did not vary, the handle was turquoise both times.

You just don’t realize how flimsy and lame the plastic ones are until you can hack away mercilessly with a real one. This was actually the best thing about it – you can just go to work without having to be sensitive to the flex and fragility of the plastic scoop.

By reading amazon reviews, I found that another metal scoop has metal for the business end, but the metal only goes up into the plastic handle about an inch! Not this one. This one has a metal handle, and only the last inch, where the hole for hanging it on an hook is, is not metal tube, but just soft grip. My only complaint* about this one is that the handle is parallel to a tangent on the lowest point of the scoop, there’s no angle to it, like the plastic one has. You could, theoretically, bump your knuckles into the litter while working with this. In fact, I have once or twice, but it doesn't bother me.
 

Attachments

  • scoop 1.jpg
    scoop 1.jpg
    144.8 KB · Views: 31
Last edited:

NKlamerus

Well-known member
Joined
Feb 3, 2014
Messages
1,381
Location
Springfield, Or. (From Florida)
Oh man. I use to use those plastic versions to scoop shrimp and live bait out of 5 gallon buckets.

We stored our boat on the side of the house where leaves would work their way to the bilge. So a kitty litter scoop was a perfect removal tool.

But more often than not, we forgot a bait net......so the scoop did the job.

Also, they should advertise those nice scoopers as "full tang" lol
 
OP
S

Squankum

Well-known member
Joined
Mar 28, 2011
Messages
7,903
Location
Southeast
And now for a quick defense of cheap, plastic things like that scoop. Hey, it's cheap! That allows people who otherwise weren't going to buy one to have one. I'm not against that. What I'm against is when mass produced/ever-more-decontented stuff takes over the market, to the point that the Good Stuff Co. can't stay in business anymore, and you no longer have the option of Good Stuff. (For example, plastic cat scoops are almost the entire retail market.)

I'm not necesssarily blaming Ebule Corporations here; the customers have a part in it, too.

Concrete example, or more specifically, a chrome-moly example, just ordered a set of impact hex bits, metric, 1/2" drive. I'm sure they're made in Taiwan. On a quality/price ratio, I bet they're going to be great. I was digging through my big (and I mean, big) amazon wish list looking for something else to crack the $35 mark so I could hit free shipping, and, oh yeah! That's what I had in mind for those Ford 4.6L block drain plugs! Only an hour or two later did the little voice in my head (the smart one) say, "Hey, Chris, while I was napping, did you forget to check Harry J. Epstein's first for a US-made set?"

So I checked. It's a question of spending $45ish vs. $80ish. And at that price point, I might not have done it.

Similarly, NKlam's household, if it had to sink $25 into cat litter scoops, probably wasn't going to have a second one around to be tossed towards boat leaf duty. (I'm not saying you're poor, just saying, $25 vs. $6 affects these decisions for most people.)

So, I'm no saint. But I also have learned in recent years, Taiwanese tools are not junk.

So in the good old days, all the goods were durable (well, we'd like to think) but people didn't have much stuff. Nowadays, we have lots of stuff, but a lot of it is disposable.
 
Last edited:
OP
S

Squankum

Well-known member
Joined
Mar 28, 2011
Messages
7,903
Location
Southeast
My loyal readers may remember me talking about John Muir Press publications and their "How to Keep your VW Alive" shop manuals. http://www.garagejournal.com/forum/showpost.php?p=4467889&postcount=357

I fell in love with the illustrations in those books; they were done by Peter Aschwanden.

I also used to use the manual for early Honda cars (CVCC era) back in the 80's, and I recently got this book for my collection. Here's a drawing I remembered well: all the animals running off with the contents of a toolbox.

My favorite is the frog with the tire pressure gauge and combination wrench.
 

Attachments

  • image.jpg
    image.jpg
    142.2 KB · Views: 73
Last edited:
To avoid these ads, REGISTER NOW!
OP
S

Squankum

Well-known member
Joined
Mar 28, 2011
Messages
7,903
Location
Southeast
Recent fun in the underground lair: Front sway bar bushings on the Ford van. This E-150, a 2003, is from the period where the sway bars poked through holes in the twin I-beams. A very direct method. Unfortunately, the factory bushings wear out and there winds up being a lot of daylight in the hole. Nobody likes a sloppy hole.

I was herding the van down the highway a month ago when it came to me, that “chuggle” kind of subtle noise I had been hearing from the LF corner when riding around town with the window down, why it might be the sway bar bushings I knew weren’t great, and that that also meant that driving down the highway, minor steering corrections were being done without the front sway bar engaging… at first. Slop on each bushing meant a period of delay before the front sway bar helped out – which mean the front roll resistance was lower, but rear roll resistance stayed where it was, meaning less understeer/more oversteer.

Or “loose” in NASCAR terminology.


Not all oversteer is tail-out drifty yee haw stuff. It’s just a term referring to how much rotation you get for a given amount of steering input, and in real life, especially herding a giant Blunderpig down the highway, yes, give me boring understeer, please. OK, technically, I may have moved the van from "less understeer" to "more understeer." And only in a specific situation -- but one that the van spends most of its time in.

I had trouble getting the stock bushings out last weekend. They’re bonded into metal sleeves, and the metal sleeves must come out of the I-beams, too. My first attempts involved a 5/8” bolt and washers and sections of pipe and whatnot, as I was following this guy’s method:

http://www.ford-trucks.com/forums/1192319-removing-i-beam-bushings.html

It didn’t do jack squat for me.

The bushing sleeves poke out the back of the I beam and you can look at them and see if you’ve made any progress pushing them forward. I never did. I rented a ball joint kit from the auto parts store, looking for a certain size sleeve to fit around the front of the bushing while I cranked the bolt/nut/washer combo. Didn’t have enough room for the big C clamp that comes in the ball joint kit. It was one of those situations where if you took everything apart further, like, say, shocks off, radius arms off, tie rod off, you’d have more room for other attempts.

So I gave up and reached for implements of destruction. There’s a lip in the metal sleeve so it can’t be pushed any further through the I-beam when they assemble these at the factory. I used an air chisel to lift up the lip on the metal sleeve. I could reach about two thirds of the perimeter with my air chisel, then I switched to a square tip punch for my air hammer and pushed the wreckage though easily through the hole, towards the rear. How did I ever live before my air compressor? I would have gone batty doing that with a hammer and chisel.

Installation was a breeze by comparison; I even used a large woodworking C clamp on one of them.

I-beam bushings:
Moog K80222 Sway Bar Link Bushing
http://amzn.com/B000QQXAH8

Bar-to-body bushings:
Moog K8690 Bushing Kit
http://amzn.com/B000C560AW

For $12.61 for the I-beam bushings, I'm happy. It didn't solve the "chuggle" noise I was hearing from the LF wheel with the window down. But it steers better now, like a normal understeering street car when making small corrections. And the ride got a little worse at low speeds, because there’s less front suspension independence, left to right. Oh well, that’s minor compared to weaving down the highway like so many E-150’s like to do.

I also replaced the bar-to-body bushings with some blue plasticky things that are the basic Moog part, because 148K mi/12 years/while I'm in there/fair price.

Oh, and one of the four ball joints that some guys replaced (not on my watch) not that long ago has worn out. They put in some brand that have zerk fittings… but not the right lower, where something else went in, presumably cheap shitte.

People! Moog ball joints are $24 on amazon! Why would you buy anything else?! So there are more projects in the future of this front end, and bigger, longer efforts than these bushings. (Although the bushings sure stymied me when I was tired and running out of time and orgone, the previous weekend.)
 
Last edited:
OP
S

Squankum

Well-known member
Joined
Mar 28, 2011
Messages
7,903
Location
Southeast
An OE bushing, with its lip chiseled, surrounded by the Moog Problem Solver type bushing. Moog will sell you a replica of the factory style bushing (steel sleeve, rubber) if you want, if you're entering your van in a concours d'elegance or racing it in a stock class.
 

Attachments

  • moog swaybar.jpg
    moog swaybar.jpg
    74 KB · Views: 53
Last edited:
OP
S

Squankum

Well-known member
Joined
Mar 28, 2011
Messages
7,903
Location
Southeast
The I-beam sway bar hole, free and clear and lubed up, waiting for me to cram something in it.
 

Attachments

  • i beam hole.jpg
    i beam hole.jpg
    134 KB · Views: 38
OP
S

Squankum

Well-known member
Joined
Mar 28, 2011
Messages
7,903
Location
Southeast
Huzzah! Success!

Also, made in USA. Moog isn't 100% that way, but they seem to make an effort.

Photo is with an iPhone 3GS. The secret to my success in these last two pics coming out so well is my putting down the LED headlamp and grabbing the 100W incandescent bulb drop light and positioning it properly. Lighting counts for so much!
 

Attachments

  • installed bushing.jpg
    installed bushing.jpg
    123.1 KB · Views: 50
Last edited:
OP
S

Squankum

Well-known member
Joined
Mar 28, 2011
Messages
7,903
Location
Southeast
Come see the violence inherent in the system!

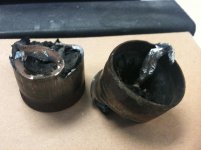
A better view of the Ford sway bar bushings, after the air chisel peeled their lips, then I pushed the wreckage through with a blunt tip, and the whole bushing pushed through, too.

It's fun to destroy things... in a skillful way. :thumbup:
 

Attachments

  • bushing 3.jpg
    bushing 3.jpg
    107.6 KB · Views: 40
  • bushing 2.jpg
    bushing 2.jpg
    116 KB · Views: 42
  • bushing 1.jpg
    bushing 1.jpg
    127.6 KB · Views: 42
Last edited:
OP
S

Squankum

Well-known member
Joined
Mar 28, 2011
Messages
7,903
Location
Southeast
My air fittings report. By Squankum.

When I got my air compressor, right as I was moving into the underground lair, I got into GJ at the same time, and learned about Milton. I’ve bought a lot of Milton bits since then. But recently, I was wondering, is there an easier-to-use coupler? Didn’t Griot’s used to sell something with a button on the side? I checked. Griot’s doesn’t sell it, they sell something Danish.

http://www.griotsgarage.com/product/increased+airflow+anti-jam+coupler+set.do

Meh. I read up on GJ and the kind I think they used to carry were these:

Prevost 1/4" Coupler High Flow Euro Style 1/4" NPT (PRVERC071201)
http://amzn.com/B00HX6YT4W
$21.40/ea

And some folks in GJ were very positive in their reviews, so I got one to try it out.

Yep, it’s pretty neat. Easy to stick tools into, and very easy to release, just "press a boot-un", as the Fab Four used to say.

It’s normal size, please do not misinterpret photo. It’s not 3 feet long and my hands aren’t giant, nor is this Senor Wences sucking on a Swedish marital aid. Also, please ignore my handwriting on the whiteboard, it’s hanging from strings and it wobbles!
 

Attachments

  • bluecoupler.jpg
    bluecoupler.jpg
    79.1 KB · Views: 43
OP
S

Squankum

Well-known member
Joined
Mar 28, 2011
Messages
7,903
Location
Southeast
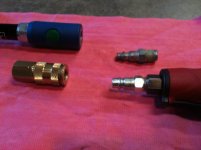
Now for the Gazintas.

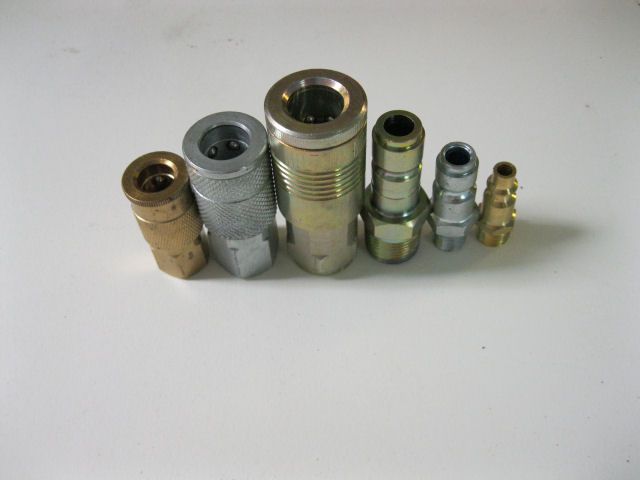
Top left corner, the Prevost coupler, lit murkily.

Lower left, the Milton fitting, which I had no problems with at all, but sometimes took more hand and brain to operate than the slick Prevost coupler.

Milton S-764 HI-Flo V-Style' A,M,V-Feet 1/4-Inch Brass Body
http://amzn.com/B0000AXC95
$7.71/ea

Top right fitting is a Campbell-Hausfeld barb I got somewhere long ago, presumably from Wal-Mart. I had it in my blow gun for many years, and when I upgraded to an air compressor... wait, are you wondering why I had an blow gun before I had an air compressor? Well, I also have a portable air tank... okay, back on track, when I upgraded to this compressor and Milton everything, I didn't swap this over, and a few years later, here we are, I didn't even realize I still had a C-H barb in the mix, until the day I tried to use it in the new Prevost coupler.

There is no Gazinta here. It goes in, but the air leaks out badly. So, Milton coupler is tolerant of the C-H barb, but the Prevost is not.

Bottom right, an Aircat tool o' mine with a Milton barb on it.

Milton S760-1 steel plug
http://amzn.com/B005IUEFMG
$4.52/pr

The Milton barb Gazinta the Prevost, no problem.


Now for the reason to buy all this fancy stuff, rather than C-H at Wal-Mart: inside diameter. Using my low tech diameter finder -- drill bits -- here are the results:

Campbell-Hausfeld normal kind: 3/16, or .187"
Milton barbs (aka plug), 17/64, 0r .265".

That's 40% more diameter. I just did the pi*r^2 for you folks, and the areas are 0.027 square inch vs. 0.055 square inch, aka double. Or, as some on GJ have put it, their air impact gun now runs like a raped ape.*


So, in conclusion, the Prevost is a luxury item, but you do use it every time you use an air tool, so there's that. Otherwise, I strongly endorse Miltony goodness.
 

Attachments

  • couplers.jpg
    couplers.jpg
    94.2 KB · Views: 33
Last edited:
OP
S

Squankum

Well-known member
Joined
Mar 28, 2011
Messages
7,903
Location
Southeast
And now, a brick in a washing machine:


Muscial accompaniment:


Same number, tight band, sloppy star. Jerry Lee's been into the corn squeezins!

_
 
Last edited:

Bob Heine

ALLIANCE MEMBER
Joined
Oct 24, 2009
Messages
10,709
Location
Boca Raton, Florida
I started with M-style couplers and plugs decades ago when that was all that was available from hardware and auto supply stores. Then I found the larger T-style couplers and plugs at Harbor Freight and upgraded all my 3/8" hoses when they went on clearance. Made up a few M-to-T adapters but didn't notice a huge difference in air tool performance.

When I upgraded the air system in the garage a couple of years ago, all the main lines were 1/2" so I used 1/2" G-style Milton couplers and plugs to connect/bypass the filter. These are the three styles of fittings, with the G-style in the middle:
Couplers-3sizes.jpg


Turns out the M- and T-style fittings flow the same 40 Cubic Feet per Minute (CFM). The G-style fittings flow 99 CFM so they are a big upgrade. At about $20 a set, and being gigantic, I didn't upgrade all the hoses.

That's when I found the V-style couplers and plugs. The couplers accept the old M-style plugs (without leaking) and the matched sets flow 74 CFM. The comparison is deceiving (M- V- and T- styles from left to right).
MVTCouplers_zps10fae0d7.jpg


The air coupler section of Milton's catalog compares all their fittings:

https://nebula.wsimg.com/4cadc9fd0e...F9A89657DD9338EBF&disposition=0&alloworigin=1

The M-V- and T-style fittings show a difference but not as dramatic as I expected. I suspect the difference in flow ratings is in the coupler's internal valve.
TvsVCoupler_zps0ae023ab.jpg

The valve on the T-style (left) has two large tangs to open the coupler when you connect the plug. That means all the airflow goes through the center slot. The valve on the V-stle (right) has one tang in the middle so the airflow goes through on both sides. Just a guess on my part.

I used the part numbers from the Milton catalog to find the best prices for these V-style fittings. I found good prices on V-style plugs ($0.88) at ToolSource:
http://www.toolsource.com/style-flow-brass-plug-male-p-106753.html

As long as you are thinking of upgrading your fittings, Zoro has decent prices on Flexzilla air hoses. I converted my air reels from 3/8" rubber hoses to 1.2" Flexzilla. I even got a few short pieces for the connections to the air system. The Flexzilla is much lighter and thinner-walled than the rubber hoses so they fit nicely.
A-C%20Fan%20Setup_zps3re5dwxn.jpg


The reel nearest the camera is a 25-foot and the reel on the back wall is a 50-foot. In my dotage I found plugging and unplugging multiple air tools annoying so I made up a 4-foot whip (stub, if you are googling) with a Harbor Freight triple coupler, with V-style couplers replacing the originals.
Flexzilla%20Stub_zpsyg0jetwk.jpg
 
OP
S

Squankum

Well-known member
Joined
Mar 28, 2011
Messages
7,903
Location
Southeast
Thanks for the full write up, Bob! :thumbup:

I have been wearing a cheap Timex for about ten years now, heh heh. For years I was buying an $18 Casio digital watch every three or four years, until they just got too beat up or died. Then I "splurged" and got a $39 Timex Ironman and my gosh, the step up in quality and durabiltiy has been great! I've changed a velcro band here and there, and a battery every couple of years. It has been rock solid. I'm sure Casio has something that might tempt me, but the day I was shopping at Wal-Mart, this was the least-giant option in a durable digital watch.

Here's the full Milton catalog, kids:
https://www.miltonindustries.com/milton-catalog-index.html

I have something Flexzilla-ish in my Sears CMan overhead hose reel. It came loaded with 50 feet of that stuff. I thought I might reload the reel with the ol' heavy Goodyear red hose, out of curmudgeonliness, but I gave it a try and I've had no problems with the red flexy modern stuff. Do loops of it on the floor lay perfectly flat? Nope. Gotta watch your step sometimes, or arrange it well, but that's it.

I'm content with my airflow volume for now. If I ever wind up going after a giant nut that requires real power, yeah, I'll start pondering larger diameter stuff, and, maybe just run a separate basic setup direct from the ******** on the side of my tank.
 
Last edited:
OP
S

Squankum

Well-known member
Joined
Mar 28, 2011
Messages
7,903
Location
Southeast
And now for another installment of Cooking With Squankum.

First, let me state my theory: restaurant pizza that you like, if you freeze it and then reheat it in an oven or toaster oven, is even better the next time around. I do not know why, but it is.

I invented this method for dealing with leftover pieces. The missus had been stacking them together in a wad then putting them in a one-gallon Ziploc bag and putting them in the freezer. Days later, I'd have a chore on my hands, having to separate one slice from another, and dealing with bends, too, hoping to thaw things out before prying the wad apart, etc etc.

So I started putting a piece of cardboard into the 1g Ziploc with them, and placing the slices on that cardboard. Two or three per side. This is the last of 3 pieces this leftover bag had. As you, the careful observer, have deduced, I used some cardboard from the pizza box. I like to cut it with my new Swedish cheap knife, but that's just me.

Frozen pieces come out indivdually and flat this way.
 

Attachments

  • image.jpg
    image.jpg
    141.4 KB · Views: 61
Last edited:
OP
S

Squankum

Well-known member
Joined
Mar 28, 2011
Messages
7,903
Location
Southeast
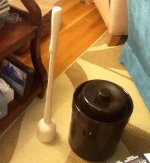
These came in the mail from Ohio the other day. The wooden thing on the left is made out of poplar. Either somebody has appointed me King of Holland, or it's for mashing sauerkraut.

The ceramic crock, as best I can tell, comes from Germany. (And hooray for that, do you want your food to sit for three or four weeks in something made in a hurry in China?)

There's a trough in the top that holds water, the lid then sits down in that moat, and the cabbage fermentation inside can push out excess gas through the moat water, but otherwise, it's sealed.

Hasn't been used yet. Its time is coming soon, though.

https://www.lehmans.com/


_
 

Attachments

  • image.jpg
    image.jpg
    58.3 KB · Views: 33
Last edited:
OP
S

Squankum

Well-known member
Joined
Mar 28, 2011
Messages
7,903
Location
Southeast
I have opinions about camping that I'm not posting over at Jack Olsen's 12 Gauge Garage.

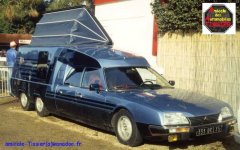
I've got nothing against Citroens or Citroen CX's, but only in the past year did I find out that they made dually... well, dual rear axle... cargo models and that RV's had been put on them. Here's one example:
 

Attachments

  • image.jpg
    image.jpg
    92.2 KB · Views: 54
Last edited:
OP
S

Squankum

Well-known member
Joined
Mar 28, 2011
Messages
7,903
Location
Southeast
Because I'm making an effort to not clutter up Jack Olsen's thread, where he's hashing out design details for a small trailer camper he wants to buiild, I didn't post that goofy French camper above as a suggestion.

While I went searching for pics of old CX duallys, I discovered this more modern Citroen, a C6 apparently, and.... oh my.
 

Attachments

  • image.jpg
    image.jpg
    74.2 KB · Views: 43
Last edited:
OP
S

Squankum

Well-known member
Joined
Mar 28, 2011
Messages
7,903
Location
Southeast
Yes... oh my. I'm not sure if George Takei would want to ride on top of that or inside it.
 

Attachments

  • image.jpg
    image.jpg
    136 KB · Views: 39
OP
S

Squankum

Well-known member
Joined
Mar 28, 2011
Messages
7,903
Location
Southeast
Don't take it to the music festival, people will line up outside it wanting to go to the bathroom.

This is what happens in a nation where Econoline chassis and 1/2 ton trucks aren't sold by the hundreds of thousands every year! Plus, wine, I guess. Or something.
 

Attachments

  • image.jpg
    image.jpg
    89.8 KB · Views: 34
Last edited:
To avoid these ads, REGISTER NOW!
Top Bottom