To avoid these ads, REGISTER NOW!

Above 1200 Sq/FT Bald is Beautiful - 7k sq feet+ of Gruntledness

Wokspaces above 1200 squarefeet.
OP
T

tig

Well-known member
Joined
Feb 7, 2011
Messages
1,051
Location
Durango, CO
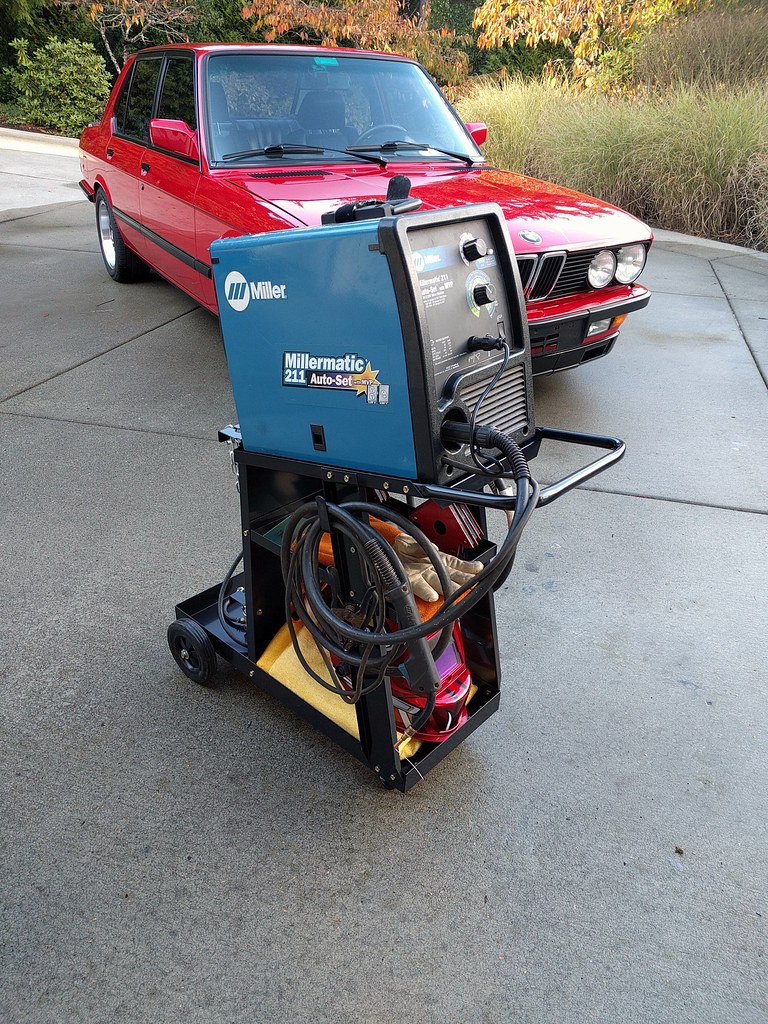
Happened to wander into a pawn shop last weekend.

Saw this:


The were asking $899. It has everything that came with it but the manual and 120v power plug adapter. It does have the 230v power plug.

Got them down to $720. Cash back guarantee w/in 7 days...

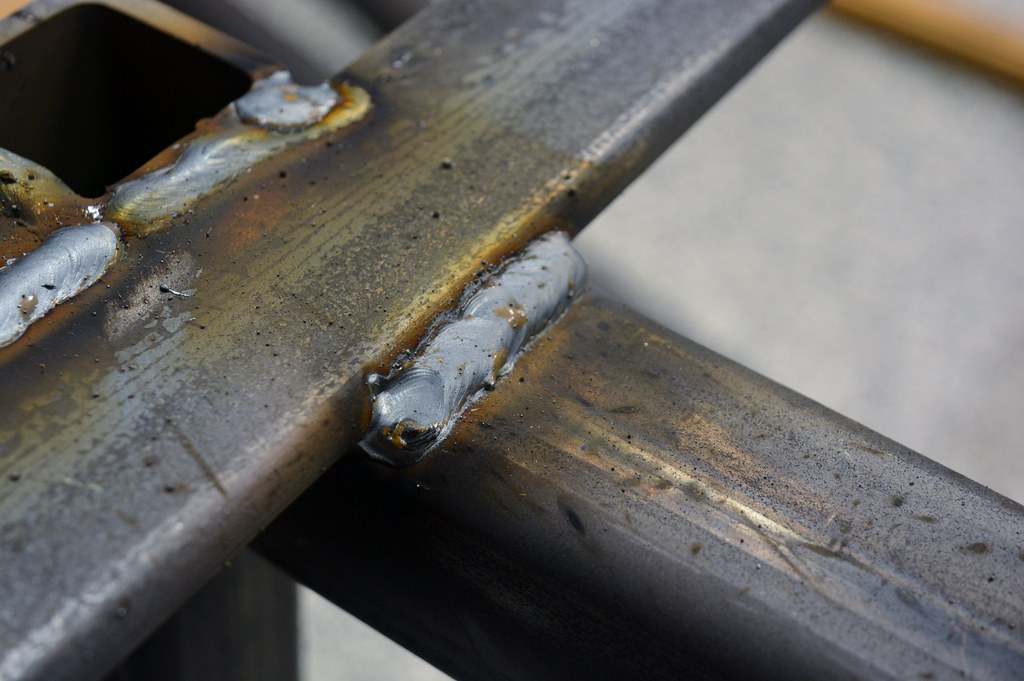
Took it home and verified the wire fed smoothly and it made a spark. Yay.

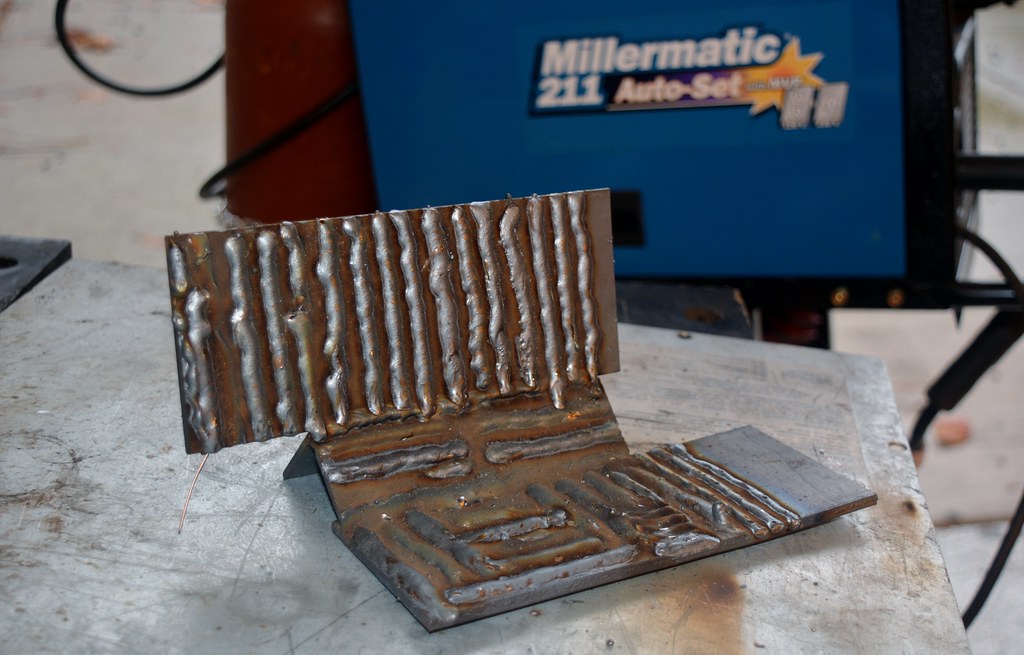
Amazon Prime Sunday Delivery is da' bomb.

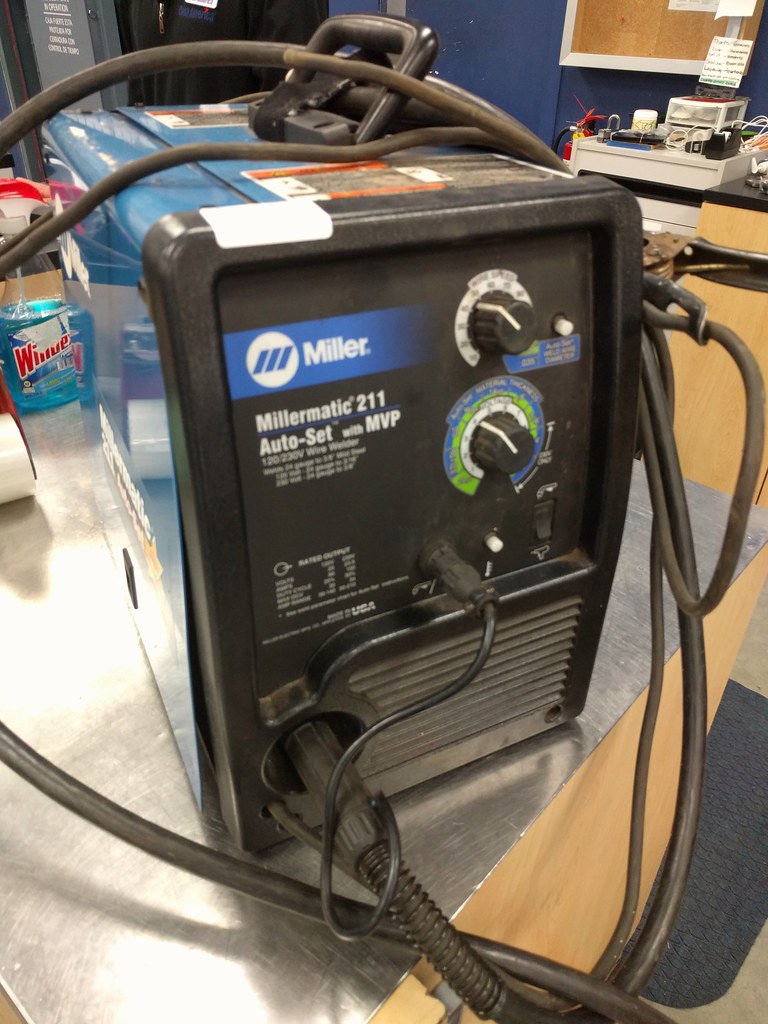
This arrived at about 1:30pm Sunday:

https://www.amazon.com/gp/product/B00440DVE4/?tag=atomicindus08-20

Assembly took about 45 minutes.


Also got new tips and nozzles from Amazon.

Going to get some gas today.

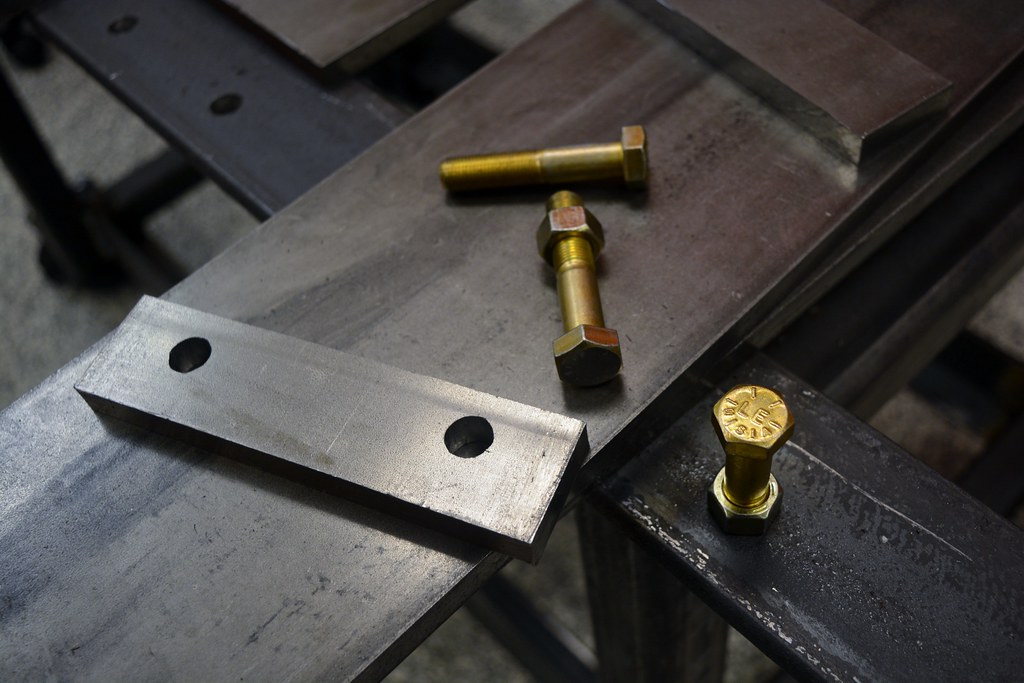
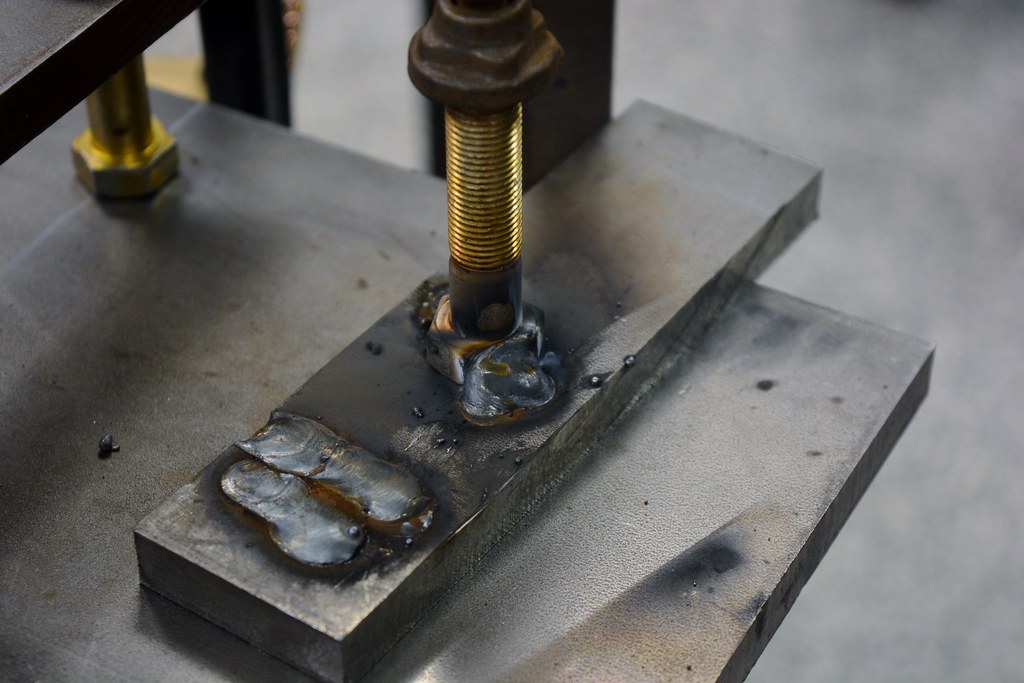
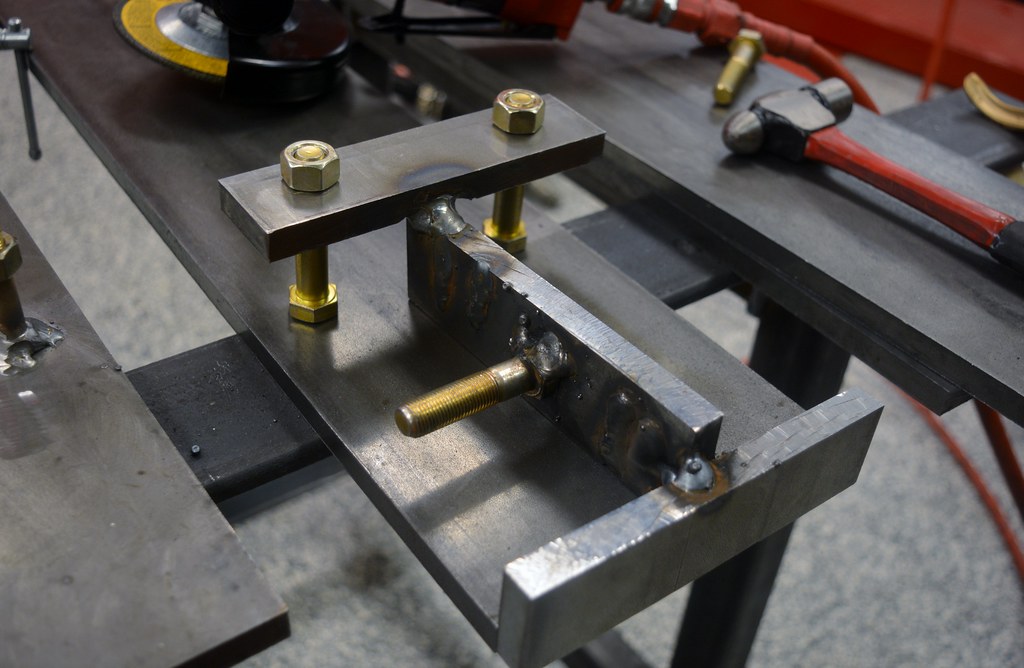
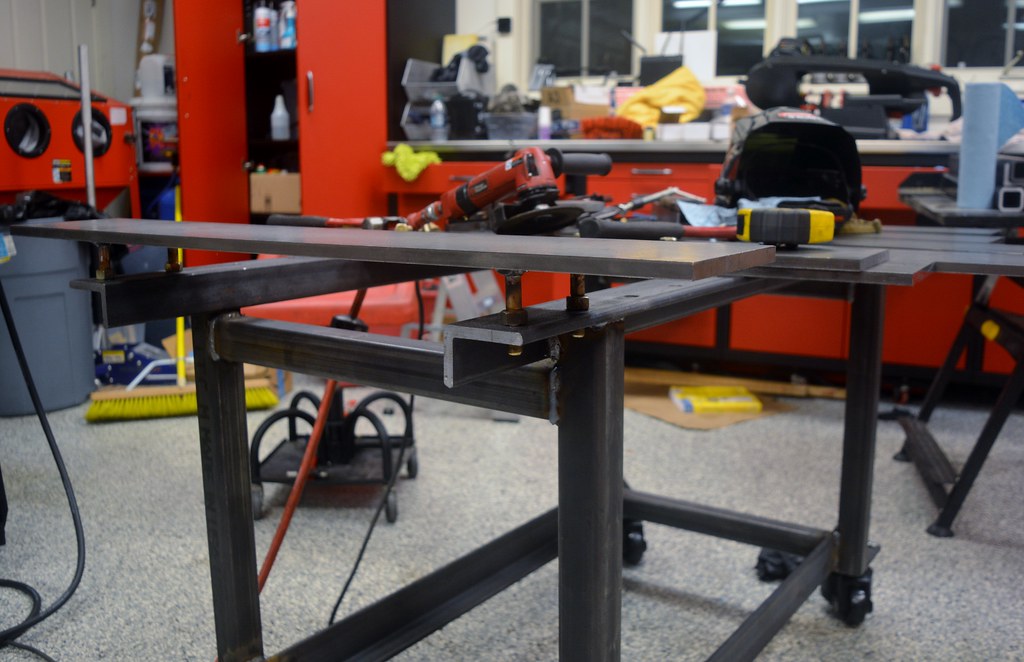
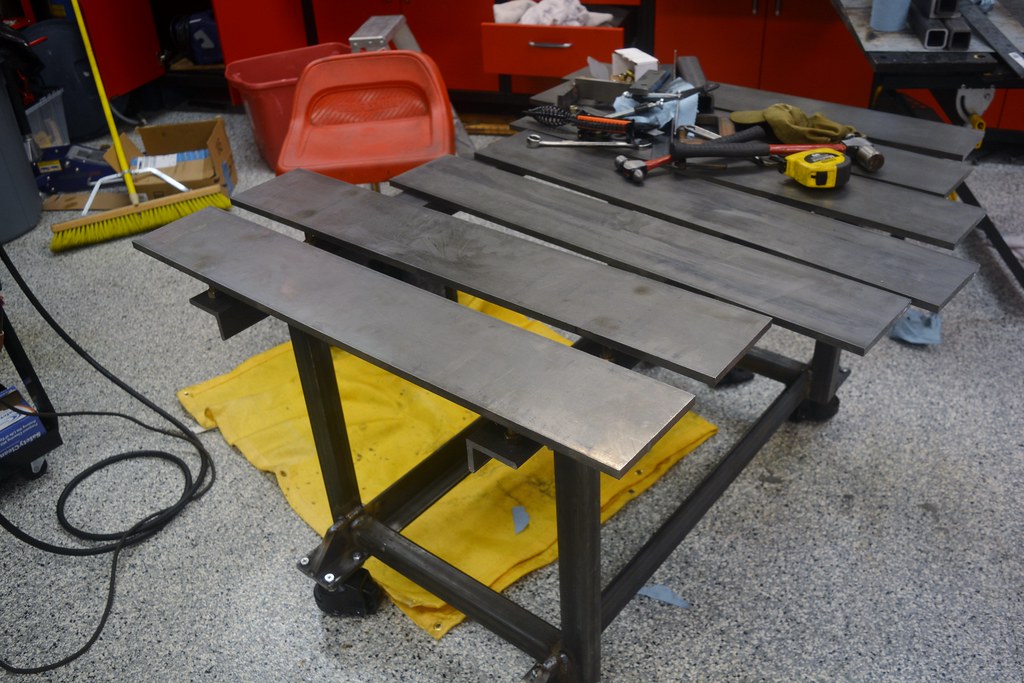
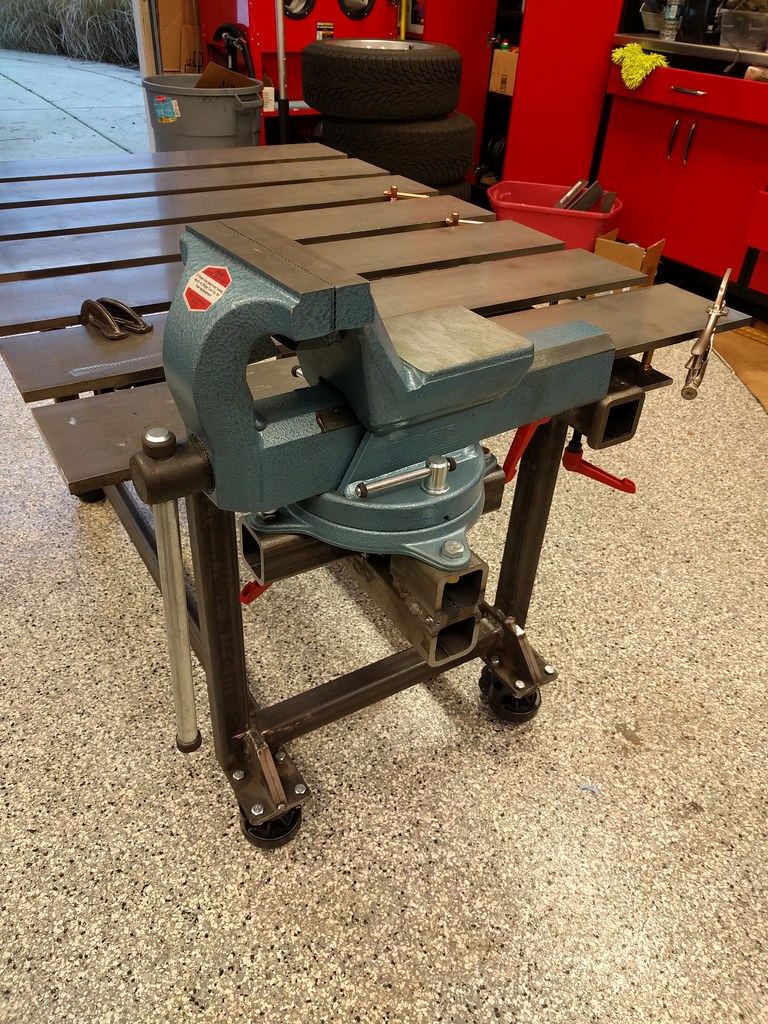
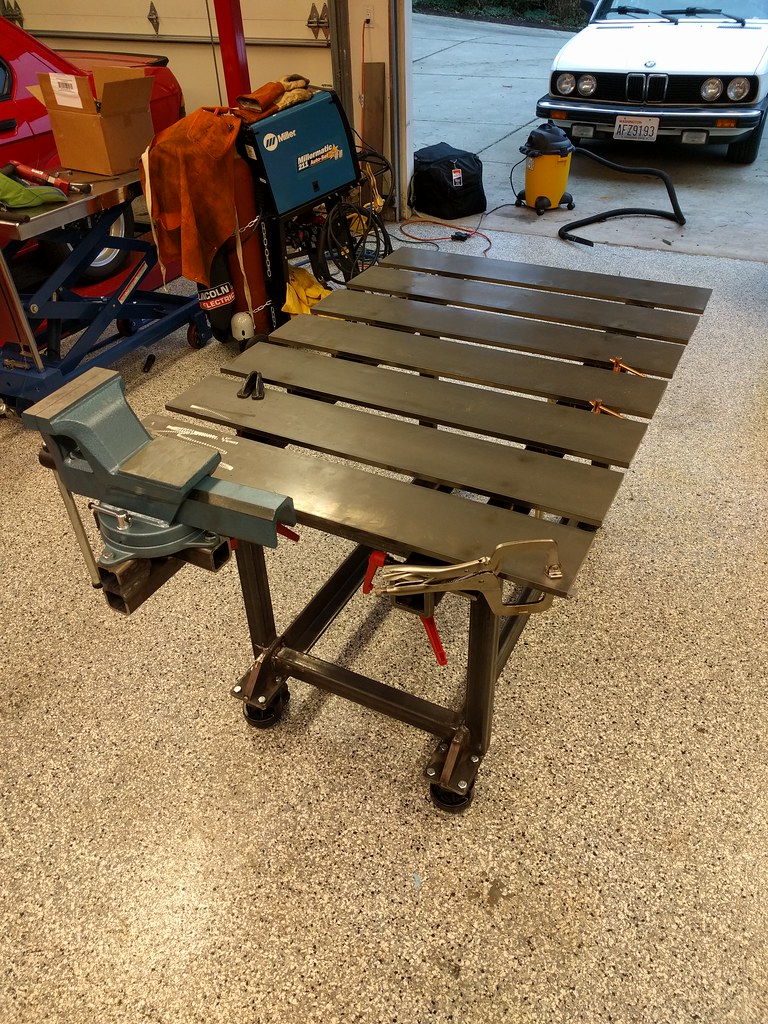
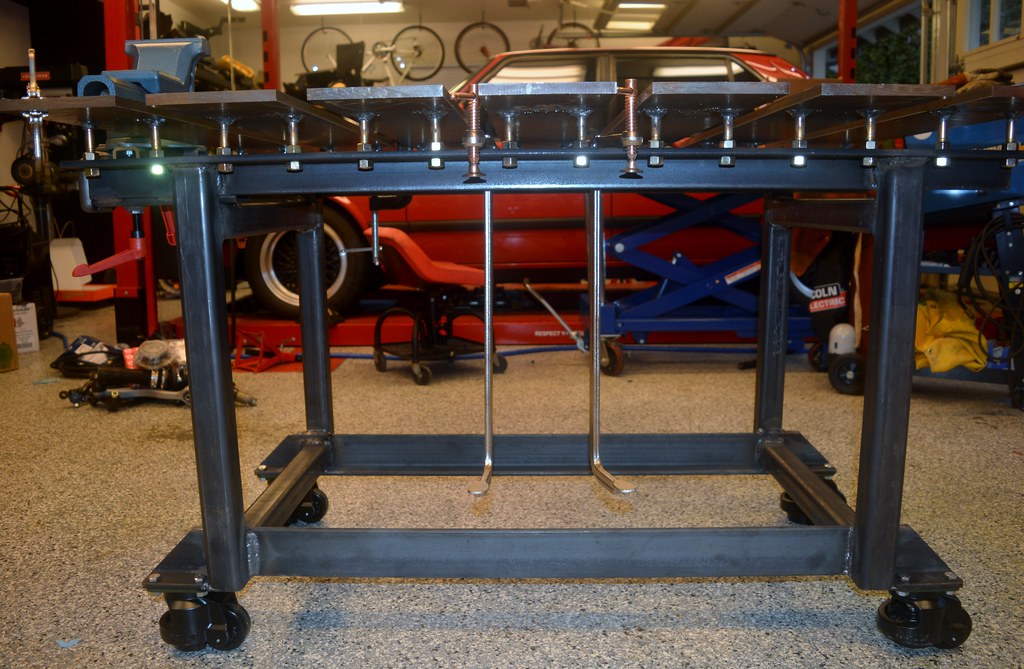
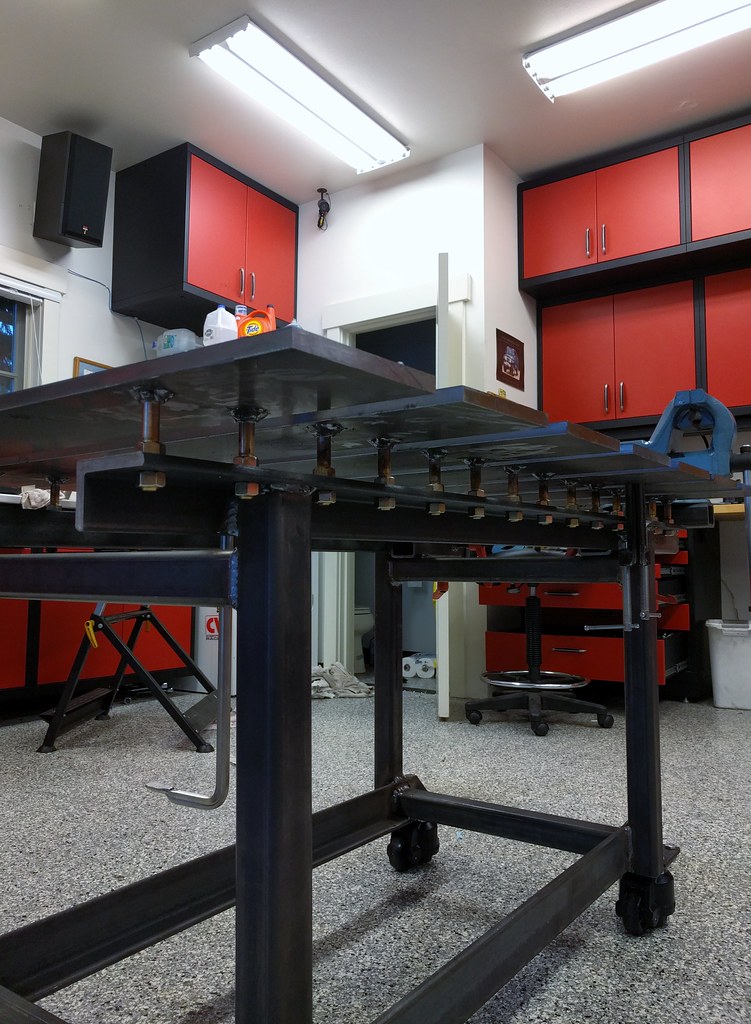
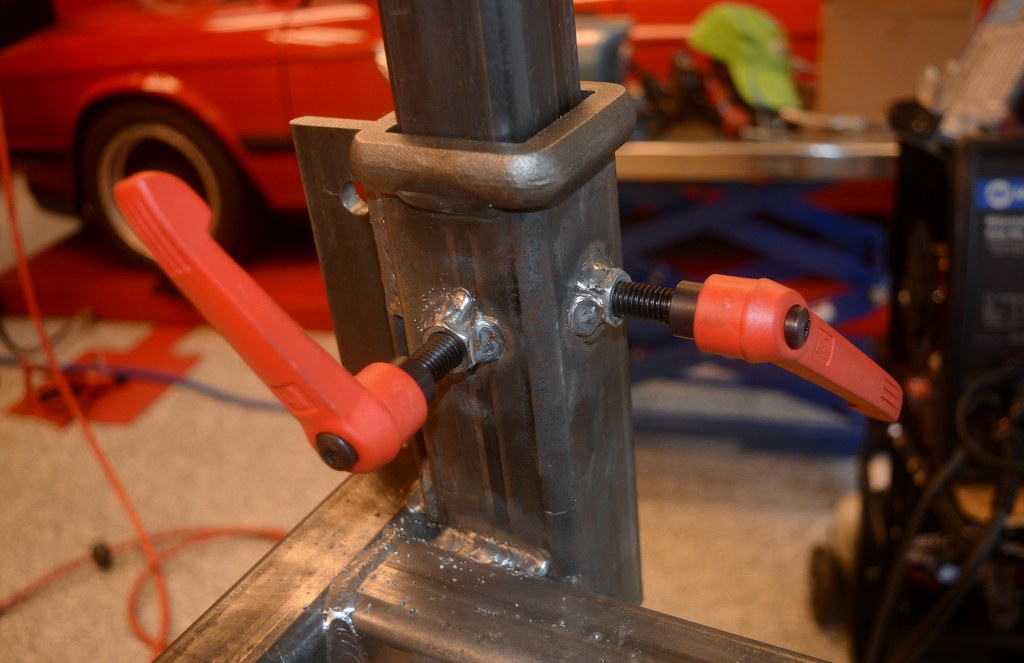
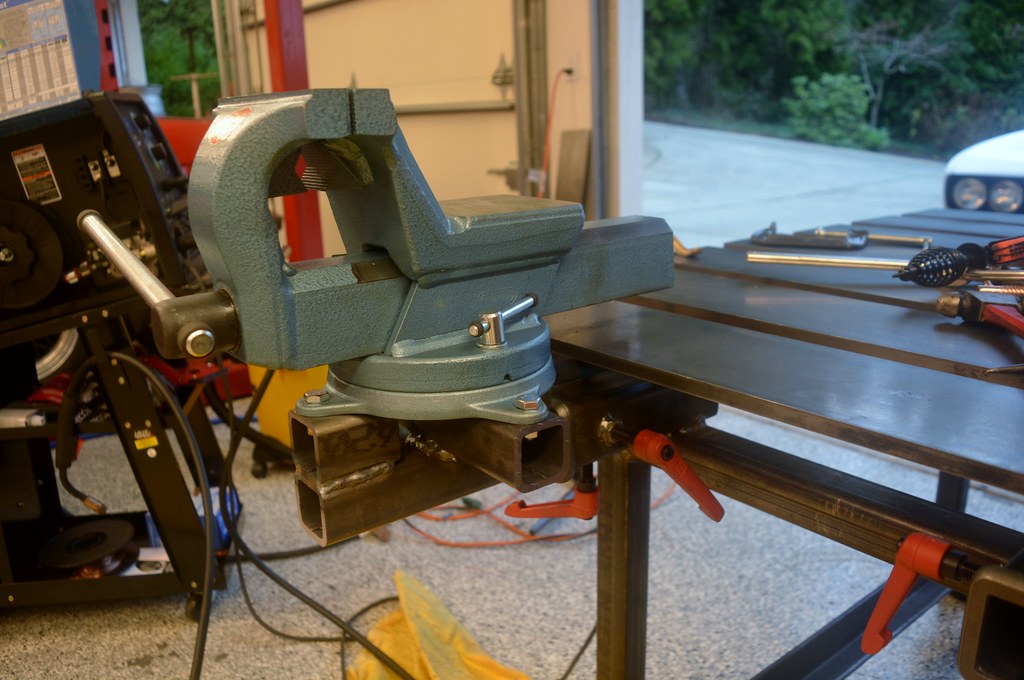
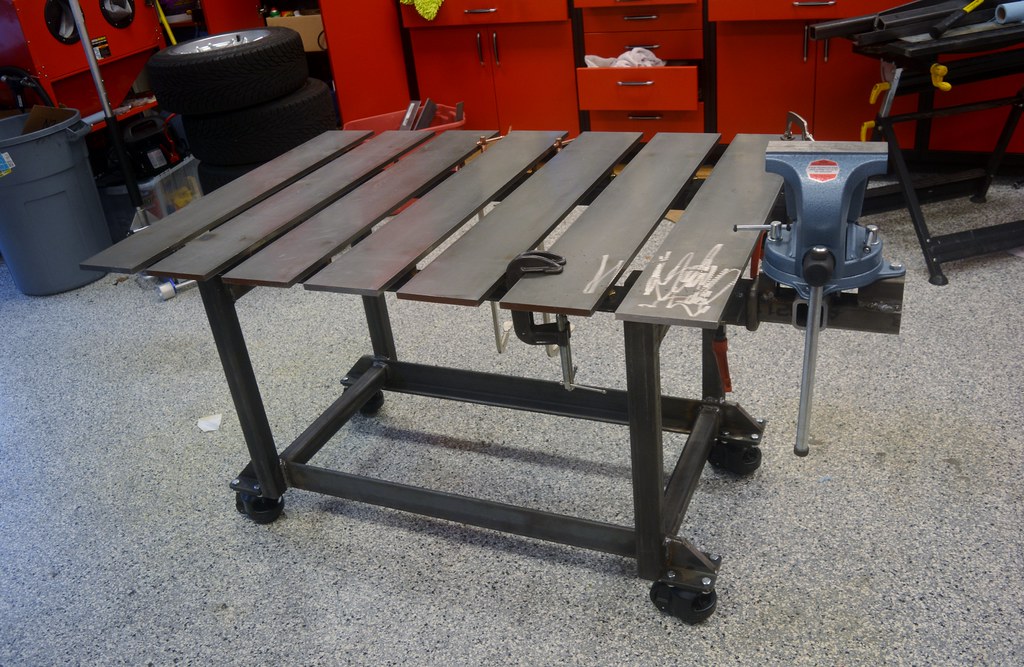
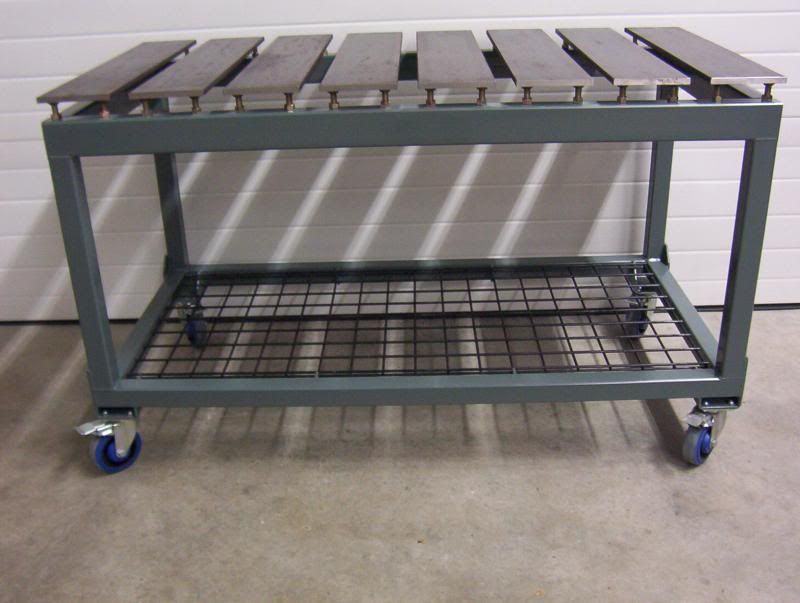
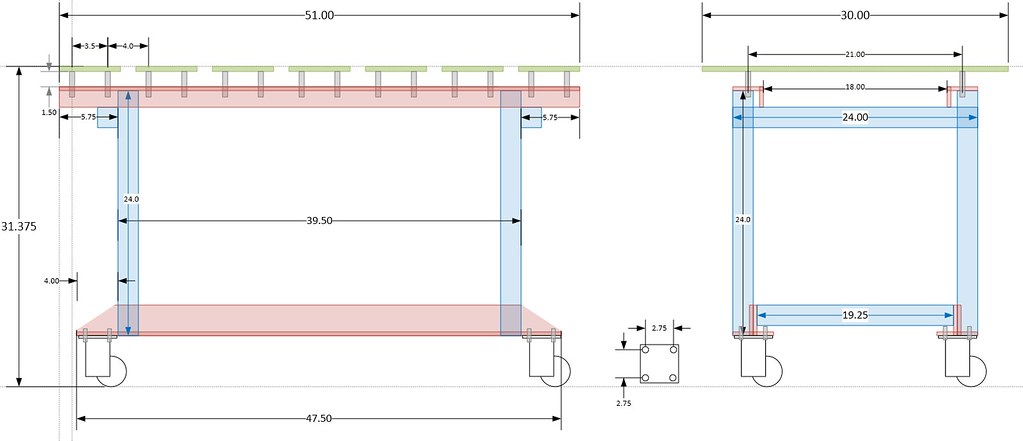
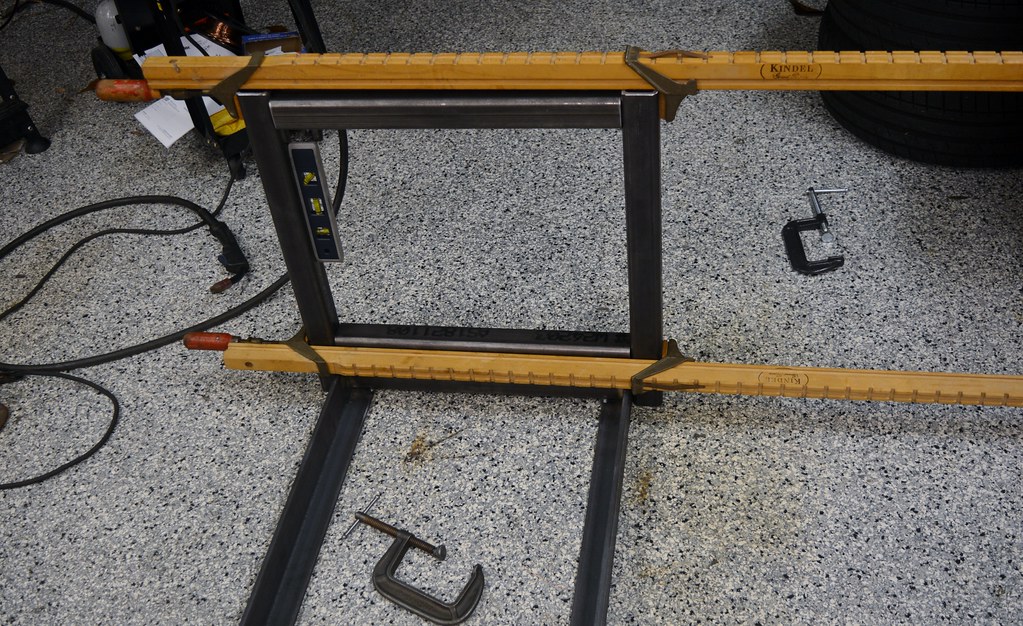
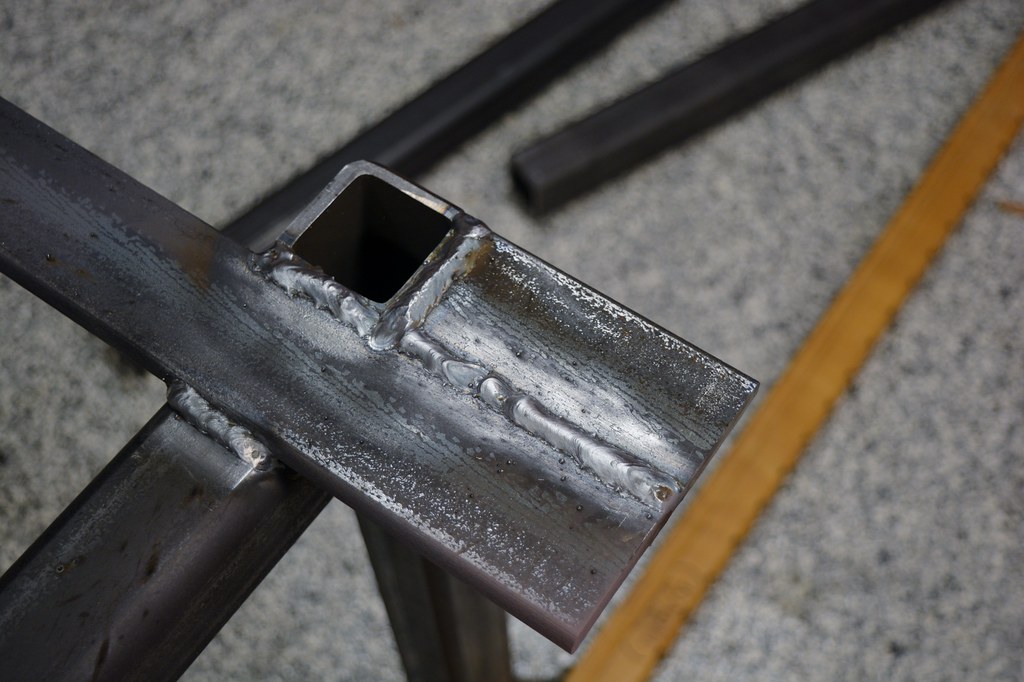
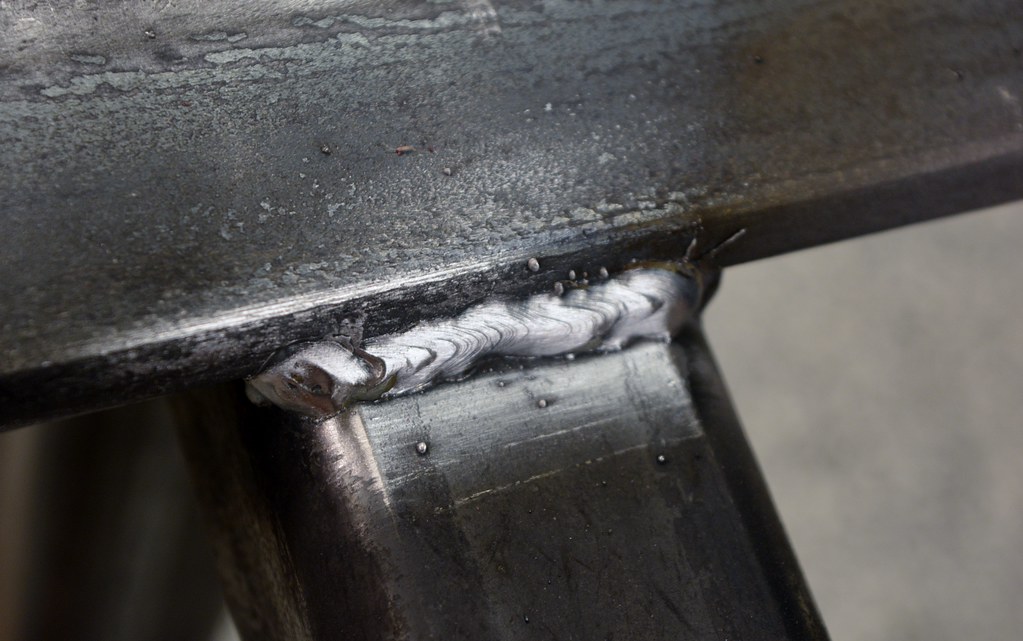
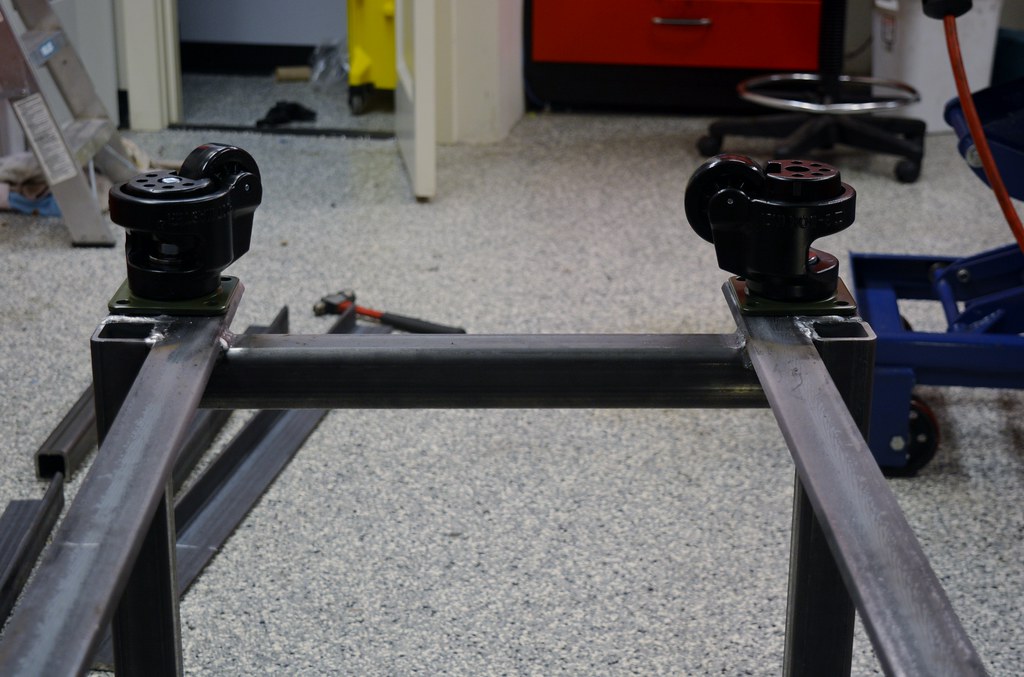
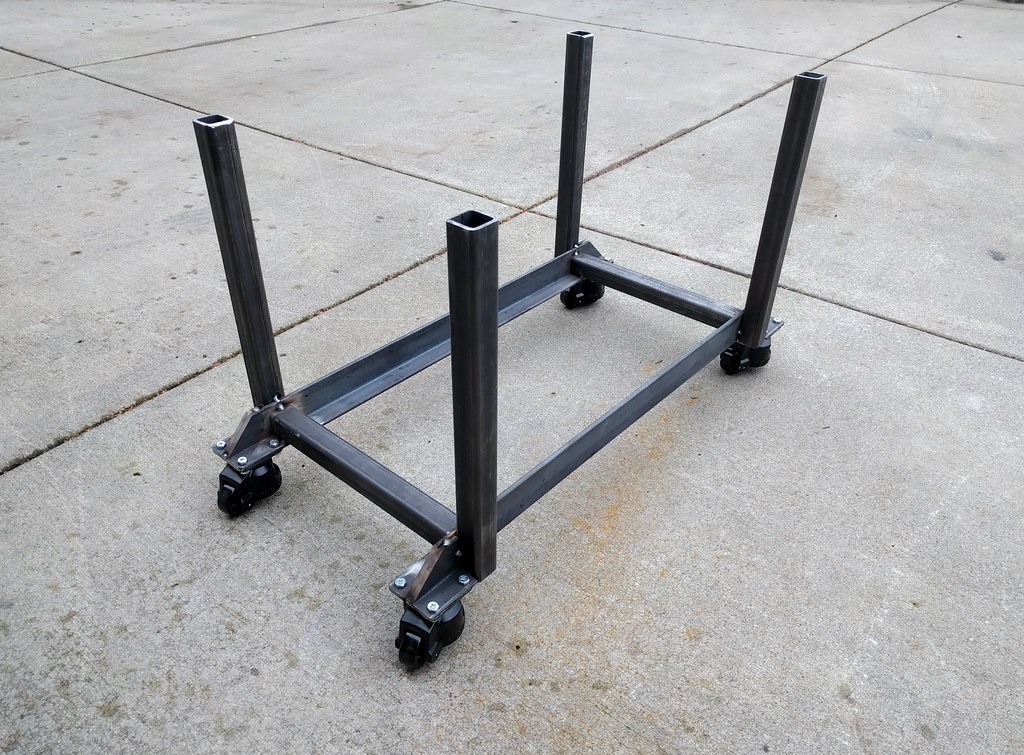
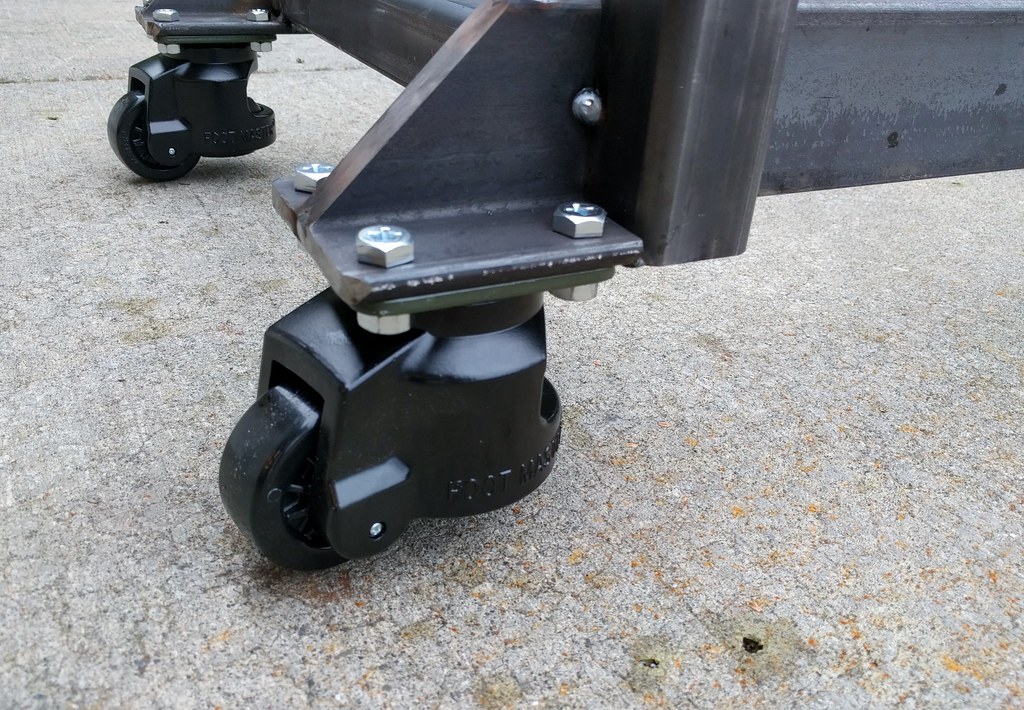
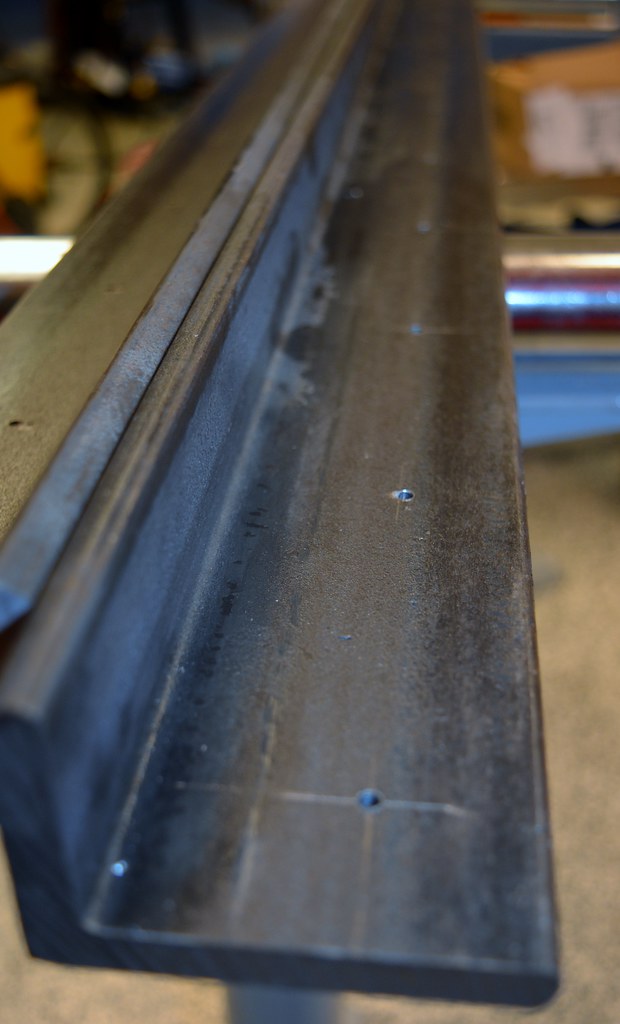
400lbs of steel will be delivered today too...first project will be a welding table that hopefully will end up looking something like this:

 
To avoid these ads, REGISTER NOW!
OP
T

tig

Well-known member
Joined
Feb 7, 2011
Messages
1,051
Location
Durango, CO
Nice score. No Bimmer updates?

Oops. Yep:

Maytag's suspension is shot. I've deferred everything except the dogbones and it's clear all the rubber bits including the UCABs and subframe bushings are done, done, done. It all seemed to go south pretty quickly, pretty recently. Never had any shimmy before. Only slight 'oh-****-the-rear-end-is-floating' from the subframe bushings. But recently the car actually feels almost unsafe.

I also have been itching to play with some coil-overs; just so I'd know what they were all about. I bought a lightly used set of BC Racing off a member a while back and they've been sitting.

I had the old subframe from Vlad (it was replaced by one I bought from spen) and another off the turbo car part out. I put IE adjustable (posilock) camber/toe kits on both, just as I did on the one that went on Vlad. One is for Maytag and the other for the Blue car project.

Over the past months I've removed all the bushings and bearings from these and the TAa whenever I had wrench time. What a PITA.


I've ordered Moosehead UCABS, E31 LCAs, and all the other necessary replacement bits for Maytag (i had a fair number of parts already for the Blue car).

Ready for powder coater...


(The second set of TAs are for the blue car...yes, that project is moving forward...slowly).

Getting everything organized before surgery.


Not shown are new bearings (remembered them after I took the photo) and brakes (on car).

Before...


You can see how worn the TA bushings are:


Starting at rear. Plan is to complete it first then move to front.


Before:


After:


Now awaiting some bushings to be installed in the new rear trailing arms.
 

Boosted1

Well-known member
Joined
Nov 25, 2007
Messages
1,676
Location
Georgetown, KY
Maytag will drive like a new car.
Nice work on the clean up too. Looks really good. You will like have that welder.
I don't weld a lot, but when you need to it is really handy to have.
 
OP
T

tig

Well-known member
Joined
Feb 7, 2011
Messages
1,051
Location
Durango, CO
Got her up and running. 75/25 with .30 wire. Works wonderfully.


So much easier than the stick welder!
 

56vette461

Well-known member
Joined
Jan 13, 2013
Messages
491
Location
Northern California
Tig,

Your gonna love the miller 211. I have had mine since they were introduced. I have used it on several different projects and it just keeps on performing great.
 

smschriefer

Well-known member
Joined
May 28, 2009
Messages
841
Location
Yorktown, VA
You have no idea how excited I get when I see Bald is beautiful at the top of my subscriptions list with a nice bold font indicating unread posts. You've made me lust even more for E28s than I already did. I look forward to the next installment covering Matag. You can even throw in pics of Vlad and the new blue car if you like. Heck, more pics of your 911 works too!
 
OP
T

tig

Well-known member
Joined
Feb 7, 2011
Messages
1,051
Location
Durango, CO
You have no idea how excited I get when I see Bald is beautiful at the top of my subscriptions list with a nice bold font indicating unread posts. You've made me lust even more for E28s than I already did. I look forward to the next installment covering Matag. You can even throw in pics of Vlad and the new blue car if you like. Heck, more pics of your 911 works too!

Even when I'm an idiot?

Laying it all out there. Full transparency. I have no shame. Or I should be ashamed.

I am an idiot.

First, after polishing the mating surface of the hub flange and then freezing them overnight I decided to try the hammer method of putting the hub in.

It worked great; it went in relatively easily and I felt good that I wasn't destroying the bearings. I got the axle flange on and everything tightened up.


Then I said to myself, let's look at the other side and make sure the brake lines line up and all that...

Then I said: "Charlie, you are a ******* idiot." Why? Because I had put the ******* dust-shields on the wrong side of the car!!!!!!!!!!!!!

I had my son helping me, and I'm going to blame the fact that I was so happy that he was with me that I was distracted.

This meant the hub flange I just pounded in had to come out. And this meant that my brand new bearing was going to get destroyed because you can't pull the bearings without destroying them.


One step forward, two steps back, or something like that.

Now to order another bearing from Blunt (he LOVES me). At least now I know how to do it with the TAs on the car!
 

smschriefer

Well-known member
Joined
May 28, 2009
Messages
841
Location
Yorktown, VA
Idiot? Nah, that's harsh. It is a lesson learned. A hard lesson, but one you won't forget, or we the readers will forget. Always double-check before committing to something you aren't familiar with.

I know I've done the same type of thing on some of my cars. My last error was installing new wheel bearings and forgetting to cut off the inner race of the old bearing that was still on the axle. It took me forever to tighten the nut and the moment I tried to spin the wheel and it was frozen, I knew exactly what my error was. It happens, we are human after all.
 
OP
T

tig

Well-known member
Joined
Feb 7, 2011
Messages
1,051
Location
Durango, CO
My last error was installing new wheel bearings and forgetting to cut off the inner race of the old bearing that was still on the axle. It took me forever to tighten the nut and the moment I tried to spin the wheel and it was frozen, I knew exactly what my error was. It happens, we are human after all.

I could totally see doing that! I didn't realize the inner race was even on the spindle initially, and wouldn't have unless I happened to read a thread online where someone described the procedure for removing them.

Now that i know, I don't think i'll ever make your mistake because I find getting them off to be oddly fun: Cut a groove in the race with the Dremel and then use a hard whack on a drift/chisel to cause the race to crack...they are pretty brittle. Quite satisfying.
 
OP
T

tig

Well-known member
Joined
Feb 7, 2011
Messages
1,051
Location
Durango, CO
Welding table time!

I have been collecting ideas from welding table-build threads for years. I finally settled on a design based on @AMCGuy's thread: http://www.garagejournal.com/forum/showthread.php?t=180145

His looks like this:
100_2232.jpg


In my case I decided to go with beefier steel (mostly because I was unsure of what to order and decided I'd be better with thicker than too thin). I'm also making mine slightly smaller (51" instead of 60", but still 30" deep and about 32" high). I also wanted more overhang so that I could maneuver around the table easier.

My materials:

Planks: 6" x 1/2" x 30" set 1.5" apart
Long-side horizontal pieces: 3" x 2" x 3/8" angle
Short-side horizontal pieces and legs: 2" x 2" x 1/2" square tube
Casters: Heavy Duty Leveling Casters from McMaster Carr. They look like this:

9008t45p1-e01el.png


The steel came last weekend and I've been practicing cutting and welding and dreaming of how the table would get laid out.


I finally got enough clarity in my head to start making drawings. I think I have it all figured out...

The design:


Green are the 6x1/2" planks.

Red are the 3x2" angle iron. Note the one for the top has the 3" side horizontal (where the bolts will go supporting the planks) and the bottom one has the 3" side vertical. The bottom one extends 4" past the legs and will be mated with a 4" section of 3x2" angle iron making a 4x4" base for each caster.

I'm mounting the short-side top horizontal member on the outside so it can serve as a receiver for tools. It will also support two 2.5" trailer hitch receivers facing out the short side (not in diagram).

Probably way more complicated (and stout) than I'll ever need, but the real point here is to have a real project to learn to weld with.

Tomorrow I'm gonna start cutting for realz!
 
Last edited:

Boosted1

Well-known member
Joined
Nov 25, 2007
Messages
1,676
Location
Georgetown, KY
That's going to be a nice table.
I've been considering that same FEMI saw. How do you like it?
Do you use the auto feed feature?
 

Bears Fan

Well-known member
Joined
Jan 26, 2012
Messages
3,437
Location
Indiana
I to have the Millermatic 211 and I love it :thumbup: No complaints and I have owned now for over two years. I really like the style of welding table you decided to go with, I will be watching to see how yours comes out. I went with a more traditional bench style welding table.

Tester%20001%20Custom_zpssxzzlpit.jpg
 
OP
T

tig

Well-known member
Joined
Feb 7, 2011
Messages
1,051
Location
Durango, CO
The Miller is great. Makes me feel like I sorta know what I'm doing.

I want your vise.
 
OP
T

tig

Well-known member
Joined
Feb 7, 2011
Messages
1,051
Location
Durango, CO
Slept on it (or not) and made some tweaks based on how I'll actually assemble things. I had some trickyness before that would have actually made it harder to get things aligned and even while welding. Now it's simpler.

The key was where I needed to **** the 2x2" tube into the inside of an angle-iron piece. before I just figured the inside radius of the angle-iron (where the bend occurs during mfg) would prevent me from butting the 2x2" right inside the corner. Then I realized I could easily just trim one edge of the 2x2" on the grinder and it would fit snug.

 
OP
T

tig

Well-known member
Joined
Feb 7, 2011
Messages
1,051
Location
Durango, CO
Except for the 6x1/2" planks, all steel is cut. I need to find a way to get it cut. Maybe I'll buy another tool :evil:


The base is tacked. Hoping to find some garage time after work this week...


Also shopping for a big vise. I've always wanted a Wilton, but man are they expensive!
 
Last edited:
OP
T

tig

Well-known member
Joined
Feb 7, 2011
Messages
1,051
Location
Durango, CO
Typo above. I accidentally wrote that my planks would be 6x1". They are 6x1/2" cold-rolled steel. Typos fixed.

Last night I made some progress.

Using trusty old furniture vises my dad absconded from the Kindel Furniture factory in the '70s.


One end went together very-straight with no drama. The vices held everything even as I made my strategically planned spot welds.

On the other end, no matter what I tried, I couldn't get the legs to be perfectly vertical with just the vises. I finally said eff-it and resorted to holding the metal with my hand as I laid down a few tack welds. Duh. As long as the vices were preventing gross movement, this enabled me to get as close to perfect as I think is possible. This is called learning by doing. I like it.

After assembling the base & legs I flipped what now actually resembles a table over to finalize the caster supports. I figured this stuff will all be hidden from view and thus would provide good opportunity for me to practice welding in anger with little chance of long-term visual embarrassment. I'll need to grind parts of these gap welds away so the caster scan sit flush, and I know that's going to be a PITA, but I also know I need to learn lessons the hard way.


For this 3/8" steel my Miller 211 is at max wirespeed & voltage. I tried messing with different settings to get amount of popping and splattering down, but in the end I just took it as a given that with hefty material like this it's not going to 'sound like bacon frying'. I had very little splatter, but a lot more sparks than when I was practicing at 1/4" and below.

I think was moving too slow here?


Looks good to me. But what do I know?


Casters:


I don't actually have any good grinding discs...so those are on order. I'll be using my pneumatic angle grinder... Once I get it so the casters are flush, I'll drill the holes, mount them up, and then turn the table back over. That way I can use the adjustable casters to get the table perfectly level (floor is sloped) for the rest.

Requisite Garage Pr0n shot:

 
To avoid these ads, REGISTER NOW!

fergus

Well-known member
Joined
Oct 4, 2009
Messages
1,620
Location
Yolo County CA
Slower wire speed will help with thicker material. Less wire speed = more heat since you're staying in one spot longer. Thicker metal needs more heat. For example, on my little Lincoln flux-core machine, for 1/4" material (the most it will handle) I turn the heat up all the way and the wire speed down to a 2 (out of 10).
 

Berwolf21

Member
Joined
Nov 26, 2016
Messages
7
Great thread, will definitely be using this thread for ideas for an upcoming build!

Some of those welds look like they didn't penetrate much. To practice cut some small pieces similar to the welds you need to do and then weld and cut them to check that settings and speed are getting you good welds.

Sent from my Pixel XL using Tapatalk
 
OP
T

tig

Well-known member
Joined
Feb 7, 2011
Messages
1,051
Location
Durango, CO
Progress.

Got my grinding wheels so was able to grind the caster bases. Drilled some holes and mounted them up.


They are awesome. Make it real easy to level the table.


Also drilled all the pilot holes for the plank bolts on the horizontal supports. Took my time figuring out the best way to measure and drill on the drill press. That 2nd hole looks like it's not centered, but it is..that was a mark from a previous measuring attempt. All holes are precisely 1.125" from edge...


Need at 16/32" or 9/16" bit which I don't have to finish this part...
 

Andrew S

Well-known member
Joined
Nov 16, 2011
Messages
67
Location
Central Washington
Tig,
Layout on angle iron such as you show here is commonly done from the square corner, and marked on what would be the bottom side of the flange in your last photo. The front edge where you measured from isn't as accurately formed in some cases. How accurate depends on the batch you happen to receive. I hope this helps you in the future.
Andrew
 
OP
T

tig

Well-known member
Joined
Feb 7, 2011
Messages
1,051
Location
Durango, CO
Tig,
Layout on angle iron such as you show here is commonly done from the square corner, and marked on what would be the bottom side of the flange in your last photo. The front edge where you measured from isn't as accurately formed in some cases. How accurate depends on the batch you happen to receive. I hope this helps you in the future.
Andrew

I actually guessed that was the case and verified that edge was true before hand. Thanks for calling this out though!
 
OP
T

tig

Well-known member
Joined
Feb 7, 2011
Messages
1,051
Location
Durango, CO
Been a long time since I drilled so many holes in something. And longer since it was 3/8" thick steel.

By my trusty old Craftsman drill press and a handy vise I had bought at HF a while back, made this job straight forward. Lots of oil and slow & steady...


Ta-da! The core table is done. Some of the welds actually look good too! Some not so good, but I'm confident they'll hold. I certainly am a better welder than when I started, but the inconsistency I showed as I was progressing shows I have a loooong way to go. :)


Now I get to wait until I can cut the planks. I have some 'accessorizing' to do as well.
 

smschriefer

Well-known member
Joined
May 28, 2009
Messages
841
Location
Yorktown, VA
Your new welding cart is coming along nicely and should be quite stout. Now that you have some downtime while you wait to cut the planks... how is Maytag progressing? Is the the surgery complete, or is Maytag still under anesthesia awaiting closure?
 
OP
T

tig

Well-known member
Joined
Feb 7, 2011
Messages
1,051
Location
Durango, CO
Your new welding cart is coming along nicely and should be quite stout. Now that you have some downtime while you wait to cut the planks... how is Maytag progressing? Is the the surgery complete, or is Maytag still under anesthesia awaiting closure?

This arrived:


Also got the replacement bearing. Blunt rules.

Hubs are assembled. All that's left is to install to have the rear done.

-shocks/coil-overs
-diff
-half-shafts
-exhaust


Balor

Well-known member
Joined
Feb 2, 2014
Messages
452
Location
Florida
Welding table time!

I have been collecting ideas from welding table-build threads for years. I finally settled on a design based on @AMCGuy's thread: http://www.garagejournal.com/forum/showthread.php?t=180145

His looks like this:
100_2232.jpg


In my case I decided to go with beefier steel (mostly because I was unsure of what to order and decided I'd be better with thicker than too thin). I'm also making mine slightly smaller (51" instead of 60", but still 30" deep and about 32" high). I also wanted more overhang so that I could maneuver around the table easier.

My materials:

Planks: 6" x 1/2" x 30" set 1.5" apart
Long-side horizontal pieces: 3" x 2" x 3/8" angle
Short-side horizontal pieces and legs: 2" x 2" x 1/2" square tube
Casters: Heavy Duty Leveling Casters from McMaster Carr. They look like this:

9008t45p1-e01el.png


The steel came last weekend and I've been practicing cutting and welding and dreaming of how the table would get laid out.


I finally got enough clarity in my head to start making drawings. I think I have it all figured out...

The design:


Green are the 6x1/2" planks.

Red are the 3x2" angle iron. Note the one for the top has the 3" side horizontal (where the bolts will go supporting the planks) and the bottom one has the 3" side vertical. The bottom one extends 4" past the legs and will be mated with a 4" section of 3x2" angle iron making a 4x4" base for each caster.

I'm mounting the short-side top horizontal member on the outside so it can serve as a receiver for tools. It will also support two 2.5" trailer hitch receivers facing out the short side (not in diagram).

Probably way more complicated (and stout) than I'll ever need, but the real point here is to have a real project to learn to weld with.

Tomorrow I'm gonna start cutting for realz!

Tig I might have missed it but could you tell me what program you used to sketch up this bench/table? Thanks. rngr1
 
OP
T

tig

Well-known member
Joined
Feb 7, 2011
Messages
1,051
Location
Durango, CO
To mount the planks I need to weld bolts to the bottom that line up with the holes in the 3x2" angle pieces in the top.

I knew this would be tedious and error prone. So I devised a way of making it "rinse & repeat". Step one is to use a piece of scrap from cutting the planks to length (36") which is the right width (6") and to drill two perfectly spaced holes with a 1/2" bit. I filed those holes to be JUST big enough for a bolt to fit through (the bolts are 1/2").


The lighting didn't capture it, but those two bolts lying there have had the raised lettering filed off, so they are flat on the top.

Next up was to get one end welded up. Here I marked the right depth and used the bar from above to place accurately.


Then I realized I better do some practice welding bolts before I did it in anger. After a few attempts I got the technique down (my first attempt was clearly too weak and I broke a spot-weld with a hammer strike easily). Subsequent trials proved I was getting plenty of penetration and no cold welds.


Using the partial jig above I got one end done:


With that, I built a full jig that indexes against the end of the plank:


Ta-da.


I've subsequently done a second plank and it all fit nicely... so I know the jig is accurate.


Now just to find some time to finish the other 5 planks...
 
OP
T

tig

Well-known member
Joined
Feb 7, 2011
Messages
1,051
Location
Durango, CO
Progress on Maytag this last weekend. Rear is all back together and she's on 4 wheels. Not derivable because i didn't bleed the brakes (and it's not aligned), but at least I could get it off the lift so I could put my wife's winter tires on.


OP
T

tig

Well-known member
Joined
Feb 7, 2011
Messages
1,051
Location
Durango, CO
I have officially completed my first real welding project. The welding table is DONE.


Some of my welds are actually respectable too.


I actually went in today and cut out a few welds that I butchered. In one case it was a totally cold weld that looked like lava. I now have the hang of it.


I bought two trailer hitch receivers for mounting tools, like my new vise. At McMaster Carr they sell these trick adjuster handles. Please don't laugh at my welds on the nuts. Not pretty, but I'm pretty sure they'll hold ;-)


Kinda fun building a mount for the Rigid vise my son got me for Christmas. You could say it was the first welding project I completed using the new welding table! I need to get some 1/2" bolts; the ones you see here are temporary.


Glorious!
 

stioc

Well-known member
Joined
May 2, 2005
Messages
1,317
Location
SoCal
Nice work on the welding table. Love your hydraulic lift cart; makes me want to get one of those things!
 
OP
T

tig

Well-known member
Joined
Feb 7, 2011
Messages
1,051
Location
Durango, CO
I don't weld and so don't know but why use planks for welding table?

Fine work and documentation - thanks for posting.

So you can clamp stuff. When welding, clamping is super important because metal likes to warp when it gets hot....
 
To avoid these ads, REGISTER NOW!
Top Bottom