To avoid these ads, REGISTER NOW!

Between 705 & 1200 SQ/FT Another Garage Build, 26 x 30 w/ future studio apartment above

Workspaces between 705 and 1200 squarefeet.

The Tool Tyrant

ALLIANCE MEMBER
Joined
Dec 19, 2011
Messages
2,182
Location
Bonita, Ca. (San Diego)
TF, I was thinking of having the jack stud on the stem wall would be better, then what I am calling a trimmer could be raised off the slab 1/4" to prevent moisture getting into it(In addition to putting flashing between the concrete and stud). I thought I would have the "trimmer" go down to slab just so I have wood to attach the door frame to. What do you think? I don't think me having 2 extra studs around the door frame will be an issue.

dii, transfering the load through the stem wall or slab is no difference, the pour is monolithic and the same footer is under the stem wall and door opening area.

Sometimes replying to posts is like playing 'musical chairs'...who gets there first!
Keith, ya, that's fine...either way. But as I stated, be sure to add to the length of the header!
 
To avoid these ads, REGISTER NOW!

tylerg1

Well-known member
Joined
Mar 28, 2014
Messages
173
Absolutely beautiful design, many of the same features I want to incorporate into a future garage at my house. I look forward to seeing the progress.

Thank you for sharing so much information so we can really see what you are doing!
I am in Hickory NC..


Subscribed!
 
OP
K

kasander

Well-known member
Joined
Jun 7, 2016
Messages
424
Location
Wilmington, NC
Thanks TF.

Now, I just need some plumbing answers so I can do that on Saturday and hopefully get it inspected Monday...
 
OP
K

kasander

Well-known member
Joined
Jun 7, 2016
Messages
424
Location
Wilmington, NC
For any CAD geeks, I have been working on modeling the garage in Autodesk Inventor. Yeah, I know it's not ideal, but it's what I have and know how to use. So, started creating 3D models and am getting a little carried away. I am thinking about having it 3D printed when I finish so I will have a scale model...

3d_framing1.png
 
OP
K

kasander

Well-known member
Joined
Jun 7, 2016
Messages
424
Location
Wilmington, NC
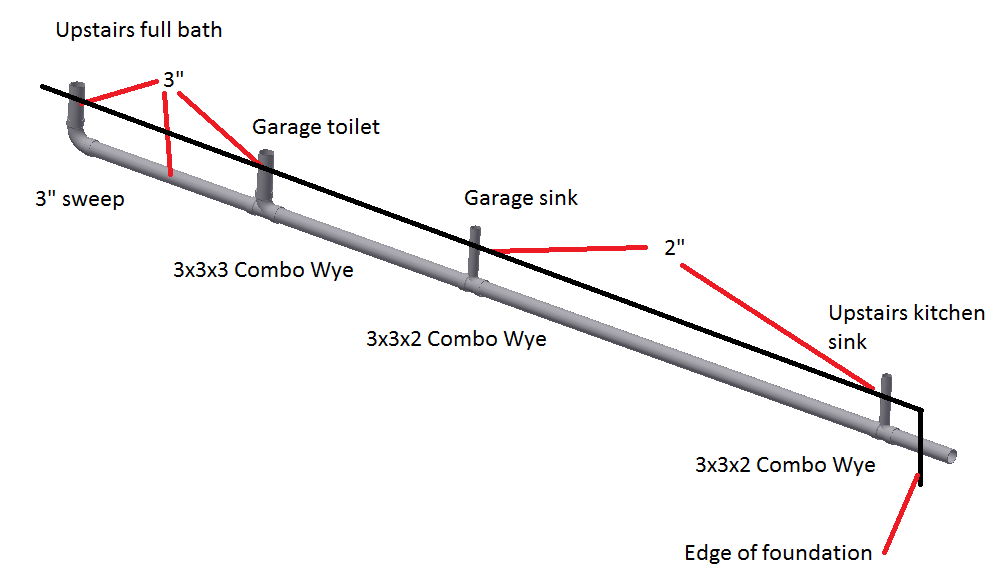
Hey guys, still need some plumbing advice so I can get this knocked out tomorrow. I will run 1" PEX water line into one of the walls, but still not sure on the drains.

Anyone see any issues with me putting this in the slab?

plumbing_3d_2.png
 

The Tool Tyrant

ALLIANCE MEMBER
Joined
Dec 19, 2011
Messages
2,182
Location
Bonita, Ca. (San Diego)
Hey guys, still need some plumbing advice so I can get this knocked out tomorrow. I will run 1" PEX water line into one of the walls, but still not sure on the drains.

Anyone see any issues with me putting this in the slab?

Sorry Keith, the only thing I learned from the plumbers on the jobsite was sh*t flows downhill and payday was on Friday. Can't help you out there pal.:dunno:
 

sunman76

Well-known member
Joined
Nov 15, 2010
Messages
48
Location
S.W. Oklahoma
I'm not a plumber but there is a code i think about how many and spacing for vents. Somebody that knows will post.
 
OP
K

kasander

Well-known member
Joined
Jun 7, 2016
Messages
424
Location
Wilmington, NC
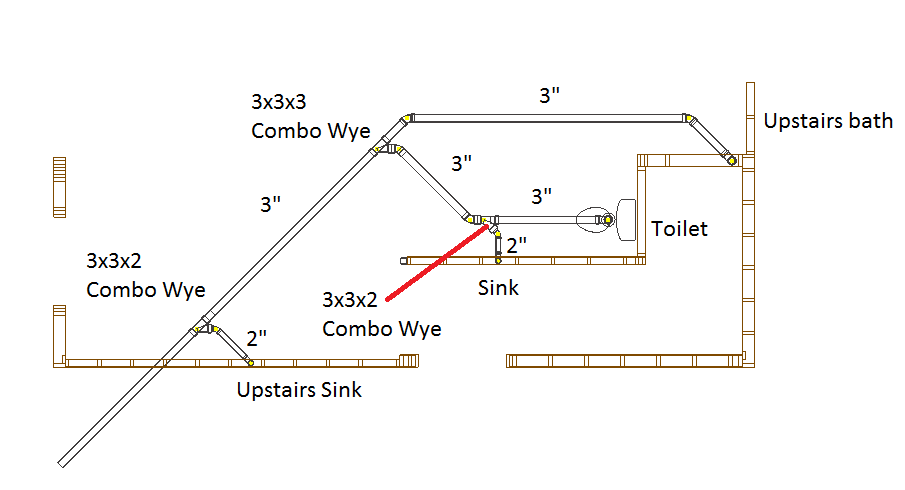
I got a plumber to come over and help me install the water and drains today. Will post pictures tomorrow. I think what I had drawn up would have worked, but the plumber apparently doesn't like running pipes diagonally, so we put in a few elbows and I think I got everything lined up to pop up through the stairway walls.

On another note, my original plan was a 12/12 roof, but with dormers front and rear, only a few feet on each side are at 12/12 pitch. With the dormers it allows for a 10' ceiling on the upstairs. I think I am going to change it to 10/12 which will make the peak 2' lower. (My house is probably a 4/12 pitch for reference). It will still have 9' ceiling upstairs and I will only lose a little space in the corners. What do you guys think? Here is a picture of my CAD models side by side.

roof_pitch1.png


roof_pitch2.png


roof_pitch3.png
 
OP
K

kasander

Well-known member
Joined
Jun 7, 2016
Messages
424
Location
Wilmington, NC
I will take some pictures of the plumbing, however, the inspector failed it for running drain pipe inside a footer... Apparently my plumbing consultant did not know that was not allowed. You can run the drain across a footer, but not down the length of it... I will be doing some more cutting and gluing this week to correct that then I should be good.
 
OP
K

kasander

Well-known member
Joined
Jun 7, 2016
Messages
424
Location
Wilmington, NC
Ok, I think I have modified my plumbing design now to work without going through the footers... Time to go buy some more pipe and fittings...

plumbing_version2.png
 

spudley

Well-known member
Joined
Dec 27, 2016
Messages
702
Location
Northeast Wisconsin
If you're not worried about matching your house roof pitch, I'd go with the 10/12 and lose the extra 2' upstairs. Unless you formerly played in the NBA, not much to gain upstairs and you'll heat/cool a little less space.
That looks like quite the I-beam you're using. So a 12" 30' beam doesn't require a post? Must be thick metal. Either way that should be a solid floor.
Are you spacing the 14" floor trusses at 16" or 19.2" centers?
 

jask

Well-known member
Joined
Jul 4, 2009
Messages
314
Location
Gods Country, B.C.
Subscribed!
That looks like a really nice garage, and very much like what I have been thinking about for a family property.
 
To avoid these ads, REGISTER NOW!
OP
K

kasander

Well-known member
Joined
Jun 7, 2016
Messages
424
Location
Wilmington, NC
Spudley, beam is only 26' long because it stops at the interior wall between the flights of stairs. It is a W12 x 50 beam. 50 lbs per foot, so it will weigh 1300 lbs...

Original floor truss design was 19.2" on centers, but I requested 16" so I don't have to worry about sagging floors.


I think I will go with 10/12 main roof pitch.


10/12 vs 12/12:

10/12 Pros:
2' lower peak (garage will already be taller than my 1300 sf ranch house with 4/12 pitch)
Shorter rafters (cheaper)
Less surface area of roof (less sheathing, shingles, etc, again, cheaper)
Less volume to heat/cool

12/12 Pros:

10' interior ceiling height upstairs (is this really a Pro?)
A few extra square feet of space (only in corners)

I hope to redo the plumbing this weekend and finally pour the slab/footers next week...
 

spudley

Well-known member
Joined
Dec 27, 2016
Messages
702
Location
Northeast Wisconsin
Spudley, beam is only 26' long because it stops at the interior wall between the flights of stairs. It is a W12 x 50 beam. 50 lbs per foot, so it will weigh 1300 lbs...
Kinda makes my 8 x 17 beam holding up my 26' X 42' cabin a bit wimpy. But...I'm using three posts in the basement:)

You have a very nice design, and utilizing the dormers upstairs is a good idea to add useful space. I see little reason to do 10' ceilings upstairs.

I'm very appreciative of your posts as I'm in the planning stages (built a cardboard mock-up) of a 24X38 garage with floor trusses and dormers upstairs, very similar design to yours but I wasn't planning the very stylish dormer/gable bump out you used. But that may now change...

One question for the engineers. From what I see, this beam will rest above 2- 1 3/4" x 11 7/8" headers on the outside wall. Is this possible because the floor trusses will have marginal weight bearing on the beam other than the deflection factor?

Could one use I-joists instead with this configuration?

I knew I should've stayed in engineering!
 
OP
K

kasander

Well-known member
Joined
Jun 7, 2016
Messages
424
Location
Wilmington, NC
spudley, I wanted functional dormers and I hate the small 2' wide dormers with just the width of a window. That is why I am stick building the roof instead of just buying attic trusses. I am paying alot more, but getting a very functional space. Downstairs is 26 x 30, so 780 sq. ft. Taking out the area for the stairs, I will have over 600 sq ft upstairs. Full 9' ceilings out to the front wall in the gable dormer, 6' height at the back wall under the shed dormer.

Attic trusses for a 26' span have a 12' wide opening, so 360 sq ft, then take out 40 sq ft for stair opening and it would only be 320 sq ft. And that is only at 7.5' height in the middle. Not usable as a studio apartment...

The most usable space would be to have shed dormers on front and back, but I do not like the look of shed dormers, so I just used it on the back. I was originally going to just have a 8-10' wide gable dormer on the front, but I wanted more space. I browsed dormers and thought about doing a nantucket dormer which is two gable dormers connected by a shed dormer between them. I wasn't sold on that look, so I finally decided on a gable dormer flanked by two shed dormers. The original drawings the engineer gave me had the gable dormer as just an overbuilt gable on top of a shed dormer, which was cheaper, but I wanted a functional dormer with the full ceiling height out to the front wall. This also increased the cost by doubling up the LVL ridge beam and adding the LVLs between the steel beam and the front wall. Sorry for the dissertation, but that's how I wound up with this design...

For the floor trusses, you could use I-joists, but you cannot run HVAC ducts through them, which I may do at some point, and it also is a pain in general for running plumbing and electrical because you have to drill holes in specific spots.

You could also avoid the steel beam with really tall floor joists, but I wanted to reduce wasted height, so with a span of only 13', the 14" tall trusses are plenty sufficient. The beam will also be useful for pulling engines with a chain hoist if I ever need to do that.

Here are the truss calculations. It is pretty straightforward. Live load limit is deflection of L/480 and total load deflection should be less than L/360. To get those deflections, I needed a beam with I >= 341 in^4. So I could have used the following beams: W12x45, W14x38, W16x31. I chose the 12" beam so it would not protrude so far down below the garage ceiling. I also stepped up to the W12x50 just to get some extra stiffness and less deflection.

http://pelicanpointroad.com/garage/W12 Calc.pdf

Beam dimensions: http://www.engineeringtoolbox.com/american-wide-flange-steel-beams-d_1319.html

The LVL header that supports the beam is plenty strong enough. It has 2 jack studs under each end and is less than 4' wide. I could have used a column on that wall, but I am a symmetrical guy, so I wanted the 1st floor window centered on the side of the garage.

The LVL headers above the garage doors are supporting even more load than the one under the steel beam...

I am a mechanical engineer, perhaps that is why I am so detail oriented about the garage design/build. I am learning alot now and will continue to learn through this project!
 

spudley

Well-known member
Joined
Dec 27, 2016
Messages
702
Location
Northeast Wisconsin
Your plans and reasoning are right on the money. Very like minded with your view on the look of shed dormers upstairs. I'm planning a shed dormer only for one side for those exact reasons. I was going with two or even three gable dormers on the other side(mostly for looks) but the space in between would be pretty worthless, unless I planned a bathroom space using one of the gable dormers. Anyway now I'm looking at your design very carefully.

I agree on the symmetry, even going so far as employing the "golden rectangle" sizing to my design plans.

I think the 2' reduction in overall height will make your building even more aesthetically pleasing to the eye not to mention useful.

Thank you for your reply and good luck. I'll be watching carefully.

BTW, you live in a beautiful state. My son went to graduate school at UNC and so I had a few visits. Even spent a week at the Outer Banks a few years back. It's on the list of places to see again!
 

spudley

Well-known member
Joined
Dec 27, 2016
Messages
702
Location
Northeast Wisconsin
Forgot to mention my 5 year old grandson and chief architect, wants an observation tower accessible from the upper floor. So maybe a spiral staircase needs to be in my plans...:)
 

jask

Well-known member
Joined
Jul 4, 2009
Messages
314
Location
Gods Country, B.C.
Kasander I was mulling over the plan today and realized you are going to have some headroom issues over the toilet downstairs, you might want to move the toilet location a couple feet closer to the front of the building.
 
OP
K

kasander

Well-known member
Joined
Jun 7, 2016
Messages
424
Location
Wilmington, NC
jask, According to my model, I will have about 7' headroom at the front of the bowl, so I think that should be plenty. The wall behind the toilet will be 5.5' tall and slope up at about 36.5 degree angle. For every foot away from the wall, the ceiling will rise about 9".
 
OP
K

kasander

Well-known member
Joined
Jun 7, 2016
Messages
424
Location
Wilmington, NC
Quick update and a few pics. Finished the plumbing last weekend and had it inspected Monday. Took the day off work today to meet the concrete guys and make sure they put everything in the right place. The built forms for the stem walls, termite treatment was done, plastic put down and rebar and wire put in place. I had a buddy make some plates to hold my anchor bolts in place and those were positioned as well. I also made some 2x fixtures to hold the plumbing drains in place. Another inspection on Monday, then pouring on Tuesday, weather permitting!

slab_prepped.JPG


plumbing_in_stem_wall.JPG


column_footer.JPG
 
Last edited:
OP
K

kasander

Well-known member
Joined
Jun 7, 2016
Messages
424
Location
Wilmington, NC
Got the slab poured Tuesday and it went ok. There were a couple of spots where the concrete had too much sand so it didn't get smooth, but looks ok. I may end up painting it later. Will get a good picture later, but here is a time lapse video I made. The gopro battery died a few times so I missed some of it, but oh well.

Garage Pour Timelapse
 

mnwebb

Well-known member
Joined
Mar 6, 2017
Messages
98
Location
St.Paul, MN
Looks great Kasander!

Did you add a floor drain in the garage?

Is your roof peak somewhere around 25'?

Best of luck,
W
 

ncboat

Well-known member
Joined
Aug 20, 2015
Messages
166
Location
Wilmington North Carolina
Kasander, that is exciting. I may have missed it but what was the large trench for in the one corner. I thought plumbing but after you roughed it in it was still there. Since I thought your original concrete estimate was prior to the stem wall decision how much did that add to the cost? Are you still happy with American and polecat?
 
OP
K

kasander

Well-known member
Joined
Jun 7, 2016
Messages
424
Location
Wilmington, NC
mnwebb: No floor drain and flat floor. I did slope the 6" area that will be in front of the garage door so it would drain out.

Robey5: Will add a few pics of the finished slab.

ncboat: Trench was footer for load bearing wall around stairs. Also recessed area for plate to support column that supports the W12x50 beam in the ceiling.
Stem walls added $300 + cost of concrete which was about 1/2 yard if I remember correctly. The only thing I'm not happy about is that the finish is not slick as I requested. There was too much sand in parts of the mix, so the surface is rough in a few areas. They should have had some extra cement in their work truck to mix in while they were troweling the concrete but they didn't. Also, they originally told me they would use a power trowel, but then ended up doing it all by hand which may have had something to do with it.
 
OP
K

kasander

Well-known member
Joined
Jun 7, 2016
Messages
424
Location
Wilmington, NC
Quick update, picked up two trailer loads of lumber last Thursday, about 10,000 lbs. Started laying out the bottom plates and getting everything square Saturday, and built the first wall section on Sunday afternoon. I will upload more pics tonight. Now the real work begins.

loaded_up.JPG
 

diiulio

Well-known member
Joined
Nov 14, 2008
Messages
136
Location
Saratoga Springs, NY
What did you run through the stem wall? I see 2" PVC and then some other conduit or PVC in the corner also looks like it is in the wall. Are those drain/vent for plumbing, or ???
 
OP
K

kasander

Well-known member
Joined
Jun 7, 2016
Messages
424
Location
Wilmington, NC
Progress has been slow, been busy with other stuff. Hope to get a couple of wall sections stood up this weekend.

Unloaded one trailer, started putting down bottom plates to get a square base.

materials_unloaded.JPG


diiulio, PVC through exterior walls is for:

Back right corner:
2" Electrical Conduit (To bring in ethernet from house)
2" PVC (Water supply - There is a piece of 1" PEX tubing inside the 2" PVC)

Right wall closer to front:
2" PVC drain/vent to upstairs kitchen

The 3" PVC just inside the rear exterior wall is drain for upstairs bathroom.

bottom_plates.JPG
 
To avoid these ads, REGISTER NOW!
Top Bottom