To avoid these ads, REGISTER NOW!

Above 1200 Sq/FT The ASYLUM - Happy 40th Birthday to Me! (Est. 2005)

Wokspaces above 1200 squarefeet.
OP
S

shopnut

Well-known member
Joined
Feb 22, 2006
Messages
4,237
Location
Florida
73survivor said:
Beautiful garage! I'm currently in the planning stage for my garage. You have a lot of great ideas. What is the spacing of the support posts?

Posts are generally on 12' centers except for the main bay where there is a 26' clear span and it required 13' spacing on the wall posts.
 
To avoid these ads, REGISTER NOW!

vinculum

Well-known member
Joined
Aug 29, 2006
Messages
71
Location
York, Pa.
just beautiful...

It must be great to sit back with a beer and a few close friends and think "Isn't life great!"

The apartment is icing on the cake!

Dr V
 
OP
S

shopnut

Well-known member
Joined
Feb 22, 2006
Messages
4,237
Location
Florida
Sorry - haven't posted in a while. Home improvement projects at the primary residence had me side-tracked.

I finished the sliding doors on the storage lofts and here's a shot of the backlit banners at night. Makes for a great nightlight!
 

Attachments

  • 25-night.JPG
    25-night.JPG
    58.8 KB · Views: 1,384

jhn9840

Well-known member
Joined
Mar 11, 2007
Messages
1,189
Location
Northern Panhandle of WV
Just found this thread. Of all the great garages on this site the Asylum got to be one of the three best. You have a great plan. No stone has been left unturned. Plus the location. Just love it, please keep the pics of future developments coming.

jhn9840
John
 
OP
S

shopnut

Well-known member
Joined
Feb 22, 2006
Messages
4,237
Location
Florida
Here's a view of one of the four window "nooks". The others are about 4ft long and have cabinets flanking both sides but this one next to the door ended up about 5ft. I'm placing extinguishers by the two personnel doors. Directly above the window are recessed lights with a switch between. When this picture was taken the overhead storage area was not quite complete, hence visible wood framing. Aluminum mini-blinds were found at K-mart (of all places!). Black squares are duplex outlets - never can have enough of those. Work surface is stainless. Wall material was mentioned in an earlier post. Black corner trim is vinyl material that I found at Lowe's which is very easy to work with and adds that finishing touch.

I use these areas for small projects and did not want them to be obtrusive and stick out beyond the cabinetry. I will have a large roll-around workbench with 360 degree access to handle the big projects.

This picture reminds me I need a new doormat!
 

Attachments

  • 26-nook.JPG
    26-nook.JPG
    59.3 KB · Views: 3,375
OP
S

shopnut

Well-known member
Joined
Feb 22, 2006
Messages
4,237
Location
Florida
These two pictures show the progress of the side bay. Please don’t mind the mess.

If you look closely at the photo with the corvette banner, you will see the PVC pipe framing around it. The frame is hanging on a cable and allows the “door” to slide to the right gaining access to the storage loft. I added five recessed lights in the ceiling directly below the banner. Just to the right of the lights, next to the post, is where the air hose and cords hang down. Reels are hidden in the loft. I mounted an arm to the post which holds the fan and halogen work light. They can swing to just about any position. I’ll post some details on that in the future. The handle on the center of the post works in conjunction with a fold-down step and allows me to reach the fan for re-positioning. The other storage loft will have a mirror image of all these features.

The other photo (with the toolbox) shows the drill press mounted on the post. I mounted a vise and a small arbor press to the other post. As mentioned earlier, I’m trying to keep the floor clear for easy cleaning. (I just need to get rid of some of that other junk now!). You can also see the space I left above the yellow cabinets for the storage bins. I figure I have room for about 20 bins up there in that side bay so that should help satisfy my packrat nature. I prefer the clear plastic type bins with built-in lids so I can easily see the contents. I’m working on three large swing-up doors to hide the bins and they’ll have some cool banners on them for decoration.
 

Attachments

  • 27-SHOP1.JPG
    27-SHOP1.JPG
    65.1 KB · Views: 1,640
  • 28-SHOP2.JPG
    28-SHOP2.JPG
    74.1 KB · Views: 1,953
OP
S

shopnut

Well-known member
Joined
Feb 22, 2006
Messages
4,237
Location
Florida
Here are two close-ups of the fan/light mentioned before. One shows it in a stored position and the other with it extended out. The fan is remote-controlled and the light has a switch built into the main post. The arm is actually an OmniMount model “CL-M” TV arm that extends about 3 feet out. It will reach around the post if I need it to. It is out of normal reach so the handle on the post, along with a step below it allow me to step up and move it around. The airflow and increased lighting makes a nice addition to any shop
 

Attachments

  • 30-FAN02.JPG
    30-FAN02.JPG
    59.8 KB · Views: 1,197
  • 29-FAN01.JPG
    29-FAN01.JPG
    61.9 KB · Views: 1,230
Last edited:
OP
S

shopnut

Well-known member
Joined
Feb 22, 2006
Messages
4,237
Location
Florida
Not exactly garage stuff here but its part of the whole ASYLUM package.

Here are some updated pictures of the apartment. We bought a bunch of unfinished oak furniture and went for it one weekend. The LCD TV is up and the surround sound system is installed. I mounted the TV on an articulating arm allowing rotation in either direction so it can be seen when we’re sitting at the kitchen table or sitting on the porch beyond the French doors. The speaker wiring was routed before the drywall was hung. In one picture, you can see the dog looks pretty comfortable. The wife even had room for some of her guitar collection. The couch pulls out into a bed and its fine for weekends. We got rid of the lousy mattress that came with the couch in favor of an air mattress that gets deflated before folding up - so far it’s working.
 

Attachments

  • 31-apt01.JPG
    31-apt01.JPG
    77.1 KB · Views: 2,068
  • 32-apt02.JPG
    32-apt02.JPG
    75.1 KB · Views: 1,852

loganwildman

Member
Joined
Mar 2, 2007
Messages
6
What type of Dobro's are those? Never tried to play one of those, but I've played along side of a gent that can really make one wale. Also, is that a Fender hanging there?
 
OP
S

shopnut

Well-known member
Joined
Feb 22, 2006
Messages
4,237
Location
Florida
What type of Dobro's are those? Never tried to play one of those, but I've played along side of a gent that can really make one wale. Also, is that a Fender hanging there?

From Dobro's, Fender's , National's, to Gibson's, she's got a little of everything. The collection is approaching 30 now. Resonators seem to be her favorite lately, for playing slide. Not much into playing music myself, but I like to listen and the fancier guitars make pretty interesting 3-D wall art. She keeps the "second-stringers" at this place (no pun intended).
 
OP
S

shopnut

Well-known member
Joined
Feb 22, 2006
Messages
4,237
Location
Florida
I had to take a picture for the insurance agent so I thought I would share.

This will be my vantage point from my second story office (when I get around to building it!). The plan is to build a room on top of the bathroom and laundry room. A stairs will be located directly to the left in the main bay (refer to the plan view at the start of this thread). I plan for this to be a completely finished “clean room” where electronics equipment and other sensitive items are kept. It will also have a sleeper sofa for occasional guests (No, I am not accepting reservations yet!). A large bay window will look out over the shop floor and the existing clerestory windows will allow a great view of the lake. Because I have plenty of height, I plan to add long storage bins between the first and second floors in the space between the floor joists to store lumber and pipe. They will be about 10ft deep. I worked in something similar already into the bottom of side bay storage lofts. One such bin can be seen in this picture on the triangular wall near the bottom (around the corner from the Corvette banner). I figure you might as well use otherwise wasted space.
 

Attachments

  • 33-inter.JPG
    33-inter.JPG
    75.9 KB · Views: 4,298

loganwildman

Member
Joined
Mar 2, 2007
Messages
6
From Dobro's, Fender's , National's, to Gibson's, she's got a little of everything. The collection is approaching 30 now. Resonators seem to be her favorite lately, for playing slide. Not much into playing music myself, but I like to listen and the fancier guitars make pretty interesting 3-D wall art. She keeps the "second-stringers" at this place (no pun intended).

Neat. I play a 5 string Fender Bass, and a Fender accoustic at a local church, and play most other places if asked. Everything from Christian rock to old time country, blues. Tried bluegrass, but it's not my taste.

I love the garage and the cars :beer: , keep the pictures coming. Hopefully I'll get my wife convinced that I need a shop sometime soon. LOL

Here's a link to my ongoing project.
http://mysite.verizon.net/resrf505/
 
OP
S

shopnut

Well-known member
Joined
Feb 22, 2006
Messages
4,237
Location
Florida
SOME LOW-COST DOORS TO HIDE THE CLUTTER…

I’m nearly finished with the side bay. Lately, I completed the swing-up doors for the upper storage areas and pictures are attached showing them open and closed. It ended up being an extremely cost effective way of doing it and I’m happy with the results. I used a PVC frame that hinges on a pipe at the top. I found that 1-1/4” PVC pipe fits perfectly over the galvanized pipe (used for the chain link fence top rail) to create a hinge. The rest of the frame reduces down to 1” pipe and seems plenty sturdy. Even over the 9.5’ span there is virtually no sag with that steel pipe inside. Clamps fasten the steel pipe to the wall.

I have so much “junk” that I wanted to make it easy to find the things I’m looking for. Clear plastic bins are extremely helpful but I still need to open the doors to see them. Since these doors are 8 feet off the ground, I decided to make this easy to do from standing on the ground by gluing another 18” long pipe at a right angle to the rest of the PVC frame (extending back into the storage area) and connecting a rope to the end of it. There is a small pulley and rope cam cleat (available at any marine store) where it would rub on the bottom edge of the storage area. The rope has a string trimmer pull start handle on the end of it. To open the door, you pull down on the rope and “lock” it in the cleat. This action, in turn, pivots the door upward. To release, just pull the rope down a bit and out to pull it out of the cleat and let gravity do its thing. So now I will be able to quickly go around the room and find the right bin before dragging the step stool over.

I started out with advertising banners on the doors but then decided to make some custom checkered flag banners instead for a more uniform look and a perfect fit. I found a place that had outdoor vinyl material in 6” squares and bought a roll. I plan to continue this checkered pattern around the entire perimeter of the shop to go along with the ceiling flag.
 

Attachments

  • 35-DOORS.JPG
    35-DOORS.JPG
    70 KB · Views: 1,477
  • 34-DOORS.JPG
    34-DOORS.JPG
    66.4 KB · Views: 1,434
Last edited:
To avoid these ads, REGISTER NOW!

ledfoot

Member
Joined
Dec 22, 2007
Messages
14
Location
Sarasota FL
Fantastic shop, love the architecture, looks very old Florida but nice clean & modern! Your attention to detail is admirable.

-Jeff
 
Joined
Dec 24, 2007
Messages
7
Location
indiana
Great looking shop man,I have always said if I ever build a place thats what it would be a shop with living space in it as I want more work rooms than house.
 

Homebody

Well-known member
Joined
Dec 14, 2007
Messages
1,347
Location
Northern Illinois
I make my money the old fashion way - I earn it. The moderate and steady pay of an engineer financed this project.

LOL, Good for you! My father-in-law is a retired engineer and is still the only person I know that still draws up plans to hang 2 pictures on a wall!

He's currently doing a massive O gauge train layout that I doubt he'll ever finish as he spends too much time "planning" it.

Great looking place you have there.
 
OP
S

shopnut

Well-known member
Joined
Feb 22, 2006
Messages
4,237
Location
Florida
The folks at NASCAR may have a bigger flag, but I’ve never seen it…

I finally got around to hanging my checkered flag to hide the rough framing on the ceiling. It’s not perfect but I am happy with the results. Each square of the pattern measures 5 feet.

How I did it:
A cable was stretched between main beams at the peak for the fabric to drape over and has a curtain rod tube to protect the fabric from the cable and allow it to roll (equalize) side-to-side. The ends are attached at the wall and have the ability to take up the slack. I bought the material at Walmart on clearance for $1/yard so what you see (4 strips worth) cost about $35 total. Of course, the real cost is time in labor to sew it and put it up. I only covered 2 of the 3 main sections of the ceiling as I am tackling the upstairs office next and its walls will span all the way to the ceiling.

The Overall Plan:
I have eventual plans to insulate and finish the ceiling with the same white vinyl material as used earlier (in fact, it was already purchased during a 50% off sale) but the height makes this a major undertaking so it may not happen for another couple of years. So this will have to do for now.

The vertical wall above the rollup doors will also be insulated and covered in vinyl someday. Meanwhile, some banners (man’s wallpaper) help to hide the rough framing.
 

Attachments

  • 36-Flag.JPG
    36-Flag.JPG
    71 KB · Views: 749
Last edited:

comp

Well-known member
Joined
Dec 26, 2005
Messages
510
Location
Eville In.
The folks at NASCAR may have a bigger flag, but I’ve never seen it…
I finally got around to hanging my checkered flag to hide the rough framing on the ceiling. It’s not perfect but I am happy with the results. Each square of the pattern measures 5 feet.

How I did it:
A cable was stretched between main beams at the peak for the fabric to drape over and has a curtain rod tube to protect the fabric from the cable and allow it to roll (equalize) side-to-side. The ends are attached at the wall and have the ability to take up the slack. I bought the material at Walmart on clearance for $1/yard so what you see (4 strips worth) cost about $35 total. Of course, the real cost is time in labor to sew it and put it up. I only covered 2 of the 3 main sections of the ceiling as I am tackling the upstairs office next and its walls will span all the way to the ceiling.

The Overall Plan:
I have eventual plans to insulate and finish the ceiling with the same white vinyl material as used earlier (in fact, it was already purchased during a 50% off sale) but the height makes this a major undertaking so it may not happen for another couple of years. So this will have to do for now.

The vertical wall above the rollup doors will also be insulated and covered in vinyl someday. Meanwhile, some banners (man’s wallpaper) help to hide the rough framing.

Nice :beer:
 
OP
S

shopnut

Well-known member
Joined
Feb 22, 2006
Messages
4,237
Location
Florida
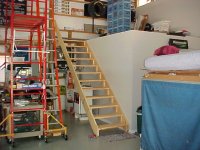
I FINALLY BUILT MY STAIRWAY…

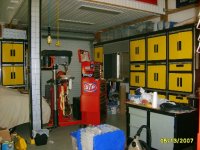
The stairs is not finished but is functional for now. This is the start of a major project inside the shop area that includes an upstairs enclosed office and a post-mounted jib crane. More details of the overall plan can be found in post #57. No more struggling with trying to carry things up and down a ladder. The water heater and sink will remain under the stairs. There’s also room for a small fridge, entertainment command center, and clothes washer (for the grimy shop rags) under there.

EDIT:
Total rise on the stairs will be 119". Here are some details:
Stairs-Layout-37a.JPG Stairs-Layout-37b.JPG

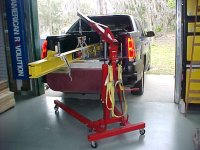
AND THE OVERHEAD CRANE IS NEXT…
I selected a 1 ton jib crane with a 10’ long I-beam and the attached plan view shows the sweep. I just couldn’t fit the 12’ version as it would hit the column across the bay. The 10’ crane still gives adequate coverage over the main work area. I don’t really intend to lift 2000lbs with this thing but maybe up to 1000 or so. Even with only 1000lbs being lifted, the crane will be exerting about 4000lbs of pull on the top wall anchor. This is going to take a little bit of engineering. A post will span from floor to ceiling at the spot marked at the base of the stairs.

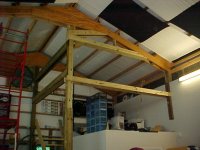
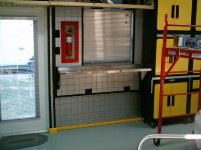
A FEW MORE FEATURES…
The office and stairs will be totally closed in. The wall just to the left of the stairs will have a pocket to store plywood sheets hidden out of sight. The plywood will rest on its 4’ edge in front of the laundry sink and then slide into the wall pocket until it bumps up against the crane post (you can see some framing in the plan view). There will be a door at the base of the stairs to keep dirt/dust out of the stairway while performing messy jobs. I would love to make this a pocket door as it may be open most of the time, but I would have to cut into existing framing and drywall and this project is big enough as is. There will be another door at the top of the stairs (that one is shown) going into the office. There will be quite a bit of storage above the stairway, accessible from the office (I’m trying to use all of that 20’ of ceiling height, of course). Lastly, the walls will be finished off to match the rest of the shop – aluminum tile panel up to 8’, checkered flag from 8 to 10’, vinyl siding on up to the ceiling.
 

Attachments

  • 37-Stair.JPG
    37-Stair.JPG
    67.8 KB · Views: 1,390
  • 38-Crane.JPG
    38-Crane.JPG
    48.7 KB · Views: 881
  • 39-Crane.jpg
    39-Crane.jpg
    3.9 KB · Views: 697
Last edited:
OP
S

shopnut

Well-known member
Joined
Feb 22, 2006
Messages
4,237
Location
Florida
MY CRANE ARRIVED TODAY…

Here’s a shot taking it off of the truck. The engine hoist came in handy.

Now its time to build the massive structure to hold it up 14 feet in the air. That might sound high, but I figure I have 12' high doors so I might as well be higher than that, plus I have plenty of ceiling height going to waste. I have it pretty well planned out and will figure out the rest as I go. And then add more just to be safe. It’s probably going to take a month or so before I’m ready to hang it.

More to come…
 

Attachments

  • Crane-04.JPG
    Crane-04.JPG
    74.8 KB · Views: 976
Last edited:

The BN Guy

New member
Joined
Jan 19, 2008
Messages
4
Location
San Antonio, TX
Mind if I ask where you found the garage doors? I have a client that wants a set on his garage and I'm having some trouble finding the ones he wants.

Thanks!
P
 

PAToyota

Well-known member
Joined
Jan 20, 2006
Messages
4,366
Location
South Central Pennsylvania, USA
Just realized I had never posted in this thread - I really like the style of your shop and all that you have done to the inside. I've thought for awhile that if I had it to do over and had the room, I'd go with a monitor style like that myself.
 
OP
S

shopnut

Well-known member
Joined
Feb 22, 2006
Messages
4,237
Location
Florida
Mind if I ask where you found the garage doors? I have a client that wants a set on his garage and I'm having some trouble finding the ones he wants.

Thanks!
P


The brand is US-Door and they come in a variety of styles and colors. I didn't directly buy them, the builder did. Check out
roll-up doors Perhaps there is a distributor in your area.
 

HiHoSilver

Well-known member
Joined
Mar 8, 2008
Messages
217
Location
Eleanor, WV
sweeeeeet......just awesome:bowdown:

after seeing this I hange my head in shame when I call my hole in the wall a garage lol:lol_hitti
 
OP
S

shopnut

Well-known member
Joined
Feb 22, 2006
Messages
4,237
Location
Florida
HERE’S THE START OF THE CRANE SUPPORTING STRUCTURE

I got a great start on the framework for the crane. As I mentioned earlier, a cantilevered jib crane puts quite a load on its wall mount points and I’m trying to design for it.

There’s a main 6x6 pressure treated column as the backbone. This will be surrounded by 2x8’s to build it up to about an 8.5” square cross-section. Box-beam supports run horizontally back to the 6x6 posts forming the walls of the barn. I ordered a 5’ piece of aluminum angle to “skin” the column and become the base plate for the crane. This will keep the crane brackets from locally crushing the wood.

For added safety, I’m running some aircraft cables between the main columns of the barn. Box beams were assembled will lag bolts on 12” centers and main connections were made with 5/8” bolts.

With just a little more gusseting, I will be ready to hang the crane. Once up, I should be able to tell if (and where) more structure is needed.

The window for the second story office will be located between the two light-colored horizontal beams so this area must be kept clear. The crane mounts will attach to the ends of the dark-colored horizontal beams.
 

Attachments

  • 41-Crane.JPG
    41-Crane.JPG
    55.4 KB · Views: 1,371
Last edited:
To avoid these ads, REGISTER NOW!
Top Bottom