To avoid these ads, REGISTER NOW!

Detached Garage in Major City [Build Thread]

garagedriven

Active member
Joined
Aug 27, 2018
Messages
26
Location
Toronto
“Any space out of the weather is a good space.” - Falcon67

Starting this thread to document building a new, detached garage in a major city (Toronto). I’ll also be documenting it on YouTube and on a blog I set up if you’re interested in following along there as well.

The space’s primary purpose will be to store my daily driver and it will have a bit of an auto detailing focus.

Performing research for this project over the last six months is what led me to this forum and I’ve learned a lot (and drooled a lot) over some the amazing spaces on here. It’s also sent me down a rabbit hole about everything garage related. What started as researching garage designs and materials has spawned into a growing passion for auto detailing and DIY home ownership projects.

In other words, for me, the impending garage build has been the driver for a whole new set of passions and interests.

And that’s why I’m calling this project and journey Garage Driven. What I’m realizing (and what all of you obviously know already) is that a garage is the anchor element and space that facilitates these passions and hobbies for the modern homeowner and enthusiast.

At minimum I want to document the project for fun, and it gives me an excuse to post stuff to YouTube.
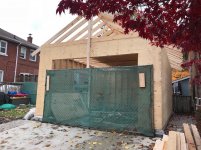
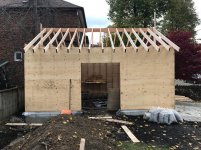
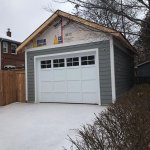
THE BUILD

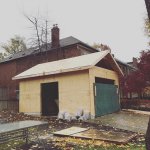
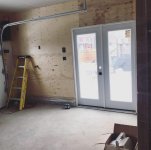
We bought our house almost four years ago and this is the beautiful garage that came with it :/

attachment.php


attachment.php


(VIDEO TOUR OF EXISTING GARAGE)

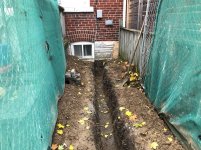
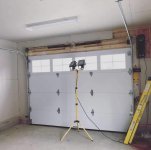
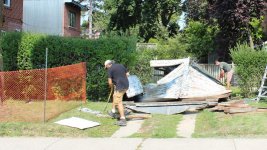
Yesterday was demo day:

attachment.php


(VIDEO OF DEMO)

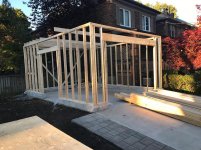
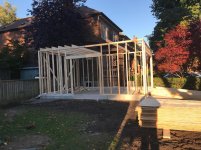
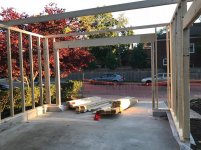
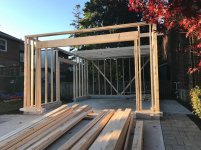
GARAGE DESIGN AND PLANS

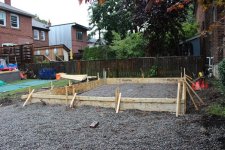
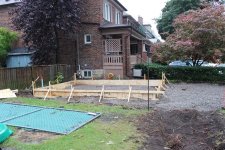
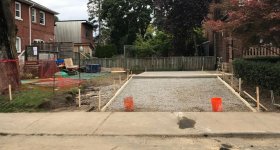
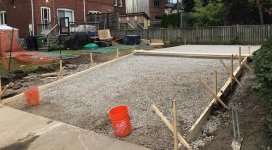
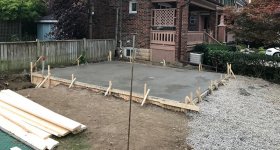
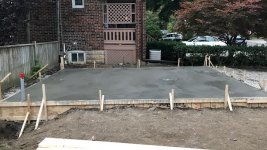
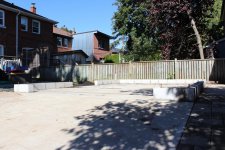
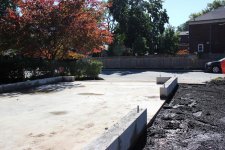
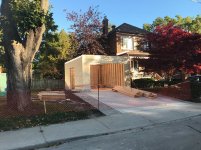
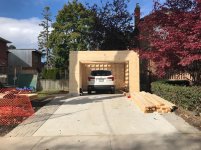
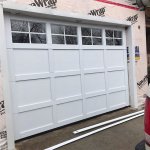
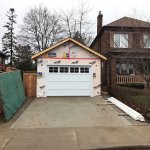
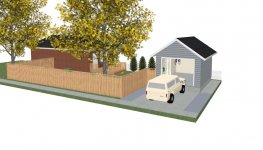
This is going to be a relatively small garage. The dimensions of the space are 14’ x 19’ 6”. That’s just enough space to park our SUV along one side and have a little room leftover for some shallow storage and cabinets along the other wall (I think).

attachment.php


And that’s not the only thing that’s tight.

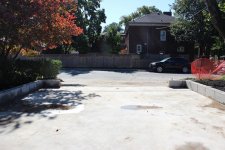
The paved driveway in front of the garage is only 17 feet long - also just enough space to fit our car between the garage and sidewalk. I’m sure all of you who live in suburban homes with huge three car garages are cringing right now.

attachment.php


attachment.php


(VIDEO WALKTHROUGH OF PLANS)

At the end of the day, this is the reality of living in a major north american city. I’m substantially restricted in terms of allowable size and I’m going with a footprint that makes sense for my overall property. I’m also avoiding having to secure special permits that are costly, time consuming and open to neighbour objections.

Ultimately, I think the challenge of setting up a smaller space for storage and some detailing will be an interesting (and sometimes frustrating) process that will hopefully lead to some projects and solutions that others will find interesting as well.

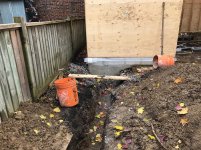
I’ll also be taking on frigid and messy Canadian winters, figuring out how to create a space that can stand up against snow, slush and salt, and allow me to perform occasional indoor winter detailing. I’ll be taking a lot of cues and inspiration from Rick on this one.

Thanks for checking out the thread - I'll try and post more updates soon.
 

Attachments

  • demo-thread.jpg
    demo-thread.jpg
    111.3 KB · Views: 1,827
  • demo-t2.jpg
    demo-t2.jpg
    21.8 KB · Views: 41
  • garage-design-thread.jpg
    garage-design-thread.jpg
    140.7 KB · Views: 1,841
  • IMG_1654.jpg
    IMG_1654.jpg
    106.6 KB · Views: 1,828
  • Screen Shot 2018-09-20 at 5.05.27 PM.jpg
    Screen Shot 2018-09-20 at 5.05.27 PM.jpg
    77.6 KB · Views: 1,857
  • garage-render-thread.jpg
    garage-render-thread.jpg
    114.8 KB · Views: 1,830
To avoid these ads, REGISTER NOW!

theoldwizard1

Well-known member
Joined
Feb 22, 2011
Messages
43,114
Location
SE MI
The most important thing about any building with a slab is making sure the slab is far enough above grade that no ground water will ever be above it !

You will notice in Rick's build the walls are on top of curbs/"pony walls". A lot of cities now require this. These pony walls are poured as part of the foundation so require forms to be set to get them up that high. The floor is poured separably.

These walls need to be waterproofed just like a basement wall. 3 steps. Asphalt based waterproofing (tar), waterproof membrane, and dimple board along with weeping tile. Back fill with gravel. Of course at best this protects 3 side !

Doing it "right" is not cheap, but you will have a dry floor. Make sure the floor has just enough pitch for water to flow out under the garage door.

Use moisture resistant resistant "green" drywall (at least 4' up) and several coats of semi-gloss/gloss latex paint and the walls will pretty water resistant. (Make sure the drywall is at least 1" off of the floor.)

Last, build a high as code will allow. This will allow a low mezzanine to be built along the back wall. It needs to be high enough so that the nose of your vehicle will fit underneath it. This is really just a very large shelf, 4' deep, running across the back but done correctly (2x8 16" O.C.) and you will have a lot of heavy storage up there ! Run these joist all the way out to the sheathing on each side. next to a stud and sister a 2x4 underneath each of these joists.
 
OP
G

garagedriven

Active member
Joined
Aug 27, 2018
Messages
26
Location
Toronto
The most important thing about any building with a slab is making sure the slab is far enough above grade that no ground water will ever be above it !

You will notice in Rick's build the walls are on top of curbs/"pony walls". A lot of cities now require this. These pony walls are poured as part of the foundation so require forms to be set to get them up that high. The floor is poured separably.

These walls need to be waterproofed just like a basement wall. 3 steps. Asphalt based waterproofing (tar), waterproof membrane, and dimple board along with weeping tile. Back fill with gravel. Of course at best this protects 3 side !

Doing it "right" is not cheap, but you will have a dry floor. Make sure the floor has just enough pitch for water to flow out under the garage door.

Use moisture resistant resistant "green" drywall (at least 4' up) and several coats of semi-gloss/gloss latex paint and the walls will pretty water resistant. (Make sure the drywall is at least 1" off of the floor.)

Last, build a high as code will allow. This will allow a low mezzanine to be built along the back wall. It needs to be high enough so that the nose of your vehicle will fit underneath it. This is really just a very large shelf, 4' deep, running across the back but done correctly (2x8 16" O.C.) and you will have a lot of heavy storage up there ! Run these joist all the way out to the sheathing on each side. next to a stud and sister a 2x4 underneath each of these joists.

All great advice, thanks. I think I'm doing everything you've mentioned but thinking about plywood on the inside walls instead of drywall. Then I can hang stuff anywhere and not have to sweat it.

The mezzanine / shelf idea is good.
 
OP
G

garagedriven

Active member
Joined
Aug 27, 2018
Messages
26
Location
Toronto
Yesterday was excavation and concrete prep day. The crew managed to get the entire site cleared of hedges and roots, excavated the grass and dirt, threw down gravel and prepped for pouring the pad. Below is a video and some pics.

Next up, pouring the concrete pad and driveway.


attachment.php


attachment.php


attachment.php


attachment.php


attachment.php
 

Attachments

  • excavation-thumb-gj.jpg
    excavation-thumb-gj.jpg
    79.5 KB · Views: 1,485
  • IMG_1702.jpg
    IMG_1702.jpg
    110.2 KB · Views: 1,482
  • IMG_1701.jpg
    IMG_1701.jpg
    98.9 KB · Views: 1,482
  • IMG_1700.jpg
    IMG_1700.jpg
    109.5 KB · Views: 1,483
  • IMG_1699.jpg
    IMG_1699.jpg
    124.9 KB · Views: 1,481
  • IMG_1695.jpg
    IMG_1695.jpg
    127.2 KB · Views: 1,482
OP
G

garagedriven

Active member
Joined
Aug 27, 2018
Messages
26
Location
Toronto
The concrete pad has been poured and the forms for the driveway have been set up. The truck arrived around 8am Thursday and the crew spent most of the morning installing and setting up the pad.

attachment.php


attachment.php


attachment.php


attachment.php


attachment.php


attachment.php
 

Attachments

  • IMG_3838.jpg
    IMG_3838.jpg
    80 KB · Views: 1,372
  • IMG_4234.jpg
    IMG_4234.jpg
    84.4 KB · Views: 1,364
  • IMG_3722.jpg
    IMG_3722.jpg
    104.1 KB · Views: 1,364
  • IMG_9128.jpg
    IMG_9128.jpg
    98.1 KB · Views: 1,366
  • IMG_9563.jpg
    IMG_9563.jpg
    91.9 KB · Views: 1,373
  • IMG_3731.jpg
    IMG_3731.jpg
    96.2 KB · Views: 1,378
OP
G

garagedriven

Active member
Joined
Aug 27, 2018
Messages
26
Location
Toronto
The concrete and foundation work is now complete. Over a 4-5 day period, the crew poured the concrete pad for the garage and driveway, laid down interlock and set the foundation blocks. The weather has been brutal and wet this past week so things are a little muddy and messy.

But now that the blocks have been set on the pad, I'm getting a much better sense of the space I'll have inside.

Getting lots of looks from neighbours and dog walkers - people are mostly positive and supportive though. One guy the other day said, "Dude, I'm jealous. I'd kill for a garage." lol


attachment.php


attachment.php


attachment.php


attachment.php


attachment.php
 

Attachments

  • concrete-pour-thumb-vid.jpg
    concrete-pour-thumb-vid.jpg
    79.4 KB · Views: 1,284
  • IMG_1703.jpg
    IMG_1703.jpg
    91.6 KB · Views: 1,283
  • IMG_1704.jpg
    IMG_1704.jpg
    93.6 KB · Views: 1,285
  • IMG_1706.jpg
    IMG_1706.jpg
    96.6 KB · Views: 1,284
  • IMG_1707.jpg
    IMG_1707.jpg
    87.5 KB · Views: 1,280
  • IMG_1709.jpg
    IMG_1709.jpg
    112.8 KB · Views: 1,288

captain14

Well-known member
Joined
Dec 19, 2012
Messages
7,028
Location
Near College Park Maryland 20740
Bet you can’t wait. Save the photos and create an album so you can share later in life when friends ask you about the garage.

Take photos of all the utility work so you can find it easily later if there are issues.
 

macs_rock

Well-known member
Joined
Mar 13, 2011
Messages
190
Location
Idaho
Subscribed, I love small garages as I'm not sure I'll ever have the space to have a big one.
 

Bessy

Well-known member
Joined
Dec 18, 2012
Messages
992
Location
Ontario, Canada
Subscribed! I love these small builds, they're truly the most ingenious when it comes to effective use of space. Back at my parents place I worked out of 12×17' worth of space, which seems like a palace now compared to the driveway I have to work on in Mississauga right now.

Sent from my Pixel using Tapatalk
 
OP
G

garagedriven

Active member
Joined
Aug 27, 2018
Messages
26
Location
Toronto
Subscribed! I love these small builds, they're truly the most ingenious when it comes to effective use of space. Back at my parents place I worked out of 12×17' worth of space, which seems like a palace now compared to the driveway I have to work on in Mississauga right now.

Sent from my Pixel using Tapatalk

Hey! :canada2:

That's close to what my interior dimensions are going to end up being (13'x18'6"). I'm going to pull my vehicle in once the framing is up to really get an idea of what's going to be possible cabinet / storage wise.
 

Bessy

Well-known member
Joined
Dec 18, 2012
Messages
992
Location
Ontario, Canada
There are a few of us Canucks on here if you keep your eyes peeled. Two things I'll mention that I've taken into account in mine since it's a small space:
1) make (almost) everything mobile, tools, benches, etc. But;
2) have one static (solid, anchored to the wall/floor) heavy-duty bench with a good vice on it.

I made the mistake of making both my benches mobile, and I've regretted not having a good solid bench when needed. Mine are both the same height (exactly) which is nice though.

Sent from my Pixel using Tapatalk
 
OP
G

garagedriven

Active member
Joined
Aug 27, 2018
Messages
26
Location
Toronto
There are a few of us Canucks on here if you keep your eyes peeled. Two things I'll mention that I've taken into account in mine since it's a small space:
1) make (almost) everything mobile, tools, benches, etc. But;
2) have one static (solid, anchored to the wall/floor) heavy-duty bench with a good vice on it.

I made the mistake of making both my benches mobile, and I've regretted not having a good solid bench when needed. Mine are both the same height (exactly) which is nice though.

Sent from my Pixel using Tapatalk

Makes sense! Appreciate the advice. I'm hoping to have enough room to get a fixed bench along the right wall - there's a chance it might have to be a fold down bench though. We'll see soon.
 
OP
G

garagedriven

Active member
Joined
Aug 27, 2018
Messages
26
Location
Toronto
Lumber for framing has arrived. The city building inspector came on Friday and approved the footings and foundation so framing work can start next week. I posted some vids of the lumber being dropped off the back of the truck on insta here:

https://www.instagram.com/p/Boz9NeLA0bk/

attachment.php
 

Attachments

  • IMG_0422.jpg
    IMG_0422.jpg
    113.6 KB · Views: 935
To avoid these ads, REGISTER NOW!
OP
G

garagedriven

Active member
Joined
Aug 27, 2018
Messages
26
Location
Toronto
After a bit of a pause and some bad weather, framing is finally underway. Hoping to have the walls and roof portion completed this week. Planning to pull the car in and get a sense of how much space is left over.

attachment.php


attachment.php


attachment.php


attachment.php


attachment.php
 

Attachments

  • IMG_3703.jpg
    IMG_3703.jpg
    114.1 KB · Views: 844
  • IMG_0243.jpg
    IMG_0243.jpg
    114.2 KB · Views: 842
  • IMG_4274.jpg
    IMG_4274.jpg
    117.5 KB · Views: 847
  • IMG_1867.jpg
    IMG_1867.jpg
    109.9 KB · Views: 846
  • IMG_1838.jpg
    IMG_1838.jpg
    107.6 KB · Views: 846

theundermount

Well-known member
Joined
Jan 17, 2016
Messages
489
Location
ON
great looking little garage! I bet the neighbors love you for tearing down that old eyesore that was there. keep it up what are the plans for roofing material?

Sent from my SM-G935W8 using Tapatalk
 
OP
G

garagedriven

Active member
Joined
Aug 27, 2018
Messages
26
Location
Toronto
great looking little garage! I bet the neighbors love you for tearing down that old eyesore that was there. keep it up what are the plans for roofing material?

Sent from my SM-G935W8 using Tapatalk

Going with asphalt shingles - probably charcoal colored. It's an affordable option and will be in keeping with the neighbouring houses, which is important given how close together everybody is.
 

Bessy

Well-known member
Joined
Dec 18, 2012
Messages
992
Location
Ontario, Canada
Garagedriven, Looks like things are moving along pretty well. Did you manage to test fit the car in there yet?
 
OP
G

garagedriven

Active member
Joined
Aug 27, 2018
Messages
26
Location
Toronto
Things have been a bit slow on the project recently. My contractor is juggling two jobs so isn't on site everyday. He was upfront about that at the outset and the alternative was waiting until April which I didn't want to do. Weather has also been awful - we've been getting a ton of rain.

But I did test fit the car and yep, it's pretty tight but not too bad overall. I'll definitely be putting some hanging cabinets at the back over the front of the hood, but I'm torn right now on whether to also put a cabinet array down the right side. It's doable but would make it a tight squeeze for getting in and out on the passenger side.

attachment.php


attachment.php


attachment.php


attachment.php


attachment.php


attachment.php
 

Attachments

  • IMG_6696-2.jpg
    IMG_6696-2.jpg
    110.8 KB · Views: 598
  • IMG_6410-2.jpg
    IMG_6410-2.jpg
    116.4 KB · Views: 600
  • IMG_4096.jpg
    IMG_4096.jpg
    122.9 KB · Views: 600
  • IMG_3162.jpg
    IMG_3162.jpg
    96.8 KB · Views: 596
  • IMG_1373.jpg
    IMG_1373.jpg
    123.1 KB · Views: 596
  • IMG_1136.jpg
    IMG_1136.jpg
    91 KB · Views: 599

theundermount

Well-known member
Joined
Jan 17, 2016
Messages
489
Location
ON
I say go for the cabinets, a passenger can always just get out of the car before you pull in, it's a detached garage anyway so they would still have to walk outside eventually, if you have kids in car seats etc that may be a different story I guess...food for thought looking great though driveway is very clean

Sent from my SM-G935W8 using Tapatalk
 
OP
G

garagedriven

Active member
Joined
Aug 27, 2018
Messages
26
Location
Toronto
Don’t put the cabinets on the right side until everything else is done and closed in.

Maybe make a pattern out of cardboard boxes and hang on the RH side as test?


Ya, I'm not rushing to order them right now but will keep an eye on any Black Friday deals. I actually did do a mockup footprint with cardboard boxes already. The passenger door can open to the second stop and basically almost be touching where the cabinets would be.


I say go for the cabinets, a passenger can always just get out of the car before you pull in, it's a detached garage anyway so they would still have to walk outside eventually, if you have kids in car seats etc that may be a different story I guess...food for thought looking great though driveway is very clean


It's a good point. We do have do have kids in car seats right now so it's a consideration.


how thick is the pad for garage poured?


Pretty thick. The plans called for 4" but it looked much thicker when they poured it. It's also 4,600 PSI. It's particularly thick around the perimeter as well which I'm happy about.
 
OP
G

garagedriven

Active member
Joined
Aug 27, 2018
Messages
26
Location
Toronto
Ceiling joists and rafters are up, and the crew also dug the trench that will carry the electrical and plumbing to the garage. I also decided to upgrade my electrical service to the house from 100amp to 200amp which the City came out and did last week.

Looking like the rest of the roof framing might get finished today which will be good because it's a wet mess inside the garage right now with the constant rain we're getting.

attachment.php


attachment.php


attachment.php


attachment.php


attachment.php


attachment.php
 

Attachments

  • IMG_9644.jpg
    IMG_9644.jpg
    112.6 KB · Views: 496
  • IMG_8392.jpg
    IMG_8392.jpg
    141.2 KB · Views: 495
  • IMG_8209.jpg
    IMG_8209.jpg
    114.9 KB · Views: 495
  • IMG_7488.jpg
    IMG_7488.jpg
    97.9 KB · Views: 34
  • IMG_5132.jpg
    IMG_5132.jpg
    138.2 KB · Views: 488
  • IMG_2580.jpg
    IMG_2580.jpg
    140.3 KB · Views: 485
  • IMG_0573.jpg
    IMG_0573.jpg
    126.2 KB · Views: 486

PhantomEB

Well-known member
Joined
Feb 6, 2006
Messages
6,717
Location
Medicine Hat, AB, Canuckistan
Mines little compared to a lotta of here, 24x24 but I second Putting up cupboards at the head wall with tool boxes down below inside a well solid bench top cabinet.

Everything else can be pretty much mobile.
 

captain14

Well-known member
Joined
Dec 19, 2012
Messages
7,028
Location
Near College Park Maryland 20740
Post #34 third picture down shows a brick arch over the basement window and another photo shows brick arches over the first and second floor windows. Your house was constructed immediately after WWII (45-50?) or during the war when all of the steel was regulated to war use? That style is typically seen around the Wash DC in the close in neighborhoods.
 
OP
G

garagedriven

Active member
Joined
Aug 27, 2018
Messages
26
Location
Toronto
Post #34 third picture down shows a brick arch over the basement window and another photo shows brick arches over the first and second floor windows. Your house was constructed immediately after WWII (45-50?) or during the war when all of the steel was regulated to war use? That style is typically seen around the Wash DC in the close in neighborhoods.

Built in the 1920's in Toronto :)
 
OP
G

garagedriven

Active member
Joined
Aug 27, 2018
Messages
26
Location
Toronto
Thanks to everyone who has been following this thread and apologies for the awful job I've been doing keeping it updated. I've been finding it easier to update on instagram if you're interested in following there:

https://www.instagram.com/garagedriven/

Here's some photos of progress over the last couple of months.

attachment.php


attachment.php


attachment.php


attachment.php


attachment.php


attachment.php


attachment.php
 

Attachments

  • 50529292_307359959968312_585841219627296184_n.jpg
    50529292_307359959968312_585841219627296184_n.jpg
    67 KB · Views: 178
  • 49913180_308832129742377_7439266951418543627_n.jpg
    49913180_308832129742377_7439266951418543627_n.jpg
    90.3 KB · Views: 180
  • 50249947_161898098109814_3640829931036187300_n.jpg
    50249947_161898098109814_3640829931036187300_n.jpg
    67.9 KB · Views: 181
  • 47692814_280493315969819_7462230200062768642_n.jpg
    47692814_280493315969819_7462230200062768642_n.jpg
    103.2 KB · Views: 180
  • 47692768_281477532543359_385060966551442605_n.jpg
    47692768_281477532543359_385060966551442605_n.jpg
    105.9 KB · Views: 178
  • 44436328_325669118251763_3020884968699214504_n.jpg
    44436328_325669118251763_3020884968699214504_n.jpg
    85.3 KB · Views: 179
  • 44444528_256342208398246_5892378739194930533_n.jpg
    44444528_256342208398246_5892378739194930533_n.jpg
    84.8 KB · Views: 178
OP
G

garagedriven

Active member
Joined
Aug 27, 2018
Messages
26
Location
Toronto
And a few more....

attachment.php


attachment.php


attachment.php


Prier hose bib installed inside garage:
attachment.php


Some detailing / pressure washing products from Obsessed Garage
attachment.php


NewAire G73 Electric Garage Heater installed:
attachment.php


Current status:
attachment.php


As of right now, the exterior of the garage is complete. Insulation, drywall and plywood have been installed on the inside. The reason for the two different kinds of materials is that the building inspector required me to install fire-rated drywall along two walls due to the proximity to my neighbours house.

I will be waiting for temperatures to warm up before doing mudding and taping... so everything that comes after that (paint, floor, cabinets, pressure washer setup etc) is on hold until that happens.

My contractor will be installing a attic access hatch next week likely.
 

Attachments

  • 50995868_2307032556232249_7855392636187216177_n.jpg
    50995868_2307032556232249_7855392636187216177_n.jpg
    77.3 KB · Views: 178
  • 50887393_234530427501251_853766123551389879_n.jpg
    50887393_234530427501251_853766123551389879_n.jpg
    55.1 KB · Views: 178
  • IMG_8437.jpg
    IMG_8437.jpg
    72.9 KB · Views: 178
  • IMG_8444.JPG
    IMG_8444.JPG
    67.4 KB · Views: 181
  • IMG_8443.JPG
    IMG_8443.JPG
    53.2 KB · Views: 185
  • 51600998_557822474731948_7662020430503583413_n.jpg
    51600998_557822474731948_7662020430503583413_n.jpg
    109.2 KB · Views: 184
  • IMG_8525.jpg
    IMG_8525.jpg
    80.1 KB · Views: 185
To avoid these ads, REGISTER NOW!
Top Bottom