To avoid these ads, REGISTER NOW!

Craftsman Drill Press

OP
F

FrankLee

Well-known member
Joined
Sep 13, 2010
Messages
3,547
Location
seMI, 48317
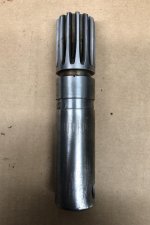
I’m having some questions about the chuck. I saw online that maybe it is an adapter for a different chuck?

Also here is the motor on it. Runs quiet so I'm just going to clean it up good and repaint.

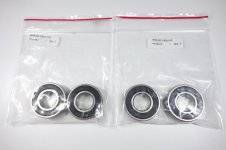
The chuck and parts above look normal except the gap between the thrust bearing and the quill.

Is that as high as the quill returns? If so, that's a problem.


It once had a vari-slow on it.
A Vari-Slo would not fit on a 12-1/4" or 13-1/2" machine.

That hole above the badge was likely for a custom belt guard, a switch, or a lamp.
 
To avoid these ads, REGISTER NOW!

Unruh

Well-known member
Joined
Aug 12, 2017
Messages
1,431
Location
Silverdale, Washington
No it returns all the way, I just have to apply pressure on the handle. I’m guessing that is the return springs and they to to be adjusted. When I do put it all the way up. The pulley above raises about a 1/2 inch? Is that common?
attachment.php
 

Attachments

  • E8EAE527-BCB5-4723-8E15-8579978FD55C.jpg
    E8EAE527-BCB5-4723-8E15-8579978FD55C.jpg
    68.9 KB · Views: 392
OP
F

FrankLee

Well-known member
Joined
Sep 13, 2010
Messages
3,547
Location
seMI, 48317
No it returns all the way, I just have to apply pressure on the handle. I’m guessing that is the return springs and they to to be adjusted. When I do put it all the way up. The pulley above raises about a 1/2 inch? Is that common?

No, the pulley should not lift on a feed return. I believe once you get it apart, cleaned and reassembled, most issues will be resolved.
 
OP
F

FrankLee

Well-known member
Joined
Sep 13, 2010
Messages
3,547
Location
seMI, 48317
Probably missing the screw that holds the pulley bearings in place.
I had the same problem with the pulley. No screw...

Because his drill press has a two-handle feed rod with no knobs, it is a 12-1/4" drill press with three porous bronze bearings and one thrust bearing.

Despite the external similarity, these smaller drill presses have a very different internal geometry than their larger 13½" and 15½" siblings. There are two set screws in the pulley instead of the retaining screws.

Check here:
https://www.garagejournal.com/forum/showthread.php?p=5658352&post5658352
 

shadycrew31

Well-known member
Joined
Jun 23, 2017
Messages
58
Location
Burbs of Philly
Hi All, looking at a few craftsman options near me found a few models within my price range. Each model is around $200 give or take $25, I plan on haggling a bit to get down to $150 on either of the 100's. I realize the question is subjective but based on first look which would be the better option? I do minimal metal and wood working, would not be heavily used.

The 100 appears to be one of the gold 30th anniversary machines, but the motor is mounted on the wall maybe? Its hard to make out what happened to the thing.

34369139_2145304005705634_5346656034893070336_n.jpg


Another appears to be an early model 100 or I guess 80? with a dunlap ball bearing motor, in decent shape could use a little love.

36900476_10205155863733080_5026739876817534976_n.jpg


The 150, looks to be in great condition hard to tell what motor is with the unit. looks to be a later model based on what I can see.

45506176_10156245625884032_6957926167177330688_n.jpg
 

sheltonfilms

Well-known member
Joined
May 28, 2014
Messages
157
Hi All, looking at a few craftsman options near me found a few models within my price range. Each model is around $200 give or take $25, I plan on haggling a bit to get down to $150 on either of the 100's. I realize the question is subjective but based on first look which would be the better option? I do minimal metal and wood working, would not be heavily used.


The 100 appears to be one of the gold 30th anniversary machines, but the motor is mounted on the wall maybe? Its hard to make out what happened to the thing.


34369139_2145304005705634_5346656034893070336_n.jpg


Another appears to be an early model 100 or I guess 80? with a dunlap ball bearing motor, in decent shape could use a little love.


36900476_10205155863733080_5026739876817534976_n.jpg


The 150, looks to be in great condition hard to tell what motor is with the unit. looks to be a later model based on what I can see.


45506176_10156245625884032_6957926167177330688_n.jpg


First one looks like a 56 model. The motor on the wall looks actually like a motor on a plate mounted to factor motor plate. It’s most likely a jackshaft reduction setup. Motor goes to bottom of jackshaft, power goes up through jackshaft to the top and then over to spindle pulley. Motor appears to be a “Long C” style motor from a decade earlier.

2nd is a 100 (80s have straight two knob handles).

3rd 150 could have a factory motor. Those from that time did have external capacitor motors.

All look pretty good a close glance. But pictures can be deceiving. Need to look in person.


Sent from my iPhone using Tapatalk
 
OP
F

FrankLee

Well-known member
Joined
Sep 13, 2010
Messages
3,547
Location
seMI, 48317
First one looks like a 56 model. The motor on the wall looks actually like a motor on a plate mounted to factor motor plate. It’s most likely a jackshaft reduction setup. Motor goes to bottom of jackshaft, power goes up through jackshaft to the top and then over to spindle pulley. Motor appears to be a “Long C” style motor from a decade earlier.

2nd is a 100 (80s have straight two knob handles).

3rd 150 could have a factory motor. Those from that time did have external capacitor motors.

All look pretty good a close glance. But pictures can be deceiving. Need to look in person.


Sent from my iPhone using Tapatalk

In addition, the #1 and #3 are floor standing models with non-tilting tables.

The quill on #1 is extended. That could be simply a spring that needs to be re-tensioned or a broken spring.

#2 is bench top with a tilting table.

The 150 is the cleanest, but the motor/belt is badly mis-aligned. Look for wear on the pulleys. Those motors did not come equipped with a switch, so look for an add-on box or foot switch. Check whether the motor is sleeve or ball bearing. There are nice evolutionary features on the 150 (quill snap ring, rapid adjust feed stop, pivot motor mount), but I'm not a fan of the newer feed return spring design.

Cleaned up, any one of those would serve you well.
 
Last edited:

shadycrew31

Well-known member
Joined
Jun 23, 2017
Messages
58
Location
Burbs of Philly
First one looks like a 56 model. The motor on the wall looks actually like a motor on a plate mounted to factor motor plate. It’s most likely a jackshaft reduction setup. Motor goes to bottom of jackshaft, power goes up through jackshaft to the top and then over to spindle pulley. Motor appears to be a “Long C” style motor from a decade earlier.

2nd is a 100 (80s have straight two knob handles).

3rd 150 could have a factory motor. Those from that time did have external capacitor motors.

All look pretty good a close glance. But pictures can be deceiving. Need to look in person.


Sent from my iPhone using Tapatalk

In addition, the #1 and #3 are floor standing models with non-tilting tables.

The quill on #1 is extended. That could be simply a spring that needs to be re-tensioned or a broken spring.

#2 is bench top with a tilting table.

The 150 is the cleanest, but the motor/belt is badly mis-aligned. Look for wear on the pulleys. Those motors did not come equipped with a switch, so look for an add-on box or foot switch. Check whether the motor is sleeve or ball bearing. There are nice evolutionary features on the 150 (rapid adjust feed stop, pivot motor mount), but I'm not a fan of the newer feed return spring design.

Cleaned up, any one of those would serve you well.

Appreciate the quick responses.

I was concerned about the alignment on the pulley/motor and the ramifications it could have. it I figure if I can get him down to $150 it might be worth it.

One more that just popped up, its about 3 hours north of me but looks to be in good condition. I do see it has the external switch, motor looks to be in better alignment and its about $25 cheaper than the other 150.

I'd need to talk the wife into using her 4 runner, I'm sure it would fit. I saw the breakdown for transportation post as well so I can give that a shot if needed. The family truck can only be trusted for 1 hour drives in mild weather.
 

bubinga

Well-known member
Joined
Jul 26, 2014
Messages
12,744
Location
Bridgeport Ohio. (Across River From Wheeling WV)
Any recommendations on what to do to the hole before painting? JB Weld then sand it down?
JB Weld would be just fine for that application.
Grind the area down about an inch, inch and a half radius from the hole,
so You have some area to feather it in.
I have/ would put tape on the inside, so you can fill the hole without loosing all you JB weld.
Don't be afraid to do it in 2, 3, or 4 coats. On your Finale coat, spread your JB weld Thin, BUT about 2 inches from each side of the hole.
Then when you sand, most of the JB weld furthest away from the hole will be Sanded away all together, BUT it will let it feather in nice, and be all even .
Then when You Prime and paint, you won't see a depression where the hole is. You could even use Body filler (auto) for your last skim coat, You know, if you have any laying around, But not 100 % needed. JB weld sands pretty easy,:thumbup:
 

Unruh

Well-known member
Joined
Aug 12, 2017
Messages
1,431
Location
Silverdale, Washington
JB Weld would be just fine for that application.
Grind the area down about an inch, inch and a half radius from the hole,
so You have some area to feather it in.
I have/ would put tape on the inside, so you can fill the hole without loosing all you JB weld.
Don't be afraid to do it in 2, 3, or 4 coats. On your Finale coat, spread your JB weld Thin, BUT about 2 inches from each side of the hole.
Then when you sand, most of the JB weld furthest away from the hole will be Sanded away all together, BUT it will let it feather in nice, and be all even .
Then when You Prime and paint, you won't see a depression where the hole is. You could even use Body filler (auto) for your last skim coat, You know, if you have any laying around, But not 100 % needed. JB weld sands pretty easy,:thumbup:

Great advice. I’ll try it when the time comes. Thanks :beer:
 

s14kev

Well-known member
Joined
Dec 12, 2008
Messages
245
Just finished a restoration on this one. Completely stripped, blasted, painted, new bearings etc. Also rewired much of the motor with proper terminated connections and fiberglass sleeved wires. Turned out fairly well. I made a mobile base for it after I realized it was too damn heavy to move around once assembled. It will be a user for sure but it's almost too pretty to cover it with metal swarf!

View media item 88859
View media item 88860
View media item 88861
View media item 88862
View media item 88863
View media item 88864
View media item 88865
 

s14kev

Well-known member
Joined
Dec 12, 2008
Messages
245
On another note, If anyone is embarking on a similar project, I have a pair of sealed quill bearings (6202RS5/8) and sealed motor bearings (6202RS16) up for sale. The quill bearings have a 35mm OD and 5/8" ID and the motor bearings have a 35mm OD and 16mm ID. Shoot me a PM if you need them.
 

Attachments

  • DSC03803.jpg
    DSC03803.jpg
    72.6 KB · Views: 26
To avoid these ads, REGISTER NOW!

Unruh

Well-known member
Joined
Aug 12, 2017
Messages
1,431
Location
Silverdale, Washington
Just finished a restoration on this one. Completely stripped, blasted, painted, new bearings etc. Also rewired much of the motor with proper terminated connections and fiberglass sleeved wires. Turned out fairly well. I made a mobile base for it after I realized it was too damn heavy to move around once assembled. It will be a user for sure but it's almost too pretty to cover it with metal swarf!

View media item 88859
Someone call 911, cause s14kev just stole the show! She looks like she is ready for the ball. I hope mine looks half as good as that when I’m done.
 
Last edited:

sheltonfilms

Well-known member
Joined
May 28, 2014
Messages
157
Re: The Classic Craftsman 100/150 Drill Press

Has anyone thought of converting the Jacobs 33 taper over to something like Morse taper 2?

My thoughts would be to get a 2MT extension and you would have to cut off part of the existing spindle and weld the extension on (need precision here). Then a new bearing for the bottom of the quill to match the OD of the 2MT extension.


Sent from my iPhone using Tapatalk
 
OP
F

FrankLee

Well-known member
Joined
Sep 13, 2010
Messages
3,547
Location
seMI, 48317
Just finished a restoration on this one. Completely stripped, blasted, painted, new bearings etc. Also rewired much of the motor with proper terminated connections and fiberglass sleeved wires. Turned out fairly well. I made a mobile base for it after I realized it was too damn heavy to move around once assembled. It will be a user for sure but it's almost too pretty to cover it with metal swarf!

That is beautiful work right there!
 

Craptain

Well-known member
Joined
Apr 18, 2013
Messages
4,027
Location
Tampa Bay FL
Re: The Classic Craftsman 100/150 Drill Press

Has anyone thought of converting the Jacobs 33 taper over to something like Morse taper 2?

My thoughts would be to get a 2MT extension and you would have to cut off part of the existing spindle and weld the extension on (need precision here). Then a new bearing for the bottom of the quill to match the OD of the 2MT extension.


Sent from my iPhone using Tapatalk
My first question is why? Jacobs 33 is very common and easily available. On my lathe the tailstock uses Morse taper with an adapter to Jacobs. In other words I use Jacobs anyway.

Sent from my SM-G930T using Tapatalk
 

sheltonfilms

Well-known member
Joined
May 28, 2014
Messages
157
Re: The Classic Craftsman 100/150 Drill Press

Possibility of getting a bigger chuck.


Sent from my iPhone using Tapatalk
 
OP
F

FrankLee

Well-known member
Joined
Sep 13, 2010
Messages
3,547
Location
seMI, 48317
Re: The Classic Craftsman 100/150 Drill Press

Has anyone thought of converting the Jacobs 33 taper over to something like Morse taper 2?

My thoughts would be to get a 2MT extension and you would have to cut off part of the existing spindle and weld the extension on (need precision here). Then a new bearing for the bottom of the quill to match the OD of the 2MT extension.

I'm thinking that a morse taper spindle from an Atlas (or other) machine would fit into a King-Seeley quill without modification and work well.

Below is a picture of both side-by-side. I lined up the bottom of the lower bearings.

I believe both take 5/8" special bore bearings. The Atlas splined pulley shaft fits nicely onto the K-S spindle and I believe the opposite would be true. There is a slight difference in the length of the splines above the quill.


IIRC, long ago, I swapped the spindle from this Duro machine into a Craftsman machine.


sheltonfilms

Well-known member
Joined
May 28, 2014
Messages
157
I'm thinking that a morse taper spindle from an Atlas (or other) machine would fit into a King-Seeley quill without modification and work well.

Below is a picture of both side-by-side. I lined up the bottom of the lower bearings.

I believe both take 5/8" special bore bearings. The Atlas splined pulley shaft fits nicely onto the K-S spindle and I believe the opposite would be true. There is a slight difference in the length of the splines above the quill.


IIRC, long ago, I swapped the spindle from this Duro machine into a Craftsman machine.


Good info Frank. I guess that's a good way of not having to cut an ejector slot into the side of an existing quill (recessed female taper).

Fair enough. I never thought about that as I have a mill which covers the larger requirements.

Sent from my SM-G930T using Tapatalk

If I only had a mill (or better yet the room for one).:(
 

Unruh

Well-known member
Joined
Aug 12, 2017
Messages
1,431
Location
Silverdale, Washington
Did some cleaning on the column here is some before and after. These are just sneak peeks. I plan on buffing them more. I'm just excited with how they are turning out and wanted to share.

You can see the Column in the back of this picture.
attachment.php


Here is a close up of the column.
attachment.php


And after some sanding and buffing. Like I said, I have a few more steps I wanna take this through, but I'm excited to see the difference.
attachment.php
 

Attachments

  • C12B87C7-7959-4660-8259-C818B454C64C.jpg
    C12B87C7-7959-4660-8259-C818B454C64C.jpg
    60.9 KB · Views: 1,257
  • 8CEC571A-DAE7-43B5-8977-4C92628F197E.jpg
    8CEC571A-DAE7-43B5-8977-4C92628F197E.jpg
    60.4 KB · Views: 1,254
Last edited:

Unruh

Well-known member
Joined
Aug 12, 2017
Messages
1,431
Location
Silverdale, Washington
Couple more before and after. I still plan on trying to clean out this Pinion's teeth, but again I'm pretty excited with what I'm finding. Not a lot of wear marks except where the set screw was on the feed stop collar.

attachment.php


Here you can see the wearing from the set screw. Once it gets all back together it won't show, but I plan on taking a file to it and cleaning it up a bit. I still plan on buffing this more but happy with the progress.

attachment.php
 

Attachments

  • 4363FF8B-55BD-445F-9D86-E1F692D3B727.jpg
    4363FF8B-55BD-445F-9D86-E1F692D3B727.jpg
    69.3 KB · Views: 1,244
  • 4BC7D0A0-CF7A-42F3-A1E1-CE890B504CCF.jpg
    4BC7D0A0-CF7A-42F3-A1E1-CE890B504CCF.jpg
    71.7 KB · Views: 1,246
Last edited:

IdahoMan

Well-known member
Joined
Feb 26, 2015
Messages
434
Just finished a restoration on this one. Completely stripped, blasted, painted, new bearings etc. Also rewired much of the motor with proper terminated connections and fiberglass sleeved wires. Turned out fairly well. I made a mobile base for it after I realized it was too damn heavy to move around once assembled. It will be a user for sure but it's almost too pretty to cover it with metal swarf!

View media item 88859
View media item 88860
View media item 88861
View media item 88862
View media item 88863
View media item 88864
View media item 88865

That is a stunner!

What paint did you use?
How is the runout?
 
OP
F

FrankLee

Well-known member
Joined
Sep 13, 2010
Messages
3,547
Location
seMI, 48317
...

I'm just excited with how they are turning out and wanted to share.

...

Thanks for sharing... that is looking great! Results like that make the effort to save these old machines worthwhile.


12/12/2018

DP#51 is an Atlas 1455 with a taper spindle, a head frame lift and an absurdly large Dayton 1/2 hp motor. The front pulley guard is missing, the motor pulley is not original and the table support was repaired.

 
Last edited:

s14kev

Well-known member
Joined
Dec 12, 2008
Messages
245
That is a stunner!

What paint did you use?
How is the runout?


Rustoleum Soft Iron Metallic. I started painting all of my machinery restorations with this. It's a good balance of a very low sheen (almost flat) cast iron color but with enough metallic in it to really make the finish pop.

Runout is exceptional. Less than 1 thou measured with a Mitutoyo test indicator with a piece of drill rod at the tip of the chuck jaws.

I got really lucky with this one. It was in exceptional shape before restoration and looks like it had very minimal use. I almost felt bad repainting it. Certainly made my job much easier starting with a good specimen.
 

erik a

Well-known member
Joined
Jan 31, 2017
Messages
58
Location
Silver Spring MD
My recent 1952-53 "100" refresh.
The grey is original, just cleaned up.
The pot metal parts were repainted to match the original soft aluminum color.
New bearings of course. Nice and smooth...
 

Attachments

  • DP left.jpg
    DP left.jpg
    59.4 KB · Views: 40
  • DP right.jpg
    DP right.jpg
    58.4 KB · Views: 47

honza.vosalik

Well-known member
Joined
Feb 27, 2016
Messages
882
Location
Missouri
This showed up on local marketplace. The guy's asking $350.
 

Attachments

  • 48269172_10218028552242255_8916282802903711744_n.jpg
    48269172_10218028552242255_8916282802903711744_n.jpg
    78.7 KB · Views: 103

shadycrew31

Well-known member
Joined
Jun 23, 2017
Messages
58
Location
Burbs of Philly
Well I picked up my new beauty this Saturday. Was really impressed with the condition it was in. The spindle doesnt return without moving the handle back. If I remember correctly these should be spring assisted to return back up but I might be confused.

Also the bushing on the motor could be replaced but not major. I thought the on off switch was pretty creative.

45638266464_326c52078f_z.jpg


45638266354_935b494fca_z.jpg


45448695415_2371d59954_z.jpg


45448695345_082188d3a4_z.jpg


45638266424_ef7414c295_z.jpg
 
To avoid these ads, REGISTER NOW!
Top Bottom