To avoid these ads, REGISTER NOW!

Craftsman 103.23100

Spider1953

Active member
Joined
May 4, 2019
Messages
32
Location
Wilmington Ca
Hey Guys.
I love the old stuff. I mostly restore tube radios but I’ve done desk fans, space heaters & vacuums from the ‘30s-‘40s.
I need a drill press so I thought “hey, why not a Good Ol fashion one.
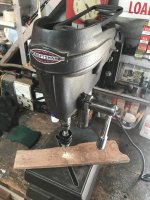
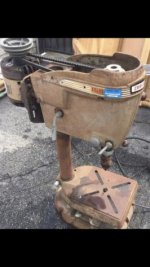
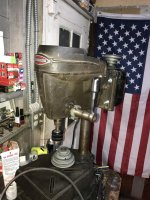
I picked up a craftsman 103.23100 today and started clean’n. The guy said it worked so I plugged Her in and sure enough She started spinning. Something looked off on the belt. It was on wrong so I took it off and put it all the way up to the top. It was now lower on the motor (at an angle from the front pulley)
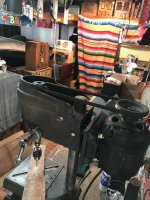
So I adjusted the motor mount and it’s now straight as an arrow. I turned it on and all the lights in the garage went dim so I shut it off quickly.
It ran for 2 seconds tops.
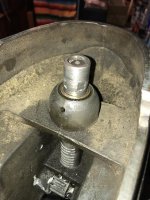
I took the front pulley off and this is what I found. I don’t know what any of these parts are called so I’ll just call it a shaft. The shaft looks all chewed up. I’m wondering if this happened because the belt was all crooked and the motor was way off. The shaft doesn’t spin freely but the motor seems to run smooth and quiet with the belt off.
Any help will be great. I would love to get Her up and drilling for me ASAP. And if this shaft is shot, where can I find a replacement.
Thanx Y’all. This seems like it’ll be a fun little hobby for me.
 

Attachments

  • 64E2D4FC-D182-457D-B7FD-38A29C0C552B.jpg
    64E2D4FC-D182-457D-B7FD-38A29C0C552B.jpg
    124.7 KB · Views: 93
  • 04B77C9C-7AF4-4E08-AD58-C0C51252E103.jpg
    04B77C9C-7AF4-4E08-AD58-C0C51252E103.jpg
    130.7 KB · Views: 83
  • B1E86602-BF46-4736-9863-38EDCD83A25B.jpg
    B1E86602-BF46-4736-9863-38EDCD83A25B.jpg
    107.5 KB · Views: 82
  • FCC743A9-5F2B-470D-8DC5-8CF7D672AA08.jpg
    FCC743A9-5F2B-470D-8DC5-8CF7D672AA08.jpg
    122.2 KB · Views: 92
Last edited:
To avoid these ads, REGISTER NOW!

rickhigginshtbr

Well-known member
Joined
Aug 7, 2012
Messages
1,551
Location
Lower Bucks, PA
Wow, that may be the first time I've seen one of those that didn't have sealed bearings. See where it looks wet coming out of that hole in your first two pics? Put some air tool oil in there. There should be a lower bearing too.
 

FrankLee

Well-known member
Joined
Sep 13, 2010
Messages
3,551
Location
seMI, 48317
WAIT!

Before you do anything else, click the link that Jay provided or the one in my signature. They are the same thread.

Then click and review the "Newbie Pointers" link and get the owners manual for your machine.

Then click and review the "Spotter's Guide" to identify the size, age and series of your machine. Hint: Your feed handle was replaced. The original was a rod with no knobs.


There are several issues that could be your problem. Once you’re aware of which machine you have, we’ll begin diagnosis.
 
Last edited:
OP
S

Spider1953

Active member
Joined
May 4, 2019
Messages
32
Location
Wilmington Ca
Ok after some research, I’m going to say that my DP is a
Craftsman 80 12 1/4 (1946-1949)
I found an owner’s manual on eBay for $10 in perfect condition.
I’ll make copies of all the pages and study those.
I just like to have the original manuals.
I collect all the original schematics for my radios too.
Should I start the tear down now or wait til I get the manual??

Wow. I learned so much from that link. Thanx for that.
 

FrankLee

Well-known member
Joined
Sep 13, 2010
Messages
3,551
Location
seMI, 48317
Ok after some research, I’m going to say that my DP is a
Craftsman 80 12 1/4 (1946-1949)
I found an owner’s manual on eBay for $10 in perfect condition.
I’ll make copies of all the pages and study those.
I just like to have the original manuals.
I collect all the original schematics for my radios too.
Should I start the tear down now or wait til I get the manual??

Wow. I learned so much from that link. Thanx for that.

OK. Perfect.

No. You don't need the manual for tear down. It's mainly needed for part names when asking questions. You can use a working copy from VM.

There is a link in the Craftsman Drill Press thread called "Craftsman/Dunlap 12¼" Drill Press Head Frame Disassembly". That should help tear down.


Regarding the splined sleeve (shaft) that does not spin freely... there are a few possible causes.
  • the previous lubrication has gummed-up
  • the pulley set screws have caused burrs on the sleeve
  • the sleeve is out-of-round due to the set screw being over-tightened


You may have read that your machine has three porous bronze sleeve bearings. Two in the quill/spindle assembly and one for the splined sleeve. They are all pressed in.

During disassembly, I never remove those unless they are trashed. Replacing them requires pressing them in and usually the ID compresses. They must be reamed to the correct size.

For bronze/sleeve bearings in motors and machines, I use 3-in-One motor oil in the blue bottle. I would first put a few drops on the top of the bronze bearing along the splined sleeve... not in the lube port hole. I would not use any kind of penetrant, WD-40, or solvent on the bronze bearings; only use what your final lubrication is.

Then start dismantling the machine per the procedure in the link. When you get to step #22, determine what is causing the sticking. If burred, you may need to file the burrs off so the sleeve will slide out the bronze bearing.


Because your machine has a threaded spindle, it came from the factory with a keyless chuck. Yours was replaced with a keyed chuck. That's a good thing.
 
Last edited:
To avoid these ads, REGISTER NOW!
OP
S

Spider1953

Active member
Joined
May 4, 2019
Messages
32
Location
Wilmington Ca
Ok. I tore Her down. Holy Smokes. That was a job....
it was kind of fun though. She’s all cleaned up and lubed up.
The motor is aligned with the front spinal and the belt is on.
I put it on too tight and the motor was fighting for its life.
I loosened it a little and now She’s doing Her job correctly.
Thank you all for the links and advice.
That was fun.
I found this other one on offer up and I talked the lady down to $18 and a pack of Marlboro reds.

Here we go again. I want to paint this other one. Only since She’s all rusty.
 

Attachments

  • 41BB09E5-4CFC-4FE6-948B-50BDDAA53FA8.jpg
    41BB09E5-4CFC-4FE6-948B-50BDDAA53FA8.jpg
    120.3 KB · Views: 63
  • 9A6AD482-A9B8-47C2-A146-14A8B9C5197D.jpg
    9A6AD482-A9B8-47C2-A146-14A8B9C5197D.jpg
    118.5 KB · Views: 46
  • CB2B1CEC-5496-41DF-8DF6-17285862FA3F.jpg
    CB2B1CEC-5496-41DF-8DF6-17285862FA3F.jpg
    20.8 KB · Views: 24
  • D5772DAB-B4DC-498E-8A35-6C7EEB61FA7F.jpg
    D5772DAB-B4DC-498E-8A35-6C7EEB61FA7F.jpg
    20.4 KB · Views: 23
Last edited:

FrankLee

Well-known member
Joined
Sep 13, 2010
Messages
3,551
Location
seMI, 48317
Ok. I tore Her down. Holy Smokes. That was a job....
it was kind of fun though. She’s all cleaned up and lubed up.
The motor is aligned with the front spinal and the belt is on.
I put it on too tight and the motor was fighting for its life.
I loosened it a little and now She’s doing Her job correctly.
Thank you all for the links and advice.
That was fun.
I found this other one on offer up and I talked the lady down to $18 and a pack of Marlboro reds.

Here we go again. I want to paint this other one. Only since She’s all rusty.

Excellent on both drill presses! It's a slippery slope.

One suggestion... move the belt to the bottom steps. At the top, it's screamin' fast.
 

FrankLee

Well-known member
Joined
Sep 13, 2010
Messages
3,551
Location
seMI, 48317
Also, if that’s the original belt, you will find that a new cogged belt is much more flexible and will run smoother.

There is a belt replacement post in the Craftsman Drill Press thread.
 
OP
S

Spider1953

Active member
Joined
May 4, 2019
Messages
32
Location
Wilmington Ca
Mine is asking for a 1/2 x 37”
Can I use the 45” then just slide the motor mount out???
I’m not sure if that’ll put strain on the mount.
Remember..... I don’t know anything about these DPs
 

FrankLee

Well-known member
Joined
Sep 13, 2010
Messages
3,551
Location
seMI, 48317
Mine is asking for a 1/2 x 37”
Can I use the 45” then just slide the motor mount out???
I’m not sure if that’ll put strain on the mount.
Remember..... I don’t know anything about these DPs

No, you’ll need to stay close to the original spec. If you buy an autozone belt check a few sizes because prices can vary widely with a small change in size. I would try to stay within 1-1/2” longer than spec.

For example:
  • belt 17370 (37") is $10.99
  • belt 17375 (37.5") is $10.99
  • belt 17380 (38") is $5.99
  • belt 17385 (38.5") is $6.99

YMMV, but I know which I'd choose.
 
Last edited:
To avoid these ads, REGISTER NOW!
Top Bottom