To avoid these ads, REGISTER NOW!

One way to fix a toolbox broken channel track (what the drawer slide rides in)

tool_scrounge

Well-known member
Joined
Jul 20, 2010
Messages
4,190
Location
Southern California
Fixing a Snapon toolbox broken channel track (what friction drawer slides ride in)

A bit back I picked up a Snap-on KR557D tool box that had a broken channel track. This is the C shaped track welded into the toolbox frame that the drawer friction slide moves in. Snap-on does not supply replacement channel tracks, so I needed to fix the existing one.

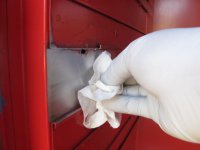
First, I removed all the drawers for better access.

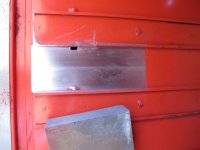
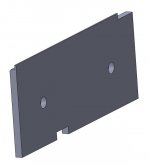
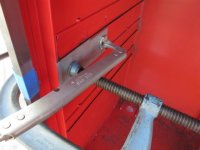
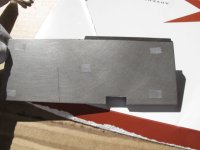
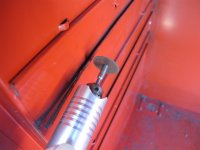
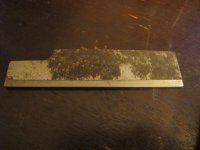
The channel track was very bent, but only the first couple of inches were actually cracked or separated. So the next step it to bend back the distorted lip to save as much as possible. So I tool a piece of steel 1.25" flat stock and machined a lip down to 0.111" (see photo). This is the inside dimension of the undamaged channel track lip. This piece of steel is then C-Clamped inside the track to act as a form to bend the damage lip against.

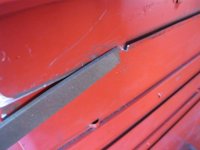
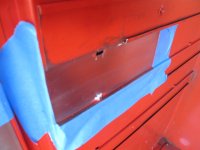
I then used body hammers to CAREFULLY bend the track back. See the resulting photo.

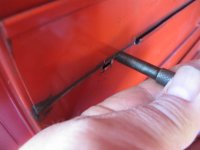
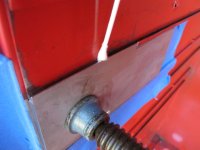
Then using a Dremel type grinder with a cut-off wheel, I cut off the cracked part of the track. Snap-on has protruding alignment features in the tool box wall below the channel track for spot welding in assembly. The one guide under the guide track also needed to be removed as shown. In retrospect I would have cut with the cut-off wheel from the bottom to avoid the two slight vertical cuts in the channel track.

More to follow in the next message...
 

Attachments

  • IMG_6355.JPG
    IMG_6355.JPG
    88.1 KB · Views: 89
  • IMG_6381.JPG
    IMG_6381.JPG
    82.7 KB · Views: 88
  • IMG_6380.JPG
    IMG_6380.JPG
    79.1 KB · Views: 85
  • IMG_6379.JPG
    IMG_6379.JPG
    70.2 KB · Views: 77
  • IMG_6378.JPG
    IMG_6378.JPG
    84 KB · Views: 79
  • IMG_6377.JPG
    IMG_6377.JPG
    80 KB · Views: 79
  • IMG_6565.jpg
    IMG_6565.jpg
    120.4 KB · Views: 83
Last edited:
To avoid these ads, REGISTER NOW!
OP
T

tool_scrounge

Well-known member
Joined
Jul 20, 2010
Messages
4,190
Location
Southern California
After the broken part of the channel track is cut off, there is still the other side of the broken channel track lip is protruding slightly. I lightly hammered these flat with a flat punch, taking care not to damage or distort the rest of the channel track. I then carefully used a file to remove what little lip was still protruding. I also the file to removed any burrs on the remaining channel track lip.

Al this point I made careful measurement and designed a replacement steel rail for the damaged channel track. The section would then be glued it in place. If carefully machined to fit, the next channel track below will provide support (in addition to the glue). I modeled this up in CAD as shown in the attached pictures. The glue region is about 2.2" x 6". With 12+ square inches of glue area and the support of the rail below, I think I will get enough strength. I designed it originally for two screws holes to allow initial adjustment and keep it in place while the glue dries. In the end I omitted the screw holes and just temporarily clamped it in place.

I machined up the channel track replacement piece out of 3/16" thick 304 stainless steel. I would normally use A36 steel plate but those pieces showed up a bit thin from the metal supplier. The photo below is the test fit it with a C-clamp. I put the drawer in place and it slid in and out fine with load using the usual paraffin wax as lubricant (per Snap-On's recommendations).

To have good bond strength, the paint under the channel track replacement piece need to be removed. A sanding block and blue tape made easy work of removing the paint.
 

Attachments

  • IMG_6393.JPG
    IMG_6393.JPG
    90.6 KB · Views: 82
  • IMG_6392.JPG
    IMG_6392.JPG
    77.7 KB · Views: 70
  • IMG_6390.JPG
    IMG_6390.JPG
    79.2 KB · Views: 76
  • snap-on_tool_box_channel_track_repair_2.JPG
    snap-on_tool_box_channel_track_repair_2.JPG
    22.2 KB · Views: 67
  • snap-on_tool_box_channel_track_repair_1.JPG
    snap-on_tool_box_channel_track_repair_1.JPG
    28.4 KB · Views: 71
  • IMG_6387.JPG
    IMG_6387.JPG
    86.5 KB · Views: 76
  • IMG_6383.JPG
    IMG_6383.JPG
    77.4 KB · Views: 74
Last edited:
OP
T

tool_scrounge

Well-known member
Joined
Jul 20, 2010
Messages
4,190
Location
Southern California
After sanding, be sure to wipe everything clean with a cloth and isopropyl alcohol.

I then applied 5 small pieces of tape to the surface of the replacement piece to act as a spacer to keep the glue bond line around 0.003" thick. Adhesive bond lines that are too thin have reduced strength. Probably wishful thinking as the tool box sheet metal is probably not that flat.

Blue painters tape was also applied to make cleanup of the excessive epoxy that squeezed out easier.

Bpjr here recommended using T-88 epoxy to glue the replacement piece in place. The T-88 shear specifications are pretty impressive so I used it.

After applying a thin layer, I clamped it in place. Note that a piece of wood was taped to the outside of the box to prevent damage from the C-clamps. Q-tips were then used to clean off any epoxy the squeezed out of the joint, especially in the track area.

The glue worked well but takes a long time to cure. I removed the clamp after half a day and waited three days for full cure.

The repair worked well with the tool box drawer installed and loaded up. Not quite as smooth as the other drawers, but functional.

The real trick is to machine the adapter so the bottom of the replacement channel track matches the existing channel track. This allows the slide move in and out without going over a lip. If I ever did this again I would probably lap this surface on the replacement channel track adapter to smooth out the machining marks.
 

Attachments

  • IMG_6404.JPG
    IMG_6404.JPG
    91.4 KB · Views: 76
  • IMG_6394.JPG
    IMG_6394.JPG
    86.1 KB · Views: 66
  • IMG_6401.JPG
    IMG_6401.JPG
    83.7 KB · Views: 67
  • IMG_6399.JPG
    IMG_6399.JPG
    83.5 KB · Views: 67
  • IMG_6398.JPG
    IMG_6398.JPG
    86.6 KB · Views: 65
  • IMG_6396.JPG
    IMG_6396.JPG
    70.3 KB · Views: 68
  • IMG_6403.JPG
    IMG_6403.JPG
    87.1 KB · Views: 80
Last edited:
To avoid these ads, REGISTER NOW!
Top Bottom