To avoid these ads, REGISTER NOW!

The Pain Cave/Movie Room/Workshop/Panic Room Garage

OP
P

pgray007

Well-known member
Joined
Jul 25, 2007
Messages
573
Location
Charlotte, NC area
I have a funny relationship with California. I like making fun of their wack-a-doodle politics, gas that costs $12,438.45 (as least last time I checked), rolling brownouts, etc., but whenever I’m out there for work, basking in the 78F weather with 35% humidity I can’t help think “Ahhhhh, so THIS is why people live here!”

I mention this because up to this point, we’ve basically had SC (SoCal) weather down here in SC (South Caccalackey). It’s been a pleasure to work outside, and I was almost getting to the point of complaining about the lack of rain.

Well, apparently my mental complaints were heard, since we just made out way through a good 10 days of rain, with those weird southern days where you have a crazy thunderstorm, then 30 minutes later it’s beautiful out, then another 30 minutes and it’s pouring and the tornado sirens are blaring.

I’ve been waiting for a flashing repair, and once that was wrapped up between the monsoons, waiting for a better day to do more work on the garage stairs, but figured I’d sneak in a mini-project that was outstanding, mainly installing a tow hitch on my wife’s car.

I’ve done a couple hitches on past cars, and ordered one early in lockdown so we could put our bike rack on her car when taking family bicycle adventures. The install video looked easy enough, and we found some used plastic ramps to lift the tail up, which presumably would make the job easier than past hitches were I was shimmying under a non-elevated car.

This all seemed like a recipe for success, with the first glimmer of ugliness showing up when I check amazon for some reviews of the used gorilla ramps we’d acquired. Basically, 9 of 10 reviews were stellar, with people mentioning that they’d rolled their Freightliner on the ramps and slept the evening under the vehicle, but every 10th review of so mentioned the ramp failing catastrophically, falling upon dad while he was changing the oil in the family Wagonero to save a few bucks so he could put Tiny Tim through community college, killing dad and igniting the Zippo he carried in his pocket from when he served valiantly in Vietnam, igniting the house and burning down the entire neighborhood, which was primarily filled with pregnant women, nuns, doctors for the poor, and a team of Nobel-prize winning scientists that were hours away from sending the email with the formula for their cure for cancer.

I don’t like being under cars in general, and while the ramps made working under the rear of our minivan easier, I kept thinking about my pending demise at the hands of our mighty minivan.

No matter, I told my wife... there were minimal parts to remove (just a simple wind shield and popping the exhaust off 3 hangers). If all went well, it was a 45 minute job, and using my usual 2X estimation process, I told her I’d be done for dinner in 90 minutes.

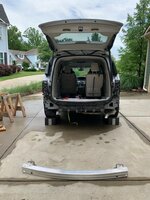
24 hours later, here’s where we were:
ba9bc01e0c09857e6fc97a068f259958.jpg


Sent from my iPad using Tapatalk
 
To avoid these ads, REGISTER NOW!
OP
P

pgray007

Well-known member
Joined
Jul 25, 2007
Messages
573
Location
Charlotte, NC area
The problems with the tow hitch started with the exhaust hangers. In the install video from eHitch, the company where I’d bought the hitch, the installed popped these guys off with a pry bar with a couple of brisk nudges.

It took me a half dozen rather aggressive yanks with a pry bar and locking pliers, and liberal dousing with soapy water, but I eventually got the exhaust off.

This had me about 40 minutes behind schedule, but I was relieved to get to the easy/fun part of the process, which is putting a fish wire, which is basically a wire with a spring-looking wind on the end, through an access hole, threading a stopper and bolt, and yanking it through to nicely drop through the smaller hole where it’s supposed to go.

On my last two hitches, this was the highlight of the operations, where I praised the genius of whatever engineering and voodoo went into creating the fish wire, and marveling at the simple efficiently of the whole process.

This time, the bolt immediately became stuck somewhere in the chassis, and my son and I spent a good 40 minutes trying to jam various objects into the frame to move it, eventually backing the bolt out.

I slept on the matter, tried again in the morning, and bolt 1 of six easily slid through. Considering this a fluke, I attempted bolt #2, and this time spent 60 minutes whacking the frame with a hammer to dislodge the bolt, running multiple wires, and other nonsense.

The third bolt was an easy “in and out” that didn’t need to travel from one hole to another, so I switched to the other side of the vehicle with some trepidation. Another 60 minutes of jiggling, banging, and cursing, and I gave a good “yank” when it seemed like the bolt was close, and my fish wire unceremoniously detached from the bolt and spacer, leaving it stuck in the frame.

I took a time out and considered my options. Obviously there was some sort of block in the chassis that wasn’t in the car on the video, or wasn’t otherwise noted on the inter webs. I could try to get anther bolt, and live with something bouncing and potentially rattling in the frame, or remove the rear bumper which appeared to allow access to the frame where my bolt was hiding.

Rather than running **** into the chassis, while contemplating how disgustingly disfigured I’d be if the car fell atop my nogin, I figured I’d just pull the bumper.

This was a surprisingly satisfying exercise. Despite a 42 step process from FCA, it at least proceeded without incident, and each step was completely with little incident.

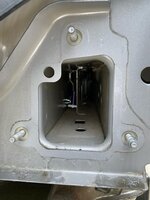
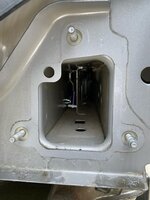
Upon finally pulling the bumped, it was clear what the problem was.

377203d84acd99936c3a77a09bc25cd6.jpg

I’d guess that my one bolt that went through easily went on the outside of that barrier, and all the others spent time stuck on the inboard side.

If nothing else, it took 18 seconds to get all the bolts in with the bumper off

18c301f42c9e0a7ededa1146c962c6d1.jpg


and with some help from the Mrs., we got the hitch into position, bolted on, and another hour or so to put everything back together.


Sent from my iPad using Tapatalk
 

Attachments

  • 377203d84acd99936c3a77a09bc25cd6.jpg
    377203d84acd99936c3a77a09bc25cd6.jpg
    118.3 KB · Views: 2
  • 18c301f42c9e0a7ededa1146c962c6d1.jpg
    18c301f42c9e0a7ededa1146c962c6d1.jpg
    48.6 KB · Views: 3
OP
P

pgray007

Well-known member
Joined
Jul 25, 2007
Messages
573
Location
Charlotte, NC area
Today was a classic South Carolina early-summer day. High 80’s on the thermometer and the hydrometer. The one major benefit was that no rain was predicted, a positive change from the week-plus of rain we’ve been enduring.

The handyman I’d hired had checked out the flashing problem, and said it was an easy fix, which basically involved adding some new plastic flashing over the areas that was damaged, and caulking the area that had some old water exposure. He felt good about not needing to remove the door, so with the fix in place it was time to redo the upper landing’s decking.

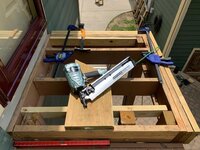
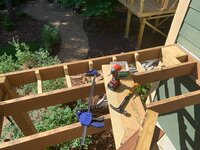
I beefed up the framing to add the picture frame, which hides the somewhat ugly Trex cut ends.

f7c1d9cb755cc9c7f39c2129a5520522.jpg

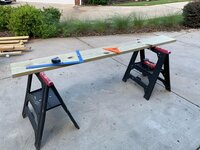
I taped the joists, and laid out my “ghetto picture frame.” I determined I’m not smart enough to do a picture frame on the first deck board, closest to the house, since it’s notched to accommodate the siding.

176be6b56d6605907dbb1d5085460fcf.jpg

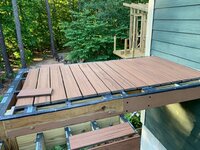
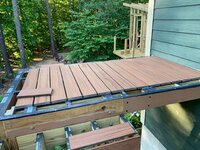
The decking process was relatively straightforward, and the Trex hidden fasteners are incredibly satisfying to drive home. I did a half-*** job leveling out the joists, but it worked out OK in the end.

9747b9645e7ceda5cb17f904f56e3104.jpg

Next up is removing the upper stairs, removing the decking on the middle platform, and then decking the platform, installing the new stairs, and then posts, rails, and fascia.

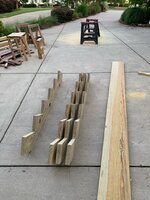
I started on the stringers, and once again was a bit far from perfect, but it’s looking to be good enough to for gov’t work thus far...

e19d4b0e8aaddf15c58d369869d860db.jpg
ecc8f88a75c07eecd55c89a7b6f59447.jpg


Sent from my iPad using Tapatalk
 

Attachments

  • e19d4b0e8aaddf15c58d369869d860db.jpg
    e19d4b0e8aaddf15c58d369869d860db.jpg
    139.7 KB · Views: 2
  • ecc8f88a75c07eecd55c89a7b6f59447.jpg
    ecc8f88a75c07eecd55c89a7b6f59447.jpg
    140.5 KB · Views: 0
  • 176be6b56d6605907dbb1d5085460fcf.jpg
    176be6b56d6605907dbb1d5085460fcf.jpg
    121.1 KB · Views: 0
  • f7c1d9cb755cc9c7f39c2129a5520522.jpg
    f7c1d9cb755cc9c7f39c2129a5520522.jpg
    116.8 KB · Views: 0
  • 9747b9645e7ceda5cb17f904f56e3104.jpg
    9747b9645e7ceda5cb17f904f56e3104.jpg
    130.1 KB · Views: 0
OP
P

pgray007

Well-known member
Joined
Jul 25, 2007
Messages
573
Location
Charlotte, NC area
With some momentum built up it was time to finish the weekend strong, especially as monsoon season appeared to have let up, at least for a few days.

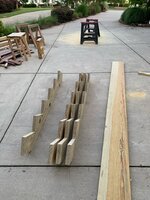
I finished up my final stair stringer. Again they were imperfect but seemed a bit better than my first set of stairs. If nothing else, hand picking the boards seemed to have helped, and was worth the effort of going to Lowes, which apparently only has 16-foot 2x12’s, which were hanging way out the back of the mighty minivan.

d38a53de1afaca78e3d158eb1056fca9.jpg

I did a lighter whack with the grinder this time, since I think that may have hurt more than it helped last time, and also treated the stringers with the delightfully-named Copper Green Brown while on the ground rather than doing another elaborate leveling, grinding, taping ritual. There was also a significant change I’d spill Copper Green Brown and stain the stone landing below, so this was an easier option.

ebaf98de7932c86aaffd461ae5669a14.jpg

With that, it was time for the final round of what I tell my kids is the opposite of construction: destruction.

c34701a32b54dd74a4f7d1c88a791dc7.jpg


Sent from my iPad using Tapatalk
 

Attachments

  • ebaf98de7932c86aaffd461ae5669a14.jpg
    ebaf98de7932c86aaffd461ae5669a14.jpg
    175.3 KB · Views: 0
  • d38a53de1afaca78e3d158eb1056fca9.jpg
    d38a53de1afaca78e3d158eb1056fca9.jpg
    139.6 KB · Views: 0
  • c34701a32b54dd74a4f7d1c88a791dc7.jpg
    c34701a32b54dd74a4f7d1c88a791dc7.jpg
    161.1 KB · Views: 0
OP
P

pgray007

Well-known member
Joined
Jul 25, 2007
Messages
573
Location
Charlotte, NC area
The upper set of stairs seemed like it was holding together a little better than the lower set, save for one tread that will bend up at the edges to nearly a 45-degree angle on a hot day.

Most of the treads came off without too much protest.

a36c1a4c3d40e7a51d3cb9916ab8dddd.jpg

Although the last couple took some stringer parts with them.

6e8f61ee255eeaf7f4c122ab31b18db0.jpg

And with that, we were fully committed to replacing the stairs should I ever want to visit the movie room again:

604b5da9adceb301afe2039fb4329441.jpg

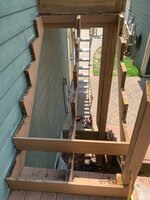
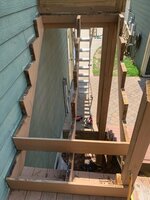
With the that it was time to rip out the decking on the middle platform. Not sure if it’s clear in the picture, but the deck boards were either butted or had expanded to the point that they were butted, and it seemed like that hampered the platform’s ability to “breathe.” Many of the joists were damp, and there were some ants living under the fascia board who were quite unhappy that I’d removed their nice cover. They kindly relocated their operation as I monkeyed around on the platform in the hot sun.

e5302185ceefb85c2549ebea9876d5a7.jpg

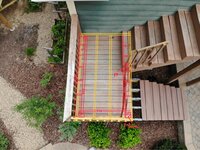
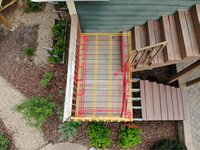
I’ve been trying to do a better job planning what I’m going to do before just diving in, so I used a drone picture and my iPad to sketch out the framing I wanted to add to support a picture frame on the decking. I discovered that the iPad “Markup” tool has a nice ruler feature so I could add straight lines and visualize what I was going to do.

e8ce41d70191ee4de204d12fd48a09bf.jpg

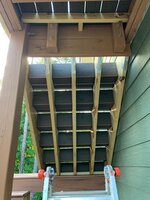
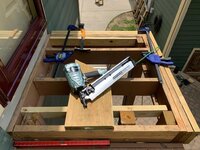
I tried a neat trick I saw on the interwebs, notching a 2x8 joist and running it perpendicular to the existing framing, then putting a 2x4 in the notch. This provided framing to support the outer deck board that would make up the picture frame, as well as providing a parallel “sub joist” to hold the ends of the deck boards.

215c9e7f9d819030da2710b629d3b44b.jpg


Sent from my iPad using Tapatalk
 

Attachments

  • a36c1a4c3d40e7a51d3cb9916ab8dddd.jpg
    a36c1a4c3d40e7a51d3cb9916ab8dddd.jpg
    120.9 KB · Views: 0
  • 6e8f61ee255eeaf7f4c122ab31b18db0.jpg
    6e8f61ee255eeaf7f4c122ab31b18db0.jpg
    106.1 KB · Views: 0
  • 604b5da9adceb301afe2039fb4329441.jpg
    604b5da9adceb301afe2039fb4329441.jpg
    145.3 KB · Views: 0
  • e5302185ceefb85c2549ebea9876d5a7.jpg
    e5302185ceefb85c2549ebea9876d5a7.jpg
    183 KB · Views: 0
  • e8ce41d70191ee4de204d12fd48a09bf.jpg
    e8ce41d70191ee4de204d12fd48a09bf.jpg
    166.4 KB · Views: 0
  • 215c9e7f9d819030da2710b629d3b44b.jpg
    215c9e7f9d819030da2710b629d3b44b.jpg
    153.5 KB · Views: 0
OP
P

pgray007

Well-known member
Joined
Jul 25, 2007
Messages
573
Location
Charlotte, NC area
It took the better part of Sunday to wrap up the framing and blocking for the posts, but it looked decent once done.

dfbdc5c61822ba1fe2a440227284e2e3.jpg

My back was barking a bit from playing Spider-Man creeping around on the framing. Stuff like this always has me respecting the pros that do this day in and day out, climbing around on rafters and whatnot.

I got some time Monday afternoon and taped all the framing. This is probably my least favorite job since its painstaking work, the tape loves to stick to itself, and it’s fairly nasty stuff. I was in the zone so didn’t capture any pictures, but basically it’s the same picture as above but with Vycor tape on top.

With the taping done, I went into decking. This is always the most satisfying part since it goes incredibly quickly. It’s almost a let down that it takes days of framing and taping to do an hour of decking, but I’ll take it.

5d1b718d3d556a2865ccc83f1481b1e2.jpg

Apparently I had some sort of major error in my material calculation spreadsheet, or somehow forgot that I had two sets of stairs, since I’m about 25 LF short of deck board and don’t have any for the upper set of stairs. That shouldn’t pose too big a problem since I can source it in a few days, and that gives me time to do the picture frame, get the stringers in, and work on the fascia a bit. It finally feels like there’s a little light at the end of the tunnel. I’m a bit worried about the railing since I don’t do much metal work, but I’m hoping it’s a simple exercise of basic cutting I can do with a hacksaw.


Sent from my iPad using Tapatalk
 

Attachments

  • dfbdc5c61822ba1fe2a440227284e2e3.jpg
    dfbdc5c61822ba1fe2a440227284e2e3.jpg
    149.3 KB · Views: 0
  • 5d1b718d3d556a2865ccc83f1481b1e2.jpg
    5d1b718d3d556a2865ccc83f1481b1e2.jpg
    175.6 KB · Views: 0

Vette60

Well-known member
Joined
Mar 15, 2006
Messages
448
Location
Glen Allen, VA
If nothing else, it took 18 seconds to get all the bolts in with the bumper off

Yikes. I have enjoyed following along and my wife is bugging me about adding a hitch to her SUV so we can get a larger bike rack!

I too was looking on line and thinking how hard can it possibly be?!? The photo of the disassembled back half of the vehicle says maybe harder than originally thought.

Good luck on the rest of the stairs and decking.
 
OP
P

pgray007

Well-known member
Joined
Jul 25, 2007
Messages
573
Location
Charlotte, NC area
Yikes. I have enjoyed following along and my wife is bugging me about adding a hitch to her SUV so we can get a larger bike rack!

I too was looking on line and thinking how hard can it possibly be?!? The photo of the disassembled back half of the vehicle says maybe harder than originally thought.

Good luck on the rest of the stairs and decking.


I’ve done hitches on two of my other cars and it was easy. One was an SUV and with the additional ground clearance it wasn’t a problem. I also did one in my car, and also not a problem save for there not being much ground clearance (it was before I got the ramps). In all cases probably saved a hundred bucks on doing the install myself. Worth it in 2 of the 3 cases I guess...

I’m not much of a “car guy” so probably lacking in technique. I’d say if the hitch you’re trying to install doesn’t require removing the exhaust from the hangers (another area that was a bit of a struggle) it’s a pretty easy job.


Sent from my iPad using Tapatalk
 
OP
P

pgray007

Well-known member
Joined
Jul 25, 2007
Messages
573
Location
Charlotte, NC area
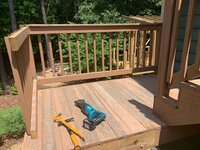
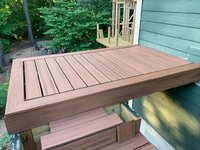
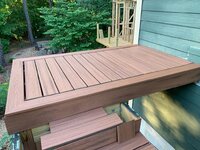
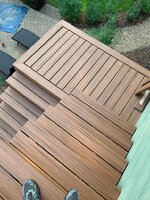
Finally got the picture framing on the middle platform done. Weather willing and Zoom meetings being scarce permitting, stringers to the top should go up tomorrow.

ab0184d767f87fa3bff62cde1fa49848.jpg
53891784080ade7f87489503fa81c010.jpg


Sent from my iPhone using Tapatalk
 

Attachments

  • 53891784080ade7f87489503fa81c010.jpg
    53891784080ade7f87489503fa81c010.jpg
    159.7 KB · Views: 0
  • ab0184d767f87fa3bff62cde1fa49848.jpg
    ab0184d767f87fa3bff62cde1fa49848.jpg
    179.7 KB · Views: 0

captain14

Well-known member
Joined
Dec 19, 2012
Messages
7,070
Location
Near College Park Maryland 20740
The project looks good along with the treehouse in the backyard.

Just a thought for your next Zoom meeting , how about a subliminal message about the two projects going on? You know just a flash of a picture during the Work video.
 
To avoid these ads, REGISTER NOW!
OP
P

pgray007

Well-known member
Joined
Jul 25, 2007
Messages
573
Location
Charlotte, NC area
The project looks good along with the treehouse in the backyard.

Just a thought for your next Zoom meeting , how about a subliminal message about the two projects going on? You know just a flash of a picture during the Work video.


Thanks! Treehouse is in another thread although that’s been in a bit of a holding pattern while focusing on the stairs.

I had a Zoom background of the treehouse when I’d taken an official week off to work on it, but much of the recent progress has been “unofficial” between meetings and later calls so don’t want to do too much subliminal messaging!


Sent from my iPad using Tapatalk
 
OP
P

pgray007

Well-known member
Joined
Jul 25, 2007
Messages
573
Location
Charlotte, NC area
With the middle platform done, I wanted to regain access to the upstairs room. After a bit of a rain delay, I got my stringers notched for the 2x4 that would support them on the platform and got my stringer hangers up. Perhaps the hardest part of that job was finding the perfect ladder position that allowed me to 1) Get the hanger in the right spot, 2) Have enough room for the drill and impact driver, and 3) Not fall to an early demise.

A test fit of the first stringer looked half decent.

5a84f10c13d62b175cb05e0b7ef7e21d.jpg

With some solid momentum I went to my wood pile to grab one of the PT 2x4s I was quite sure I had, and alas, there were none. I’d ordered a bunch during my last wood delivery, but I guess I’d used more than I thought with the supplemental framing.

This put a pause to the program until my wife grabbed one while out and about.

2x4 sourced, cut, and screwed into the framing, I got the stringers up. Things looked “good enough for government work” in terms of level and square, and I enlisted the help of my family to cut up some Vycor strips.

My daughter joined me on the platform, and we had a wide ranging chat about presidential elections, monarchies, and the consequences of messing with a monarch circa 10th century (OFF WITH YOUR HEAD!) This was a lot of fun but had me distracted so had to fit some minor screwups like starting to put in the stair tread clips before screwing in the facia.

No big deal and the work went quickly.

South Carolina summer has also officially arrived, and it was hot and humid, especially in the direct sun on the deck platform, so I was sweating like a fat kid at the buffet and it looked like a minor rain show had occurred once I was done with the treads.

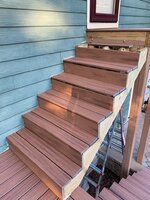
Things were looking better...

64ed188f13fbd335d7effec2621ff806.jpg

Getting there... My second set of stringers, while not perfect, was much better than the first, and I think I only used one shim.

ee19faa4d9222b24aaf222720a71c60c.jpg

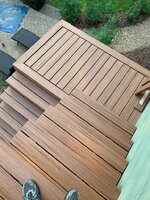
A view that wasn’t possible a few days before:
c45d24c05cd7a101698ea6263b1aedef.jpg

The next day, I finished up the fascia around the top platform, a slightly nerve wracking experience hanging over the platform, balancing a drill and fascia pieces although I finally had the rather obvious idea to screw some blocks to hold the fascia and serve as an additional pair of hands.

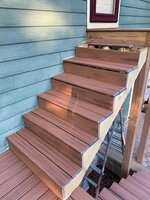
With the fascia on, I got the last stair on, and upstairs access was fully restored, with no more temporary steps or awkwardly balancing on stringers.

bfd80f8b45fec6b7bd65ce4e89862575.jpg

ba18fbc07f26754a6966bc5f3e29b459.jpg

Things were looking OK, so I decided to call it a day. We have some time away planned so I’ll have a bit of a break. I think the next step will be starting the railing, either on the top of middle platform so I start easy. I have a funny feeling I’ve probably ordered an incorrect number of posts (there are tall “stair” posts and “standard” posts) and/or some incorrect rail lengths. I’ve also never cut metal in any meaningful manner, so that will be a bit of an adventure.


Sent from my iPad using Tapatalk
 

Attachments

  • 64ed188f13fbd335d7effec2621ff806.jpg
    64ed188f13fbd335d7effec2621ff806.jpg
    115.2 KB · Views: 0
  • ee19faa4d9222b24aaf222720a71c60c.jpg
    ee19faa4d9222b24aaf222720a71c60c.jpg
    147.8 KB · Views: 0
  • c45d24c05cd7a101698ea6263b1aedef.jpg
    c45d24c05cd7a101698ea6263b1aedef.jpg
    197.7 KB · Views: 0
  • bfd80f8b45fec6b7bd65ce4e89862575.jpg
    bfd80f8b45fec6b7bd65ce4e89862575.jpg
    140.8 KB · Views: 1
  • ba18fbc07f26754a6966bc5f3e29b459.jpg
    ba18fbc07f26754a6966bc5f3e29b459.jpg
    118.3 KB · Views: 0
  • 5a84f10c13d62b175cb05e0b7ef7e21d.jpg
    5a84f10c13d62b175cb05e0b7ef7e21d.jpg
    150.5 KB · Views: 0

Kevkx125

Well-known member
Joined
Dec 26, 2013
Messages
3,394
Location
DOUGLASSVILLE, PA
pgray007 stairs are looking good. Just make sure every one is real careful using them with out a railing!! the project has turned out great so far, great job!!
 
OP
P

pgray007

Well-known member
Joined
Jul 25, 2007
Messages
573
Location
Charlotte, NC area
pgray007 stairs are looking good. Just make sure every one is real careful using them with out a railing!! the project has turned out great so far, great job!!


Yes! Railing is coming soon. I confess I had a bit of a fear of heights when I started this, but nothing like several days to alleviate that. The Mrs. still won’t come upstairs though!


Sent from my iPhone using Tapatalk
 

DeeDubz

Well-known member
Joined
Nov 20, 2019
Messages
1,453
Location
Socal
Very impressive OP. I like all the work you've done. I feel your pain with your pinky lol. I dislocated mine 8 months ago while grappling. Looking back I wish I had taken a picture prior to resetting it. After that I taped it up and continued class. Wife was pretty pissed my finger looked bad so 2 months later I went to the doc. The ligament fused to my bone, so I had to wear a brace for 3 months... it sucked.
 
OP
P

pgray007

Well-known member
Joined
Jul 25, 2007
Messages
573
Location
Charlotte, NC area
So we decided to “abandon ship” for a bit and pickup stake for a week or so and head to a relative’s house in Florida. They’ve packed up and headed north, so we’re taking advantage of the sun and change of scenery without risking spreading any COVID.

The drive down was interesting, with the roads at a moderate, but reduced level of traffic, and an elaborate COVID “Checkpoint” setup at the FL boarder with traffic barrels and dozens of police cars, but the highway running right past the checkpoint. Odd times.

While I’m not building anything physical, I thought I’d catch up on some technical “building.” I’ve mentioned my automation systems in the past, and I have some stuff that kicks off based on my location, which is pulled from my mobile phone. It’s primarily “stupid party tricks” (as is most home automation) like shutting down the sink water heater when I’m over 100 miles away, or turning off lights/music that I generally forget to do when leaving the movie room. Some is borderline useful, doing things like rolling back our thermostats when we leave on an extended trip, and then putting them back to normal as we head back home.

I haven’t really travelled since early March, so I didn’t really notice that this functionality had broken at some point.

Like all things home automation, this is accomplished through a bunch of “hacks” that are the construction equivalent of caulk and duct tape. A key element of my location-driven stuff was a software plugin that was built and made available for free by some kindly gentleman I’d never met (again, as is the case with lots of home automation stuff). The only problem is that said kindly gentleman disappeared from the face of the earth, and his plugin has slowly deteriorated to the point that it no longer works.

“Why not use “real” stuff from big important companies like Google?” you ask? Well, big important companies like Google do the same ****. I had a Nest thermostat that nicely talked to all my other automation stuff, and then they decided to shut down connectivity from “outside the ecosystem in order to better serve our valuable customers,” with is corporate speak for “throw alway all your other stuff and only buy our stuff if you want it to work together, otherwise don’t let the door hit you in the a$$.”

There are some emerging standards in the automation space, many of which serve as “translators” of sorts, getting one device or service to talk to another. One of the more interesting ones is called Node-red, which is based on the node.js programming language, but uses a nice flowchart metaphor to let you connect stuff, and do basic “translations” with minimal code writing.

For my geolocation challenges, I grabbed a new app on my phone called OwnTracks, which theoretically will acquire my location, and send it to an endpoint of my choice, so I don’t have to relay on Google, Apple, or kindly gentlemen prone to disappearance.

I got OwnTracks to talk to Node-red easily enough, and then the challenge was to get Node-red to format the data I needed and perform some calculations. I impressed myself wildly by essentially copying and pasting a formula to calculate the straight line distance between two lat/long coordinates, a formula which involved sines and cosines and things I haven’t contemplated since high school and can’t recall what they do other than something related to circles.

All that done, the final step was to get Node-red to spit out some MQTT, which is a way for machines to talk to each other, and has become a standard of sorts with automation and the “Internet of Things.” Basically, if you can corral something into spitting out MQTT, you can get other software to **** it in and do something with it.

It took a good couple of hours of trial and error, but I can now push the location from my phone into the ether, and through some roundabout means have it broadcast on my garage network in MQTT. Now I just need the automation system to “ingest” this MQTT and turn it into something it can use, ideally in the same format as the old plugin so I don’t have to rewrite all my events that do things based on geolocation.

If all goes according to plan, I’ll have invested about 15 hours to completely redo something that was working fine a month ago. The joys of building!


Sent from my iPad using Tapatalk
 
OP
P

pgray007

Well-known member
Joined
Jul 25, 2007
Messages
573
Location
Charlotte, NC area
Today was what we call a ****. They say a picture is worth 1,000 words, so in the interest of efficiency, here you go:

b64e5c1eaee569260739a453c57f1ef7.jpg

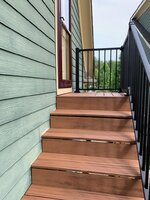
See that gap between the top rail? Yeah, it’s impossible to miss.

I generally like the Trex stuff, and their installation manual has been pretty good to this point, but the AL rails seem like a total afterthought, and the manual seems like a project they gave to the intern at 4:58PM on Friday before company happy hour.

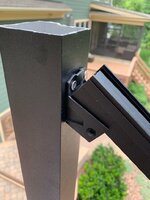
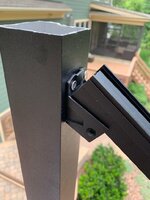
First off, as a logical human I was trying to determine if the brackets that attach the top and bottom rails to the posts were different, beyond the obvious of a top and bottom. The instructions weren’t so helpful here:

b63694e12671e5ca6c1785e79218712a.jpg

Per the manual I clamped the bottom rail to find where to put the bottom bracket, then measured up for the location for the upper bracket. A cursory examination didn’t reveal any differences between the brackets (aside from the obvious lower and upper posts), but I failed the test on one of my posts, realizing that there was a slight nuance to the top rail bracket versus the bottom bracket, and even better, the screw spacing was different between the two brackets. Not a huge problem, as I could move both brackets up about 1/2” and redrill the holes.

I successfully completed my first foray into cutting aluminum on the miter saw, and after a couple test fits got my bottom rail in. I put in two of the balusters, and immediately something looked off.

Clamping in the top rail resulted in the picture above. Looking back in the instructions, here’s where it all went south:

80f68d28408332f82a2a5a7f4b7e08cd.jpg

The wording was awkward, but I caulked that up to the generally poor railing-related instructions and measured up 36” since I had 36” railing. The key nuance was measuring up the “required” distance. Unhelpfully, nowhere in the prior steps did anything mention how to determine that “required” distance. Upon reflection, it was somewhat obvious that racking the rails would result in a variable mounting distance, but one would have expected/hoped that they could at least mention that “mouthing distances will vary depending on stair angle” or something simple like that, or provide a little more color to “required” distance.

So with that, I’m going to have to figure out how to determine the elusive “required” distance, move the lower post top bracket, recut that post using the circular saw (a new metal cutting adventure), and then replace the top post, hopefully being able to salvage it for another location or I’m out a $90 post.

To say this was frustrating is an obvious understatement, but I’m writing this at the dawn of a new day, and hopefully will be a bit more successful in getting some rail up.


Sent from my iPad using Tapatalk
 

Attachments

  • 80f68d28408332f82a2a5a7f4b7e08cd.jpg
    80f68d28408332f82a2a5a7f4b7e08cd.jpg
    133.5 KB · Views: 0
  • b63694e12671e5ca6c1785e79218712a.jpg
    b63694e12671e5ca6c1785e79218712a.jpg
    137.1 KB · Views: 0
  • b64e5c1eaee569260739a453c57f1ef7.jpg
    b64e5c1eaee569260739a453c57f1ef7.jpg
    128.1 KB · Views: 0
OP
P

pgray007

Well-known member
Joined
Jul 25, 2007
Messages
573
Location
Charlotte, NC area
Nothing like a new day (and several hours of hard-won knowledge) to get things moving again.

I removed my upper brackets and marked the post to be cut using the circular saw. I have a nice 7 1/4” Milwaukee that I bought recently for the treehouse, and while it’s a great saw, it’s a bit heavy so was slightly awkward cutting down the posts.

With that done, I triple checked the measurements for my top rail, again following the instructions. Doing this to the letter, the rail was a good 3/4” too long, again making it seem like they maybe took the instructions for the horizontal rails and just tried to adapt them without anyone actually testing the installation procedure.


6cb08b8d158eb6613973d27e393f81c1.jpg


My newly mounted brackets were a touch too low, so I removed, redrilled, and remounted them for what seemed like the 30th time, and thankfully the self-taping screws had enough life in them to survive this marathon of screwing and unscrewing.

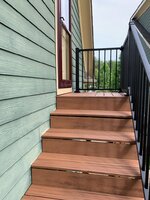
After countless redos, the rail finally fit, the balusters were plumb, and everything finally went together! Huzzah!

4d3576e6b60432ca0991914175db2117.jpg

One of the posts was a touch shaky, so I went to big blue and got some longer lag screws, fixed up that problem, and went after the horizontal rails. This was MUCH easier, especially as I had the official Trex template that snuggled up to the post and made it easy to mount the brackets.

The rails were much easier to cut for the horizontal, and I was able to chop up an 8’ section, and get everything cut and mounted in about 3 hours versus the solid 8 I’d invested in the stair rail.

I cleaned up the aluminum dust I’d spilled everywhere, which has now become “mulch glitter,” and found it quite satisfying to whack the decorative top caps with a mallet to get all the finishing pieces on.

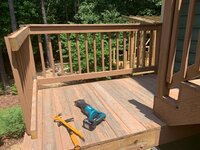
All told, I probably installed that diagonal rail 8 times before finally getting it right. I was just about ready to throw the metal rail out the window, but the result looks pretty good, and hopefully I’ll be able to bang out the next couple of sections with much less effort.

4a60c643a875e3e0cd453e9feb147489.jpg

27b48565cd686343cc20594f48c6d6e6.jpg


Sent from my iPad using Tapatalk
 

Attachments

  • 27b48565cd686343cc20594f48c6d6e6.jpg
    27b48565cd686343cc20594f48c6d6e6.jpg
    149.3 KB · Views: 1
  • 4a60c643a875e3e0cd453e9feb147489.jpg
    4a60c643a875e3e0cd453e9feb147489.jpg
    156 KB · Views: 2
  • 4d3576e6b60432ca0991914175db2117.jpg
    4d3576e6b60432ca0991914175db2117.jpg
    145.8 KB · Views: 3
  • 6cb08b8d158eb6613973d27e393f81c1.jpg
    6cb08b8d158eb6613973d27e393f81c1.jpg
    90.2 KB · Views: 2
To avoid these ads, REGISTER NOW!
Top Bottom