To avoid these ads, REGISTER NOW!

Between 485 & 705 SQ/FT Mid-Century Moto Mecca Makeover

Workspaces between 485 and 705 squarefeet.
To avoid these ads, REGISTER NOW!
OP
S

sakurama

Well-known member
Joined
Oct 10, 2010
Messages
1,458
Location
Portland - the cool one.
Modern bikes seem to have so many layers of perfectly interwoven plastic and composite materials, which are absolutely functional, but which can conspire to hide the basic form of the bike, and the cheapness of the individual parts makes the whole thing feel less, for lack of a better term, heirloom? As the form is lost and smoothed over, the integrity of the bike is smothered.

As I type this, I feel like I am attempting to name something that permeates many areas other than motorcycles- so many aspects of life seem to be objectively improved but viscerally distant or even disconnected.

To say something like this makes me feel like I'm on the verge of, "they don't make 'em like they used to..." but what you're saying is completely true. The things that have tamed our bikes and cars have also disconnected us from them. Because racing requires advances it means taking out the weak points - sadly that's us to a degree. The reason we love machines is because we feel the rawness of what a motor is - contained explosive fury. It's the same thing that thrills you when you ride a spirited horse - your controlling something scary and that's thrilling. Computers are taking that away to a degree.

To me cars peaked in the late 60's and early 70's in terms of their visceral connection. Motorcycles were the 80's to 90's. Perhaps both could be tied to fuel injection since bikes lagged in that regard. But fairings started to cover all the things that the EPA and and technology required. I think dishonesty is harsh but pretty close.

So my goal is a bike that weighs between 330-350lbs (dry) or about the same as a 690, and makes about 80-90rwhp. The KTM 990 is 461 and makes 95rwhp for a power to weight of 4.85lbs per hp. The BMW 1200GS is 5.31lbs/hp and if I meet my goals on the low hp and high weight I'll be 4.37lb/hp or if I'm lucky 3.66lb/hp and as we both know less weight is more important than having more hp. I think the magic number is just under 4lbs/hp.

And to the aesthetics question I can see in my past builds that what I respond to is the honestly of the materials. To get the weight down I want to build the tanks from carbon/kevlar (another learning curve!) and, just maybe with Sean's help, I'll explore titanium for the frame. I don't think I can become proficient in time so I'm considering options. But I find I don't like paint more and more as I go. My bikes are best raw, showing the work - like the way that I draw showing construction lines. I want the process to be seen in the result.

Fingers crossed I can get some sponsorship but I'll be plowing ahead regardless.

Gregor
 

tj675

Well-known member
Joined
Apr 9, 2019
Messages
905
Location
The Mitten
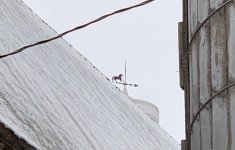
Back in the 70's, when we lived in Pennsylvania in that house that was built in 1724, my dad bought a metal detector. It was very cool thing and a great idea as the property was littered, literally, with tons of things. We found coins, axe heads and lots of trash. My favorite thing was this horse. I have no idea how old it is but it was on the weathervane of the old barn which burned in the 1800's so it's at least that old.

i-XrjPsXF-X2.jpg


Some of the welds were better than others but it fixed it up. I'm sure I destroyed any value it had but that probably happened when it broke anyway. Nadia is in her horse stage so now she can have this neat thing that I found in the ground with her grandfather.


Gregor

Gregor,

As usual awesome work. I’m a sucker for a cool weathervane, so I had to comment on this one. I think every barn roof needs a horse charging into the wind.

attachment.php
 

Attachments

  • 6EA150B7-72A5-4A0D-B3C2-005A06976709.jpg
    6EA150B7-72A5-4A0D-B3C2-005A06976709.jpg
    99.8 KB · Views: 2,677

NWhomeowner

Member
Joined
May 31, 2010
Messages
5
I'm moved to chime in on what neduro said: ". . . I really appreciated the care and respect the political posts a while back were treated with. Community needs disagreement but cannot survive contempt, and I really appreciate a discussion that had the former without the later. "

For a bit I was afraid that this thread—which I've valued a lot for years—might veer too much into politics and suffer for it. Thanks to Gregor and to all who contribute for the good spirit that they bring to this. And of course the content itself is glorious!

And while I'm at it (rather late to comment on the firewood rack, though) I thought I'd mention that a low-tech, low-toxicity way to remove mill scale is a soak in regular old white vinegar. It will take a day or two instead of the minutes needed for muriatic (hydrochloric) acid. But it's cheap and much less toxic and easy to dispose of. I've been amazed at how well it works.
 

Vertigo Cycles

Well-known member
Joined
Jan 14, 2010
Messages
193
Location
Portland, OR
... To get the weight down I want to build the tanks from carbon/kevlar (another learning curve!) and, just maybe with Sean's help, I'll explore titanium for the frame. I don't think I can become proficient in time so I'm considering options. But I find I don't like paint more and more as I go. My bikes are best raw, showing the work - like the way that I draw showing construction lines. I want the process to be seen in the result.


Gregor

Hell yes to all of this. Love the idea of it being raw.

I'm happy to help wherever possible but I'm sure you'll be amazing at welding ti after 30min of goofing off with it. Getting any bends dialed is going to be the hardest part.
 

neduro

Member
Joined
Aug 23, 2014
Messages
6
Location
Salida, CO
So my goal is a bike that weighs between 330-350lbs (dry) or about the same as a 690, and makes about 80-90rwhp.

It's funny- we've hit on the same formula. Continuing the tangent...

IMG_8514-X2.jpg


Gregor has seen this bike if I recall, but this is a 2012 KTM 450 RFR, which is their factory rally racebike. It was adapted from the 690 rally that preceded it. When the Dakar went to a 450 formula, KTM tried a number of different things and all their pilots preferred the 690 chassis with a 450 sx motor slotted in. The trellis frame gives incredible stability, the whole package shares very little with the 690 enduro that has been sold here.

The cool part is that the 690 motor still fits, using all OEM parts (OEM but a bit unobtainable). Lyndon Poskitt has travelled the world on such a bike, and when I got this bike, I traded him a spare 450 motor for a 690 motor built to his spec. We didn't go wild, so it's more on the 70hp end of the spectrum... but last week I decided it was time to get moving on this project and put it in.

2020120417002129-IMG_7011-X2.jpg


2020120417004340-IMG_7027-X2.jpg


When I finish, I'll have 70hp and 300ish lbs dry, on factory suspension and 10 gallons of fuel capacity.

But I won't have made my own bike. You'll have me there!

One thought: I've got spare tanks for it. I wonder if they would make a good mold for the outside shape of your project? The rear tank in particular might be relevant? If they would help get in touch.

Back to lurk mode.
 

old_smokey

Well-known member
Joined
May 16, 2018
Messages
410
Location
Manitoba
It's funny- we've hit on the same formula. Continuing the tangent...

IMG_8514-X2.jpg


Gregor has seen this bike if I recall, but this is a 2012 KTM 450 RFR, which is their factory rally racebike. It was adapted from the 690 rally that preceded it. When the Dakar went to a 450 formula, KTM tried a number of different things and all their pilots preferred the 690 chassis with a 450 sx motor slotted in. The trellis frame gives incredible stability, the whole package shares very little with the 690 enduro that has been sold here.

The cool part is that the 690 motor still fits, using all OEM parts (OEM but a bit unobtainable). Lyndon Poskitt has travelled the world on such a bike, and when I got this bike, I traded him a spare 450 motor for a 690 motor built to his spec. We didn't go wild, so it's more on the 70hp end of the spectrum... but last week I decided it was time to get moving on this project and put it in.

2020120417002129-IMG_7011-X2.jpg


2020120417004340-IMG_7027-X2.jpg


When I finish, I'll have 70hp and 300ish lbs dry, on factory suspension and 10 gallons of fuel capacity.

But I won't have made my own bike. You'll have me there!

One thought: I've got spare tanks for it. I wonder if they would make a good mold for the outside shape of your project? The rear tank in particular might be relevant? If they would help get in touch.

Back to lurk mode.


And that right there is my dream bike. Enjoy, that thing is perfect!!


Sent from my iPhone using Tapatalk
 
OP
S

sakurama

Well-known member
Joined
Oct 10, 2010
Messages
1,458
Location
Portland - the cool one.
It's funny- we've hit on the same formula. Continuing the tangent...

IMG_8514-X2.jpg


The cool part is that the 690 motor still fits, using all OEM parts (OEM but a bit unobtainable). Lyndon Poskitt has travelled the world on such a bike, and when I got this bike, I traded him a spare 450 motor for a 690 motor built to his spec. We didn't go wild, so it's more on the 70hp end of the spectrum... but last week I decided it was time to get moving on this project and put it in.

When I finish, I'll have 70hp and 300ish lbs dry, on factory suspension and 10 gallons of fuel capacity.

Damn, that's as good as it gets.

I have to say I sometimes wonder about the wisdom of using such an antiquated platform for this sort of build. But then that's also what makes it cool. If this works then I'll explore other options but I still think there's some juice to squeeze out of the boxer platform.

I will say perhaps the most encouraging words were from Jimmy Lewis who saw the bike in the early stages and thought it was really cool. He said, "You don't need a lot more power - that's going to be a solid bike" and if anyone knows about riding boxers off road - it's Jimmy.

Also, the goal is not to win Dakar, but to hone in on the idea of a cross country bike that doesn't shy away from a Forest Service road or make you regret taking it off pavement.

Thanks for sharing that Ned! I'm looking forward to swapping bikes and going on a ride with you down in Salida next year.

Gregor
 

GeddyT

ALLIANCE MEMBER
Joined
Jun 17, 2015
Messages
1,239
Location
Bellingham, WA
I really enjoyed reading this discussion on the chase for the perfect bike and changes over time that have disconnected man from machine. I REALLY look forward to following along as you build your dad's bike into something special.

I didn't start riding until 2005, so my riding experience leans more toward the digital side vs. analog, and surely you have a lot more data points regarding what a good/fun bike should feel like (didn't you club race 250 GP at one point?), but my views are a little all over on the subject.

I think you hit one nail on the head, and this is that manufacturers would be smart to make chasing low weight the next battleground. The horsepower wars have gotten stupid, with seemingly every manufacturer needing to up the ante with every new bike and then increasingly rein it in with electronics. Also, this relentless pursuit for a high peak horsepower has steepened power curves at the expense of poor partial opening throttle response and less usable torque lower in the rev range where it's needed more often.

A perfect example of this was the out of the box vs. uncorked experience with my R1. In the USA, Yamaha took the cheap and easy path to satisfying noise emissions requirements and simply capped the throttle opening at something like 80% (I forget, but I have the stock throttle map, and it's plain as day), robbing the bike of about 20 horsepower. Taken to the track in stock trim, the bike was perfect and lap times reflected that, but it was... boring. A simple ECU flash unlocked the throttle and restored all of the power, and suddenly it was a snarling gorilla that, honestly, I lacked the ability to ride. Bike felt faster and was a hell of a lot more exciting, but lap times were slower, first gear stopped being an option, and I couldn't finish a session due to exhaustion.

My pervious liter bike was built in 2005. Fuel injected and modern, but with a power curve I liked a lot better. More pull off the bottom, less uncontrollable power in the middle and top. Throttle response smooth as butter. apparently, the 10 years of development that followed yielded a bike with the same top end power and less low end torque after electronics taming to a point where it's controllable.

That being said--and I'm sorry if this is rambling on too much on your thread--I don't think the progress from analog to digital is all bad. My fuel injected dirt bike has been a dream come true relative to the carbureted bike it replaced. (Hell, just the fact that I'll never have to rebuild another FCR carburetor is worth the price of admission...) Similarly, I never knew I had to have a quickshifter until I had one. And now I feel the same way about an up-and-down quickshifter. On the road, modern IMU based traction control systems are absolutely incredible.

I think the real wake-up call was riding an Alta in the woods. Mind. Blown. Without the distraction of the clutch lever, the shifter, worrying about being in the right gear, and having a perfectly smooth throttle, there was such a perfect connection to the trail in front and the bike beneath. It's a really heavy bike, but it felt super light due to the lack of rotating mass.

Which comes back to the pursuit of lightness. In my opinion, it's chasing peak horsepower has ruined modern motorcycles, not necessarily the prevalence of electronics. While some electronics developments have helped connect the rider to the road/trail, others remove the rider from that connection in the pursuit of taming ever increasing peakiness. To me, the answer is simple: The manufactures need a simple number to sell to customers and an excuse to keep increasing the price of the product, thus the horsepower war. Instead, it would make sense to shift to promoting the curb weight figure. Or even power/weight ratio. Make low weight the holy grail of bragging rights. "The bike had to go up in price by $1000 this year: we cut 10 pounds!" With lower weight, less power is sufficient, and we can return to engines that connect the rider to the ground while keeping the electronics developments that have actually added value. A real win-win.

Again, sorry if this was too big of a tangent. Seems all of my friends have been hanging up their riding spurs, and I really get few opportunities to talk bikes anymore with anybody but my "online friends"...
 
OP
S

sakurama

Well-known member
Joined
Oct 10, 2010
Messages
1,458
Location
Portland - the cool one.
I really enjoyed reading this discussion on the chase for the perfect bike and changes over time that have disconnected man from machine. I REALLY look forward to following along as you build your dad's bike into something special.

I'm certainly not dissing the electronics. I did race 250 GP bikes and I would have given anything at the time to have some kind of traction control. It was a peaky and violent powerband and when it came on while you're leaned over it would spin up quickly and then send you to the moon over the high side.

i-kWHZJ5p-X2.jpg


Eventually I built a Tigcraft (above) which was essentially a YZ426 motor (built to 65rwhp) in a tube framed 125 chassis with RS125 running gear. It was just under 190lbs. but had tremendous torque and you could ride an entire lap in one gear if you really wanted to. Because it was light and the power was more friendly I could ride it harder than the 250 and while it had less power I was faster on it than on any bike I've ridden. That shot above was probably the zenith of my road racing career - after that I got rid of my road race bikes and started doing rally racing.

So as you found out on the R1 more power often makes you slower. It used to be a fun game to take the Tigcraft to a track day before a race and line up with the "big bikes" in the fast practice sessions. I'd go easy for a few laps as the tires warmed up and then I'd drop the hammer. We used to call liter bikes at track days "rolling chicanes" because they were so slow in the corners.

So there's a sweet spot on power and weight and Ned and I are sort of the same mind - 350lbs and 80-90rwhp. But the other aspect of that is well set up suspension, weight bias and CG and of course geometry. Small changes in these can really change the character of a bike. And of course for this I'm talking about a bike that will be both on and off road.

06049%20KTM%20d5-005777c-X2.jpg


My goal is to find the things that made me comfortable, remember the things I didn't like and wanted to change and bring them together in a package that makes you excited to look at. To build this bike is to collect my best memories of riding motorcycles and compress them into one thing that hits a universal truth.

It's a bit over the top to write out but I know what I'm going for in my head.

Gregor
 

bdking

Well-known member
Joined
May 16, 2013
Messages
94
Location
PDX
Riding the KTM 500 was pretty great on last year’s east Oregon trip. I’d love to have one of Poskitt’s rally bikes but I can’t swing the (totally justified) cost. The 500 is powerful enough for long trips and definitely lightweight.

That said it did rattle my iPhone’s camera to death.

Maybe I can shave some weight off the AWD 990...
 
OP
S

sakurama

Well-known member
Joined
Oct 10, 2010
Messages
1,458
Location
Portland - the cool one.
That said it did rattle my iPhone’s camera to death.

From what I'm hearing it's the new phones and not the bikes. I think everyone I know who's used an iPhone on a dirt bike has had to replace the iPhone. I ordered a new QuadLock vibration mount - we'll see.


I have luckily been very busy with work but that also has put the brakes on my big "pre-christmas" project - the stairs.

i-GfbdPsL-X2.jpg

I ordered up some clear fir flooring for the paneling of the stairs. I don't have a clear idea yet of what the stairs are going to look like but I know they will match the walls.

i-vg5tcwQ-X2.jpg

Luckily I have this thread to go back to and I found my "formula" for the perfect stain for the boards. I bought more Amber Shellac and dedicated one quart to the stain: 500ml amber shellac, 10ml medium brown Transtint, 1ml golden brown and 1-2ml red brown. I upsized the ratio for the larger amount.

i-rpJ7xTt-X2.jpg

Because our paneling is flooring you don't usually get to order it in lengths - it comes in random lengths and you just get it by square footage. My lumber yard was able to get me 13' lengths but I did my calculations on 8' lengths and when I ordered I called out the wrong number from my notes. So I have a lot of extra which isn't a bad thing since it usually takes a while to get. I'll find a use for it.

i-bnGSfc3-X2.jpg

Since we're in the rainy season we have to do the finishing inside. So new cat toy.

i-zg6bRxj-X2.jpg

Lara and I tag teamed these since it took a while to get them done. The process is this: sand with 150 with the Festool sander, one coat of amber shellac, dry, second coat of tinted shellac, dry, some boards get a mid second coat - essentially a heavier second coat to make them darker for variations sake. Shellac dissolves itself so the first coat seals the grain from the stain and the second is the color.

i-pbqKFQJ-X2.jpg

You can't do a third or you'll lift the second and then it's game over. Next is clear satin polyurethane on top of the dried shellac. This is supposedly a no-no but then all the things I'm doing are supposedly wrong but they work. Once the first coat of poly is dry we hand sand that with 220 to just knock down the dust nibs being careful to not sand through into the stain - another game over scenario. Finally another coat of poly and we're done. Poly is put down with a small roller.

i-CchKXNH-X2.jpg

Boards in process - from back: raw, amber and finished.

i-M3sDBL6-X2.jpg

i-WxfX2Nz-X2.jpg

And doing it in the dining room is how you know you got it right - they match up perfectly in all the different light.

i-3zPvGg6-X2.jpg

Since the next step is to demo the stairs it will require a definite plan and I don't have that yet. I have ideas that aren't quite resolved and some photo shoots that are taking up the living room and my free time. I guess I shouldn't consider "work" to be infringing on my free time but after a long stretch of covid unemployment that's how it feels.

So I'm thinking of Ben's suggestions and my ideas and the hardest part of this is how to resolve all the areas where the boards join at right angles and how to minimize that so it looks clean. Plus how to attach the rail and all that. And how to redo the closet under the stairs...

It's a lot to get my head around and while my deadline was Christmas that pressure is off now. Because of the huge Covid surge we've canceled all our family plans, travel and social engagements - it's sad but it's the right thing to do. If there's an upside it's that this takes pressure off of finishing though I'd still love to get this done. If I can finish my work this week I just might be able to dive in next week.

You hear that Lara? Next week! Fingers crossed.

Gregor
 

gearhead1960

ALLIANCE MEMBER
Joined
Mar 21, 2019
Messages
1,825
Location
Manassas, VA, a small blot in history
Next is clear satin polyurethane on top of the dried shellac. This is supposedly a no-no but then all the things I'm doing are supposedly wrong but they work.

Love the flooring and the color.

I did the same thing on a workbench surface using MDF but made sure the shellac was wax free. Sealed great and the satin poly made for a nice surface....
 
Last edited:

E12-535iTurbo

Well-known member
Joined
Feb 27, 2014
Messages
492
Location
The Netherlands
The process is this: sand with 150 with the Festool sander, one coat of amber shellac, dry, second coat of tinted shellac, dry, some boards get a mid second coat - essentially a heavier second coat to make them darker for variations sake.

Gregor, what kind of sander are you using? My old bosch sander broke down so I'm in the market to up my sanding game.
 

PatDonovan

Member
Joined
Aug 3, 2016
Messages
5
Gregor

Great to see the stair project moving forward. All your different projects are so inspiring, but
I really love the house projects, because I love MCM architecture so much. Looking forward to seeing what your final design looks like, knowing you, it'll be awesome and immaculately executed. Best of luck sir, looking forward to more.

PAT
 

fastev

Well-known member
Joined
May 28, 2013
Messages
97
Location
Portland, OR
Gregor, I've got a few hundred feet of old growth flooring that we pulled out of our house. If you need any let me know. I've slowly been cleaning it up for storage.
 
OP
S

sakurama

Well-known member
Joined
Oct 10, 2010
Messages
1,458
Location
Portland - the cool one.
Gregor, what kind of sander are you using? My old bosch sander broke down so I'm in the market to up my sanding game.

I'm going to answer this question at the very bottom...

I've been working with a new client: Garrett Wade. You may know of them, they do a lot of woodworking tools. The pandemic has sort of turned a lot things upside down and while it killed my business at first I've also gotten work because I'm able to shoot at home.

They wanted me to shoot some lights "on a shop ceiling" and needless to say my shop is very, very small and this one shot became a nightmare with me pulling down all my hanging lights, drilling new hooks in the ceiling and trying to hang their lights. It didn't work at all...

"...I came into this game for the action, the excitement. Go anywhere, travel light, get in, get out, wherever there's trouble, a man alone."

After giving up on the ceiling idea I suggested my bench as a background and the art director loved it. Of course the bench top was a hot mess of projects which I needed to clean and this was a good excuse.

i-8xChQhk-X2.jpg


I've never liked the single task light hanging over the bench and I decided to get rid of it and add it to the isle behind the bench. But I needed a bench light - a nice one. Well a few years ago I bought a nice LED panel that I planned to use for video but has sat in the cottage with the rest of my good intentions - this seemed like the right time for some good light.

Those black tubes are Foba Combitubes - essentially a high tech, German erector set for still life photographers. I've owned it forever and don't use it too often but when I need it it's amazing. I have decided to make a flexible light and camera mounting system with it.

i-TW62v6c-X2.jpg


I turned some 2" aluminum pucks and machined them to accept the profile of the Combitubes so they'd be stronger than just the 3/8" thread they use. The Combitubes use a taper and thread system to let you combine them and keep their strength - it's quite smart.

i-TPknnSM-X2.jpg


The nice part of having a ceiling of stacked 2x4's is I can screw into it anywhere and it will be strong.

i-8nP9BxC-X2.jpg


The kit I have has a bunch of these knuckles that hold two tubes. Used in combination you can make a nice rigging system.

i-2m2KrR7-X2.jpg


i-bpQ4S9S-X2.jpg


i-Q2XMRv4-X2.jpg


So I went from one crappy light bulb to a pretty expensive, dimmable, color tunable flat LED light panel. Upgrade!

Now I had to clean the bench.

i-QKGwWDc-X2.jpg


I've always wanted to have this top blanchard ground. It would be amazing and flat but it's always been a project that gets pushed because of how all consuming it would be. The surface of this bench is actually pretty nice with a lot of character. It just needs a good cleaning. First I give a coat of Navel Jelly and let it sit overnight.

i-pjCTR3d-X2.jpg


It would have been easier to get it off if I'd not let it sit but it's much less noxious after drying. Scotchbrite and soapy water and a lot of scrubbing.

i-gtw2jCD-X2.jpg


Then I wiped it down with WD40. I tried to wire brush the rust out as well but at a certain point you just have to accept the patina.

i-4jspWrc-X2.jpg


And finally I bring in my studio strobes and shoot the string of work lights in a coil on the bench.

i-hD6Kftq-X2.jpg


That's the raw shot - I'll still have work to do but you can now see how my 1300lb. "background surface" looks.

And now to answer the question of the sander - illustrated with my new bench light.

i-rr6ZDmD-X2.jpg


I have two: this Festool ETS 150/3EQ and a Rotex 150 FEQ but it's this one that gets all the work. I've had it for just less than 20 years as one of the first Festools I bought and I use it for 90% of everything. The /3 is the stroke size and this is the smaller, finer of the options. The 150 is the disk size and I wanted both my sanders to use the same size medium plus the 150mm size is pretty ideal. This sander has paid for itself a dozen times over. Once the switch broke but I was able to order a new one and replace it myself (Festool sells parts to normal people to fix their own tools) and it's not stopped since.

Of course I live with an "influencer" who works in the world of food and when she found out I put in a "nice" light over the bench, well...

i-nkxfvVB-X2.jpg


You may have seen this on my Instagram. We were given a take home pizza kit to test bake by a new place in town and it was very good. The family is all about the Detroit style grandma pies and this one, from PopPizza, was on point.

So tomorrow I'll open a can of worms on another project I've been messing with - gunsmithing!

Gregor
 
To avoid these ads, REGISTER NOW!

jake28

Well-known member
Joined
Aug 28, 2018
Messages
482
Location
SF, CA
[mention]sakurama [/mention] congrats on the garret wade partnership. I hope they’re great to work with, and while you can’t pay a mortgage in bronze planes and sharpening stones, I hope they treat you well.
 

E12-535iTurbo

Well-known member
Joined
Feb 27, 2014
Messages
492
Location
The Netherlands
And now to answer the question of the sander - illustrated with my new bench light.

i-rr6ZDmD-X2.jpg


I have two: this Festool ETS 150/3EQ and a Rotex 150 FEQ but it's this one that gets all the work. I've had it for just less than 20 years as one of the first Festools I bought and I use it for 90% of everything. The /3 is the stroke size and this is the smaller, finer of the options. The 150 is the disk size and I wanted both my sanders to use the same size medium plus the 150mm size is pretty ideal. This sander has paid for itself a dozen times over. Once the switch broke but I was able to order a new one and replace it myself (Festool sells parts to normal people to fix their own tools) and it's not stopped since.

Gregor

I feel honored a you took the effort to shoot a picture, upload and explain the reasoning/experience. You should get Festool sponsorship as I've went out and got the ETS 150/3EQ, like many others I got into Festool because of you and I'm happy I did. I'm just waiting on the adapter for the vacuum now then I'll put it to work.

Btw I love the "influencer"-photo with the full workshop in the back :)
 

nwdustin

Well-known member
Joined
Dec 6, 2015
Messages
49
Location
Tacoma, WA
I somehow missed the chatter about the Gravely and just ran across it last night. I'm in the middle of buying 5 acres on a river outside of Olympia, WA and about 1/3 of it is covered in blackberries or these annoying thorny rose bushes. I thought my old John Deere would tackle it and it sadly struggled. Seeing that machine and then finding a couple are available locally, I'm thinking I'll need to acquire one sometime in the next few months. It would easily make quick work of anything out there.

Also looking forward to any gunsmithing posts you have up your sleeve. My father passed away early on in the pandemic (unrelated) and while I didn't have a great relationship with him, he left some of his stuff to me, including five very old 22 rifles that need some love and attention. I've been itching to dig into those and your posts usually seem to get the motivation flowing, so thanks in advance, lol.
 

rk_tek

Well-known member
Joined
Apr 12, 2015
Messages
153
Location
Bella Vista, AR
I’m in for gunsmithing. Before wife and family I poured a bunch of money into my Ruger 10/22. I have a few other guns now including one I’ve contemplated making a biathlon style stock for.

Matter of fact, I’m in for just about any subject you want to cover. I’m not a coffee drinker, but I find even those discussions interesting.
 
OP
S

sakurama

Well-known member
Joined
Oct 10, 2010
Messages
1,458
Location
Portland - the cool one.
I’m in for gunsmithing. Before wife and family I poured a bunch of money into my Ruger 10/22. I have a few other guns now including one I’ve contemplated making a biathlon style stock for.

Matter of fact, I’m in for just about any subject you want to cover. I’m not a coffee drinker, but I find even those discussions interesting.

Wow, you guys posted while I was writing this one - so there's some serendipities.


Alright, guns.

I've avoided ever really bringing this up because it's become a very controversial sort of subject and now, with armed groups of crazy math deficient mobs toting them around it might not be the best time but maybe, just maybe, we can take a step back and see the gun for what it is - a tool.

And as you all know I'm all about nice tools.

I want to first address a thing I find problematic - "gun culture".

There are a lot of problems with this but chief among them is that guns have somehow moved away from their origins as tools, something every culture depended on to put food on the table, to being a political identity totem. I don't even want to touch that because it's toxic.

When I grew up in Colorado guns were everywhere. Our pickup truck, like every other ranchers, had a gun rack in the back window and my dad kept a pistol loaded with snake shot in the door pocket. We hunted but mostly these were tools to keep "pests" at bay: namely coyotes, prairie dogs and rattlesnakes. At the time this was considered conservation - people kept numbers in line where natural predation wasn't doing the job and it was part of your job in the community.

Every kid took a hunter safety course put on by a local NRA member, a group who's main goal was to promote gun safety and hunting. Obviously things have taken a turn. Pretty much every kid got a gun when they turned 13 or so.

i-kfLRD5h-X2.jpg


In almost every case that was a Ruger 10/22. When dad passed I got his collection of guns as the only person in the family with any interest in them. Two of them were Ruger 10/22's - one was mine and one was Lara's.

To me a gun is a machine. It's a precise, machined single stroke engine. The world of mall ninja's and tarted up AK's and AR's didn't exist when I was growing up. So what people did, the people that can't leave well enough alone, was to make their guns more accurate. Making things better versions of themselves is something I've been fascinated with since I was a kid.

Also, accuracy. To own a gun was to participate in a craft - marksmanship. As a kid I wanted to be a bi-athlete, the sport where you cross country ski with a highly accurate rifle and then stopped and shot targets. It was obscure, weird, physical and precise - it was the perfect sport. While I didn't understand their guns I wanted one - or at least I wanted a gun like their guns. Information was hard to come by back then.

A Ruger 10/22 is no Anschutz and I have an Anschutz anyway. But since I have two Ruger's I thought it would be fun to make the gun I wanted when I was a kid - forty years later but an itch I have yet to scratch.

i-N7Nk7Fv-X2.jpg


Ruger has built over 7 million of these guns. They are a staple and almost everyone who has guns probably has at least one of them. I've heard it called the small block chevy of the gun world. I'd consider more of the XR100 of the gun world - small, unintimidating, dead reliable, a great learning tool and endlessly customized beyond all common or financial sense. Right up my alley.

Also, this adage is probably appropriate: there's nothing more expensive than a free motorcycle. That is probably the case with a free 10/22 as well.

i-VmkHCWk-X2.jpg


I bought this stock years ago when I first hatched the plan to make a "target 10/22" and it's been annoyingly taking up space in the garage. Since I can't work on the stairs between shots or jobs I figured I'd just start doing a little here or there on this stock. Namely stripping it because I hated the color.

i-JXKqQPT-X2.jpg


The style of gun that I love is the target gun - a machine built to a single, focused purpose. These always have very specific anatomical grips that make "holds" consistent and repeatable.

I am not sure if I've mentioned it but I met Ben when I joined our local club. Portland Rifle & Pistol Club was the first club I'd been to when I moved to Portland that didn't seem political and was in fact filled with a very eclectic and diverse group of smart and interesting people. Including Ben. I'd bounced around different clubs feeling very uncomfortable as a more liberal person who liked to shoot. I also wanted to find a purpose to shooting as the targets of zombies weren't very hard to hit. Another club suggested PRPC and "Bullseye" and soon I was on the team of like minded people learning how to be extremely accurate.

i-QDVvpSH-X2.jpg


Bullseye is the American version of Olympic style shooting - essentially it's .22 caliber pistols shot with one hand at 50' for different time periods and it's all about absolute accuracy. On the left is my current Pardini SP22 - the pinnacle of target pistols. The right is my dad's Browning Buckmark which I've built as a loaner gun. The rules allow a red dot sight (no magnification) and it's something I've been doing every Monday night since before I started the house. It's a reset for the week to focus on one thing for an hour and it's a form of meditation. Also, our team is pretty good - one of the best in the country.

So, while I'm highly competitive with a pistol, the rifle is for fun. You can see on the Pardini how I've sculpted the grip to be an exact fit for my hand. It fits like a glove. So I decided to use the same technique to work on the stock of the Ruger.

i-bQsXfxv-X2.jpg


It's basically a ball engraving bit. I am essentially dimpling the area where your hand grips the gun. I find this surface has a lot of grip but also can allow a bit of airflow so your hand doesn't get sweaty and slippery. I also love the look.

i-stPG97c-X2.jpg


The separate part on the left is called the comb - it's where you rest your cheek when you aim the sights and it's adjustable on a target rifle for the same reason you shape your grips - so you can get exact repeatability of the shot process.

i-9H2L89R-X2.jpg


I also wanted some detail in the front to help balance the grip in the front so I machined a groove to the fore stock.

i-MBZLb3d-X2.jpg


So I've been sanding and shaping the stock to where I like it. The next step would be to "bed" the action, the "action" being the actual metal gun parts consisting of the receiver (holds the barrel and bolt) and the trigger unit. Ruger's action is only held by a single 12-24 screw and a company called Kidd Precision makes a rear tang that you can add that gives you two screws - much more sturdy and repeatable. I'd ordered one around the time I got the stock and now, faced with the rather complex task of machining the receiver to accept the tang and then machining the stock to accept the action. Well, I decided that I should "practice" on Lara's gun - the one that I was going to keep "stock".

I'll cover the bedding process in the next post as this is already pretty long. I've toyed with a bit of machining on my guns for a while but this is my first "build" as it were and it was a lot more tricky than I expected.

Gregor
 
Last edited:

kjdhawkhill

Well-known member
Joined
Jan 19, 2015
Messages
822
Location
Flyover state #4
I've always thought of anything 22lr as a pest control tool, until one starts tricking them out.

Competing for fun makes it a toy, not a tool.
Competing for money, turns the same device back into a tool.

If you could find a way to apply your toys to my squirrel problem (or problem squirrels), I'd appreciate it. Goes to show how thin that line can be, huh?
 

bdbecker

ALLIANCE MEMBER
Joined
Nov 18, 2015
Messages
5,559
Location
Iowa
I'm sure a trigger job is already on your radar. If not already done, I'd offer a bit of advice - use a kit from one of the aftermarket companies like Volquartsen instead of trying to tune up your factory parts. I got into a little bit of an informal Ruger target rifle build-off a few years ago with my Dad and Cousin. When it came down to the trigger, I spent hours tuning up the factory parts and was very pleased with the results until I shot my Dad's rifle. My trigger was very nice, but his was about as close to perfect as it gets. Same story with my Cousin's rifle who also used the same kit.

We all ended up with rifles that shot very well. My Cousin and I could shoot ragged 3/4" holes at 50 yards, but Dad found the magic combination and ended up with an absolute tack driver that will throw rounds through the same hole. He's also a heck of a good shot, so that probably helped him a little.

I could yammer on about this subject for hours, so I'll just leave it there for now. One more thing though... Wolf Match Target... it's a little greasy and smells funny, but oh buddy does it shoot nice.
 

Justind97

Well-known member
Joined
Oct 6, 2014
Messages
691
Location
Ottawa, Canada
Gregor - The Dremel troubles me. I would have thought you would have gone down the Foredom rabbit hole and found an excellent used unit which can also be budget friendly.

I do enjoy all the projects that you immerse yourself in, especially the two wheel kinds!
 

rk_tek

Well-known member
Joined
Apr 12, 2015
Messages
153
Location
Bella Vista, AR
I'm sure you've done your research on this but here was my approach to 2 issues I had.
Firstly is the V block that attaches the barrel can pull the barrel down in the action. I drilled and tapped for a 4-40 set screw right behind the takedown screw. I believe I've seen V blocks that are drilled and tapped for this as well.

View media item 108817
secondly, I had slop between the trigger assembly and the receiver. The two pins had play in their holes. Again, I drilled and tapped the back of the receiver for a 4-40 set screw and put pressure on the trigger assembly to take the slop out.

View media item 108818
Record your torque settings for the barrel V block and take down screw. These can change point of impact and repeatability quite a bit. I have mine in a now discontinued Predator Raptor stock that I really love. Trigger is a Rimfire Technologies piece(couldn't afford a Kidd or Volquartsen at the time). the Green Mountain barrel is accurate when it works, but I'm pretty sure the headspacing is wrong as it has lots of light strikes and ejection problems.
 

rk_tek

Well-known member
Joined
Apr 12, 2015
Messages
153
Location
Bella Vista, AR
Gregor - The Dremel troubles me. I would have thought you would have gone down the Foredom rabbit hole and found an excellent used unit which can also be budget friendly.

I do enjoy all the projects that you immerse yourself in, especially the two wheel kinds!

I'm expecting him to find a set of dentist tools complete with the ultra quiet compressor and more tooling than he can use in a lifetime for $100.
 
OP
S

sakurama

Well-known member
Joined
Oct 10, 2010
Messages
1,458
Location
Portland - the cool one.
Since my worry was messing up a stock that I'd spent a lot of time sanding and shaping I figured that Lara's 10/22 would be a good candidate to try out bedding the action. It won't change the look of the rifle but it should improve it's accuracy. So I'm sort of keeping it stock.

Bedding an action essentially using some kind of epoxy to create a perfect fit between the gun action and the gun stock. Being wood and mass manufactured they are generally a pretty sloppy fit and this can create movement that can hurt accuracy. When you think about shooting it is in essence an effort to reduce tolerance stacking. A movement of 2-3 thousandths of the gun when the trigger is pulled will grow as the bullet travels down range and can end up way off target.

i-ZTMxtxv-X2.jpg


This is both 10/22's broken down. The one on top is the complete action and the bottom is broken down to basic components. The "receiver" as the name may suggest, accepts all the different parts and is like a frame. Since it holds the barrel it's the part we want to "bed" to the stock. Interestingly we don't want to constrain the barrel because shooting creates heat and the barrel needs to be free to expand and contract. So target rifles generally "free float" the barrel. Now, everything I tell you here is subject to endless discussion and controversy so take it with a grain of salt.

i-KJFcdsP-X2.jpg


The first thing I decided to do was redrill the action to accept a larger 1/4-20 screw. It isn't something people do but it seemed to me that if we're trying to create a stronger connection a larger bolt makes sense. Also, I learned that in soft materials like aluminum you want to use coarse threads, not fine. They're larger and stronger.

i-kpgQMCM-X2.jpg


The method I'm doing is called "pillar bedding" which is to make a tube of some kind that is glued to the stock and which the action then rests on and is tightened to. They're typically done with the larger part under the action which made no sense to me since the only thing holding it in place would be friction.

i-FwDjJbD-X2.jpg


Part of what I like to do is think through a problem and apply what I know from other things to the new problem. In this case I decided that if I counter bored receiver I could make a perfect fitting lug on the pillar to index the whole assembly. If the goal is to create a union this should be a better solution. I found one person doing something similar with long range weapons so I feel like the idea makes sense.

i-nX8KzTr-X2.jpg


I then bored the stock to accept the "T" hat shaped lug. I'd already turned down the 1/4-20 hex head to be more precise and fit the lug more snug.

i-xQ8fNPk-X2.jpg


My test fit was flawless and I was really happy so far.

i-HbwBfFg-X2.jpg


The next thing to do is remove some wood inside the stock that serves to lock the action in place. The bedding and rear tang will make this unnecessary.

Here's the pillar I made bolted to the action. The ribs are to hold the epoxy and create more surface area with the glue. This will constitute the front of the action and be the main method of fixing the action to the stock. It should be a big improvement over a loose fitting 12-24 screw.

Next up is the rear tang.

Gregor
 
OP
S

sakurama

Well-known member
Joined
Oct 10, 2010
Messages
1,458
Location
Portland - the cool one.
I don't know why I've never gone down the Fordam rabbit hole. It seems like a big jump from a Dremmel to an air grinder and maybe that's the middle. I honestly don't like the Dremmel that much - it's not nearly as powerful as you really need.

Damn you. I may need to look into this.

G
 

rk_tek

Well-known member
Joined
Apr 12, 2015
Messages
153
Location
Bella Vista, AR
Are you using an aftermarket receiver with a rear tang? I don't know if a receiver with a rear tang can accomodate this, but some people drill the rear of the receiver with a 1/4" hole in line with the barrel so the gun can be cleaned with a rod from the rear by dropping the bolt. I never went that far as I just use a bore snake or drop the rod in from the muzzle, then attach a swab.

10/22s can be taken in so many directions between tacticool and precision. Although a bolt gun is a lot easier to make accurate. My Savage 17HMR is as accurate out of the box as my 10/22 and cost 1/4 as much. But we don't play with guns because we are smart with money do we?
 
To avoid these ads, REGISTER NOW!
Top Bottom