To avoid these ads, REGISTER NOW!

Questions on KRE3800 cleanup

shannonw

Well-known member
Joined
Jun 18, 2010
Messages
660
Location
Florida
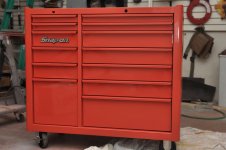
Hi folks, now ex lurker here. I picked up an 80's kre3800a other day for 200 bucks. Not sure honestly if that was a decent price or not but finding someone who would part with a solid cabinet this cheap seems tough and even with the rust still 10x more solid for the price on anything i've seen at hd or lowes,etc. (never realized how heavy these sob are)

http://www.flickr.com/photos/32698314@N05/sets/72157626837786432/

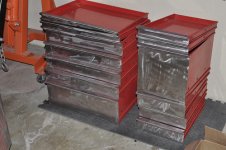
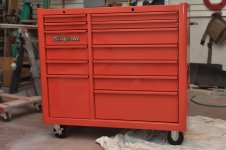
Anyways surprisingly except for some light rust in a corner it's in pretty good shape, it had been sitting in a shed for 6 years. The only noticable ding is one i put on the back loading it into the suv and forgetting about the $@#$@ hatch latch. The drawers inside are excellent as well as inside paint (or is it powder coated?) except for a bit of the same type of spotty rust by the big drawer. The rust doesn't seem that bad. Paint would buf out pretty good if not for the rust areas.

The rust seems light enough. I was thinking sanding the front, drawer fronts,sides, back, top, bottom and shooting with matched 2k and flip out the casters.

Questions I have are i'm not sure what a decent method to do with the rust area is outside of sandblasting it, once i sand it down and wire/abrasive wheel it, should i hit it with some type of rust converter or navel jelly then prime/paint? I've used that stuff before but if it works or not i have no clue.

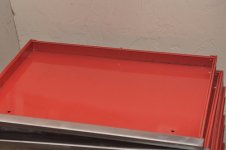
Any tips on getting the silver drawer edges off? Are they just snapped on?

Thanks! I've been lurking for awhile and the ideas you guys come up with are humbling!
 
To avoid these ads, REGISTER NOW!
OP
S

shannonw

Well-known member
Joined
Jun 18, 2010
Messages
660
Location
Florida
Anyways an update, local auto valspar got me the paint giving them the ppg color, good match! I've got the exterior stripped down (used the poly strip disks on angle grinder). Took no time really, 45m or so to strip it, just have to go back over some spots. Not going to bother with the inside, drawer sides, or the inside of the drawers they're all in excellent shape. just the exterior and drawer fronts and drawer lips.

Attack plan is finish stripping, hit it with the orbital sander to clean up a bit. mask off the inside and everything but front of drawers. Shoot with dtm primer and the 2k single stage valspar (i have supplied air, no waiting around for water based to dry). Would like to have done the inside so didn't have to mask but seems like so much more work to do the drawers from scratch and that's all in excellent shape, except the fronts.

Side note, getting the decorative drawer edges off took some figuring out, they're aluminum not plastic like i thought. I sprayed pb blaster to lube them really well and knocked em from the sides with a ratchet extension and slid them off. I couldn't come up with a way to unsnap them as they grab the lip in back, i'd have had to make some pry tool or something i think. I was afraid of leveraging and bending something, sliding worked well enough.
 

canuckian

Well-known member
Joined
May 7, 2009
Messages
4,103
Location
East coast of Canaaada
nice box you have there, especially for what you paid for it! as far as I know, you took the drawer trim off the correct way. If my memory is correct, when I put my cart together, I slid mine across the lip. i suppose I could have snapped them on but I wouldn't try removing them that way.
 
OP
S

shannonw

Well-known member
Joined
Jun 18, 2010
Messages
660
Location
Florida
Hi Thanks! Glad to know that's how those go on!

Yes i'm pretty happy with the find, friction drawers but solid and it'll clean up. This is my first *real* toolbox thus my surprise at how dang heavy these things are, I've had those plastic cabinets in the 2car garage and cheapo little ace hardware type vertical tool box that falls over every time you open more than one drawer.

After reading this site so much, I ditched the cabinets built a drop shelf around the perimeter of the garage, and decided to find a decent tool box.

I had been looking at all the usual lowes,hd deals but after reading a lot on this site decided to wait until i could find something more substantial. Having never seen/used a decent one before I couldn't fathom the outlay for even a used snapon set and was wondering a bit if these things were too big!

Of course now that i got it here, i realize...the tool box can never be too big!

And now of course now that I see how solid a decent steel toolbox is i'm addicted. I'd like to find some metal wall cabinets to hang next and some more KRA pieces. Then maybe one day i'll move up =) but for now i'm a happy freakin camper.
 
OP
S

shannonw

Well-known member
Joined
Jun 18, 2010
Messages
660
Location
Florida
Re: Questions on KRA3800 cleanup

Finished stripping bottom and and few things i left behind the other day. Going to clean up the tight spaces tomorrow and around the locks and around where i'm going to mask. Debated the trouble of masking everything off vs dropping it off at a media place but i don't want to go too nuts here on 200 bucks.

Took me a hit to realize how the pull handle came apart. Before i realized remove the two rubber end pieces, then i saw some flat head screws inside, after a few minutes i realized the handle has an insert you can knock out.

I've been using on things the HF poly discs for the angle grinder, but I'm thinking the name brand stuff at HD,etc last twice as long, but my grinder is only a 4" and HF is the only place i can find a 4" poly disc. Going to upgrade my old ryobi to a better brand soon larger size i can find disc for easily! I was running short on disc here and running them pretty thin.

I'll be interested to see how my spraying goes, i have no experience. I painted an outboard that was covered in barnacles and pitted and a few dash pieces I made with a mountain gravity sprayer (non-hvlp) and they came out ok for a first timer with a crappy compressor, not perfect by any means.

I've been using HF cheapie hvlp for shooting gel coat repairs and parts and the mountain for the paint. I realized a full size sprayer for the paint is oversize for i've been doing and picked up on ebay a deal on a devilbiss sri, it has a 1.0 tip so i'll shoot the primer with the HF cheaper, and the paint with this sri and see if i've improved any. cfm requirements on the detail gun are a lot lower and it supposedly can do a 6" fan, i think it may be better with the crappy compressor i have.
 

Attachments

  • 5807189730_5663c83f0d.jpg
    5807189730_5663c83f0d.jpg
    115.8 KB · Views: 59
  • 5806625983_d8a4c2db81.jpg
    5806625983_d8a4c2db81.jpg
    101.4 KB · Views: 47
  • 5807191008_e661573718.jpg
    5807191008_e661573718.jpg
    105.8 KB · Views: 61
  • 5806626363_aecbd71163.jpg
    5806626363_aecbd71163.jpg
    61.1 KB · Views: 43
  • 5167873843_f8ff2204c7.jpg
    5167873843_f8ff2204c7.jpg
    97.3 KB · Views: 48
Last edited:
OP
S

shannonw

Well-known member
Joined
Jun 18, 2010
Messages
660
Location
Florida
Ok an update and questions, first off if you're expecting a guru restore you'll be disappointed =) I 've painted only a few things, barely have any idea what i'm doing and I'm still working out the bugs. I don't have the room to have drawers everywhere and the garage taken up for weeks at a time so I had to cut some corners and really bust *** and rush a few things.

The good news, the front came out good I thought, I was really worried about that and all the drawers but the detail gun I shot those with did really well, got my hopes up. Paint is a little off, not sure if i used the wrong ppg code, or it's the brand, or it's just 25 year old paint or powder coat. But nothing major. Compared to the before and after pictures it's a big improvement.

Now the bad news, with the detail gun 6" fan I didn't get a consistent finish on the sides and back, I have some streeks, there's coverage but it's streaky I guess from where I didn't get consistent overlap each coat? or probably that and not enough material flowing out each coat maybe. I got plenty on the drawers

I'm glad it's the big sides, no problem to reshoot if it bugs me. Might just put a poster on the sides. But I'm wondering if a wetsand or compound and buff with the pc orbital would help clear that up a bit?
 

Attachments

  • 5820343730_1bbd8a7283_z.jpg
    5820343730_1bbd8a7283_z.jpg
    115.9 KB · Views: 85
  • 5820343984_320b312afe_z.jpg
    5820343984_320b312afe_z.jpg
    122.8 KB · Views: 68
  • 5820344240_5a22b65df5.jpg
    5820344240_5a22b65df5.jpg
    99.3 KB · Views: 76
Last edited:
To avoid these ads, REGISTER NOW!

canuckian

Well-known member
Joined
May 7, 2009
Messages
4,103
Location
East coast of Canaaada
not too shabby at all! I'd give the wetsand/compound a go first. As long as the color is consistent and there's enough paint to do those processes, I'd say it'll come out ok. If not, possibly try a gun with a wider fan and give it another go.
Keep in mind I'm not a painter/refinisher so consider the above more of a suggestion than advice LOL
 
OP
S

shannonw

Well-known member
Joined
Jun 18, 2010
Messages
660
Location
Florida
Thanks! I'm stoked with how the front came out. I'll hit it next week with the buffer to bring the shine out, I think the sides will clean up, you really have to look to see it. Worst case I'll reshoot those sides with the bigger gun when I paint the garage lighting SO red. Not any grand plan or fancy, just creating a little neater space, just found this box and said hey that would be a cool focal point also.

i'll leave the drawer trim off for now, i like how it looks, maybe put some 3m film on the handles.

I was surprised, I used almost a quart of dtm primer and that 1 pint of paint just made it, I started thinking it might not, so left the bottom primered.
 

countryroad82

Well-known member
Joined
Mar 18, 2011
Messages
3,447
Location
Kentucky
Wetsand your dry spots (the streaks) with 1200 to knock down the texture, then sand with 1500, and finally 2000 and buff. Use something like a soft block http://www.motorguard.com/sur_1_1.html I normally use the black (hard) side. Don't go crazy with the coarse grit papers (I know it is about as coarse as notebook paper but believe me) it is better to have to go back and resand than have to repaint. Oh and stay away from the edges as much as possible.
 
OP
S

shannonw

Well-known member
Joined
Jun 18, 2010
Messages
660
Location
Florida
Hi thanks for the tip! wasn't sure what grit to use. I've corrected errors shooting gelcoat, wasn't too sure about paint. Can get pretty aggressive with gelcoat as it's on thick.

I will get some blocks, i've been just hacking by on stuff with those 3m sanding foam pads (I wrap paper around them) but they're not as stiff, I think it's time to grab a couple of real ones.
 

countryroad82

Well-known member
Joined
Mar 18, 2011
Messages
3,447
Location
Kentucky
The 3M pads are ok for what you are working on I didn't know that you had anything like that. Just make sure to soak your paper for about 10 minutes and wrap it around your pad here is a pretty good how to vid on colorsanding a buffing http://www.youtube.com/user/SWRNCfan#p/c/6D709317FF7531EF . The same procedures follow for a car as it would for a toolbox, it is still paint!!! If you like the vids subscribe to that channel, he is a good guy I use his vids to demonstrate to my customers what I have to do to their vehicles and why I charge what I charge. He also has another channel worth subbing to here
which is pretty cool. Anyway good luck and make sure to post pics!!!
 
OP
S

shannonw

Well-known member
Joined
Jun 18, 2010
Messages
660
Location
Florida
Just thought i'd update this thread, have been working on other things. Did an ikea butcher block counter in the laundry room and had a piece left over...said hey why not use it on the toolbox.

I didn't have enough to go the full length of the box but had enough from cutting down the depth to add to the sides. Here's how it turned out. Still have to sand and poly it, still haven't gotten around to putting the rest of the parts back on the box but did switch out the locks for some new ones.

Now that i've been using it, i can't believe the sheer amount of stuff you can put in these things =P I've seen some larger craigslist I'd have probably have picked up now instead but this seems to fit everything I need, i'm really looking for some older metal wall cabinets at the moment but imagine i'll have to call some office supply places or settle on the sams club ones.
 

Attachments

  • 5989603624_a18d5cdc8c_z.jpg
    5989603624_a18d5cdc8c_z.jpg
    109.5 KB · Views: 92
  • 5989043841_9713a16385_z.jpg
    5989043841_9713a16385_z.jpg
    131.5 KB · Views: 78
OP
S

shannonw

Well-known member
Joined
Jun 18, 2010
Messages
660
Location
Florida
Thanks! That ikea stuff was pretty cheap, i needed a cheap laundry room counter top and was going to just slap a laminate one down but an 8 foot ikea is 59 , 39 for the 4 footer. The cheap lagen is beech (no idea how sturdy it is but i'm not going to be hacking on it or dismantling transmissions on it. They have oak that is thicker too (i saw someone else on here use the ikea oak). This is about 1 1/4 thick..but heck for the price tough to beat. I'd have ran back and for the 4 footer but they were out so i decided to piece it with glue and dowels.
 
To avoid these ads, REGISTER NOW!
Top Bottom