To avoid these ads, REGISTER NOW!

Between 265 & 485 SQ/FT Uncle Lenny's house of toys and tools

Workspaces sized between 265 and 485 squarefeet.

LeonardY

Well-known member
Joined
Apr 16, 2011
Messages
5,034
Location
Southern California
New member. Great information and inspiration here. Posted a few times, Haven't properly introduced myself.

I bought my house new in 1996. This is my first home and I did my best to setup the garage. Now, fifteen years later and lessons learned. I've redesigned and started rebuilding the garage. The garage is two cars, 20' x 20', attached to the house. I had the builder install a 220V outlet and a dedicated 20 amp circuit. No room to expand the garage. I always park my car in the garage.

The first version of the garage was a 14' long by 2'6” deep bench running down the entire right side of the garage. Built large drawers at one end with a pegboard cabinet above. The left side of the garage has wall mounted shelves. Built over the garage door shelving for storage. I replaced the single light bulb with three fluorescent fixtures and track lighting.
There was garage, garden and holiday stuff, all stored in it.
The garage has morphed since then depending on tools acquired or my storage needs
I built a shed and stored all the garden equipment in it.
Tore out about 9' of the bench when I realized it had just become a big shelf. Added some overhead cabinets at the back of the garage.
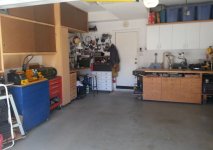
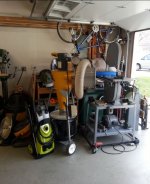
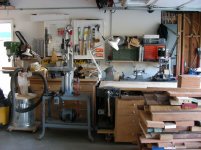
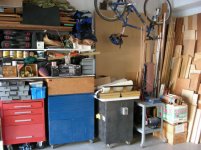
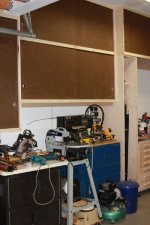
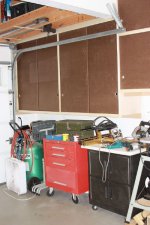
Now the entire right side of the garage is a jumble of tools. All are on wheels.
And that's where I currently am.

Here's the plan. I've already redesigned the space but money is tight. (What's new?)
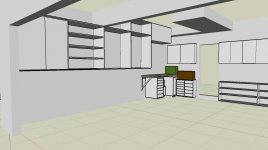
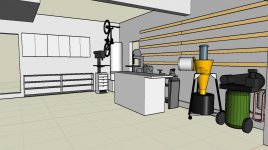
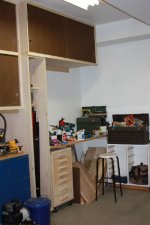
The wall hung shelves are being replaced with enclosed cabinets. They will have sliding doors to keep the dust out. I've designed them to make the most of the space. The cabinets are starting at 4' off the ground so I can store tools underneath. I am adjusting my designs to use what material I have available. Part of this build is to use as much of the stored material and supplies as possible.

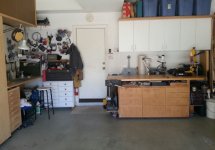
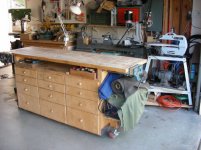
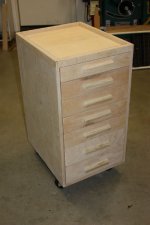
I have put a new bench in the back left corner of the garage. I am building a roll around tool box. It will be stored under the bench. In that corner will also be a wall mounted cabinet which my Kennedy box will sit on. Once that is completed, I am going reorganize my tools.

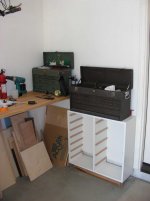
The back wall will still have the overhead cabinets with the addition of a lower shallow cabinet. On the right side of the garage, I am tearing out the last of the 5' of the original bench. That wall will be the wood lathe, dust collection, compressor, and the rolling bench.
I build everything from fine furniture to highly detailed models. I rarely work on cars anymore.
 

Attachments

  • DSCN0450.jpg
    DSCN0450.jpg
    136.7 KB · Views: 773
  • garage1.jpg
    garage1.jpg
    82.2 KB · Views: 730
  • garage2.jpg
    garage2.jpg
    123.7 KB · Views: 825
To avoid these ads, REGISTER NOW!
OP
L

LeonardY

Well-known member
Joined
Apr 16, 2011
Messages
5,034
Location
Southern California
More pictures of the current condition.

The last two pictures are what I got done today. I mounted the cabinet for my tool box and built the carcass of the roll around tool box.

Leonard
 

Attachments

  • DSCN0448.jpg
    DSCN0448.jpg
    47.9 KB · Views: 744
  • DSCN0446.jpg
    DSCN0446.jpg
    33.8 KB · Views: 662
  • DSCN0444.jpg
    DSCN0444.jpg
    51.5 KB · Views: 680
  • DSCN0443.jpg
    DSCN0443.jpg
    58.3 KB · Views: 700
  • DSCN0463.jpg
    DSCN0463.jpg
    47.6 KB · Views: 676
  • DSCN1493.jpg
    DSCN1493.jpg
    127.8 KB · Views: 623
  • DSCN1494.jpg
    DSCN1494.jpg
    139.3 KB · Views: 627
OP
L

LeonardY

Well-known member
Joined
Apr 16, 2011
Messages
5,034
Location
Southern California
Haven't posted any progress. Because as with all good plans, it fell apart.

I've spent most of my time re-designing for one reason or another. Then I had to fix or find what I needed. And finally I blew out my back on the tennis court.

But I'm better now...Finally...progress.

I moved all the stuff on the shelves into the dining room. It isn't used much anyway. Tore down the old shelves.

I built a roll around tool cabinet and the sliding door cabinets. I added a broom closet. I got tired of tripping over the brooms.

Any comments welcome.

Happy Fourth of July.
 

Attachments

  • IMG_1597.jpg
    IMG_1597.jpg
    56.9 KB · Views: 605
  • IMG_1596.jpg
    IMG_1596.jpg
    65 KB · Views: 560
  • IMG_1595.jpg
    IMG_1595.jpg
    69.6 KB · Views: 545
  • IMG_1534-1.jpg
    IMG_1534-1.jpg
    30.4 KB · Views: 535
  • IMG_1537.jpg
    IMG_1537.jpg
    48.6 KB · Views: 597
Last edited:

cobraace

Well-known member
Joined
Jun 15, 2011
Messages
66
You have skill,s with wood very nice roll around:D and the sliding door,s are a good idea keep it up.
 
OP
L

LeonardY

Well-known member
Joined
Apr 16, 2011
Messages
5,034
Location
Southern California
Life has gotten in the way of this garage build. Everything you can think of has happened. Loss of a job (More importantly, spending cash.) New job. Loss of loved ones. As you know, that will put you into a tail spin. I've regained my footing and motivation. So here's an update after all the years have passed.

I don't have a lot of in progress photos and it really wouldn't be all that interesting.

I've shifted and moved tools all over. Trying to find the best location for them. And this where I have landed. It's not fancy but very functional. The car can move be put in every night and I can still sit at my bench and work.
There is the one corner where all the tools get shoved. It will never be organized.

This isn't the finish, it's just a pit stop.
 

Attachments

  • 1.JPG
    1.JPG
    90.1 KB · Views: 582
  • 2.JPG
    2.JPG
    99.7 KB · Views: 540
  • 3.JPG
    3.JPG
    117 KB · Views: 527
  • 4.JPG
    4.JPG
    80.6 KB · Views: 555
  • 5.JPG
    5.JPG
    125.7 KB · Views: 622

bad_idea

Well-known member
Joined
Jun 11, 2011
Messages
4,332
Location
Pasquotank, NC
I am impressed with the cabinets you have built. The roll around tool box is higher quality than much of the furniture in my house. What material is the tool box made of - pine, oak, maple, etc?

Sorry to hear life got in the way of your garage time. Not to say garage time is the most important thing. Saying that time spent in the garage means life is rolling at a smooth enough pace that you can spend the time out there. Glad things are mellowing out for you.
 
OP
L

LeonardY

Well-known member
Joined
Apr 16, 2011
Messages
5,034
Location
Southern California
Years later...
Not much has changed. I've been busy with work. But now, the pandemic has me at home and there are so many things to do.

The garage hasn't changed much. Which tells me that I landed on a pretty good setup. But there is always room for improvement.

I have taken the time to use and learn my CNC mill. The silver lining is I am able to call the companies I have been working during the day. Instead of having to do it at lunch and no where near the machine or the computer. It used to be a 48 hour turn around to find out if the correction worked.

Here some of the parts that I've been making. You might or might not know what they are.
 

Attachments

  • 20200308_190057.jpg
    20200308_190057.jpg
    94.4 KB · Views: 607
  • 20191005_130802.jpg
    20191005_130802.jpg
    152.1 KB · Views: 576
Last edited:
OP
L

LeonardY

Well-known member
Joined
Apr 16, 2011
Messages
5,034
Location
Southern California
While doing all of this. I was taxing my compressor.

And that lead to this modification, service and upgrade on the compressor.

There was a lot of moisture build up in the filter regulator. The air was wet coming out of the blow gun.
It was time to service the compressor. I drained the oil and refilled with synthetic. Removed the old regulator filter and replaced it with a separate filter and regulator. I also tightened all the fittings. I made a bracket to hold the new assembly solid.
I discovered what was rattling. It was the filter cover and after contemplating several complicated fixes. I used a tie wrap. That worked perfectly.
I took off the leveling feet that I thought would be such a good idea years ago. Replaced them with 1/4" thick rubber. I used VHB to attach them.

Lastly I found the bung plug was higher than the receiving fitting. It left about 4 cups of water in the bottom of the tank. I milled a couple of slots down to the upper thread engagement. Now I can drain the tank completely.

The compressor doesn't make much noise now. I could put it in a box but when I'm running the mill I wear hearing protection so it isn't necessary.
 

Attachments

  • 20200910_112354.jpg
    20200910_112354.jpg
    147.2 KB · Views: 509
  • 20200908_133131.jpg
    20200908_133131.jpg
    151.5 KB · Views: 401
  • 20200910_103432.jpg
    20200910_103432.jpg
    147.3 KB · Views: 373
  • 20200910_100055.jpg
    20200910_100055.jpg
    68.6 KB · Views: 355
  • 20200910_103701.jpg
    20200910_103701.jpg
    139.5 KB · Views: 347
  • 20200908_133608.jpg
    20200908_133608.jpg
    53.8 KB · Views: 558

j p smith

Well-known member
Joined
May 22, 2013
Messages
1,213
Location
Glendale, Arizona
Years later...
Not much has changed. I've been busy with work. But now, the pandemic has me at home and there are so many things to do.

The garage hasn't changed much. Which tells me that I landed on a pretty good setup. But there is always room for improvement.

I have taken the time to use and learn my CNC mill. The silver lining is I am able to call the companies I have been working during the day. Instead of having to do it at lunch and no where near the machine or the computer. It used to be a 48 hour turn around to find out if the correction worked.

Here some of the parts that I've been making. You might or might not know what they are.
What are you making
 

j p smith

Well-known member
Joined
May 22, 2013
Messages
1,213
Location
Glendale, Arizona
While doing all of this. I was taxing my compressor.

And that lead to this modification, service and upgrade on the compressor.

There was a lot of moisture build up in the filter regulator. The air was wet coming out of the blow gun.
It was time to service the compressor. I drained the oil and refilled with synthetic. Removed the old regulator filter and replaced it with a separate filter and regulator. I also tightened all the fittings. I made a bracket to hold the new assembly solid.
I discovered what was rattling. It was the filter cover and after contemplating several complicated fixes. I used a tie wrap. That worked perfectly.
I took off the leveling feet that I thought would be such a good idea years ago. Replaced them with 1/4" thick rubber. I used VHB to attach them.

Lastly I found the bung plug was higher than the receiving fitting. It left about 4 cups of water in the bottom of the tank. I milled a couple of slots down to the upper thread engagement. Now I can drain the tank completely.

The compressor doesn't make much noise now. I could put it in a box but when I'm running the mill I wear hearing protection so it isn't necessary.
Good catch on the bung, I am going to check mine next time I drain it
 
OP
L

LeonardY

Well-known member
Joined
Apr 16, 2011
Messages
5,034
Location
Southern California
What are you making
A replica of the stop motion Walker from Empire Strikes Back. I started it for the 40th Anniversary of Empire.
The lock down gave me time in my garage to machine all the parts. Silver lining...
20210312_151531.jpg20210313_170957.jpg
There is a picture at ILM of all the parts laid out. Here is my version.
20210222_160400_04.jpg
All the machining is done.
 
OP
L

LeonardY

Well-known member
Joined
Apr 16, 2011
Messages
5,034
Location
Southern California
So I've been separated from my company. My decision was to take retirement. I wasn't planning on this but I intend to make the best of it. Garage looks like a bomb went off since I had to bring home all the treasures and tools from work. I haven't had enough motivation to unbox and clean up. I've gotten some of it done but not enough.
Right now, I intend to enjoy the holidays.
Be well my GJ friends. There is more to come.
 
OP
L

LeonardY

Well-known member
Joined
Apr 16, 2011
Messages
5,034
Location
Southern California
Boom!
1642217085361.png
The holidays are over and I am been trying to find motivation to get this mess cleaned up. It probably doesn't look as bad as it make me feel.
Here's today's small amount of progress. This is before.
1642217289229.png
Can't even get to the bench without stepping on something. After a few hours of sorting and putting things away. I got to this.
1642217444313.png
Not perfect but I can sit down and get some things done in the little bit of clear space.
 
OP
L

LeonardY

Well-known member
Joined
Apr 16, 2011
Messages
5,034
Location
Southern California
Got inspired today.
Thought I would start organizing the wrenches in the tool box.
Did a quick model of a wrench rack to fit my SK tool box.

Swapped out the filament in the 3D printer....
The filament wouldn't feed after that. Spent the next hour searching the internet and watching Youtube. Some of which had nothing to do with the 3D printer.
Two hours later...
I took apart the print head and cleaned it. (Like the manual said.)
I was back in business.

1644112941347.png
1644113007567.png

It works but needs some refinement. I have to make 3 more.
I'll remodel and run it over night.
 
To avoid these ads, REGISTER NOW!
OP
L

LeonardY

Well-known member
Joined
Apr 16, 2011
Messages
5,034
Location
Southern California
I did a couple of test prints for my socket rack. The one on the right broke after pushing the socket on it a few times.
1644459214550.png
1644459418324.png
The green one broke.

Both were the same in terms of hanging on to the socket. I'll figure out what I need and then print them up.
 

wasfast

Well-known member
Joined
Apr 10, 2014
Messages
874
Location
San Diego CA
Don't build the part on the flat, angle it or 90 deg to the force. Otherwise, the tab underforce will break at the lay-to-layer interface in shear.
 
OP
L

LeonardY

Well-known member
Joined
Apr 16, 2011
Messages
5,034
Location
Southern California
Don't build the part on the flat, angle it or 90 deg to the force. Otherwise, the tab underforce will break at the lay-to-layer interface in shear.
Yup. Thanks.
I realized that after. I was avoiding supports. I'm used to our EOS machine at work. I don't have to think about print orientation since it's a laser sintering machine.
 
OP
L

LeonardY

Well-known member
Joined
Apr 16, 2011
Messages
5,034
Location
Southern California
I was cleaning up some old files and found these pictures. I intended to post but just never got around to it.
I responded to a few other threads with pictures and comments.
Wish I'd seen it first for inspiration.
What kind of CNC are you using?

It made me realize that other GJ members might benefit too.
So better late than never...
Back in 2012. I was searching for a CNC mill. I have a small EMCO Compact 5 combo machine that has served me well since 1985.
1647729826061.png
The lathe works well but the mill has always been problematic.
I had a lot of parameters to consider.
Here's the list as best as I can remember. I'm sure there are more than 5.
CostI wanted to stay around $5K
Tooling and FixturesStandard sizes. The Compact 5 required special sizes
SizeWanted a benchtop. (At least I thought I did.)
SoftwareWanted it included
Customer servicei knew I was going to need help

After searching I settled on a CNC Masters Baron Benchtop. Here it is on the day I picked it up. The company is local to me so I saved on shipping charges. I moved it to its location with an engine hoist. As you can see It is on a base. I opted for that because I didn't want to build one. The mill weighs 800lbs. Not really a benchtop.
1647730487090.png
And there it sat for close to 4 years being barely used.
Because the following Monday after, I was hired full time. And we were busy.

When things slowed down. I wanted to get moving. I called CNC Masters and explained that I had not really used the machine and thought it best to give it a thorough once over. I spoke one of the owners at CNC Masters. Omar helped me like I bought yesterday. And after all these years, he still does. I have even emailed him on a Sunday and received a reply later that day.

Getting going wasn't easy. Even though, I am well versed in 3D modeling. (It's my job.) and I did machine parts on a mill manually. I ran a laser cutter at work too. This felt like a different world. I soon realized I needed to really understand feeds and speeds, workholding and programming. I remember talking to one of the machinists at work. He was helping me. I barely understood what he was saying.
One of the biggest issues I had was I was learning after work and on weekends. Any problem I needed answered required me being in front of the machine. It took at least two days to get answers. This wasn't the fault of any of the companies I was working with. They just weren't open when I was learning. But I stuck at it.

Here's my first setup. Sorry for the blurry picture. I bought the vise from a friend. It turned out to be OK but as you can see it's really tall. The capacity was only 4 inches. I was going to have to modify it to fit standard jaws. (Exactly what I was trying to avoid in the first place.) So I got rid of it.
1647732861529.png

I ended up a Glacern CNC vise on sale. I couldn't be happier. BTW. Another great group for customer service.
1647733189258.png

My next problem was swapping out tooling. I looked for a quick change system. Tomach hadn't come out with theirs at the time I was looking. I found Royal made one and then I found this really cool one made by a company called Billet Design. It is what you see in the photo above. I got a hold of the designer, and he was a super nice guy. He wasn't in full blown production but he had promised a delivery date. This then all went south. I had paid for it and had waited for nearly 6 months after the promised delivery. Whenever I contacted him he always responded. I feel he isn't a bad guy. Just a guy that was making promises he couldn't keep. I waited until the point when I wasn't going to be able to get a refund. Contacted my credit card and got the charges reversed. He immediately called me and told me that it was shipping. He said he had never gotten a bad Paypal reference. I told him I would release the money to him upon receiving it.
I did get it and it is a nice quick change. I only have four quick changers. It's a modified BT30 so I might be able to do the mods myself.

My next setup was to contain as much as the chips as possible. I bent some sheet metal and attached it with rare earth magnets. I bought some clear vinyl strips and cut it up for the front. Chip containment was good but I wanted it better.
1647734652097.png

The second revision of the chip containment pan was this. I made longer sides that extend the pan out under the vise. Got rid of the vinyl and replaced it with acrylic. This is what I had on hand. I would prefer Lexan.
This works really well. Now that I have a FDM printer I am going to make a few more modifications.
1647735306766.png

Here's the final setup. Final for now....
1647735979235.png

Now it's time to stop and enjoy.

1647735923476.png
 
Last edited:
OP
L

LeonardY

Well-known member
Joined
Apr 16, 2011
Messages
5,034
Location
Southern California
Had lunch with a friend yesterday. On the way home, I decided it was time to freshen up the vegetable beds. I stopped off at a soil place and got a yard of compost. $22 for organic. Best deal in town.
1648388919475.png
Cleaned out the vegetable beds. There were a bunch of roots and Japanese beetle grubs.
1648389039839.png
The beds were almost full last year. The previous years compost broke down enough that I needed to add a good 9 cubic feet to each.
1648389221847.png
But as always something has to go wrong. The plastic hub in my wheel barrel disintegrated. But I guess that's the reason for a shop and tools. I found a length of Delrin and machined busing. Only took about an hour. But I needed a break from shoveling.
1648389513643.png1648389552759.png
1648389621162.png
Few more hours of shoveling and the veggie beds are ready. Now I just have to get my gardening buddy to the garden center. She's busy with school kids right now.
1648389794868.png
 
OP
L

LeonardY

Well-known member
Joined
Apr 16, 2011
Messages
5,034
Location
Southern California
Finished planting the side yard. I still need to do some cleaning against the house.
1650546040769.png
I have the cover any open ground because the neighbor's cats like to treat it like a litter box.
I like the cats. They keep the rodents at bay.
1650546295893.png
I lifted up the trellis about 6 inches. Last year cucumbers would get behind and it wasn't easy to get them.
1650546558854.png
 
OP
L

LeonardY

Well-known member
Joined
Apr 16, 2011
Messages
5,034
Location
Southern California
Great work on the chip tray. Gardens look great!
LY are you getting adjusted to not going to work?
Thanks for the compliment.

I don't miss the politics or the drive. I do miss the people and the projects. Mostly the people.
Had lunch with the guys last week. One is moving to Arizona somewhere along the US/Mexico border. He hasn't fully decided yet.
He traveled all over the US. Looking for a place to retire. He mentioned he stopped in Osh Kosh. Another buddy asked "To stock up on overalls?" And that's what i really miss.

And thanks for asking.
 
OP
L

LeonardY

Well-known member
Joined
Apr 16, 2011
Messages
5,034
Location
Southern California
Spent time in the garage and the yard. Wanted to clean up the chicken wire barriers. Bought some really crappy fence boards and made some frames.
1651713569810.png
My neighbor's boy was spending time with his Uncle. He's watching a squirrel. He won't move unless I say go. Yeah. I said go.
1651713651113.png
Stained the frames black.
1651713761274.png
Stapled chicken wire to them. I haven't figured out how to attach them. String works for now.
I had enough stain from when I built the planters. And just enough to give the planters a fresh coat.
1651713900814.png
 
OP
L

LeonardY

Well-known member
Joined
Apr 16, 2011
Messages
5,034
Location
Southern California
May the Fourth be with you.

I've also been working on my other project in the garage. My 3D printers have been running nonstop for 4 days.
1651714067255.png
1651714144268.png
I digitally and modeled the Walker. If your curious, the digital model renders are posted at this site.
 
OP
L

LeonardY

Well-known member
Joined
Apr 16, 2011
Messages
5,034
Location
Southern California
Got to cleaning the garage today. The aim was to put stuff away and throw stuff away.
I got this area picked up earlier in the week. No before pictures.
1655587230868.png
Here's the other side before pics.
1655587564828.png
1655587598302.png

While it doesn't look that different. I have a clear bench and table saw.
1655587844501.png
1655587891589.png
1655587980994.png
It's not perfect but I've got room to work now.
 
To avoid these ads, REGISTER NOW!
Top Bottom