To avoid these ads, REGISTER NOW!

My Garage Project...so far

Dan'sGarage

Active member
Joined
Jan 12, 2010
Messages
33
Hi All,

First off, I really want to say that I am impressed by every one on this site. My mind is so full of ideas after looking at your posts and I thank you all.

I have been working on my Garage for the last two years (we moved into this house in 2008) and have made some progress. I have two twin girls (turning 4 this year) that occupy most of my weekends so I rarely get much of a chance to work on the garage (unless I have my Mom fly in to help with my wife.)

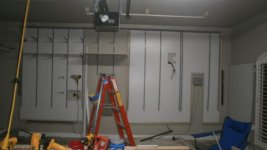
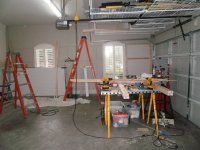
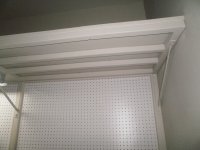
To date, I have installed ceiling storage (basically eight of those kits that are 4x4). The problem I ran into was that the joists were not even close to being a uniform length. this required the installation of stringers across the roof (using lag bolts) and then hanging the units from the stringers.so they would be uniform. It took a long time but in the end it turned out great!

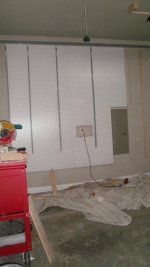
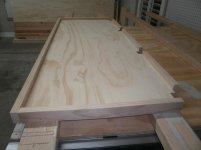
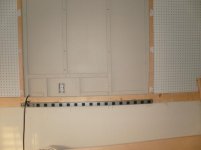
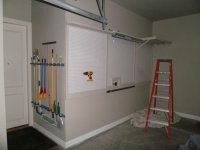
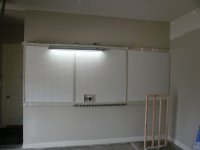
I worked on installing pegboard over most of the garage recently. I framed the sections that hold pegboard with furring strips to keep the pegboard off the wall. I then installed power strips to the framing and ran the wiring for the strips behind the pegboard (not an illegal in-wall run) and cut the cord to length for the outlet. I painted the furring strips and then hung the pegboard. Then the pegboard was framed in 1x2 lumber as well as the workbench area however, I framed it with quarter-round trim for the workbench area.

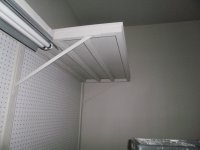
I then installed new light fixtres (one four-light fixture) and one over the workbench area. I then installed a 40' retractable power cord from the ceiling and a shop vac mounted to the wall. I didnlt like the original hose reel (one piece of plastic) so I made my own. I also installed a heavy-duty shelf over the workbench area (to house a small compressor and eventually hope to run a hose reel from the ceiling as well). I didn't run the heavy duty shelf all the way across the area as I plan to mount a flat-panel tv on the wall above the workbench area and wanted an large field of view for that tv.

My next project will be installation of wall shelving (ceiling to floor) on the wall with the breaker box and then finally building a workbench. anyhow, here are the pictures. Comments and suggestions are welcome. More pictures to follow. Thanks again guys!
 

Attachments

  • Ceiling Storage.jpg
    Ceiling Storage.jpg
    117.6 KB · Views: 264
  • pegboard trimmed and ready for paint.jpg
    pegboard trimmed and ready for paint.jpg
    133.2 KB · Views: 261
  • workbench area framed.jpg
    workbench area framed.jpg
    119.1 KB · Views: 248
  • workbench area framed 2.jpg
    workbench area framed 2.jpg
    34.9 KB · Views: 254
  • hanging pegboard.jpg
    hanging pegboard.jpg
    42.4 KB · Views: 240
  • finishing framing for pegboard.jpg
    finishing framing for pegboard.jpg
    145.4 KB · Views: 230
  • Ceiling Storage 2.jpg
    Ceiling Storage 2.jpg
    123.4 KB · Views: 236
To avoid these ads, REGISTER NOW!
OP
D

Dan'sGarage

Active member
Joined
Jan 12, 2010
Messages
33
here are a few more pictures...
 

Attachments

  • workbench area and hallway to house.jpg
    workbench area and hallway to house.jpg
    116.7 KB · Views: 229
  • big shelf.jpg
    big shelf.jpg
    126.7 KB · Views: 189
  • light fixture over workbench area.jpg
    light fixture over workbench area.jpg
    48.7 KB · Views: 161
  • Trimmed and painted.jpg
    Trimmed and painted.jpg
    44.3 KB · Views: 175
  • large shelf over workbench area.jpg
    large shelf over workbench area.jpg
    137 KB · Views: 166
  • power strip and moulding.jpg
    power strip and moulding.jpg
    117 KB · Views: 171
  • workbench area.jpg
    workbench area.jpg
    109.9 KB · Views: 188
OP
D

Dan'sGarage

Active member
Joined
Jan 12, 2010
Messages
33
Thanks for the compliment on the windows Buffalot. I can't take credit for these as they were on the house when we bought them but I bet that since there is a HOA here, and even though it is a garage, they still needed to match to the rest of the house.

A quick question for all out there, I am deciding between shelving for large wall opposite the garage door. This would be the unit that would face the cars as the come in the garge. I want to install shelving above the hood levels of the cars (certainly my Tahoe) so I can pull the vehicles in there fully.

What are the pros and cons of using a product like Closetmaid Shelf Track or installng actual cabinets from a habitat for humanity resell store or craiglist and building a wall of those? Any thought or links would be appreciated or stories/links that could help.

Oh and one last thing. I returned home yesterday from being out of town this week and noticed water coming from my garage. I immediately had a sinking feeling about what had happeded. Once I got in the garage it was confirmed...One of my hot water heaters burst in the attic (which is where most are installed in a typical Texas home). :sad:

So today was spent replacing them both. Now I need to let the sheetrock in the ceiling dry out and repaint the ceiling...an I just finished painting the garage a couple of weeks ago...Murphy's law!
 

Red Leader

Well-known member
Joined
May 15, 2011
Messages
2,689
Location
Denver, CO
Cool garage! Sorry to hear about the water leak but don't let that stop you. It looks very clean and I bet you'll really enjoy having all that space to hang your tools on! Keep up the great work!
 
OP
D

Dan'sGarage

Active member
Joined
Jan 12, 2010
Messages
33
Thanks Red Leader. It's coming along slowly but it will get finished before winter. My wife sorta gave me an ultimatum that come next winter she was going to open the garage door and drive her car in there regardless of what was there.

You should have seen how much stuff was in the garage earlier. Previously, I had rented a large storage shed (what is commonly called a Texas Basement around here) and decided I was paying too much for it and hadn't done anything with it for almost two years. So I wound up flooring the entire attic above the garage and floored over the room next to it. The only reason you don't see so much stuff in these pictures is that most of my tools, equipment, and other supplies are up there for right now.

Anyhow, the attic was able to hold most of the contents of the entire storage shed (alot was donated away). This past weekend it was nice to know that I had room to work around the water heaters (with the flooring installed).

Looking forward to working on it this weekend when I get back home.
 
To avoid these ads, REGISTER NOW!
OP
D

Dan'sGarage

Active member
Joined
Jan 12, 2010
Messages
33
Hi All,

Figured I post now that I have a little down time. This is one slow going project but as I said earlier, it's catch-as-catch-can with two four-year olds to mind and take everywhere.

Here's my update:

I started to frame up the back wall of the grage for storage shelving using furring strips and standards from Home Depot. I got the kind that hand from a rail at the top of the ceiling. However, I also wanted to have pegboard in case I wanted to hang anything in between shelves and thought that would give it a finished appearance anyway. I do like pegboard as it's handy stuff.

Anyhow, I got pretty far along in the framing project and even had the second sheet of pegboard about ready to go when I though about whether I should have anything around the service panel (Just in case I needed to install any additional wiring or sell the place and get dinged by a home inspector). :mad: 
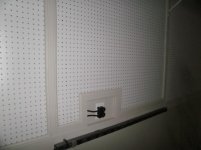
Sure enough...In the National Electric Code (NEC) I found out that there must be 36 X 36 inch squared clearance in the front of the panel. Also there cannot be any obstructions above the panel to the ceiling. :confused:

I checked out a couple of websites with home inspectors on a Google search and they confirmed this. So now, I have to go about taking a few of the strips down and rearranging the framing. It took some time but I got it done. However, I still have two small shelving standards above the service panel and can remove them and patch them when/i it becomes an issue when selling the house. Would have liked a whole wall of pegboard...but that ain't happening now. :(

Anyhow, I had to move the sprinlkler system control box over about a half a foot to fit withing studs in the framing. I also installed several Trip Lite power strips. the silver are 15 amp, the black are 20s. Since I'm not fond of tearing out walls to wire outlets (unless this is new construction), these will do nicely.

Once I have the shelving completed, I move on to a workbench. I though I'd get to a epoxy floor but I will wait until the beastly heat of next summer to clean it and etch it properly. Just getting things built over time as I can.

Anyhow, here are the pictures.
 

Attachments

  • spacing standards to meet the furring strips.jpg
    spacing standards to meet the furring strips.jpg
    46.1 KB · Views: 105
  • side shot of the future shelves.jpg
    side shot of the future shelves.jpg
    34.5 KB · Views: 104
  • half the pegboard wall installed and the other half trimmed.jpg
    half the pegboard wall installed and the other half trimmed.jpg
    51.2 KB · Views: 107
  • patching around the service panel 2.jpg
    patching around the service panel 2.jpg
    38.3 KB · Views: 103
  • framing most of the wall.jpg
    framing most of the wall.jpg
    146.2 KB · Views: 83
  • some of the first section installed.jpg
    some of the first section installed.jpg
    63.9 KB · Views: 89
  • just beginnign to measure pegboard around the service panel.jpg
    just beginnign to measure pegboard around the service panel.jpg
    59.7 KB · Views: 89
OP
D

Dan'sGarage

Active member
Joined
Jan 12, 2010
Messages
33
OK. Hard to believe its been 5 months to the day of my last post on my garage project but with two four year olds, holidays, school, dance lessons, swim lessons, and other events + a traveling job...you get the idea. Progress is about as fast as our Congress moves on a good day!

Anyhow, I finished framing up the wall that holds the shelve standards and finished up the shelves two weeks ago (I had to duck out to Atlanta and DC the past two weeks). So here is my progress so far. A few notes...I left the shelves up purposely high to keep little people safe and to ensure that the family Tahoe can fit in. All shelves have edges around them so nothing can roll off and damage cars or little people. Otherwise, once I paint the shelves...I am off to the workbench next. Once that is finished, I think I'm done for a little while. But I shoiuld have a pretty good setup for any household/car repair jobs going forward. Thanks to all who commented earlier.

One last note...I don;t have to go in tomorrow as one of my four year old girls is having her tonsils and adnoids removed tomorrow (hence the time I have for postin now that I've put her and her sister to bed). So if you could say a little prayer to the man upstairs to keep her safe. I'd really appreciate it. Thanks in advance.
 

Attachments

  • Shelf fit n finish 2.jpg
    Shelf fit n finish 2.jpg
    40.1 KB · Views: 46
  • Shelf fit n finish.jpg
    Shelf fit n finish.jpg
    41.4 KB · Views: 47
  • Shelf design 2.jpg
    Shelf design 2.jpg
    53.8 KB · Views: 52
  • Shelf designs 1.jpg
    Shelf designs 1.jpg
    51.6 KB · Views: 50
  • Completed Garage Shelves 3.jpg
    Completed Garage Shelves 3.jpg
    58.6 KB · Views: 60
  • Completed Garage Shelves 2.jpg
    Completed Garage Shelves 2.jpg
    68.9 KB · Views: 53
  • Completed Garage Shelves 1.jpg
    Completed Garage Shelves 1.jpg
    57.2 KB · Views: 61
OP
D

Dan'sGarage

Active member
Joined
Jan 12, 2010
Messages
33
A couple of additional pictures...then I'm turning in for the night.
 

Attachments

  • garage is getting there.jpg
    garage is getting there.jpg
    74.1 KB · Views: 86
  • garage is getting there 2.jpg
    garage is getting there 2.jpg
    86.1 KB · Views: 80
  • Garage Shelf Workbench.jpg
    Garage Shelf Workbench.jpg
    89.2 KB · Views: 78
To avoid these ads, REGISTER NOW!
Top Bottom