To avoid these ads, REGISTER NOW!

My Garage Adventure Begins

PatrickW

Well-known member
Joined
Feb 21, 2005
Messages
86
Location
MN
I have begun work on my garage. Pictures will follow. I'll try to document what I do (and what I should have done when I have the benefit of hindsight). Perhaps others will learn from my mistakes and successes.

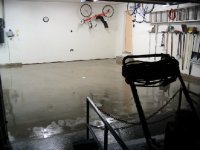
So far, after buying my 15 year old house, I have installed some shelves, moved everything out of the garage that doesn't have to be there (a garage is NOT for storage, in my opinion), and have generally cleaned up.

My plan:

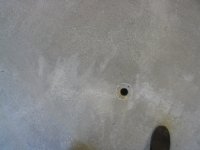
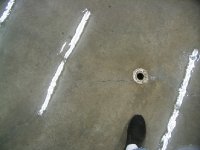
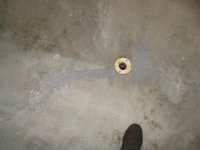
1) Fill cracks and pits in concrete floor.
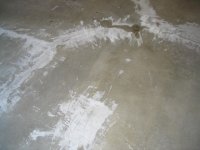
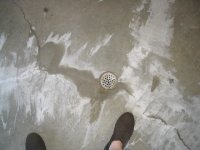
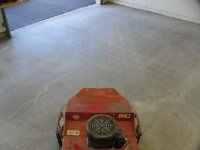
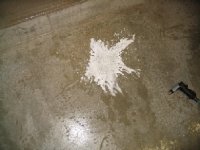
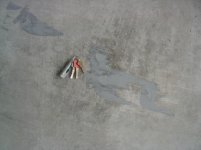
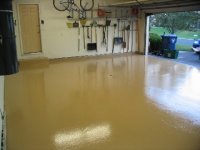
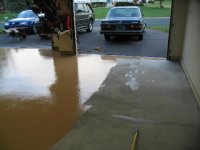
2) Rent a "buffer" machine from Home Depot and get some abrasive pads, and go over the entire floor grinding a solution of TSP with the buffer. Some areas of the floor show water beading from a previously applied sealant that has mostly worn off, and other areas are worn and pitted, other areas are oil stained.
3) Rinse, and apply Muriatic Acid solution to etch the concrete.
4) Rinse, and make sure floor is clean.
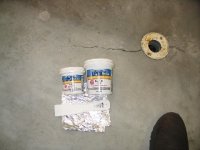
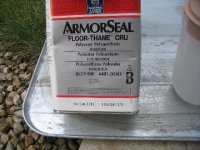
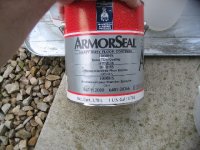
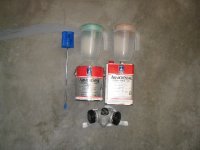
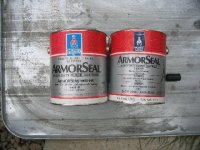
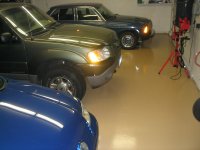
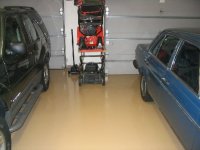
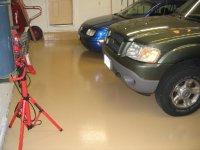
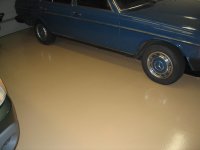
5) Apply epoxy (I'm planning on using the Sherwin Williams Armorseal).

I've never done anything like this before, so we'll see how it goes.

- Patrick
 
To avoid these ads, REGISTER NOW!

DynoDave

Well-known member
Joined
Mar 25, 2005
Messages
1,685
Location
Michigan
Good luck with your projects, Patrick. I'm sure you'll be happy with the results of your hard work.
 
OP
P

PatrickW

Well-known member
Joined
Feb 21, 2005
Messages
86
Location
MN
Progress Report

My garage originally had three 100 Watt incandescent bulbs. It was pretty dim in there.

I have replaced these with three 8' florescent fixtures, each of which uses four 4' T-8 bulbs.

In addition, I have installed two 4' T-8 shop lights which are mounted over the hood areas of two of the stalls.

The difference in lighting is amazing.

- Patrick
 
OP
P

PatrickW

Well-known member
Joined
Feb 21, 2005
Messages
86
Location
MN
Pictures of Floor

Here are pictures of how it stands right now.

The first two pictures show how I have organized things, and made some shelfs to get stuff up off the floor. The snow-blower, wheelborrow, and lawn mower used to sit "in line" between my car and my wife's car. Now those things are up and out of the way.

The rest of the pictures show the floor. It's pretty rough, having just filled in cracks and holes. I bought a 9lb container of concrete patch and hardener from Fleet Farm, and mixed it up and patched a bunch of holes, gouges, and cracks.

Lesson learned: Most of the patch mix was not needed and thus went to waste. What portion I did need dried so fast that it was hard to work with. Next time I will get the tube type stuff that I can pump in with a calking gun.

- Patrick
 

Attachments

  • Resized_Org1.jpg
    Resized_Org1.jpg
    156.8 KB · Views: 1,556
  • Resized_Org2.jpg
    Resized_Org2.jpg
    148.3 KB · Views: 1,452
  • Resized_Floor1.jpg
    Resized_Floor1.jpg
    141.8 KB · Views: 1,469
  • Resized_Floor2.jpg
    Resized_Floor2.jpg
    136.1 KB · Views: 1,397
  • Resized_Floor3.jpg
    Resized_Floor3.jpg
    141.3 KB · Views: 1,434
OP
P

PatrickW

Well-known member
Joined
Feb 21, 2005
Messages
86
Location
MN
Floor Grinding

Today I rented a Surface Grinder, instead of the buffer that I originally was considering. I also got a set of Tungsten-Carbide blades for the grinder.

This grinder was easy to use when it was running. Although it was fairly heavy, it just glided along when it was running. It wasn't very loud, nor did it kick up as much dust as I thought it would.

The picture with the car keys shows what a single pass with this machine looks like. Also in the picture is some "un-grinded" concrete. It looks pretty crappy at this point, but as the T-C blades got "settled in", the finish became a lot smoother.

Another picture shows what the floor looks like after I've gone over it twice, as well as showing the Surface Grinder machine. This grinder weighs I'd guess about 200 lbs, and has two big rotors on the bottom, each rotor having 3 blades.

By the third picture, you can see how things are really starting to smooth out. I went over the entire floor 8 times, alternating North-South, then East-West, then criss-cross one way, then the other. Then I did it all again.

When I finished with the Surface Grinder, I took my belt sander with a 50 grit belt and went over the areas that the grinder couldn't reach.

Finally, the first picture and the last picture show a previously cracked area and the floor drain area. I took these pictures in the same place that a couple of previoulsy posted pictures were taken, to try to give you a better idea of the progress.

After I finished grinding, I rinsed the floor.

Next step will be Acid Etching.

- Patrick
 

Attachments

  • Drain.jpg
    Drain.jpg
    156.8 KB · Views: 1,291
  • 3rd Pass.jpg
    3rd Pass.jpg
    151.3 KB · Views: 1,248
  • 2nd Pass.jpg
    2nd Pass.jpg
    143.9 KB · Views: 1,305
  • 1st Pass.jpg
    1st Pass.jpg
    180.1 KB · Views: 1,289
  • Crack.jpg
    Crack.jpg
    140.8 KB · Views: 1,224
OP
P

PatrickW

Well-known member
Joined
Feb 21, 2005
Messages
86
Location
MN
Acid Etching

I did Acid Etching today. I know this is probably overkill, due to having used a Surface Grinder previously, but I just want to make sure that I do everything humanly possible to do a good job of surface preparation prior to putting down the epoxy.

The first picture shows the type of acid I used. Phosphoric Acid is the active component.

Following the manufacturer's instructions, I watered the floor down and then used full strength acid on areas that showed discoloration (typically rust stains that had soaked deep into the concrete over the years). I then used a stiff bristled broom to work it around.

In the second picture we see what some full-strength acid does when it hits the concrete. It turns white and fizzes. I wouldn't want to get this stuff in my eyes.

I rinsed and scrubbed several times, which actually was the most time consuming part of this project so far. After rinsing, I could see the "drying pattern", which is shown in the third picture. Those are reflections of my new lights that you see.

Again, I show the now very clean floor drain area, as well as a picture of the garage drying out. In the foreground is the Surface Grinder and trailer.

My next step is to fill in as many of the remaining imperfections with epoxy filler as I can.

- Patrick
 

Attachments

  • 5_Acid.jpg
    5_Acid.jpg
    158.4 KB · Views: 1,137
  • 4_Acid.jpg
    4_Acid.jpg
    161.1 KB · Views: 1,127
  • 3_Acid.jpg
    3_Acid.jpg
    150.4 KB · Views: 1,130
  • 2_Acid.jpg
    2_Acid.jpg
    115.1 KB · Views: 1,143
  • 1_Acid.jpg
    1_Acid.jpg
    159 KB · Views: 1,125

bmwpower

Super Moderator
Staff member
Joined
Apr 24, 2005
Messages
12,578
Location
NJ
Actually, it's good that you did the acid etch. The acid etch gives the floor more of a 3D profile so the epoxy will adhere better. After grinding I would guess that the floor would be much smoother, ie. less of a 3D profile.

Where did you rent the grinder?

I tried Home Depot, but they said no Home Depots in the area carry these anymore. Something about "too much to maintain".
 
OP
P

PatrickW

Well-known member
Joined
Feb 21, 2005
Messages
86
Location
MN
bmwpower said:
Where did you rent the grinder?
I rented it from a local outfit called "Crown Rental". They are good people and were interested in what I was doing.

They even threw in some extra stuff without charging me: a trailer (!), extra grinding stones (which I didn't use since I had the tungsten carbide blades), and a tool kit. I'll definitely give them first shot at getting my business in the future.

I rented their grinder Friday evening around 6:00pm, and was finished using it by 9:00pm, including drive time, unloading, putting blades on, grinding, and putting back on the trailer. I had all their stuff back to them first thing Saturday morning, even though I rented it for the whole day. I was finished and brought it back as early as I was able, seeing as how good they were to lend me the extra equipment.

- Patrick
 
OP
P

PatrickW

Well-known member
Joined
Feb 21, 2005
Messages
86
Location
MN
Final Patching

This morning I went over the floor that I had ground, etched, and rinsed last night.

The first picture shows the dried floor, after I allowed it to dry overnight. I swept some fine dust out of the corners, then swept the entire garage, then went over it with a vacuum cleaner. When I wipe my fingers on the concrete, my fingers come up clean.

I used "Rustoleum Epoxy Shield" concrete patch mix, as shown in the second picture. It is easy to work with. I mixed it on paper plates, and only mixed as much as I could use right then. I had two putty knifes that I used - a narrow plastic one for mixing and for application of the epoxy patch; and a wider metal one that I used to smooth things out. When smoothing it out, I tried to keep the "grain" of my strokes running in the same direction - ie, front to back.

The third picture shows an average hole that I filled in, with a set of keys in the picture so you have reference for the size.

Tip: try to work in sections no wider than the width of your putty knife. You get a smoother finish that way.

I also include a picture of that nasty drain area, which is looking better every day.

Finally, the last picture shows the garage as it sits now, after patching.

Next steps: go over the floor and smooth any rough patches, vacuum again, then I think I'll go over the floor with a clean, dry cloth to pick up any remaining debris. Then I'll apply the epoxy, weather permitting (it's supposed to rain for the next couple days, and the instructions say to not do it if the humidity is over a certain level).

- Patrick
 

Attachments

  • Patch 3.jpg
    Patch 3.jpg
    123.2 KB · Views: 693
  • Patch 2.jpg
    Patch 2.jpg
    162.3 KB · Views: 705
  • Patch 1.jpg
    Patch 1.jpg
    132 KB · Views: 719
  • Patch 0.jpg
    Patch 0.jpg
    125.1 KB · Views: 684
  • Patch 4.jpg
    Patch 4.jpg
    172.1 KB · Views: 700
OP
P

PatrickW

Well-known member
Joined
Feb 21, 2005
Messages
86
Location
MN
A Setback...

Today I planned on putting down the Epoxy, but things didn't work out that way...

I'd picked up the ArmorSeal from Sherwin-Williams the other day. I had my paint stirrer and respirator all ready to go, per the instructions.

Upon mixing equal quantities of "Part A" and "Part B", the mixture immediatley curdled and coagulated into a nasty smelling mess that you see in the second picture. My heart sank as it dawned on me that something clearly was not right...

Unfortunatley, Sherwin-Williams had given me the wrong "Part B". To make a long story short, there are different kinds of "ArmorSeal", and they come in similarly colored containers. This wasn't the stuff that I had ordered, and nobody knew any better.

The experts at Sherwin-Williams missed it, and I didn't even think to verify that both "Part A" and "Part B" were the *right* "Part A" and "Part B". As the pictures show, they look like they go together, and I honestly thought that what they gave me was exactly what I ordered.

After I took the mess back to Sherwin-Williams, we figured out what had happened, and they replaced the wasted epoxy free of charge, and gave me the correct "Part B" that I'd ordered, as well as a discount card for my trouble.

That was an expensive mistake, and I'm glad they made it right. I'm really glad I didn't end up with a mess on my garage floor. It would have been a disaster if I'd have mixed it up and put it down, only to have it not dry at all.

Yeah, it could have been much worse. All I've lost is some time...

- Patrick
 

Attachments

  • Kit 4.jpg
    Kit 4.jpg
    170.4 KB · Views: 647
  • Kit 3.jpg
    Kit 3.jpg
    187.1 KB · Views: 658
  • Kit 2.jpg
    Kit 2.jpg
    185.6 KB · Views: 717
  • Kit 1.jpg
    Kit 1.jpg
    131.1 KB · Views: 670

DynoDave

Well-known member
Joined
Mar 25, 2005
Messages
1,685
Location
Michigan
Holy moly! I wouldn't have thought to check the 2 for compatibility. Like you sad, glad the problem made it self apparent in the can, and not on the floor!
 

bmwpower

Super Moderator
Staff member
Joined
Apr 24, 2005
Messages
12,578
Location
NJ
Were you able to purchase the epoxy over the counter?? I tried to get this same stuff last week and the guy refused to sell it to me in PA because he claimed it was not for residential use. Some new ruling or law as of Jan 1. I even told him several people I knew had obtained the same epoxy (like you) without a problem.

Post a pict of the correct Part B if you can, too.

How much did you pay? $129 gallon?

Thanks.
 
OP
P

PatrickW

Well-known member
Joined
Feb 21, 2005
Messages
86
Location
MN
bmwpower said:
Were you able to purchase the epoxy over the counter?? I tried to get this same stuff last week and the guy refused to sell it to me in PA because he claimed it was not for residential use. Some new ruling or law as of Jan 1. I even told him several people I knew had obtained the same epoxy (like you) without a problem.

Post a pict of the correct Part B if you can, too.

How much did you pay? $129 gallon?

Thanks.
Yes, I bought it over the counter. They actually had to get it shipped in from a different location, but they didn't have any issues selling it to me. If they are not supposed to, maybe they didn't know. Or maybe it's a state law in PA...?

Perhaps they are concerned about the fumes it gives off. It stunk up the whole neighborhood. Serious. I honestly think that if you tried to use this stuff without a respirator you'd be putting your life at risk. This time, the safety warnings really do mean what they say.

I'll post pictures of the correct components later.

I paid a total of $405 for two gallons each of Epoxy and Hardener. It would have been more, but the kid at the counter didn't believe the price that came up on his cash register, and knocked the price down as much as his security code would allow. :thumbup:

- Patrick
 
OP
P

PatrickW

Well-known member
Joined
Feb 21, 2005
Messages
86
Location
MN
Today I applied the ArmorSeal Epoxy.

The concrete floor was already pretty clean, but I still went over it one more time with a metal rake wrapped in a towel. When it was all said and done, I bet I easily spent 10 times as much time on surface preparation as I did on appyling the epoxy.

The second picture shows the epoxy that I used, and how I mixed it with a drill and a 5 gallon bucket is in the third picture. The instructions say mix it for at least 3 minutes, and then let it sit for about 15 minutes after that (depending on the temperature). Not having done this before, I had to do some research to find out what some of the terminology means, like "sweat in" and "pot life". Believe me, Google is your friend!

I started out by measuring about a beer-pitcher's worth of "Part A" and "Part B" - a fairly small batch - just to get a feel for how far it goes and how fast it starts to solidify. The 4th picture shows how far I got with this amount, as well as what the epoxy looks like next to the bare concrete. When I was putting down the epoxy I noticed some small holes that I missed before when I was patching. I was hoping that the epoxy would be thick enough to fill in some of these imperfections. I guess it does fill in a lot, but in hindsight I'd give a little more attention to smaller imperfections. Probably nothing that nobody but me will ever notice, but I suspect that a lot of the guys on this forum are perfectionists too when it comes to their stuff...

After getting a feel for how fast I could work, I mixed the rest of the gallon (each) of part's A & B, and applied it to the concrete. A total of two gallons (one gallon each of part A and B) covered two and a half stalls of my 3 car garage with one coat, applied with a roller (5th picture).

The final picture shows my garage as it stands now. I have about a half a gallon each of epoxy and hardener left over, so I can recoat selected areas if I need to. I'll let this sit for a week while I am out of town, and by the time I return home it should be fine to park cars on.

Also, I painted a piece of cardboard. I'm going to take that to Home Depot and have them mix up a color-matched gallon of ordinary paint so when I paint my trim it will match the floor.

My next step will be to scape all the old flaking paint off the walls, fill the holes, and repaint. I'm thinking about painting the walls and doors white, and painting the trim the same color as the floor.

- Patrick
 

Attachments

  • Epoxy 6.jpg
    Epoxy 6.jpg
    131.8 KB · Views: 822
  • Epoxy 5.jpg
    Epoxy 5.jpg
    130.7 KB · Views: 718
  • Epoxy 4.jpg
    Epoxy 4.jpg
    137.5 KB · Views: 720
  • Epoxy 3.jpg
    Epoxy 3.jpg
    141.8 KB · Views: 631
  • Epoxy 2.jpg
    Epoxy 2.jpg
    179.5 KB · Views: 627
  • Epoxy 1.jpg
    Epoxy 1.jpg
    94.7 KB · Views: 624

JohnHenrys48

Well-known member
Joined
Jan 27, 2005
Messages
199
Location
Arizona
With the exception of the grinder, I went through the same process last summer. It's time comsuming but well worth the effort. After the acid the surface felt like sand paper. I have no sign of the epoxy lifting and it's been about 10 months since I started parking and working on it.

It's looking good, you'll be happy with it.

Jim
 
To avoid these ads, REGISTER NOW!
OP
P

PatrickW

Well-known member
Joined
Feb 21, 2005
Messages
86
Location
MN
ChucksCrib said:
That's the stuff I was planning on using however, I was gonna put down two coats. Did you put down one?
It looks pretty darn good right now, however I will be putting down a second coat. It's just a little bit thin in some spots, and I'm also hoping that another coat will "flow" over some underlying imperfections and smooth things out. It's raining outside, and very humid, otherwise I'd be doing it right now.

There's a little over a gallon combined left over, so I don't know how far that will go. Hopefully it'll go a lot further over the already-coated surface. Also, I've still got some corners to do.


ChucksCrib said:
Did you guys use the "Shark-Grip" additive for traction?
No, I didn't use any traction additive. I read that it makes it hard to clean, and the abrasive grit tears up mops & squeegies.

I put on a pair of socks and walked around on the floor today. I don't think there's anything more that needs to be done to give it more traction, although I do plan on putting down some non-slip strips on the step. I would imagine that oil would make it slick, but oil makes pretty much anything slick if it isn't cleaned up, so I can live with that.

Here's another "tip": Bicycles can leak oil too. One of those bicycles that you see hanging in some of the pictures leaked a drop of oil onto the new epoxy. I don't think it hurt it, but I hope there is no oil that dripped after I finished surface preparation.

- Patrick
 
OP
P

PatrickW

Well-known member
Joined
Feb 21, 2005
Messages
86
Location
MN
How much did I spend...?

Somebody asked my how much I spent on this, so here are some ballpark figures for the benefit of anyone else who's considering doing this. Some of you might get better prices, while others might pay a little more. But hopefully this should be a fair estimate of about what you could expect to pay to do this yourself:

Floor Grinder rental: $72
New Carbide Blades: $60
Sherwin-Williams ArmorSeal: $405 (total of 4 gallons)
Respirator: $30
Concrete Patch Compounds: $25
Miscellaneous stuff: $50

Total Cost of Materials: About $650 dollars.
Cost of Labor: $0.
Proving the naysayer's wrong: Priceless :bounce:

I talked to a couple of outfits that do this professionally, and I'd have been looking at spending about $3,000 to have someone else to do it. Having a friend in the construction business, I see how they have employee turnover. I'd hate to spend $3,000 for some kid to learn how to do this on my garage.

Knowing what I know now, I could have got the floor grinder for half a day, so there's potential savings there.

Next week I'll post pictures taken from the same locations that I took the pictures in the original post. That will give you all a feeling of "before" and "after".

- Patrick
 

bmwpower

Super Moderator
Staff member
Joined
Apr 24, 2005
Messages
12,578
Location
NJ
ChucksCrib said:
I hope your right but time will tell how well this holds up. A calculated risk I am willing to take, just as you.

Worst comes to worst, you have to refinish a couple of spots. I can't imagine an entire floor lifting, etc. At least with a couple of spots you know where to concentrate your efforts!
 
OP
P

PatrickW

Well-known member
Joined
Feb 21, 2005
Messages
86
Location
MN
2nd Coat

Today I applied the second coat of epoxy to the floor.

There was about a gallon and a half combined that was left over. That was enough for me to do the corners and to give the entire floor a second coat.

The second coat of epoxy spread very well over the first coat.

I'll be out of town for a few days, but when I get back my floor should be in good shape and I will be able to take some pictures.

- Patrick

PS: Somebody asked about colors. They can mix just about any color you want, but the standard colors are clear, tan, white, gray, and I think black and red. I was torn between white and tan, but chose the tan as I think it would show dirt less than white.
 

04 Navi

Well-known member
Joined
Jul 13, 2005
Messages
269
Location
PNW
FWIW I used the Griots garage floor paint for my second attempt. The first attempt was some Behr brand junk that did not last barely a year before it look terrible. That stuff said no etching needed.
On the second try I followed Griots directions to a tee. I even rented a floor sander to get the old paint off. I succeded in removing about 90%. I am now in our fourth year with the Griots and it is holding up well. A couple of chips where the tires have sat with rocks in them, but not really any lift except where there was some old paint. My wife made me put some sand in the paint for traction and that's the only thing I would not do again.

The Griots stuff is a lot cheaper from the sounds of it and I would use it again. Prep work is the key for sure.
 

river1

Well-known member
Joined
Jun 27, 2005
Messages
165
Location
peoria az
i used groits floor paint also. it's been down 12 (yup 12) years it has held up very well and would recommend it to anyone.

later jim
 

ChucksCrib

Well-known member
Joined
Mar 28, 2005
Messages
545
Location
Connectivette
river1 said:
i used groits floor paint also. it's been down 12 (yup 12) years it has held up very well and would recommend it to anyone.

later jim


Wow...Now that's a successful application. Did you abuse the floor at all (chemicals, draging stuff, ETC.) or was it more of a show garage.

And how about some pics :bitchslap
 

bmwpower

Super Moderator
Staff member
Joined
Apr 24, 2005
Messages
12,578
Location
NJ
Forgot to ask:

(1) Sherwin Willaims guy said to reduce the first coat with the Reducer #54, R7k54. Did you do this? Said it was help the first coat adhere. Never heard this before....

(2) I'm reading the spec sheet now and it mentions a "clear finish". Does this stuff come in clear (so as to top coat the lower gray or tan coat)?
 

bmwpower

Super Moderator
Staff member
Joined
Apr 24, 2005
Messages
12,578
Location
NJ
Interesting spec on the spec sheet...

Adhesion, over conrete:
Method: ASTM D4541
Result: 865 psi

pretty good...
 

river1

Well-known member
Joined
Jun 27, 2005
Messages
165
Location
peoria az
ChucksCrib said:
Wow...Now that's a successful application. Did you abuse the floor at all (chemicals, draging stuff, ETC.) or was it more of a show garage.

And how about some pics :bitchslap

yup i've swapped motors out of a couple of cars, pulled trannies from a few others. my current project is a 53 chevy sedan i'm putting a caddy 500 in it.

here are a couple of pics i have on my puter, you can see the floor in the background. one shows the caddy test fit and the other shows the front frame rails.

later jim
 

Attachments

  • 53chevy 002-1.jpg
    53chevy 002-1.jpg
    58.7 KB · Views: 646
  • 53chevy 008-1.jpg
    53chevy 008-1.jpg
    49.9 KB · Views: 687
OP
P

PatrickW

Well-known member
Joined
Feb 21, 2005
Messages
86
Location
MN
Will post more pix this evening

I'm back in town, and the garage floor looks great.

Tonight when I get home I'll pull the cars back in, after having let it cure for a week.

When I do that, I'll take some pictures of the same areas, from the same viewpoints as before, so as to give you a "before" and "after" perspective.

- Patrick
 
OP
P

PatrickW

Well-known member
Joined
Feb 21, 2005
Messages
86
Location
MN
New Pictures

Tonight I pulled the cars back into the garage. There still is some organizing that I need to do, but hopefully these pictures will give you an idea of how the floor has turned out.

I am amazed to see how clearly you can see the reflections of the cars on the floor. If you look closely, you can actually see the reflected image of the hubcaps.

This is by no means a "show" garage. I've never done anything like this before, and I only learned about this sort of thing from reading other peoples posts here on this forum, and learning as much as I could from what they did.

This is turning into a pretty nice garage, and I'm happy to be able to say that I did this myself. My neighbors are asking about what I've been doing, and now some of them want to do the same thing.

The next step is to do some patching and painting on the walls, as they look pretty rough compared to the floor.

- Patrick
 

Attachments

  • 4.jpg
    4.jpg
    190.6 KB · Views: 568
  • 3.jpg
    3.jpg
    157.3 KB · Views: 585
  • 2.jpg
    2.jpg
    160.8 KB · Views: 601
  • 1.jpg
    1.jpg
    162.9 KB · Views: 599
  • 5.jpg
    5.jpg
    121.1 KB · Views: 567
OP
P

PatrickW

Well-known member
Joined
Feb 21, 2005
Messages
86
Location
MN
bmwpower said:
Forgot to ask:

(1) Sherwin Willaims guy said to reduce the first coat with the Reducer #54, R7k54. Did you do this? Said it was help the first coat adhere. Never heard this before....

(2) I'm reading the spec sheet now and it mentions a "clear finish". Does this stuff come in clear (so as to top coat the lower gray or tan coat)?

1. I didn't use any reducer. It might have helped on the second coat if I did, because if you know where to look and the light is shining just right, you can see where the roller went.

2. It does come in clear, and they sell that in 5 gallon buckets also. I think it's for indoor use only, and I don't know if it would hold up to garage use. I didn't use any clear. Just two coats of tan, for a total of 4 gallons (2 of "Part A" and 2 of "Part B") to do my 3 car garage.

- Patrick
 
To avoid these ads, REGISTER NOW!
Top Bottom