To avoid these ads, REGISTER NOW!

My little (dream) garage project

jimmie jam

Well-known member
Joined
Oct 16, 2005
Messages
490
Location
fort lauderdale, fl
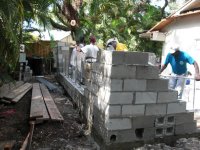
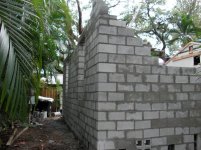
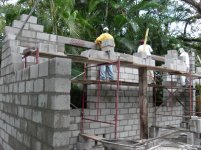
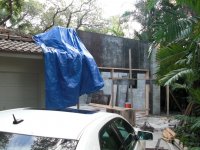
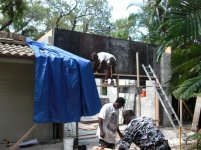
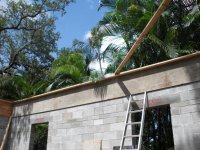
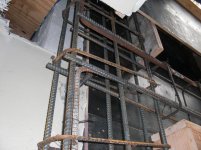
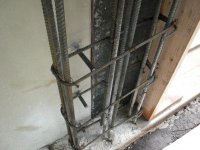
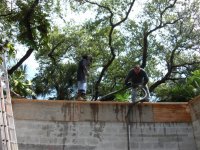
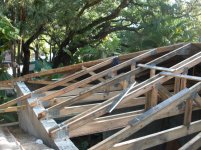
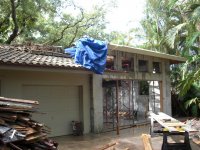
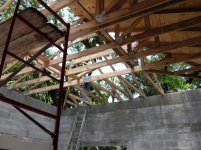
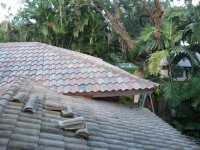
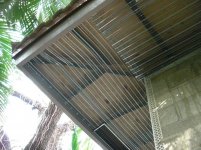
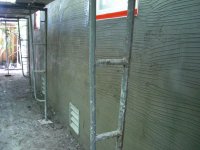
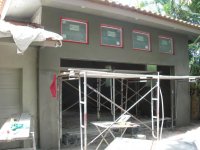
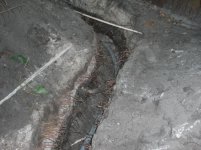
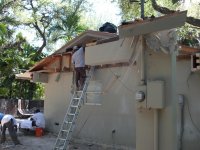
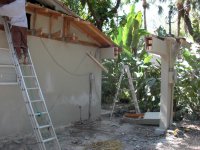
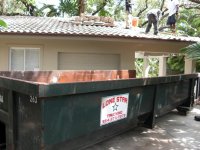
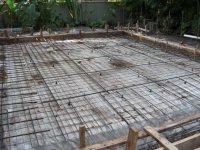
This is the story of my recent project. It was never supposed to happen because five years ago I designed a new home with a 1,400sf garage here in Ft. Lauderdale. Plans change and, in stead of the new house here, Scottsdale became the next option. Keeping my home here of 31 years for the home base, I decided to do a little addition here to keep me happy. To start with, the house had a single car garage 11 x 25. About 23 years ago I added a carport with the same foot print (mind you, I NEVER thought that I would still be here 23 years later). Back to the task at hand. After 3 months with the architect and dealing with the remaining foot print that I had to work with, the design was complete. Then it was necessary to get the proper surveys, soil tests, tree removals, etc.. Three months later and many "friendly discussions" (not) with the FLL building department, I had a permit. From the begining..........
 

Attachments

  • CIMG0585.jpg
    CIMG0585.jpg
    147.1 KB · Views: 218
  • CIMG0586.jpg
    CIMG0586.jpg
    154.4 KB · Views: 209
  • CIMG0587.jpg
    CIMG0587.jpg
    152.1 KB · Views: 187
  • CIMG0588.jpg
    CIMG0588.jpg
    139 KB · Views: 181
  • CIMG0584.jpg
    CIMG0584.jpg
    144.3 KB · Views: 244
To avoid these ads, REGISTER NOW!
OP
J

jimmie jam

Well-known member
Joined
Oct 16, 2005
Messages
490
Location
fort lauderdale, fl
The first task at hand was to remove a large double trunk Live Oak and a 40ft Sable palm tree. Then the demo began.........it took two 20 yard loads.
 

Attachments

  • CIMG0605.jpg
    CIMG0605.jpg
    144.5 KB · Views: 174
  • CIMG0604.jpg
    CIMG0604.jpg
    146.6 KB · Views: 162
  • CIMG0602.jpg
    CIMG0602.jpg
    149.7 KB · Views: 162
  • CIMG0596.jpg
    CIMG0596.jpg
    143.1 KB · Views: 168
  • CIMG0592.jpg
    CIMG0592.jpg
    148 KB · Views: 156
  • CIMG0591.jpg
    CIMG0591.jpg
    140.6 KB · Views: 164
Last edited:
OP
J

jimmie jam

Well-known member
Joined
Oct 16, 2005
Messages
490
Location
fort lauderdale, fl
Cleared most everything now. Stump grinder at work...this stump was 6' in dia. and 4' deep :shocking:
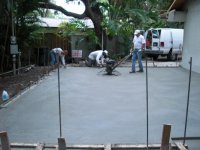
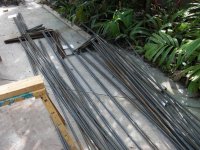
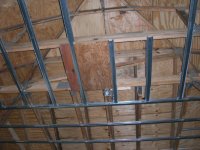
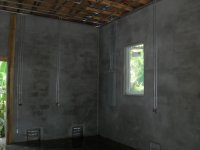
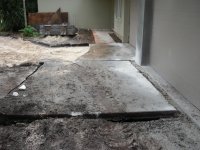
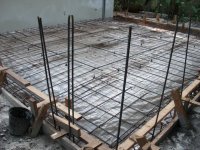
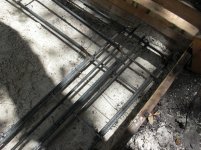
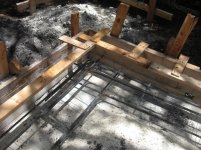
. Starting to form up......... well no photos made it. I need help with this photo upload thing.
 
Last edited:
OP
J

jimmie jam

Well-known member
Joined
Oct 16, 2005
Messages
490
Location
fort lauderdale, fl
Here we go now. Everything is cleared except for the old power drop before a swith to the temp pole. It will be replaced by new underground service. the boys have started to form up the pad and foundation.........after the stump was ground out. added 20 yards of "lake sand" for fill
 

Attachments

  • CIMG0626.jpg
    CIMG0626.jpg
    148.7 KB · Views: 156
  • CIMG0623.jpg
    CIMG0623.jpg
    152.1 KB · Views: 176
  • CIMG0616.jpg
    CIMG0616.jpg
    149 KB · Views: 166
  • CIMG0608.jpg
    CIMG0608.jpg
    148.2 KB · Views: 154
Last edited:
OP
J

jimmie jam

Well-known member
Joined
Oct 16, 2005
Messages
490
Location
fort lauderdale, fl
Getting the steel in place after 22 yards of "lake sand" (lime rock that compresses like concrete). final framing and epoxy the steel into the existing stemwall foundation 12" on center (overkill). Double mesh with #5's 4 feet on center. The inspector said WTF are you doing here.
 

Attachments

  • CIMG0646.jpg
    CIMG0646.jpg
    153.5 KB · Views: 101
  • CIMG0645.jpg
    CIMG0645.jpg
    145.3 KB · Views: 102
  • CIMG0644.jpg
    CIMG0644.jpg
    152.4 KB · Views: 101
  • CIMG0639.jpg
    CIMG0639.jpg
    141.2 KB · Views: 105
  • CIMG0638.jpg
    CIMG0638.jpg
    150.2 KB · Views: 99
  • CIMG0635.jpg
    CIMG0635.jpg
    148.2 KB · Views: 105
Last edited:
OP
J

jimmie jam

Well-known member
Joined
Oct 16, 2005
Messages
490
Location
fort lauderdale, fl
Now the fun begins....6:30am and the 21 yards of 4,000psi concrete is delivered. The boys are all over it (3 of them). The slab is 6"+ deep with huge footings..................
 

Attachments

  • CIMG0660.jpg
    CIMG0660.jpg
    139.3 KB · Views: 158
  • CIMG0659.jpg
    CIMG0659.jpg
    148.6 KB · Views: 152
  • CIMG0654.jpg
    CIMG0654.jpg
    150.4 KB · Views: 157
  • CIMG0653.jpg
    CIMG0653.jpg
    148.1 KB · Views: 132
  • CIMG0649.jpg
    CIMG0649.jpg
    148.6 KB · Views: 140

rickairmedic

Well-known member
Joined
May 31, 2005
Messages
4,165
Location
louisville ,Ky
Jimmie its looking good . There are pretty much 2 options for up;oading pictures here . Either atttching images like you are doing ooor hosting them offsite somewhere like photo bucket and then just coppying the image tags from there and pasting them into your post .


Rick
 
OP
J

jimmie jam

Well-known member
Joined
Oct 16, 2005
Messages
490
Location
fort lauderdale, fl
Jimmie its looking good . There are pretty much 2 options for up;oading pictures here . Either atttching images like you are doing ooor hosting them offsite somewhere like photo bucket and then just coppying the image tags from there and pasting them into your post .


Rick

Rick. don't know about the "hosting" thing. Why does it take sooo long to uploan these pics here?

Thanks.
 

rickairmedic

Well-known member
Joined
May 31, 2005
Messages
4,165
Location
louisville ,Ky
Well Jimmyh the basic reason it takes so long to upload pictures is we are working the server hard . At any given time theres probably 1500 + people on the board and of those lets say 50 are all uploading pictures at the same time :D
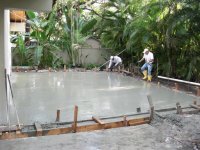
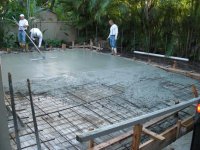
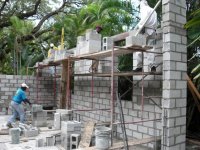
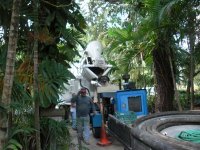
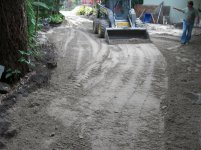
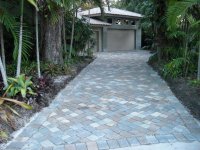
. The offsite hosting thing isnt to bad I use photo bucket myself although generally I just attatch my pictures to the post . Heres a picture from my photo bucket account just to give you and idea .


DSCI0187.jpg


Rick
 
OP
J

jimmie jam

Well-known member
Joined
Oct 16, 2005
Messages
490
Location
fort lauderdale, fl
got it. i thought that i was doing something wrong. maybe i'll try your method because if i don't it will take two months to upload my project!
 

rickairmedic

Well-known member
Joined
May 31, 2005
Messages
4,165
Location
louisville ,Ky
Jimmie you can upload all of your pictures to photo bucket . Then you open the garage journal and photo bucket on 2 differant tabs . Then you click back and forth between tabs . On photo bucket you open your album hover your mouse over the picture you want and a drop down menu will drop down . The bottom option in the drop down menu is the image link . Simply left click on the image link to copy it and then click on your tab for here and paste it in your post . I will give you a little hint hit enter a couple of times between images and your images will go down your post instead of side by side .


Rick
 
OP
J

jimmie jam

Well-known member
Joined
Oct 16, 2005
Messages
490
Location
fort lauderdale, fl
now for the block walls......waited 2 weeks before loading the block while keeping the slab wet..........form boards just removed - still laying there. Notice the plywood on the slab, I made sure that they protected that expensive finsh job on the slab.
 

Attachments

  • CIMG0672.jpg
    CIMG0672.jpg
    146.6 KB · Views: 145
  • CIMG0668.jpg
    CIMG0668.jpg
    148.2 KB · Views: 147
  • CIMG0664.jpg
    CIMG0664.jpg
    147.5 KB · Views: 146
  • CIMG0662.jpg
    CIMG0662.jpg
    145.6 KB · Views: 150
  • CIMG0661.jpg
    CIMG0661.jpg
    140.3 KB · Views: 142
Last edited:
OP
J

jimmie jam

Well-known member
Joined
Oct 16, 2005
Messages
490
Location
fort lauderdale, fl
walls getting done, nearly ready for the tie beam forms...........lentels over the window opening and rear door weight a ton......the boys were crazy lifting them that high by hand.
 

Attachments

  • CIMG0676.jpg
    CIMG0676.jpg
    147.2 KB · Views: 113
  • CIMG0677.jpg
    CIMG0677.jpg
    150 KB · Views: 111
  • CIMG0680.jpg
    CIMG0680.jpg
    148.4 KB · Views: 111
  • CIMG0681.jpg
    CIMG0681.jpg
    148.8 KB · Views: 117
  • CIMG0682.jpg
    CIMG0682.jpg
    149.6 KB · Views: 107
Last edited:
OP
J

jimmie jam

Well-known member
Joined
Oct 16, 2005
Messages
490
Location
fort lauderdale, fl
Steel ready for tie beam, forms up..........As you can see, Shane is forming the complete front for steel and the concrete. I am building a bunker..............the second pic is of the new wall sitting on the original tie beam being formed for another t. beam. It will all be tied together with #5 rods coming down every four feet tied into the original t. beam with epoxy. The complete wall was then poured solid with 4,000 psi concrete. Actually, the complete block "shell" is constructed this way. The only thing that I did that wasn't required was to pour every cell with concrete, even the ones without steel bars. Can we say "bunker"? Oh yea..........
 

Attachments

  • CIMG0709.jpg
    CIMG0709.jpg
    149.2 KB · Views: 120
  • CIMG0703.jpg
    CIMG0703.jpg
    149.4 KB · Views: 116
  • CIMG0701.jpg
    CIMG0701.jpg
    151.6 KB · Views: 116
  • CIMG0699.jpg
    CIMG0699.jpg
    144.5 KB · Views: 114
  • CIMG0694.jpg
    CIMG0694.jpg
    149.8 KB · Views: 109
Last edited:
OP
J

jimmie jam

Well-known member
Joined
Oct 16, 2005
Messages
490
Location
fort lauderdale, fl
moving right along....lots of steel in front sides (before framing)......pump is here for the tie beam and front. I was sweatinig bullets with that much weight. Did not want to blow out the forms with a few tons of mud............
 

Attachments

  • CIMG0725.jpg
    CIMG0725.jpg
    142.2 KB · Views: 113
  • CIMG0724.jpg
    CIMG0724.jpg
    149.9 KB · Views: 105
  • CIMG0723.jpg
    CIMG0723.jpg
    151.3 KB · Views: 109
  • CIMG0714.jpg
    CIMG0714.jpg
    143.3 KB · Views: 103
  • CIMG0713.jpg
    CIMG0713.jpg
    145.4 KB · Views: 104
Last edited:
OP
J

jimmie jam

Well-known member
Joined
Oct 16, 2005
Messages
490
Location
fort lauderdale, fl
ready now for trusses. I had the truss company design the open area for storage........the front jack supports were left in for a month, just in case.....
 

Attachments

  • CIMG0749.jpg
    CIMG0749.jpg
    151 KB · Views: 106
  • CIMG0745.jpg
    CIMG0745.jpg
    156.5 KB · Views: 118
  • CIMG0744.jpg
    CIMG0744.jpg
    154.7 KB · Views: 120
  • CIMG0738.jpg
    CIMG0738.jpg
    145.6 KB · Views: 138
  • CIMG0735.jpg
    CIMG0735.jpg
    143.7 KB · Views: 122
  • CIMG0730.jpg
    CIMG0730.jpg
    156.7 KB · Views: 113
Last edited:
OP
J

jimmie jam

Well-known member
Joined
Oct 16, 2005
Messages
490
Location
fort lauderdale, fl
I prepainted the 2 x 10 rough sawn cedar fascia boards. The 3/4" plywood is starting to go up.............hand nailed every 4". Yes, Ray is standing on a 2x8 nailing the facia board.....lots of rain this time of year. Its been tough keeping the existing structure water free with tarps. Take note of the 2x6 bottom tread on the trusses. Engineering only called for 2x4's but for another $175 in cost they used the larger lumber. I can put tons of weight on the storage area floor. Just getting it up 13' is the problem.
 

Attachments

  • CIMG0783.jpg
    CIMG0783.jpg
    151.9 KB · Views: 126
  • CIMG0778.jpg
    CIMG0778.jpg
    151.4 KB · Views: 139
  • CIMG0771.jpg
    CIMG0771.jpg
    145 KB · Views: 113
  • CIMG0760.jpg
    CIMG0760.jpg
    145.7 KB · Views: 128
  • CIMG0753.jpg
    CIMG0753.jpg
    132.2 KB · Views: 114
Last edited:
OP
J

jimmie jam

Well-known member
Joined
Oct 16, 2005
Messages
490
Location
fort lauderdale, fl
Let there be copper........I'm about 5 miles from the ocean and with salt air and the acidic Oak tree leaves, copper is the best defense against the elements here. There is about $1,000 of copper with this addition (the rest of the house also has copper flashings and drip edge). It only costs twice as much to go first class...make that three times...........
 

Attachments

  • CIMG0812.jpg
    CIMG0812.jpg
    140.9 KB · Views: 134
  • CIMG0813.jpg
    CIMG0813.jpg
    144 KB · Views: 122
  • CIMG0815.jpg
    CIMG0815.jpg
    138.3 KB · Views: 118
  • CIMG0824.jpg
    CIMG0824.jpg
    142.4 KB · Views: 134
Last edited:
OP
J

jimmie jam

Well-known member
Joined
Oct 16, 2005
Messages
490
Location
fort lauderdale, fl
First layer of SBR (goodyear rubber) hot mopped. The roofers caught my little tree rat that has been hanging around (bad decision on his part). then mopped a layer of 90# modified........ The inspector was a great guy and "turned his head" when he saw the SBR rubber layer. Although this is way above code, it was not on the plans and he could have made me file a "change order" and stopped the progress dead in its tracks.....good guy (I think the fact that my roofing contractor (good old north Florida boy) knew his "daddy".
 

Attachments

  • CIMG0834.jpg
    CIMG0834.jpg
    146.5 KB · Views: 383
  • CIMG0833.jpg
    CIMG0833.jpg
    145 KB · Views: 173
  • CIMG0829.jpg
    CIMG0829.jpg
    141.8 KB · Views: 156
Last edited:
OP
J

jimmie jam

Well-known member
Joined
Oct 16, 2005
Messages
490
Location
fort lauderdale, fl
Roof is on and waiting for the lift test to be finaled. Guess I better clean the older tile (it's the exact same color, believe it or not). The 5/8" impact glass is in...........these are sooo heavy, it took two of us to lift the glazing in place (those side casement windows are about 80lbs EACH.
 

Attachments

  • CIMG0898.jpg
    CIMG0898.jpg
    146.4 KB · Views: 159
  • CIMG0900.jpg
    CIMG0900.jpg
    149.3 KB · Views: 143
  • CIMG0902.jpg
    CIMG0902.jpg
    143.9 KB · Views: 197
  • CIMG0907.jpg
    CIMG0907.jpg
    144.2 KB · Views: 143
Last edited:
To avoid these ads, REGISTER NOW!
OP
J

jimmie jam

Well-known member
Joined
Oct 16, 2005
Messages
490
Location
fort lauderdale, fl
wire lath and stucco.............float finish to match the house.
 

Attachments

  • CIMG0931.jpg
    CIMG0931.jpg
    139.5 KB · Views: 146
  • CIMG0926.jpg
    CIMG0926.jpg
    140.5 KB · Views: 161
  • CIMG0918.jpg
    CIMG0918.jpg
    150.3 KB · Views: 176
  • CIMG0932.jpg
    CIMG0932.jpg
    146.1 KB · Views: 87
  • CIMG0929.jpg
    CIMG0929.jpg
    146.5 KB · Views: 89
  • CIMG0939.jpg
    CIMG0939.jpg
    137.4 KB · Views: 88
Last edited:
OP
J

jimmie jam

Well-known member
Joined
Oct 16, 2005
Messages
490
Location
fort lauderdale, fl
rear shot across the back of the house (garage is at the end with drive through door). New 400amp electric in. Starting "high hats" for the ceiling drywall, plywood backer for the garage door track supports............pics are distorted due to angle. makes everything look tiny.
 

Attachments

  • CIMG0991.jpg
    CIMG0991.jpg
    140.2 KB · Views: 111
  • CIMG0976.jpg
    CIMG0976.jpg
    142.1 KB · Views: 115
  • CIMG0968.jpg
    CIMG0968.jpg
    138 KB · Views: 117
  • CIMG0962.jpg
    CIMG0962.jpg
    148.3 KB · Views: 131
Last edited:
OP
J

jimmie jam

Well-known member
Joined
Oct 16, 2005
Messages
490
Location
fort lauderdale, fl
ceiling nears completion, 175MPH doors going in..........took three guys 11 hours to put all three doors up......damn.
 

Attachments

  • CIMG1009.jpg
    CIMG1009.jpg
    152 KB · Views: 95
  • CIMG1022.jpg
    CIMG1022.jpg
    145.2 KB · Views: 96
  • CIMG1024.jpg
    CIMG1024.jpg
    135.8 KB · Views: 114
  • CIMG1013.jpg
    CIMG1013.jpg
    134.2 KB · Views: 95
Last edited:
OP
J

jimmie jam

Well-known member
Joined
Oct 16, 2005
Messages
490
Location
fort lauderdale, fl
doors in....rails are within 8" of the 13' ceiling. Liftmaster 3800's in.............
 

Attachments

  • CIMG1028.jpg
    CIMG1028.jpg
    141.8 KB · Views: 87
  • CIMG1039.jpg
    CIMG1039.jpg
    135.9 KB · Views: 93
  • CIMG1040.jpg
    CIMG1040.jpg
    137 KB · Views: 81
  • CIMG1029.jpg
    CIMG1029.jpg
    144.1 KB · Views: 115
Last edited:
OP
J

jimmie jam

Well-known member
Joined
Oct 16, 2005
Messages
490
Location
fort lauderdale, fl
now to get off the temp pole and get the underground service in. It may not look like it but that trench is 3' deep and about a 45' run. Garage is now secure...........some vehicles back from storage. The original exterior wall of the garage will have a 10' section removed up to the lower tie beam so that everything will be open.
 

Attachments

  • CIMG1049.jpg
    CIMG1049.jpg
    145.4 KB · Views: 125
  • CIMG1044.jpg
    CIMG1044.jpg
    143.5 KB · Views: 129
  • CIMG1046.jpg
    CIMG1046.jpg
    138 KB · Views: 124
  • CIMG1053.jpg
    CIMG1053.jpg
    143.1 KB · Views: 135
  • CIMG1056.jpg
    CIMG1056.jpg
    146.4 KB · Views: 323
Last edited:

rickairmedic

Well-known member
Joined
May 31, 2005
Messages
4,165
Location
louisville ,Ky
Jimmy the garage is looking great . I dont remember tree rats like that growing up in Tampa although I have heard they have become quite common since hurricane Andrew . I saw the bimini in the garage with the vette where did you hide the boat :D.


Rick
 
OP
J

jimmie jam

Well-known member
Joined
Oct 16, 2005
Messages
490
Location
fort lauderdale, fl
You mean this one? HydraSport CC, had it custom made. It's a great dive boat. As you can see me standing in it (i'm 6'3"). It would never get into the garage because the door is only 8' high. The top of the windshield support must be 10' from the ground......
 

Attachments

  • CIMG1512.jpg
    CIMG1512.jpg
    122.7 KB · Views: 138
Last edited:
OP
J

jimmie jam

Well-known member
Joined
Oct 16, 2005
Messages
490
Location
fort lauderdale, fl
removing the old concrete drive..............pavers delivered. This guy removed the complete drive (over 65') in about 2 hours with that Bobcat and no "mistakes"............This is professional grade.
 

Attachments

  • CIMG1075.jpg
    CIMG1075.jpg
    148.4 KB · Views: 114
  • CIMG1073.jpg
    CIMG1073.jpg
    152.6 KB · Views: 110
  • CIMG1077.jpg
    CIMG1077.jpg
    146.1 KB · Views: 101
  • CIMG1078.jpg
    CIMG1078.jpg
    151.5 KB · Views: 111
Last edited:
OP
J

jimmie jam

Well-known member
Joined
Oct 16, 2005
Messages
490
Location
fort lauderdale, fl
Yep thats the one I meant . Did you make the new garage deep enough to put the boat in or do you keep it at the marina :D.


Rick

The garage is 27' deep. The trailer is 26' and the boat hangs off the back 3'. Plus, it's about 10' high. I would never keep this at home...I own a larger property two blocks away the has a little cottage on it (the one I was going to raze to build the new home on). The boat stays there on the trailer. The garage was actually built with 13' ceilings for lifts so i can have some of the other toys at home. I can't believe that you are the only response this thread has attracted :shocking: and now were're talkin boats!
 
Last edited:
OP
J

jimmie jam

Well-known member
Joined
Oct 16, 2005
Messages
490
Location
fort lauderdale, fl
A little mood lighting, electric finished.........but not yet transfered from the temp pole. FPL does not seem to care if i wait a month for them.....
 

Attachments

  • CIMG1065.jpg
    CIMG1065.jpg
    152.7 KB · Views: 92
  • CIMG1066.jpg
    CIMG1066.jpg
    149.7 KB · Views: 112
  • CIMG1064.jpg
    CIMG1064.jpg
    151 KB · Views: 96
  • CIMG1067.jpg
    CIMG1067.jpg
    158.4 KB · Views: 111
Last edited:
OP
J

jimmie jam

Well-known member
Joined
Oct 16, 2005
Messages
490
Location
fort lauderdale, fl
Back to the drive - nearly ready.............the removal and prep work was done in 4 hours total. These guys are good. They took the concrete to the crusher and bought it back later for the base.
 

Attachments

  • CIMG1087.jpg
    CIMG1087.jpg
    149.2 KB · Views: 93
  • CIMG1081.jpg
    CIMG1081.jpg
    145.1 KB · Views: 86
  • CIMG1091.jpg
    CIMG1091.jpg
    152.4 KB · Views: 84
  • CIMG1106.jpg
    CIMG1106.jpg
    149.2 KB · Views: 82
Last edited:
OP
J

jimmie jam

Well-known member
Joined
Oct 16, 2005
Messages
490
Location
fort lauderdale, fl
more of the prep........pavers started.......
 

Attachments

  • CIMG1100.jpg
    CIMG1100.jpg
    151.8 KB · Views: 78
  • CIMG1104.jpg
    CIMG1104.jpg
    145.9 KB · Views: 74
  • CIMG1116.jpg
    CIMG1116.jpg
    146 KB · Views: 97
OP
J

jimmie jam

Well-known member
Joined
Oct 16, 2005
Messages
490
Location
fort lauderdale, fl
pavers going down. House will be painted white so the drive will tie in with the trim and garage doors............these guys (5) showed up at 9:30 and were finished (and cleaned up) by 4 pm. That drive is 65' long...........
 

Attachments

  • CIMG1117.jpg
    CIMG1117.jpg
    144.6 KB · Views: 134
  • CIMG1116.jpg
    CIMG1116.jpg
    146 KB · Views: 132
  • CIMG1125.jpg
    CIMG1125.jpg
    150 KB · Views: 231
  • CIMG1130.jpg
    CIMG1130.jpg
    149.2 KB · Views: 167
Last edited:
To avoid these ads, REGISTER NOW!
Top Bottom