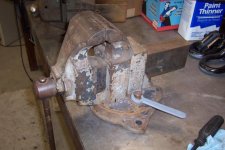
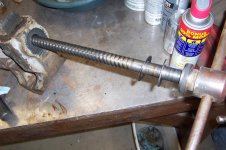
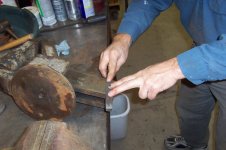
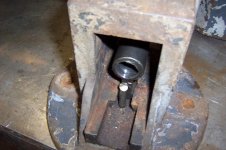
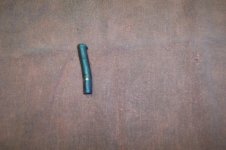
I finally started the restoration on my Chas Parker 974 1/2. I picked it up off CL last summer. It must have been in the Navy at one point because it had about 1/16 to 1/8 thick battelship gray on it. It looks like it had an easy life. Almost no one used the back for an anvil, the jaws are really nice, handle straight, original swivel handle in place, etc. The swivel handle is painted in the picture because I was experimenting with electrolsis to see if it was going to cut through the paint. The vise weighs in at 77lbs. The first 2 photos are the "before". The 3rd is the screw coming out. It had 2 shims one was .029 and the other .085 inch. In photo #4 I had to draw file the ram to get it out. It must have had a few burrs. Photo #5 is the pin which I drove out from the bottom. Photo 6 is the pin as it came out. I don't think they had to deal with QS9000 back then, it would have been hard to write a work instruction for the process of bending that pin in place. Photo #7 is all the parts, they have orange rust because the guy power washed it before I bought it and it was full of water. It has been sitting all summer with water in it.


You are using an out of date browser. It may not display this or other websites correctly.
You should upgrade or use an alternative browser.
You should upgrade or use an alternative browser.
Chas Parker 974 1/2 Vise Restoration
- Thread starter gregthor
- Start date
![ry=400[1].jpg](/forum/data/attachments/111/111365-65ca29e5ac95dbe8dec9f67e95350184.jpg)

The color will be 1966 GTO Pontiac engine metallic blue. For those of you that are not Pontiac fans it is a silver blue color that all Pontiac engines were painted in 1966.
Funny story about the vise. I saw it on CL one night. I called the seller the next morning and made an appointment to see it at lunch. It turned out the vise was only 1 mile from my work and in my opionion very nice condition. I bought it for $75 at lunch time. That night what do you think I did?? That right!!!.... search Garage Journal for Parker 974 1/2 vises and to see if I paid too much since I heard $.50-.75 lb is the going rate. I found a thread and started reading it. As I recall it said $50 would be a great price but $75 might be OK too for a Parker 974 1/2. Then I realized the vise I bought was the vise the thread was about. Small world!
Funny story about the vise. I saw it on CL one night. I called the seller the next morning and made an appointment to see it at lunch. It turned out the vise was only 1 mile from my work and in my opionion very nice condition. I bought it for $75 at lunch time. That night what do you think I did?? That right!!!.... search Garage Journal for Parker 974 1/2 vises and to see if I paid too much since I heard $.50-.75 lb is the going rate. I found a thread and started reading it. As I recall it said $50 would be a great price but $75 might be OK too for a Parker 974 1/2. Then I realized the vise I bought was the vise the thread was about. Small world!
I work in a shop half navy half marine. We use vices very similar to this, except ours have seen much better days. Regardless, they have been in my particular shop since the 70s and still going strong. Its cool to see one that still looks like a vice!
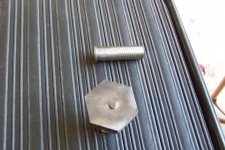
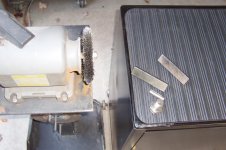
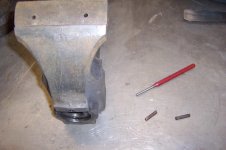
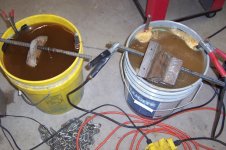
Status report -Photo #1 shows the rusty parts. The small parts were cleaned off with the wire wheel on the bench grinder. Small ductile iron parts really clean up nice with a wire wheel. Photo #2 is obviously the electrolysis tanks for the big parts. Photo # 3 is removing the jaws. I think these had been removed before since the pins were not the normal solid taper pin, they were coiled spring pins. I used a roll pin punch to get them out. They came out easy even though the jaws were nice and tight on the vise. Photo #4 is the cleaned up jaws. Photo #5 Now here is some totally useless information about the replaceable jaws. It appears the jaws were taken off before because one jaw had one center punch “dot” and the other had 2 center point “dots’. The static & dynamic main castings had corresponding “dots” so you would know which jaw went where when putting them back on. The underneath of the replaceable jaws are both stamped 420 and one of the main castings is stamped 420. I am not sure what any of this means but I thought I would add it anyways since on GJ there have been many many previous threads on vise restoration and I was afraid this one would be too boring after seeing the others so I thought I would do the CSI thing and look really deep for odd details on this vise restoration. Photo #6 is the small swivel parts all cleaned up. Here is even more useless data….. In my opinion Chas Parker are premium vises, they knew where to spend the money & effort . Look at the machining on these non critical parts. Clearly these were made in “hi production” mode notice the big knub from the cut off tool on the swivel screw. In machine shop class long ago I would have lost 5points on that part if I left a knub like that. Then look at the surface finish on the other pin. It looks like about a 250 finish. I think Parker made these small parts fast & cheap and put the effort into the jaws & screw. It seems they had some good people in their engineering department & manufacturing back then!! They knew where to put the effort!
Attachments


Hi Guys,
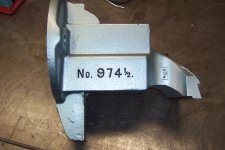
Made some more progress on the Chas Parker 974 1/2 . The first photo is all the small parts getting a coat of self ectching prmer after a complete cleaning with prep all. The second photo is cleaning out the threads. I always run a tap in all threaded holes to clean out any burrs and to find out any trouble areas as soon as possible. Photo 3 is the big parts after electrolysis & a wire brush on the 4 1/2 angle grinder. You can see there is still paint in the corners where the wire wheel won't reach so a quick visit to the sand blaster with black diamond abrasive will finish off all remaining paint. Photo 4 & 5 is the big parts getting a coat of self ectching primer. They were also cleaned with prep all prior to priming. Photo 6 & 7 is the big parts getting a final coat of 66 pontiac engine blue. Next on the resto is the lettering and polishing the handle.
Have a great week end!!


Made some more progress on the Chas Parker 974 1/2 . The first photo is all the small parts getting a coat of self ectching prmer after a complete cleaning with prep all. The second photo is cleaning out the threads. I always run a tap in all threaded holes to clean out any burrs and to find out any trouble areas as soon as possible. Photo 3 is the big parts after electrolysis & a wire brush on the 4 1/2 angle grinder. You can see there is still paint in the corners where the wire wheel won't reach so a quick visit to the sand blaster with black diamond abrasive will finish off all remaining paint. Photo 4 & 5 is the big parts getting a coat of self ectching primer. They were also cleaned with prep all prior to priming. Photo 6 & 7 is the big parts getting a final coat of 66 pontiac engine blue. Next on the resto is the lettering and polishing the handle.
Have a great week end!!
Very nice job.
I wiil be rebuilding a Parker vise soon and will definitely save this thread for reference.
Somebody on another board suggested using anti-seize on the screw threads for smooth running. Havent tried it myself.
I was wondering what the dimenisions of your 474 1/2 ram are? I need to find a "parts" ram for my vise and wondered if another junker Parker will fit.
Best,
JP
I wiil be rebuilding a Parker vise soon and will definitely save this thread for reference.
Somebody on another board suggested using anti-seize on the screw threads for smooth running. Havent tried it myself.
I was wondering what the dimenisions of your 474 1/2 ram are? I need to find a "parts" ram for my vise and wondered if another junker Parker will fit.
Best,
JP
JP,
Hopefully you got the PM with pictures and dimensions that I sent last night. I am a big fan of anti -seize. I use it all the time and will be using it on on every moving part, mating surface, thread etc. on this vise during assembly.
Greg
Hopefully you got the PM with pictures and dimensions that I sent last night. I am a big fan of anti -seize. I use it all the time and will be using it on on every moving part, mating surface, thread etc. on this vise during assembly.
Greg
Perfect, Greg. Thanks a million.
Love that Mitutoyo. I always seem to have dead batteries so I picked up a solar-powered caliper on Ebay. Not for precision work, but great for around the shop. When I grab it, it works.
I like anti-seize on lug nuts too and bring my own when the shop rotates my tires; I hate that feeling of breaking a stud to get a nut off. They look the other way and I dab a little on. Im wagering the new stuff contains ground teflon particles
Cheers,
JP Sauer
Love that Mitutoyo. I always seem to have dead batteries so I picked up a solar-powered caliper on Ebay. Not for precision work, but great for around the shop. When I grab it, it works.
I like anti-seize on lug nuts too and bring my own when the shop rotates my tires; I hate that feeling of breaking a stud to get a nut off. They look the other way and I dab a little on. Im wagering the new stuff contains ground teflon particles
Cheers,
JP Sauer
Hi Guys,
Did some work on the letter highlighting on the ol Chas Parker. The first photo shows some things I tried that did not work on some other vises I did. The roller actually it is called a brayer and it worked if the letters were perfect but I still had to use a brush to finish the job. The foam pads just made a mess. Photo 2 shows the paint I used, good old fachion testors model paint. The candy cane piece of wire I used to stir it. I just put the hook part in the paint and twirl the wire between my finger & thumb. It mixes the paint with out making a mess. Photo 3 from left to right are the brushes. Now remember this is a personel preference and if you ask 5 guys how to highlight the letters on a vise you will get 5 different answers. But this is what I did. After the foam brush and the brayer failed I asked another GJ vise expert, Craig (catalyze), he uses a pinstriping brush so I took the idea from Craig . The brush on the left was a #2, the next was a #1 both were too stiff and too cheap($2.95) Next was a number #1, I had to cut it on an angle to work. It was better and more (expensive $6.95) Finally the perfect brush for me the #1 round. Photo 4 & 5 is the results. I wish my lettering was more vivid. It actually looks better in real life. I may try putting a second coat on the letters. The last photo is the screw & handle out of the electrolyisis and a quick wash in the mineral spirits tank. I should be assembling soon!
Take care, Greg
Did some work on the letter highlighting on the ol Chas Parker. The first photo shows some things I tried that did not work on some other vises I did. The roller actually it is called a brayer and it worked if the letters were perfect but I still had to use a brush to finish the job. The foam pads just made a mess. Photo 2 shows the paint I used, good old fachion testors model paint. The candy cane piece of wire I used to stir it. I just put the hook part in the paint and twirl the wire between my finger & thumb. It mixes the paint with out making a mess. Photo 3 from left to right are the brushes. Now remember this is a personel preference and if you ask 5 guys how to highlight the letters on a vise you will get 5 different answers. But this is what I did. After the foam brush and the brayer failed I asked another GJ vise expert, Craig (catalyze), he uses a pinstriping brush so I took the idea from Craig . The brush on the left was a #2, the next was a #1 both were too stiff and too cheap($2.95) Next was a number #1, I had to cut it on an angle to work. It was better and more (expensive $6.95) Finally the perfect brush for me the #1 round. Photo 4 & 5 is the results. I wish my lettering was more vivid. It actually looks better in real life. I may try putting a second coat on the letters. The last photo is the screw & handle out of the electrolyisis and a quick wash in the mineral spirits tank. I should be assembling soon!
Take care, Greg
Attachments


Hi Guys,
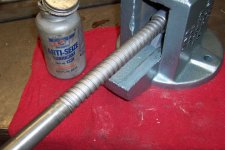
I worked on the vise again today. Photo 1- I found some ugly scratches on the knob of the main screw so I wrapped some sandpaper around a file and polished until the scratches disappeared. Photo 2- Then I hit it with the brass wire wheel on the bench grinder. Photo 3- Then I hit it with a polishing wheel; this was a waste of time. Photo 4- I polished it with mothers metal polish and then paste wax to keep it from rusting. Photo 5- Finally, I started assembly. First I installed the main nut. I put the pin in exactly like it came out, so that the nut had a little looseness but no sloop front to back. Photo 6-I completely covered the screw with never seize and ran it in and out a few times. Photo 7- is assembling the swivel parts, again with never seize between any two parts that move.
I will post more later I am at the 7 photo limit now.
Greg
I worked on the vise again today. Photo 1- I found some ugly scratches on the knob of the main screw so I wrapped some sandpaper around a file and polished until the scratches disappeared. Photo 2- Then I hit it with the brass wire wheel on the bench grinder. Photo 3- Then I hit it with a polishing wheel; this was a waste of time. Photo 4- I polished it with mothers metal polish and then paste wax to keep it from rusting. Photo 5- Finally, I started assembly. First I installed the main nut. I put the pin in exactly like it came out, so that the nut had a little looseness but no sloop front to back. Photo 6-I completely covered the screw with never seize and ran it in and out a few times. Photo 7- is assembling the swivel parts, again with never seize between any two parts that move.
I will post more later I am at the 7 photo limit now.
Greg
Attachments




Hi again,
Here are the rest of the photos from today. Photo 1 is the swivel from the bottom. It needs a 1 3/8" socket. Good thing my son is a mechanic and has a socket that big or I would be posting on the wanted forum for a 1 3/8" socket! Photo 2 is sliding the dynamic jaw in and the main screw. I put the exact same shims back in but the vise bound up so I took the smaller shim out and it was better but still had a hard spot when cranking the handle. So in photo 3 I filed some contact areas on the retainer where I am pointing with the pen. Photo 4 is with the retainer in place and tightened. I can move the handle all the way in & out with 1 finger. I think I had to tweak this because ever since I had the vise the retainer was loose. Know I know why, when you tighten it, the handle was too tight. The vise works like a champ now!!! Vise is almost done, I still need to find roll pins for the replaceable jaws and install the swivel handle and take "finished" pictures.
Have a great day,
Greg
Here are the rest of the photos from today. Photo 1 is the swivel from the bottom. It needs a 1 3/8" socket. Good thing my son is a mechanic and has a socket that big or I would be posting on the wanted forum for a 1 3/8" socket! Photo 2 is sliding the dynamic jaw in and the main screw. I put the exact same shims back in but the vise bound up so I took the smaller shim out and it was better but still had a hard spot when cranking the handle. So in photo 3 I filed some contact areas on the retainer where I am pointing with the pen. Photo 4 is with the retainer in place and tightened. I can move the handle all the way in & out with 1 finger. I think I had to tweak this because ever since I had the vise the retainer was loose. Know I know why, when you tighten it, the handle was too tight. The vise works like a champ now!!! Vise is almost done, I still need to find roll pins for the replaceable jaws and install the swivel handle and take "finished" pictures.
Have a great day,
Greg
Attachments


That's coming out great! I'm going through the electrolysis process now with a not so old wilton. I'm hoping to learn enough from this wilton before I attack my parker fixed base. I for 1 appreciate your comprehensive posts and pictures but it never seems to fail that I have more questions. first I can't seem to get into the corners of these parts with my 3m pad and I do not have access to a sandblaster. I guess I will just keep the part in the electrolysis tank until I come up with a better solution.. anyways thank you for the post!!!
Steelkilt - Thanks for your kind words. I have spent countless hours on Garage Journal and gained immeasurable knowledge from the threads/posts from the guys & gals of GJ. When I finally got a new battery & battery door for my Kodak Easy Share camera I decided to document my next project on a thread on GJ. This way I would perhaps be giving back a little to GJ. I had a concern about doing the Vise since much has already been written on Vise restoration but I did it anyways with the idea new people are viewing GJ all the time and a new thread might be OK, even if it was not a new subject. So anyways I am glad you are enjoying it.
Here is my suggestion of things to consider if the electrolysis doesn’t clean out the corners. HF (Harbor Freight) or other similar stores sell an inexpensive ($3.99)wire wheel set for a drill motor. It typically includes 1 or 2 approximately 1 1/2 inch dia wire wheels. Maybe that will work getting in the corners. Of course, there are chemical strippers, but kind of a pain to spend the money on a quart of stripper when you only need to do a small area. Here is the HF one I am thinking of.
http://www.harborfreight.com/6-piece-wire-wheel-and-cup-brush-set-1341.html
I wish you luck on your Chas Parker restoration job.(and the Wilton one also)
Greg
Here is my suggestion of things to consider if the electrolysis doesn’t clean out the corners. HF (Harbor Freight) or other similar stores sell an inexpensive ($3.99)wire wheel set for a drill motor. It typically includes 1 or 2 approximately 1 1/2 inch dia wire wheels. Maybe that will work getting in the corners. Of course, there are chemical strippers, but kind of a pain to spend the money on a quart of stripper when you only need to do a small area. Here is the HF one I am thinking of.
http://www.harborfreight.com/6-piece-wire-wheel-and-cup-brush-set-1341.html
I wish you luck on your Chas Parker restoration job.(and the Wilton one also)
Greg
Hi Guys (and Gals),
Swivel Handle installation
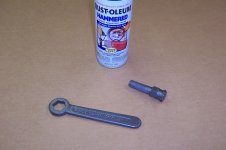
I put a little time in on the old Parker this week. I installed the swivel handle. Photo #1 is just after reinstalling the wire ring clip on the screw. I put the screw in a vise and forced the wire ring clip on with a little screw driver. I think it is easier than trying to put the clip on after you install it on the restored vise with the handle in place. Next, I repainted it since it got all scratched up installing the clip. Shown in the photo is also my plan “B”. Plan B was to use a standard ¾ inch external retaining ring. I had this on hand in case while installing the original wire clip, it was naughty and shot across the shop and went into the “black hole”. You know the black hole? Every shop has one, it’s that place where tools or parts go and you can’t find them…you know, you are laying on your back under a car and your ½ socket rolls away and you can’t find it..it has entered the black hole… or the place a wire clip might hide just as I am finishing my vise!! I have used the plan B design on another Chas Parker 239X and it works perfect and looks good but I prefer the original clip. I have been looking for a place to buy wire clips but haven’t found one yet. Ok back to the vise. Photo #2- I painted the swivel screw and swivel handle with Rustolem Hammered Dark Bronze paint. My first choice would have been to leave it bare steel and polish it but this vise will be sitting on a shelf for decoration for about 2 years and then put into service on bench in a home hobby shop so I thought paint would be a better choice for now.
Take Care and watch out for black holes! Two more posts to go, jaws installation and then the beauty shots.
Greg
Swivel Handle installation
I put a little time in on the old Parker this week. I installed the swivel handle. Photo #1 is just after reinstalling the wire ring clip on the screw. I put the screw in a vise and forced the wire ring clip on with a little screw driver. I think it is easier than trying to put the clip on after you install it on the restored vise with the handle in place. Next, I repainted it since it got all scratched up installing the clip. Shown in the photo is also my plan “B”. Plan B was to use a standard ¾ inch external retaining ring. I had this on hand in case while installing the original wire clip, it was naughty and shot across the shop and went into the “black hole”. You know the black hole? Every shop has one, it’s that place where tools or parts go and you can’t find them…you know, you are laying on your back under a car and your ½ socket rolls away and you can’t find it..it has entered the black hole… or the place a wire clip might hide just as I am finishing my vise!! I have used the plan B design on another Chas Parker 239X and it works perfect and looks good but I prefer the original clip. I have been looking for a place to buy wire clips but haven’t found one yet. Ok back to the vise. Photo #2- I painted the swivel screw and swivel handle with Rustolem Hammered Dark Bronze paint. My first choice would have been to leave it bare steel and polish it but this vise will be sitting on a shelf for decoration for about 2 years and then put into service on bench in a home hobby shop so I thought paint would be a better choice for now.
Take Care and watch out for black holes! Two more posts to go, jaws installation and then the beauty shots.
Greg
Attachments
Hi Guys & Gals,
Final Step Jaw attachment
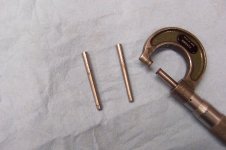
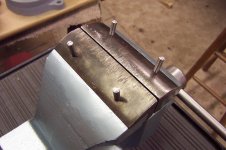
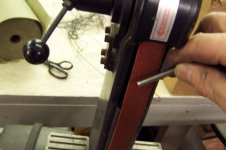
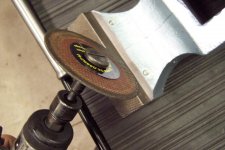
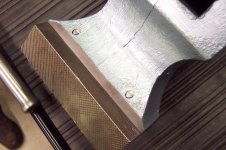
This was by far the most difficult part of this project. The goal is to attach the jaws so they are tight and both pins share the load. Each jaws has two .205 holes that mate up with two holes in the casting that seem to be about .202in. So I am assuming they left the factory with tapered pins. I have measured pins removed from other Chas Parkers and they seemed to be tapered. This vise however, had coiled spring pins, which I thought was a good idea. I don’t think they were the factory pins but I wanted to use them. Unfortunately I was unable to find coiled spring pins in this size. The closest is 7/32 which is very hard to find at a local hardware store. I am going to order some online soon so I can try them next time. I used a #3 tapered pin. Photo #1 shows the #3 X 2inch long tapered pins. The large end of a # 3 tapered pin is always .219 no matter what the length is. This was my starting point. Photo #2 shows the pins finger tight. This is why I got the 2 inch long pins because I am going to use the middle part of the pin. (The part that is tapered in the .202 - .205 dia. range.) You can see on the jaws I decided to leave the “battle scars”. I could have fixed this with the belt sander but I thought it was better to leave the evidence from the previous workers that used this vise to do a job. Photo #3 -Two pins fit perfect and two pins needed a little diameter adjustment on the belt sander so they could be tight in both the jaw & casting. This is a slow trial and error fit up and I barely touched the belt with the pin as to remove only a little at a time. Sorry I have no photo but when the pins stuck up above the top of the jaws about ¼ inch, then I hammered in the rest of the way. I hammered until they were flush with the jaw. On one I stopped because the pin started to mushroom on the top. I stopped hammering and ground it flush with the jaw. Photo #4 & 5- shows underneath the jaw where I took a die grinder and carefully ground flush the rest of the pin that stuck down. In the end, the jaws are tight, the pins are tight, 3 of the 4 pins on the top of the jaws are flush and one is a little below the jaw. ARRGH .. I am so bummed I think it looks best with all 4 pins flush. I might do this one over next week. There must be a better way to do this. Of course I always had in the back of my mind don’t hammer too hard and crack the casting or jaw. That didn’t happen so I really have nothing to complain about.
Next post will be the beauty shots.
Take Care,
Greg
Final Step Jaw attachment
This was by far the most difficult part of this project. The goal is to attach the jaws so they are tight and both pins share the load. Each jaws has two .205 holes that mate up with two holes in the casting that seem to be about .202in. So I am assuming they left the factory with tapered pins. I have measured pins removed from other Chas Parkers and they seemed to be tapered. This vise however, had coiled spring pins, which I thought was a good idea. I don’t think they were the factory pins but I wanted to use them. Unfortunately I was unable to find coiled spring pins in this size. The closest is 7/32 which is very hard to find at a local hardware store. I am going to order some online soon so I can try them next time. I used a #3 tapered pin. Photo #1 shows the #3 X 2inch long tapered pins. The large end of a # 3 tapered pin is always .219 no matter what the length is. This was my starting point. Photo #2 shows the pins finger tight. This is why I got the 2 inch long pins because I am going to use the middle part of the pin. (The part that is tapered in the .202 - .205 dia. range.) You can see on the jaws I decided to leave the “battle scars”. I could have fixed this with the belt sander but I thought it was better to leave the evidence from the previous workers that used this vise to do a job. Photo #3 -Two pins fit perfect and two pins needed a little diameter adjustment on the belt sander so they could be tight in both the jaw & casting. This is a slow trial and error fit up and I barely touched the belt with the pin as to remove only a little at a time. Sorry I have no photo but when the pins stuck up above the top of the jaws about ¼ inch, then I hammered in the rest of the way. I hammered until they were flush with the jaw. On one I stopped because the pin started to mushroom on the top. I stopped hammering and ground it flush with the jaw. Photo #4 & 5- shows underneath the jaw where I took a die grinder and carefully ground flush the rest of the pin that stuck down. In the end, the jaws are tight, the pins are tight, 3 of the 4 pins on the top of the jaws are flush and one is a little below the jaw. ARRGH .. I am so bummed I think it looks best with all 4 pins flush. I might do this one over next week. There must be a better way to do this. Of course I always had in the back of my mind don’t hammer too hard and crack the casting or jaw. That didn’t happen so I really have nothing to complain about.
Next post will be the beauty shots.
Take Care,
Greg
Attachments
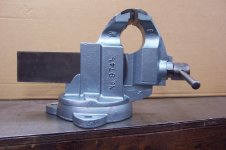
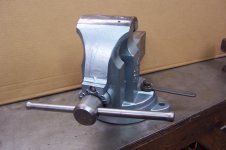
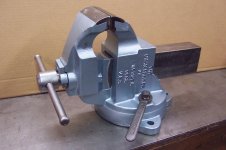
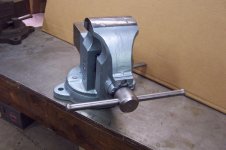
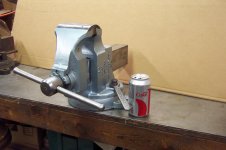
IT’S FINISHED!!!
Finally, the “after” Pictures.
Here are the specs on the vise:
Chas Parker 974 ½ Vise
Model: Parker Eclipse Machinist Vise
Jaws: 4 ½ inch
Weight: 77 lbs
Vise Opening: 7 inches
Color: 1966 Pontiac engine blue with Hammered dark bonze swivel handle. Lettering: Gloss black.
Lubrication: Anti seize compound
Backlash in main screw: about 30°
Application: This vise will be used on a bench in a home shop in about 2 years, until then it will be a decoration.
I hope you all enjoyed the thread! I enjoyed writing it!!
Thanks to all the people who post on “The Vises of Garage Journal” and other threads on vises. That was my inspiration to get addicted to vises!! ...and boy have I gotten addicted....
Greg
Finally, the “after” Pictures.
Here are the specs on the vise:
Chas Parker 974 ½ Vise
Model: Parker Eclipse Machinist Vise
Jaws: 4 ½ inch
Weight: 77 lbs
Vise Opening: 7 inches
Color: 1966 Pontiac engine blue with Hammered dark bonze swivel handle. Lettering: Gloss black.
Lubrication: Anti seize compound
Backlash in main screw: about 30°
Application: This vise will be used on a bench in a home shop in about 2 years, until then it will be a decoration.
I hope you all enjoyed the thread! I enjoyed writing it!!
Thanks to all the people who post on “The Vises of Garage Journal” and other threads on vises. That was my inspiration to get addicted to vises!! ...and boy have I gotten addicted....
Greg
Attachments

mrstrictlygm
Well-known member
- Joined
- Jul 3, 2011
- Messages
- 116
Nice vice and restoration. My dad's got a nice vintage vice collection that I took pictures of. I will be posting them on the "vices of garage journal" thread pretty soon. I see this vice you have is 77lbs. My dad has the same, Chas Parker vice but a much larger version. It is the biggest vice I have ever seen. It weighs an astonishing 185lbs. I remember when he called me over to help him move it into the basement. We had to take it apart because it was so heavy, and move it piece by piece. Unfortunatly I did not get any pictures of it, because it was in a very dark area of the basement with alot of stuff around it, but I took a look at it and it is a Chas Parker vice in excellent condition. I should have taken pics of it back when I helped him move it, but it was years ago before I even knew about Garage journal. My dad even has a vice that dates back to the cowboys era 1868 Buffalo, New York, it is awesome.
whelenfan
Well-known member
That is an awesome photo record of your resto! The vise came out great!
Josh Dekubber
Well-known member
This is very inspiring thank you for sharing. I'm on my way home now I just picked up this exact same vice.IT’S FINISHED!!!
Finally, the “after” Pictures.
Here are the specs on the vise:
Chas Parker 974 ½ Vise
Model: Parker Eclipse Machinist Vise
Jaws: 4 ½ inch
Weight: 77 lbs
Vise Opening: 7 inches
Color: 1966 Pontiac engine blue with Hammered dark bonze swivel handle. Lettering: Gloss black.
Lubrication: Anti seize compound
Backlash in main screw: about 30°
Application: This vise will be used on a bench in a home shop in about 2 years, until then it will be a decoration.
I hope you all enjoyed the thread! I enjoyed writing it!!
Thanks to all the people who post on “The Vises of Garage Journal” and other threads on vises. That was my inspiration to get addicted to vises!! ...and boy have I gotten addicted....
Greg