To avoid these ads, REGISTER NOW!

Questions on Restoring an old WT Drill Press

Skyline

Well-known member
Joined
Nov 11, 2008
Messages
3,586
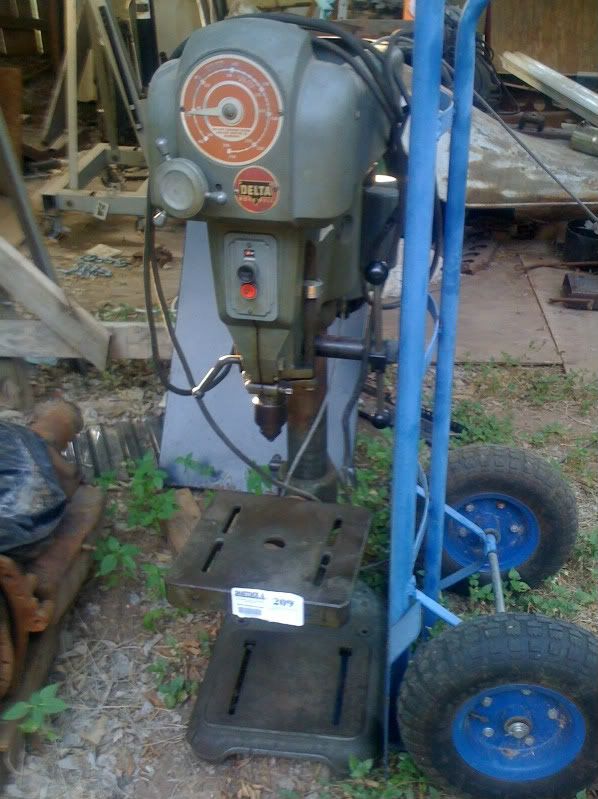
$200 later, this followed me home last night:

DSC02563.jpg

DSC02565.jpg

DSC02566.jpg

DSC02567.jpg


This drill press is 100% functional, and everything works properly. The spindle seems to have no slop, and it drills nice round holes. The speed control seems work properly, but makes quite a bit of belt/rubbing noise at the higher speeds. But I do plan to restore it to better cosmetic condition. I have a few questions:

Anyone know the model number?

Rough idea of the date of manufacture?

Best method for removing rust from the post? (Sandpaper???)

Plans for errant holes in table: I was going to first sand blast, then weld up the holes, then grind/sand it smooth. Anything wrong with this plan?

Best thing to apply to the post and tables to keep them from collecting surface rust down the road. (I assume applkication of some kind of oil...but wondering what's a good choice). My garage is unheated/uncooled, so humidity can be a little bit of a problem.

In the center of the feed handle on the right side is a knurled knob. At the moment, it seems to be frozen in place, (rotates when you rotate the feed arm). Is there some purpose to this knob other than as an alternate place to grab to control the feed other than the arm? (In other words...is it supposed to be locked in place, or is this supposed to adjust something?)
 
To avoid these ads, REGISTER NOW!

zruvalcaba

Well-known member
Joined
Oct 25, 2011
Messages
315
Location
San Diego, California
Very nice drill press you picked up there. I recently picked up a 15" Clausing and have been slowing restoring it. I'm sure others will chime in but I can tell you what I've been using so far. I bought some of those 3M ScotchBrite pads (not the ones you get from Home Depot) from my local tool and abrasive shop...they have fine, medium, and course pads...I've been using the medium on both the post and on the surfaces of the table and base. Put the pads in a sanding block and sand away with some light oil like WD40. Works really well. I initially went the Naval Jelly route but that just took way to long. The only issue is that the finish on the post will have a satin/dull finish to it instead of a shiny chrome type finish. I actually prefer the satin finish anyway. As a preservative, I just use Paste Wax. I'm by no means done with my restoration...this is just what I've done so far...experimenting mostly. To get the paint off, I was going to use Jasco paint stripper...then just use a scraper to scrape it off. Whatever is left over, I'll blast off in my cabinet, then degrease, prime, and paint. Sorry I can't be more help...that's just all I've done/experimented with so far.

Zak
 

Packard V8

Well-known member
Joined
Mar 16, 2009
Messages
7,380
Location
Spokane, WA
You need to go over to owwm.org and there will be everything you wanted to know about restoring DPs.

jack vines
 

-Brent-

Well-known member
Joined
Dec 23, 2009
Messages
4,709
Location
Utah
Nothing to add to what the other posters said, however, I wanted to comment that you've got a nice project. Having the two tables is a very handy option. I think I am going to look to do the same on my bigger DP.
 
Last edited:

Packard V8

Well-known member
Joined
Mar 16, 2009
Messages
7,380
Location
Spokane, WA
Having the two tables is a very handy option. I think I am going to look to do the same on my bigger DP.
Learn something every day. In fifty years, I've never seen a large DP with a table from a smaller DP added on it. I also can see several advantages to having a large and small table.

The smaller table makes the strongest possible shelf for storing the vise, drill index or whatever. It is also easier to raise and lower from quick small ops.

jack vines
 
OP
S

Skyline

Well-known member
Joined
Nov 11, 2008
Messages
3,586
On this drill press, the smaller upper table has no lip to catch oil, but is easily adjustable with a big lever, and has slots to bolt down a vise. The lower table is not so easily adjustable, (you need to loosen 2 big bolts on the back of the shaft...not to mention the thing is VERY heavy). Also, it does not have any holes or slots to bolt anything down. But it has a nice smooth machined surface, and a lip trench to catch chips and oil.

BTW, I found out today this drill press is made by Delta Rockwell. It was made about 1962 and is model 15-141. I don't know the history of the relationship between Walker Turner and Rockwell, but from what I was told, they stopped using the "Walker Turner Light Heavyweight" brand about 1963. So I gather this is a somewhat lighter edition of the main Walker Turner line, but this thing still weighs well over 200lbs.

As the head was set up about 5-6" below the top of the post, I wanted to raise the head....as soon as I loosened the handle I realized I made a mistake trying to do this by myself; I was not ready for how heavy that was.
 
Last edited:
OP
S

Skyline

Well-known member
Joined
Nov 11, 2008
Messages
3,586
I just took a closer look at the lower table..it definatelty does NOT belong on this drill press. It looks like it was designed for a drill press that had some sort of geared post, with a crank drive to raise and lower the table. That crank mechanism is missing...but you can see that it was once there. There are no gears on my post though.

But I do think it will be handy to have the second table...which is probably why it was installed in the first place, (this came out of a big machine shop).
 
To avoid these ads, REGISTER NOW!

Outlawmws

Well-known member
Joined
Aug 9, 2011
Messages
39,168
Location
The Badlands
I wouldn't fill with weld in that situation . Clean it well, and fill with JB weld, and block sand smooth. There are no structural worries, just the divots...
 

toddmcdong

Well-known member
Joined
Jan 10, 2010
Messages
45
Location
Austin, TX
I have a delta rockwell benchtop version of that DP. I think mine is mid 60s. It's funny to see that they just replaced the speed chart and name plate.

Mine doesn't have the knurled knob on the feed handle.


IMG_0545.jpg


I've only had it a couple months, but it's been a great drill press. Replacement belts go for $100-120 from delta and $60-80 from other suppliers.
 

Zeke

Well-known member
Joined
Aug 13, 2009
Messages
17,176
Location
Long Beach CA, the sewer by the sea.
On the shaft: I have used emory cloth on them and the finish looks good. If you will follow that with a Scotchbrite and some valve lapping compound going up and down, you will have a nice freshly ground looking surface. Of course, pitting will show if it's deep. Some have applied JB Weld to the surface and resanded, but I haven't seen any of those jobs close up.
 

chris fresh

Well-known member
Joined
Jan 10, 2011
Messages
1,519
Location
savannah ga
just to chime in, i have the same issue with my table.i have two lines of holes and i brought it to a friends machine shop yesturday to see it he could fill them and mill the surface,he said nope.he said it might be possible with a certain kind of rod,but it would still show,and the heat might bring trouble.out of all my drill presses,i've never hit the table on any of them.i keep a scrap piece of 2x6 to punch holes in.so the plan for right now is to just fill them with jb weld and then belt sand the whole table surface.

as for the column,i gave it to him to put in his big lathe and sand out,he'll probably use a scotch brite and wd-40 to if i had to guess it,then it's gonna get waxed.i'm picking it up in the morning,check my thread going on my clausing resto.there will be more pics posted tomorrow.
 

purevl

Well-known member
Joined
Apr 13, 2010
Messages
85
Location
South City, STL
Because no one else has mentioned it yet, for an "invisible" repair for the arc of shame on your table, you can drill the holes to uniform sizes, tap, insert a cast iron plug and grind flush. This is obviously pretty labour intensive, and it won't add much by way of structural soundness unless you flow a little silver solder or similar into the joint, but AFAIK it's the best way to make aesthetically pleasing repairs to holes in cast iron. If you don't care about how it looks, I personally would prefer a properly brazed repair on cast to arc welding it.
 
Last edited:

Outlawmws

Well-known member
Joined
Aug 9, 2011
Messages
39,168
Location
The Badlands
Because no one else has mentioned it yet, for an "invisible" repair for the arc of shame on your table, you can drill the holes to uniform sizes, tap, insert a cast iron plug and grind flush. This is obviously pretty labour intensive, and it won't add much by way of structural soundness unless you flow a little silver solder or similar into the joint, but AFAIK it's the best way to make aesthetically pleasing repairs to holes in cast iron. If you don't care about how it looks, I personally would prefer a properly brazed repair on cast to arc welding it.

DSC02567.jpg


Drilling and tapping plugs across this would seriously damage the structural integrity of the table even with the silver solder. And as was mentioned applying heat to it, even the lower heat of silver solder, will likely warp it further damaging it.

Right now its mostly a cosmetic defect. JB Weld can fill this and the color wont even be that far off.

I would not use a hand held belt sander on this top unless you have access to one large enough to place the whole table top on face down (Some head repair shops may have one that big used for quick cleanup of head surfaces.), as you are likely to dig gouges into the table. You want that surface dead flat and perpendicular to the drills quill/spindle.
 
To avoid these ads, REGISTER NOW!
Top Bottom