To avoid these ads, REGISTER NOW!

REED 204 (old Style) Vise Restoration

gregthor

Well-known member
Joined
Feb 24, 2010
Messages
267
Location
MICHIGAN
Dear Friends at Garage Journal,
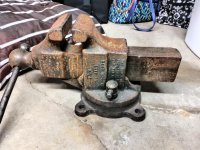
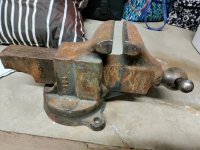
I have been on vacation so I decided to restore my Reed 204. Actually if you look close at the casting it looks like it has the thin outline of an R after the 204. I am not sure what the R means but for now I call this a 204. I picked it up last summer at a local auction. I believe it is a really old Reed. It has jaws that are machined or cast into the casting and not replaceable. Fortuniatly, the jaws still have a nice crosshatch. The only thing wrong with the vise is one of the handle end balls is missing so I will be doing some handle repair. The overall vise looks like it was made out of chocolate it is so rusty. No serious pitting just brown rust everywhere. Since I just did a thread on restoring a REED 105 S a few weeks ago I will focus on the differences of this older REED. I will mainly focus on disassembly and reassembly and skip most of the other steps since they are the same as the 105 S thread.
100_5816.jpg

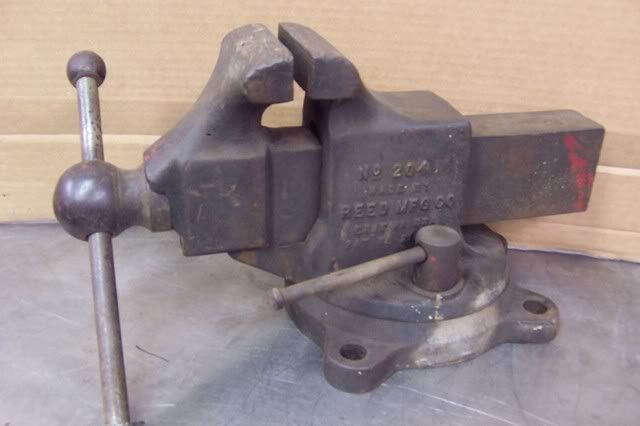
Here is a photo comparison with a newer REED 1C. Note the older one on the right does not have the split collar and the main screw has a totally different main screw end shape.
100_5817.jpg

To disassemble just unscrew the handle and the dynamic jaw comes right out. (Assuming there are no big burrs or dents on the slide ram)
100_5818.jpg

Turn over the dynamic jaw. There is a collar with a set screw that holds the main screw in the dynamic jaw. Remove the set screw and the main screw will come out.
100_5819.jpg

Another difference is the way the main nut is held in place in the static jaw.
100_5820.jpg

This model has a round cylinder with a set screw to hold the main screw in place.
To remove the cylinder, turn the static jaws over and knock out the cylinder with a punch and hammer.

100_5823.jpg

The cylinder with set screw looks like this
100_5824.jpg

Now all the parts go into the parts cleaning tank and then into the electrolysis tank. After cleaning, deburring, checking taped holes, priming, painting, lettering I will post the reassembly steps.
Greg
 
To avoid these ads, REGISTER NOW!
OP
G

gregthor

Well-known member
Joined
Feb 24, 2010
Messages
267
Location
MICHIGAN
Dear Friends at Garage Journal,
I finally got back to the Reed 204. It is time for assembly. But first I noticed that the top of the swivel had some ugly gouge marks so I hit the top with the belt sander.
100_5832-1.jpg

After a few minutes and about .025 inch removal the swivel looked like new.
100_5833-1.jpg

Here are all the parts painted and ready for assemble
100_5834-1.jpg

First I install the main nut. I tapped it in to make sure it bottomed out in the main casting.
100_5836-1.jpg

Next this little keeper goes in. Make sure the set screw is backed off
100_5837-1.jpg

Now tighten the set screw.
100_5839-1.jpg

Next the swivel bolt (anchor) is installed
100_5841-1.jpg

Next the base and nut is installed using my home made screw driver. Everything that moves is coated with anti seize lubricant.
100_5842-1.jpg

100_5845-1.jpg

Next comes the swivel handle. I always check the swivel operation and make sure the swivel works without any binding or rough spots.
100_5846-1.jpg

Now I check the dynamic jaw for smooth operation.
100_5848-1.jpg

Now lube the main screw and run it in & out to completely cover the threads in lube.
100_5850-1.jpg

Turn the dynamic jaw over and install the collar here. The screw is in too far in this photo so it would be backed out to install collar. Then make sure set screw engages into hole in main screw.
100_5852.jpg

After tightening the collar, the vise had a lot of play (backlash) so I measured the gap. It was about .084 inch.
100_5853.jpg

So I took a quick trip to the hardware store and bought some shims.
100_5859.jpg

I found a .062 shim worked best, I lubed it and installed it between the collar & casting. (The shim did not go where I measured the gap)
100_5860.jpg

The vise is all assembled now and has very little play. The operation is smooth.
I will do another thread on handle replacement later.
Greg
100_5862.jpg

100_5861.jpg

100_5863.jpg
 
OP
G

gregthor

Well-known member
Joined
Feb 24, 2010
Messages
267
Location
MICHIGAN
The "R" was missing so I didn't detail it. If you look real close you can see it might have been there at one time. I don't know if the R got knocked of the pattern at the foundry when it was cast or if it got ground off when the vise was in service. Is there such a vise as a Reed 204?
 

Carla

MEMBER EMERITUS
Joined
Nov 27, 2010
Messages
672
Hi, gregthor,

As a bit of 'trivia', what you have is what might be called a 'transition model' of Reed vise.

It has, as you see, the set-screw type of nut retainer, and the patent number marking for the 1938 patent for that design.

It has, however, the earlier style of front jaw, before the split-nut screw retainer was standardised for production.

In essence, its a mixture of early (the front jaw, main screw, and main screw nut), and later (the main body/back jaw, nut retainer) style parts. You'll notice that the main screw nut is cast iron, as was the early production, not the machined steel type of the later units.

Since there would have been some lead time in getting the patterns ready for the newer main body style, with the patent number on it, your vise couldn't have been built until some time after August of '38, when that patent number was issued.

From photos in the old ads, it would appear that the split-nut screw retainer went into production at same time, so, presumably, yours might have been assembled when 'using up' the stock of the earlier style front jaws.

Those details would tend to suggest that your vise was built in late 1938, or in 1939.

If anyone ever decides to do a 'type study' on Reed vises, as has been done on the Emmert patternmakers' vises, yours will have a interesting 'spot' in the type classifications.

If you mean to use this vise in your work, taking the time to fit a ball-thrust bearing between the thrust-face of the screw, and the front jaw, suitably re-positioning the retaining collar on the screw, will make the vise more convenient to use, as that removes the friction of the screw thrust face against the jaw, providing a more convenient 'feel' when clamping up the workpiece.

This is an 'old toolmakers' trick' from many years ago. Another 'old toolmakers' trick' is to dummy up improvised fixtures, to set the vise jaws up in a surface grinder, to grind the 'chequering' or 'knurling' down to a smooth, accurately flat finish, to avoid scars on workpieces. Thats a rather tedious job, to be sure as one has to clamp up the vise parts in the fixture, and adjust the parallelism on a surface plate, then transfer the fixture to the surface grinder, and carefully do the grind, to a 16 finish or so.

After grinding both jaws (in the case of Reed, Athol, and other makes with integral hard jaw faces), the vise has to be assembled, snugged-up, and checked for parallelism with feeler-gages. If the jaws are a few thou our of parallel, the error is noted, and one of the jaws is re-fixtured to compensate for the error, and re-ground. When correctly done, the vise will hold a .001 feeler-gage at either side of the jaws.

The 'shielded' ball thrust bearings are available from any good bearing supply house, in the 'Boston Nice' make. (and, yes, in theory, removing that friction could make it easier for a careless worker to over-torque the screw, so one must use 'common sense' in this respect)

cheers

Carla
 
OP
G

gregthor

Well-known member
Joined
Feb 24, 2010
Messages
267
Location
MICHIGAN
Hello,

Bluebolt- Thanks for the kind words

Carla -WOW Thanks for all the info!!!!! I just have one question.... Is your last name REED and did your Great Grandfather start the company???

How do you know all this about Reed's?? :bowdown:

I guess that was 2 questions...

Ok, 3 Questions - What is the purpose of the split in the retainer where the set screw goes. I assume it is some type of locking mechanism. When I took it apart, the set screw just backed right out so I didn't do anything to it when I reassembled it. Back in the day did they hit it with a chiesel to put a little tension on the set screw?

I made a new handle for this vise but maybe I should have spent more time preserving the old one. I am doing a thread on this handle replacement probably this weekend.

Anyways Thanks for all the info I really enjoyed reading it.
Greg
 

autopts

Well-known member
Joined
Jul 4, 2009
Messages
2,268
Hi, gregthor,

As a bit of 'trivia', what you have is what might be called a 'transition model' of Reed vise.

It has, as you see, the set-screw type of nut retainer, and the patent number marking for the 1938 patent for that design.

It has, however, the earlier style of front jaw, before the split-nut screw retainer was standardised for production.

In essence, its a mixture of early (the front jaw, main screw, and main screw nut), and later (the main body/back jaw, nut retainer) style parts. You'll notice that the main screw nut is cast iron, as was the early production, not the machined steel type of the later units.

Since there would have been some lead time in getting the patterns ready for the newer main body style, with the patent number on it, your vise couldn't have been built until some time after August of '38, when that patent number was issued.

From photos in the old ads, it would appear that the split-nut screw retainer went into production at same time, so, presumably, yours might have been assembled when 'using up' the stock of the earlier style front jaws.

Those details would tend to suggest that your vise was built in late 1938, or in 1939.

If anyone ever decides to do a 'type study' on Reed vises, as has been done on the Emmert patternmakers' vises, yours will have a interesting 'spot' in the type classifications.

If you mean to use this vise in your work, taking the time to fit a ball-thrust bearing between the thrust-face of the screw, and the front jaw, suitably re-positioning the retaining collar on the screw, will make the vise more convenient to use, as that removes the friction of the screw thrust face against the jaw, providing a more convenient 'feel' when clamping up the workpiece.

This is an 'old toolmakers' trick' from many years ago. Another 'old toolmakers' trick' is to dummy up improvised fixtures, to set the vise jaws up in a surface grinder, to grind the 'chequering' or 'knurling' down to a smooth, accurately flat finish, to avoid scars on workpieces. Thats a rather tedious job, to be sure as one has to clamp up the vise parts in the fixture, and adjust the parallelism on a surface plate, then transfer the fixture to the surface grinder, and carefully do the grind, to a 16 finish or so.

After grinding both jaws (in the case of Reed, Athol, and other makes with integral hard jaw faces), the vise has to be assembled, snugged-up, and checked for parallelism with feeler-gages. If the jaws are a few thou our of parallel, the error is noted, and one of the jaws is re-fixtured to compensate for the error, and re-ground. When correctly done, the vise will hold a .001 feeler-gage at either side of the jaws.

The 'shielded' ball thrust bearings are available from any good bearing supply house, in the 'Boston Nice' make. (and, yes, in theory, removing that friction could make it easier for a careless worker to over-torque the screw, so one must use 'common sense' in this respect)

cheers

Carla

Great info Carla, Imput like that is invalueable. Here's a 104 on a swivel, I believe this vise might have been made in the last few years Reed made vises. Question? Why would someone grind knurled jaws smooth on irreplacable jaws and not opt to used liners? Guys? Take note, liners will flatten the the tops of the knurls with heavy usage. After 5 years one of my liners fell off my Morgan and I noticed I had a very evenly worn jaw under it.

Reed104S.jpg
 

thundermug

Well-known member
Joined
Sep 10, 2012
Messages
1,173
Location
usa
Thanks for posting this tutorial. Time to clean up my Reed/Craftsman.

http://sphotos-b.**.fbcdn.net/hphotos-snc6/183897_605663913322_214273033_n.jpg
 
Last edited:
To avoid these ads, REGISTER NOW!

2glock40s

Active member
Joined
Oct 5, 2012
Messages
35
Location
Louisville, KY
Very nice! I just posted pics of my Reed and can only hope that mine turns out half as good as yours. What type/color paint did you use? Not sure what the original color of mine was but looks like black and possibly some red on it although that may just be stray paint from use.
 
OP
G

gregthor

Well-known member
Joined
Feb 24, 2010
Messages
267
Location
MICHIGAN
Thanks for the kind words guys.

Mine was so rusty it was impossible to tell original color. Here is the paint I used
100_6219.jpg


The rustolem is their silver color. I prefer this paint over others because it just seems really durable and holds up to alot of shop chemicals (brake cleaner, mineral spirits, etc)
The primer is what the local CarQuest has in stock and works well for me. Actually, the self ectching is not necessary on a electrolysised or sand blasted part but I just like the primer. The lettering is testors from a hobby shop. Hope that helps.
I just realized I never put a finished picture of the vise on this thread so here it is.
100_5906.jpg


I did a separate thread on making the handle for this Reed. It is here if you haven't seen it before.
http://www.garagejournal.com/forum/showthread.php?t=134045

Greg
 

Catalyze

Well-known member
Joined
Feb 7, 2011
Messages
1,369
Location
New Mexico
I always liked that Reed of yours Greg!!
I have another 204 under the bench to do......would you stop by and take it apart for me?
Craig
 
OP
G

gregthor

Well-known member
Joined
Feb 24, 2010
Messages
267
Location
MICHIGAN
Thanks Catalyze, I would love to do another Reed. Maybe you can take a side trip and drop it off when you move.
Greg
 

Aaron11588

New member
Joined
Apr 20, 2021
Messages
1
Location
MO
Can anyone tell me a little. More about this Vintage Reed 204 with a patent date of 1802? I know nothing about them and can't find one anywhere else!
 

Attachments

  • IMG_20210419_185957.jpg
    IMG_20210419_185957.jpg
    155.7 KB · Views: 47
  • IMG_20210419_185937.jpg
    IMG_20210419_185937.jpg
    150.9 KB · Views: 46

Shiftless

Well-known member
Joined
Mar 9, 2014
Messages
14,543
Location
East Bay SFO
Can anyone tell me a little. More about this Vintage Reed 204 with a patent date of 1802? I know nothing about them and can't find one anywhere else!

Thanks for reviving this ancient thread. It includes a wonderful post from Carla who is no longer with us. RIP

BTW, Reed Vise Co. was started in 1896 so if your vise is marked with a patent date of 1802, there must be a casting error.
 

exmaxima1

Well-known member
Joined
Jun 25, 2011
Messages
6,341
Location
Midwest
Can anyone tell me a little. More about this Vintage Reed 204 with a patent date of 1802? I know nothing about them and can't find one anywhere else!

Looks like the slide is badly damaged. A split would not be so bad, but that missing chunk certainly limits the travel. I hope you didn't pay too much for it.
 
To avoid these ads, REGISTER NOW!
Top Bottom