To avoid these ads, REGISTER NOW!

DIY tool for replacing VW rear axle bushings - PICS

SMKS

Well-known member
Joined
Feb 14, 2010
Messages
5,832
Location
USA, planet Earth
I'm in the process of replacing the rear axle bushings on my girlfriend's 2000 VW Beetle. I made this post for another forum. I thought people here might enjoy seeing my cobbled-together DIY tool. It works really well and made replacing the bushings really easy.


=========

I’m in the process of replacing the rear axle bushings on my girlfriend’s 2000 Beetle. I thought I’d show the tool I used to press in the in the bushings. It appears it’s similar to some tools other members have cobbled together.


Here’s what you’ll need to build the tool:
- 4 blocks of 2x4. Mine are about 4-5” long.
- 1-3/4” hole saw. NOTE - this was the size I needed for Meyle bushings. If you use a different bushing, you may need a different size hole saw.
- ⅜” threaded rod. My local hardware store had foot long pieces.
- Bolts and washers for the threaded rod
- Wrenches to turn the bolts
Pic1.jpg


To make the tool:
-Drill a ⅜” hole into two of the blocks
-Drill a hole in the other two blocks with the hole saw. My pieces of 2x4 were too thick for the saw to go all the way through. So, I drilled a small pilot hole then used the hole saw from each side to make it all the way through the block.

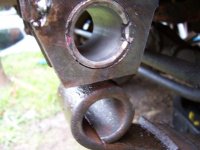
You’ll see that the central support of the bushing sticks out farther than the body on each side of the bushing. The holes allow the block to push on the body of the bushing.
Pic2.jpg


Here’s how it will go together. The outside piece will be a solid block.
Pic3.jpg


I pulled my rear axle because I couldn’t get the bushings in. If I had built this tool first, I probably wouldn’t have had to pull the axle. You could use thinner wood pieces, to make the tool smaller. That may make the tool more useable when the axle is still on the car.

Position the bushing and tool on the axle. You’ll need a solid block on the side pulling against the axle. The part pulling against the bushing will have a solid block and a hole block. Start tightening the bolt. I put the bushing in the freezer overnight and used lithium grease. The Meyle bushings are out of round. I used a file to grind a beveled edge on the end of the bushing to help guide it in. It might take several tries to get the bushing started without it popping out.
Pic4.jpg


After a while, you won’t be able to press the bushing in any farther. That’s because the bushing support has gone far enough that it is now bumping against the solid block on the other side.
Pic5.jpg


You can see the bushing has pressed in enough that the end is now even with the other side of the housing.
Pic6.jpg


Add a block with a hole to that side. Try to position it so that the end of the bushing will go into the hole in the block.
Pic7.jpg


Keep tightening the bolt. If you have it positioned properly, the end of the bushing will go into the hole. You can then tighten the bolt until the bushing is pressed in all the way.
Pic8.jpg


Additional notes:
-I’m not too impressed with the Meyle bushings. These are part number 1J0501541C. I bought mine at NAPA, but you can get them at most of the online parts dealers. These don’t seem very heavy duty. The housing is plastic and mine were significantly out of round. If you looked at them from the end, they were an oval, not round. Other members have bought the Genuine VW part, which has been updated and is beefier. If I had to do it over again, I would have bought the VW part. It’s more expensive, but appears sturdier.
 
To avoid these ads, REGISTER NOW!

pipsters

Well-known member
Joined
Sep 1, 2010
Messages
4,899
Location
USA
That's pretty neat and cheap. Out of curiosity how did you get the original bushing out of the axle?
 

blind

Well-known member
Joined
Oct 24, 2010
Messages
216
Location
KY
I did the same thing with some steel scrap on my mk3 golf. The bushing is a little different, but I cut a slit in mine with a sawzall and knocked it out with a chisel.
 
OP
S

SMKS

Well-known member
Joined
Feb 14, 2010
Messages
5,832
Location
USA, planet Earth
I drilled several holes in the rubber, then knocked out the center part with a hammer. Then I used chisels to hammer out the metal housing.

The new bushings have a plastic housing, so if I ever do this job again they should come out more easily.
 
Last edited:

david594

Well-known member
Joined
Jul 8, 2011
Messages
101
I did the same job a few years ago. Bushings go in a lot easier if you use a pneumatic impact. :)

DSC_0016.JPG
 
OP
S

SMKS

Well-known member
Joined
Feb 14, 2010
Messages
5,832
Location
USA, planet Earth
I'm about to start to rebuild the front end on my 96 Jetta, how long do the rear bushing last?

I don't know if 96 has a similar rear setup. I think the Beetle and the MKIV cars have a very similar rear suspension, but I'm not sure about the MKIII.

My GF's Beetle has 110k miles. The axle bushings were loose, but not so bad that the axle was rattling. But, the rear tires were wearing more on the inside edge. Replacing these should help that problem.

VW Vortex has a good DIY for MKIV cars.
 

blind

Well-known member
Joined
Oct 24, 2010
Messages
216
Location
KY
I didn't realize there was any vw love on this site. One person speaks up and we all show up.
The mk3's are pretty much the same. It's the same process to change. I did my mk3 at 100k miles. I didn't realize how bad they were until the new ones were in. The old ones made it feel like the car had rear steering but that went away with the new ones.
 

srmofo

Well-known member
Joined
Oct 15, 2009
Messages
6,161
Location
SW ohio
I use my ball joint press to do those. Good job on the design though, simple and effective.
 

SCscoutguy

Well-known member
Joined
Feb 23, 2010
Messages
2,229
Location
South Carolina
I use my ball joint press to do those. Good job on the design though, simple and effective.
Yea I would wager that most people just use a ball joint press. I use mine all the time for bushings.
 

Attachments

  • bushings018am8.jpg
    bushings018am8.jpg
    130.1 KB · Views: 118
  • bushings021da7.jpg
    bushings021da7.jpg
    133.4 KB · Views: 104
  • bushings023lw8.jpg
    bushings023lw8.jpg
    102.7 KB · Views: 99
  • bushings024yr9.jpg
    bushings024yr9.jpg
    101.8 KB · Views: 88

Rico.

Well-known member
Joined
May 28, 2009
Messages
1,330
Location
England
I drilled several holes in the rubber, then knocked out the center part with a hammer. Then I used chisels to hammer out the metal housing.

An even easier way to remove bushes is to use two pieces from your trusty
socket set and a vice if it's practical to do so... Use a large socket as a spacer
so the old bush has somewhere to go, and a small socket that's only just
small enough to fit inside the piece you are removing the bush from... I stole a
pic I found on the net to help me illustrate..... Then put all three in a line on a
vice and start winding..... :thumbup:

 
OP
S

SMKS

Well-known member
Joined
Feb 14, 2010
Messages
5,832
Location
USA, planet Earth
I thought about that, but it's not practical in this situation. The bushing is about 3" in diameter and the axle weighs at least 75 lbs.

An even easier way to remove bushes is to use two pieces from your trusty
socket set and a vice if it's practical to do so... Use a large socket as a spacer
so the old bush has somewhere to go, and a small socket that's only just
small enough to fit inside the piece you are removing the bush from... I stole a
pic I found on the net to help me illustrate..... Then put all three in a line on a
vice and start winding..... :thumbup:


mtkst19

Well-known member
Joined
Sep 20, 2009
Messages
1,248
Location
blitzburgh pa
Just a heads up for you vw./audi guys. snap on is the distributor for their tools. it can be made by a german company, but snappy sells it stateside it appears. it is generally 1/2 price compared baum tools and other german tool sellers. i have ordered a few specialty tools off them already. i think they were all mantra made.

http://vw.snapon.com/Home.aspx
 

cotjocky

Well-known member
Joined
Nov 21, 2011
Messages
392
Just a heads up for you vw./audi guys. snap on is the distributor for their tools. it can be made by a german company, but snappy sells it stateside it appears. it is generally 1/2 price compared baum tools and other german tool sellers. i have ordered a few specialty tools off them already. i think they were all mantra made.

http://vw.snapon.com/Home.aspx

Thanks for that link!

Most of the tools I glanced at on that page appeared to be Hazet. I'm guessing it's a mix of makers though.
 
OP
S

SMKS

Well-known member
Joined
Feb 14, 2010
Messages
5,832
Location
USA, planet Earth
Just a side note for any of the Euro car people here.

I'm going to avoid Meyle parts in the future. The rear bushings I used weren't impressive and didn't have a country of origin on the package.

Also, before I started this project I ordered a Meyle bushing set for the front control arms. They arrived yesterday and they're all made in China. :mad:
I wouldn't have ordered them if I had known they would be made in China. It's my fault for not asking the company I bought them from. I got a good deal, so I'll be using them, but I'm not too pleased.

The country of origin was just a little sticker added to the packaging. Some of the stickers had already fallen off, so a couple of the parts were missing COO info. The Meyle label itself didn't have any COO info.

I'm guessing the rear axle bushings were also made in China, but the stickers fell off.
 
Last edited:

cotjocky

Well-known member
Joined
Nov 21, 2011
Messages
392
Just a side note for any of the Euro car people here.

I'm going to avoid Meyle parts in the future. The rear bushings I used weren't impressive and didn't have a country of origin on the package.

Also, before I started this project I ordered a Meyle bushing set for the front control arms. They arrived yesterday and they're all made in China. :mad:
I wouldn't have ordered them if I had known they would be made in China. It's my fault for not asking the company I bought them from. I got a good deal, so I'll be using them, but I'm not too pleased.

The country of origin was just a little sticker added to the packaging. Some of the stickers had already fallen off, so a couple of the parts were missing COO info. The Meyle label itself didn't have any COO info.

I'm guessing the rear axle bushings were also made in China, but the stickers fell off.

There is a "Foreign Car Parts Store" about 40 miles from me. I worked there as a young man for about a year. You can get all kind of VW aircooled and other odd Foreign parts there. He stocks a lot of stuff which is nice.

I bought a CV Boot for my 2006 Jetta about a month ago. It was a Meyle branded item. The COO sticker on it was Thailand. The quality of the boot was no where near that of the factory boot. It didn't seem like a good fit either. It would have been a stretch to put it on and it was more of a conventional "rubbery" material than the "hard plastic" of the original boot. I opted to return the Meyle and buy one from the dealership. It was a little more than double the cost, but I was a lot happier with it.

My friend bought a couple brake light switches for his 2003 Mexican Beetle a couple months back. They were Meyle branded and had COO stickers of China. They have worked fine so far.

The stickers on both were on the box, not marked on the parts themselves.
 
To avoid these ads, REGISTER NOW!

Hlidskjalf

Well-known member
Joined
Apr 1, 2010
Messages
307
Location
Toronto
This is what I ended up doing with my Corrado rear axle. Pulling in the bushing with the threaded rod was twisting and breaking the rod. I had to use a friend's large press.

bushingpress3.jpg

bushingpress1.jpg

bushinginstalled.jpg
 

mtkst19

Well-known member
Joined
Sep 20, 2009
Messages
1,248
Location
blitzburgh pa
meyle is actually a good mid range part choice. those bushings cost 12 as opposed to 38 at the dealer. i generally sell them for 24ish range each. i have used them on at least 15 cars w/o issues. the control arm bushings i have not done a whole lot of as most times i run into bent arms that we just replace whole assembly. i think i have done 3 total w/ their bushings. again, bushings are cheap-- cost under 6 each for front and rear a piece. list is 30 range. sell it for around half of list per bushing.

their brake rotors are actually good too. come coated like zimmermans. again, a good mid range choice that does not warp in a month or rust out like cheap rotors. i pair them w/ pagid or textar pads for my "base" cheap brake option.

meyle is a german company, yet they make stuff all over.

http://www.meyle.com/EN/Wulf-Gaertner-Autoparts/History.html
 
OP
S

SMKS

Well-known member
Joined
Feb 14, 2010
Messages
5,832
Location
USA, planet Earth
Interesting to see that you all remove the whole axle, i've always done them with the axle still attached. (On one side.)

I was hoping not to have to pull the axle, but I could not get the bushings in. As I said before, the Meyle bushings were significantly out of round, which made it a little more difficult.

If I had built this tool earlier, I wouldn't have had to pull the axle.
 

david594

Well-known member
Joined
Jul 8, 2011
Messages
101
I dropped mine so I could cut off the shields behind the brake rotors. I was going to larger rotors and the job just seemed easier with the whole thing off the car. Also gave me a chance to sand a little rust off and throw some new paint on it.

Although to be fair I have a Shine suspension on the car, so the rear springs are so short that I don't need to use a spring compressor the R&R them which saves a fair amount of time when dropping the rear axle.
 

david594

Well-known member
Joined
Jul 8, 2011
Messages
101
256mm vented rears? I have a set of those waiting to go on my car. want to get a whole TT front subframe and struts, as well as 312mm front discs.

Yup. 256mm rear and 312mm front. Stock subframe but I do have the TT steering knuckles and control arms(which I drilled and tapped to work with the stock swaybar). Shine springs and Bilstein HD's
 

petee_c

Well-known member
Joined
Oct 4, 2010
Messages
3,032
Location
KW area, Ontario CANADA
Great to see a GJ'r do this. Been to vwvortex a lot for info. Do you think this would work any better using 3/4 plywood. I'm thinking thinner might be better if attempting it with the axle in place on a midrise lift.

Peter
 
OP
S

SMKS

Well-known member
Joined
Feb 14, 2010
Messages
5,832
Location
USA, planet Earth
Do you think this would work any better using 3/4 plywood. I'm thinking thinner might be better if attempting it with the axle in place on a midrise lift.

It would probably be better.

There are a lot of ways to improve this design. In fact, even calling this a "design" is being charitable, because this is a cobbled-together piece of garbage I created in one day.

I would encourage you to improve this piece of junk and share with us how you do it.
 
Last edited:

petee_c

Well-known member
Joined
Oct 4, 2010
Messages
3,032
Location
KW area, Ontario CANADA
I'm attempting this job at the moment. Having problems disconnecting the brake line from the axle so I can lower the rear axle enough to get at the bushing. I am assuming the nut stays with the solid brake line? I need to disconnect the short flex hose between the body of the Jetta and the rear axle.

I was able to loosen the 11mm nut, but the solid line wants to turn with the nut which probably isn't good. Any hints?

Thanks
Peter
 

david594

Well-known member
Joined
Jul 8, 2011
Messages
101
No hints here. But I trashed one of the solid lines on the rear axle doing mine and had to purchase a replacement.

Good luck!
 

petee_c

Well-known member
Joined
Oct 4, 2010
Messages
3,032
Location
KW area, Ontario CANADA
I used scrap plywood to make my tool. It worked fine for the 1st bushing, but the plywood started to compress on the 2nd bushing with about 3/4" left to pull through. I had to use some scrap 2x4 material cut to 3.5x3.5" to spread the compression load further. This worked like a charm.

I did use 7/16" rod, cause that was the biggest that would fit thru the bushing. I also used a coupler (looks like a long nut - far right on the attached pic), to prevent stretching of the thread. I had 3 nuts locked on the one end of the rod. I put a couple drops of motor oil on the threads to help decrease friction of the nut turning. There is a 2 1/8"(?) hole (same size as for a door knob) cut into the center of the inner most pieces of plywood to receive the metal inner collar of the bushing.

The pieces of plywood were laminated together with carpenter's glue and clamped for about 1 hr. I didn't actuall press with them until the next day.

If you look on the Left hand side of the tool, the 2 stack of plywood has some cedar shims glued in place to mimic the ramp of rubber on the edge of the collar. I don't think this is necessary, because as you crank down on the tool and bushing, the little rubber lip on the bushing pretty much gets squished to oblivion.

My local indy mechanic suggested dish soap as lubricant.

Future improvements for the next guy.
I made mine with left over 1/2" plywood. I might suggest 5/8" or 3/4" have a couple extra squares of 1/2" plywood pieces ready to beef up the press if you hear a lot of cracking.

- cut off the corners of the squares to turn it into a octagon (stop sign shape). it would help to clear the brake lines if you are doing this with the axle still attached.

- do not attempt to remove the solid brake lines from the flex hose if they are in good condition, and your car is more than 10 yrs old. The solid line will want to turn with the nut, and cause a crimp. A replacement line that goes down the trailing arm is about $40-50.

- the job can be done without removing the axle from the vehicle. remove the 4 brake hose clips from the flex hose just in front of the axle and massage the solid brake line through the 'bung' to get enough clearance to lower the axle.

I've got to replace the Passenger side rear brake hose tonight, bleed that caliper and I'm almost done 4 days later.


I'll take more pics of the tool once I get the car button'd up.
Peter
 

Attachments

  • bushing tool.jpg
    bushing tool.jpg
    124.8 KB · Views: 66

cb900f

New member
Joined
Jul 15, 2017
Messages
2
How did you remove old silentblock?
I have to replace those of my MKIII golf, back deck.
Greetings
 
Last edited:

PFSard

Well-known member
Joined
Sep 12, 2013
Messages
2,423
Location
Mesa, AZ
How did you remove old silentblock?
I have to replace those of my MKIII golf, back deck.
Greetings

If you don't get a response, you might send a PM to whomever you are asking for a response. This thread is 4+ years old.
 
To avoid these ads, REGISTER NOW!
Top Bottom