To avoid these ads, REGISTER NOW!

Modifications to the HF 4 and 5 drawer service carts - what changes have you made?

ndnchf

Well-known member
Joined
Jan 9, 2012
Messages
1,556
Location
Fredericksburg, Virginia
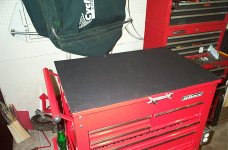
There have been several recent threads related to the HF service carts; reviews, how you've organized them, where to get coupons etc. Scattered in these I've seen a couple modifications. I thought it would be interesting to start a thread to capture the changes, improvements or other modifications you've made to your service cart. What have you done to make it fit your needs or character? I've done a couple things to mine, but look forward to seeing what you guys have done and maybe cherry pick a few of them for my own use.

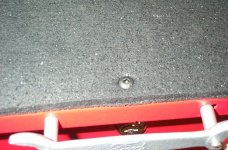
I've done two things to mine so far. First, while not an original idea, I replaced the lid handle with an old Ford script wrench. Bead blasted it and painted it hammered silver.

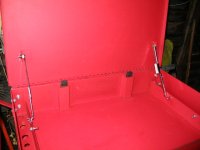
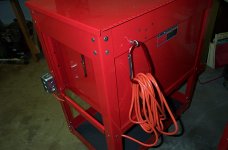
Second, I added a 115v outlet box with 25' extension cord to the cart. The outlet box is bolted to the lower right side. I added an eye bolt and large carbiner to the back of the chest to hold the cord. I'm often running around looking for an extension cord and it never seems to be where I left it. Now I have one ready to use whenever I'm working near the cart. I can charge my battery operated tools, use a trouble light, plug in a drill, radio or coffee warmer etc. I think it will be very useful.

Now its your turn - what changes have you made to your service cart?
 

Attachments

  • P1002119.jpg
    P1002119.jpg
    96 KB · Views: 7,941
  • P1002121.jpg
    P1002121.jpg
    96 KB · Views: 7,696
  • P1002122.jpg
    P1002122.jpg
    96 KB · Views: 8,215
  • P1002124.jpg
    P1002124.jpg
    96 KB · Views: 8,283
To avoid these ads, REGISTER NOW!

jjjrmx5

Well-known member
Joined
Dec 30, 2010
Messages
3,431
Location
Cincinnati, OH
5 dwr.

Sanded and then clear coated the crinkle coat pink/maroon paint with DuPont clear. Body shop dust and meatal shavings/grinding dust is not the friend of crinkle coat paint I found out quickly. LOL.

Ripped out the older style HF lid struts that fail yearly and are not warrantied.

Replaced with Snap-On service cart lock hinges and nylon shims to be oh so easy and reliable with an easier flip lid into service mode action to boot. Best $10 evah for Snap-On quality parts.

Added ribbed rubber runners as dwr liners on top of the HF stuff to handle heavy tools or highly used tools due to liner damage.

I just need a US General badge now as a co-worker long ago pried it off and they do not sell them as parts. Just want to get it back to nice.

Lock tumbler is next unless I sell the damn thing off for a new shiney gloss red version.
I hate that HF faux pinkish redish maroonish crapish color. :( :lol:
 
Last edited:

m_hatcher

Well-known member
Joined
Jan 22, 2012
Messages
473
5 dwr.

Sanded and then clear coated the crinkle coat pink/maroon paint with DuPont clear. Body shop dust and meatal shavings/grinding dust is not the friend of crinkle coat paint I found out quickly. LOL.

Ripped out the older style HF lid struts that fail yearly and are not warrantied.

Replaced with Snap-On service cart lock hinges and nylon shims to be oh so easy and reliable with an easier flip lid into service mode action to boot. Best $10 evah for Snap-On quality parts.

Added ribbed rubber runners as dwr liners on top of the HF stuff to handle heavy tools or highly used tools due to liner damage.

I just need a US General badge now as a co-worker long ago pried it off and they do not sell them as parts. Just want to get it back to nice.

Lock tumbler is next unless I sell the damn thing off for a new shiney gloss red version.
I hate that HF faux pinkish redish maroonish crapish color. :( :lol:

I got a US General badge from a 4 drawer cart from HF if you want to pay shipping you can have it. PM me
 

Ocho

Well-known member
Joined
Jun 16, 2010
Messages
314
Location
DFW, Texas
I slit a couple of short pieces of fuel hose and put them over the front edge to act as buffers for the lid.
 
OP
N

ndnchf

Well-known member
Joined
Jan 9, 2012
Messages
1,556
Location
Fredericksburg, Virginia
Replaced with Snap-On service cart lock hinges and nylon shims to be oh so easy and reliable with an easier flip lid into service mode action to boot. Best $10 evah for Snap-On quality parts.

That's one I'm going to do. The stuts on mine are still ok, but I know its just a matter of time.
 

cderalow

Well-known member
Joined
Nov 13, 2011
Messages
1,326
Location
Potomac, MD
I added the HF magnetic glove holder to the inside of the lid. So when I open it I can always find the gloves.

6853727691_361a67461a.jpg


Will probably paint the drawer fronts black eventually ang get a different handle.

edit: I've actually added two things to the above list

a quad outlet on extension cord along with the eye & hook similar to someone else, and the ernst screwdriver rails to one of the drawers (riveted in place)

6853726847_fdfdba9c38.jpg

6853727317_bb7779d2c3.jpg
 
Last edited:
OP
N

ndnchf

Well-known member
Joined
Jan 9, 2012
Messages
1,556
Location
Fredericksburg, Virginia
I just went to the Snap-On parts website to order the lid hinge set. Turns out they are now out of stock on them :sad: I guess a lot of you guys have been ordering them already. I'll check back perodically, hopefullly they'll get more in soon.
Here's a link to the parts page:

http://buy1.snapon.com/catalog/parts/pro_det.asp?Item_id=73613&group_id=19698&test=Roll+Cart%2C+Locking+Flip-Top%2C+4+Locking+Drawers%2C+Screwdriver+Compartment%2C+Red%3B%240.00%3BKRBC8T%3B73613

Its: #15 KRBC8T9 1 Hinge, Clip & Pin Set $9.15
 

cabranch47

Well-known member
Joined
Jun 8, 2011
Messages
103
Location
Louisiana
I use my 5 drawer for welding supplies/equipment. Added a 3" wide X 1/8" thick piece of sheet metal across the legs below the box to hang my angle grinders on, works great. I use the "screwdriver" compartments to store
4 1/2" grinding wheels, flap disc. Installed 2" bolts from the outside, at appropriate distances to keep the discs seperated and in in order. Cut the locking tabs off under the lid so I can open the drawers without having to open the lid. Going to add a receptacle and extension cord. Great cart for the money.
 

veesmack323

Member
Joined
Feb 1, 2012
Messages
24
I use my 5 drawer for welding supplies/equipment. Added a 3" wide X 1/8" thick piece of sheet metal across the legs below the box to hang my angle grinders on, works great. I use the "screwdriver" compartments to store
4 1/2" grinding wheels, flap disc. Installed 2" bolts from the outside, at appropriate distances to keep the discs seperated and in in order. Cut the locking tabs off under the lid so I can open the drawers without having to open the lid. Going to add a receptacle and extension cord. Great cart for the money.

I was actually thinking of doing the same thing. I was also going to fab up a bottle rack and weld it to the cart. Do you know if a smaller MIG machine (MM180) would fit on the bottom of the cart?
 
OP
N

ndnchf

Well-known member
Joined
Jan 9, 2012
Messages
1,556
Location
Fredericksburg, Virginia
I was actually thinking of doing the same thing. I was also going to fab up a bottle rack and weld it to the cart. Do you know if a smaller MIG machine (MM180) would fit on the bottom of the cart?

I just measured my Lincoln SP-135 Plus MIG, its about 15" tall including the handle on top. The bottom of the cart is about 15" tall, but only about 12" at the edge, so you'd have to turn the MIG on its side, then stand it up. It might just fit. If you took the plastic handle off the MIG, I think it would fit. But it all depends on the MIG you select.
 

ElectroLight

Well-known member
Joined
Jan 5, 2011
Messages
494
Location
Rockville, MD
I've been thinking of starting this thread for some time, subscribed! So, I have the HF 5-drawer and I added a small side cabinet, 2200VA APC UPS, articulating lamp, outlet strip and modded the aerosol tray to allow it to hold the jump box. Man, this thing does weigh a ton these days! It is kinda cool to have a self-powered service cart. I see others have disabled the top/drawer latch system, i think i'm going to disable that functionality too. It never fails, **** piled on the lid and need a tool from the drawer... It would be nice to fab up a way to be able to disable/enable the lid/drawer latch feature on demand. I'll snap some pics of my cart and post um up this weekend.
 

Vividlyvintage

Well-known member
Joined
Dec 25, 2011
Messages
128
I just dont shut the drawer all the way in. and the slide locks on the front click once and keep the drawer from opening but doesnt lock. but it would be nice to have an optional on/off system.
 
OP
N

ndnchf

Well-known member
Joined
Jan 9, 2012
Messages
1,556
Location
Fredericksburg, Virginia
A lot of great ideas here, keep 'em coming! And please post photos of your mods; as they ssy, a picture speaks a thousands words.

One thing I'd like to do is add a tough rubber mat to the lid. I've looked at several stores for something suitable, but have yet to find something I like. I have a couple different tool drawer liners, but these are all lightweight foam or soft rubber. I also have a roll of black ribbed stair runner, but that is more like vinyl and the ribs would make it hard to clean. The closest material I've seen to what I'd like is the tough rubber bed mat in my Ford F-150 pickup. I dont really need it that thick, but I like the tough material its made from. Anybody have an idea where to find something suitable without spending a fortune?
 

KenS

Well-known member
Joined
Oct 21, 2007
Messages
726
Anybody have an idea where to find something suitable without spending a fortune?

Tractor Supply has rubberized bailer (conveyor) belting on a large roll that they will cut to size for about $3 a foot. You can also get conveyor belting at industrial supply houses. It's relatively thin and flat, extremely tough and durable -- and very inexpensive.
 
OP
N

ndnchf

Well-known member
Joined
Jan 9, 2012
Messages
1,556
Location
Fredericksburg, Virginia
Tractor Supply has rubberized bailer (conveyor) belting on a large roll that they will cut to size for about $3 a foot. You can also get conveyor belting at industrial supply houses. It's relatively thin and flat, extremely tough and durable -- and very inexpensive.

I hadn't thought of that, thanks. There's a TSC store in town, looks like I need to take a ride over there :D
 
To avoid these ads, REGISTER NOW!
OP
N

ndnchf

Well-known member
Joined
Jan 9, 2012
Messages
1,556
Location
Fredericksburg, Virginia
The other question is - how best to attach the rubber pad to the lid? Screws, glue? I'm thinking that if the rubber is pretty firm and stiff, 4 screws, one 1 at each corner would work.

Ideas?
 

jjjrmx5

Well-known member
Joined
Dec 30, 2010
Messages
3,431
Location
Cincinnati, OH
The other question is - how best to attach the rubber pad to the lid? Screws, glue? I'm thinking that if the rubber is pretty firm and stiff, 4 screws, one 1 at each corner would work.

Ideas?

I picked up a black rubber "welcome mat" that had only a minimal pattern on it from Target and cut it to size.

For attachement, I have used both 3M spray trim adhesive (in the spray can) and 3M adhesive trim tape.

If mat is floppy, I'd suggest the spray adhesive. Mask cart lid to mat size, then spray both lid and back side of mat. Let set up like contact cement and then apply.

Brush on contact cement will also work.

If the mat is ridgid, then buy a roll of the grey with the red backer 3M trim adhesive tape (that you put car emblems and mouldings on with.) Then just put it on back side of mat along outer edge and a few strips in the middle, then apply. If mat is ridgid, when lid is up it won't pucker.

Both 3M heavy duty Spray adhesive and contact cement can be found at Lowes. Trim tape at NAPA or even Walmart.

As for screws--no way for me. No need to drill if you don't have to.

For my yellow snap-on service cart, I went to a tint shop and bought a cut to fit piece of thick Clear Bra (like on the front end of cars to prevent chips) and then applied it to the lid so as to not hide the yellow I like so much .

Good luck.
 

Vividlyvintage

Well-known member
Joined
Dec 25, 2011
Messages
128
1/4 inch size bolts with flat washers spaced every 6 inches around the edges, with rubber cement under the bottom of the rubber mat.. Just a thought. Not sure how well that would work though
Though you could use the bolts that have nuts on them on the bottom of the lid for other bracketry for other things such as a bolted down screw driver holder, or anything else that you can bolt down or make a bracket for that uses the backside of the nuts and bolts that are anchoring the mat down.
 
Last edited:

ElectroLight

Well-known member
Joined
Jan 5, 2011
Messages
494
Location
Rockville, MD
I used the foam pad from the bottom tray of the cart to protect the lid. I just taped the corners down with packing tape. Replaced the pad in the bottom tray with the HF interlocking foam matting that they sell for use on the garage floor. I like the conveyor belt idea.
 

cderalow

Well-known member
Joined
Nov 13, 2011
Messages
1,326
Location
Potomac, MD
not sure that i'll protect my top lid.

i tend to work off a bench rather than anything else.

just need to get a bench together now.
 
OP
N

ndnchf

Well-known member
Joined
Jan 9, 2012
Messages
1,556
Location
Fredericksburg, Virginia
I went up to Tractor Supply this morning and found 1/4" thick tough rubber matting. It was on a 3' wide roll and I needed a piece 20.5" x 30.5", so I bought 2' of it at $5.49/foot. I wanted to screw it down to the lid, but TS didn't have the fasteners I wanted, so I drove across town to our good, old fashion True Value hardware store where they have a zillion different bins of fasteners of all sorts. I found some black oxide finish 10x32x1/2" allen head cap screws that I thought would work well and blend in with the black rubber. Then back home to cut the rubber to size and install.

I bought 12 cap screws and nuts thinking I would need that many to hold it firmly in place. Turns out that was overkill. At first I thought that the 1/4" thick rubber might be a little too thick, but it turned out to be fine. The rubber is quite stiff, not floppy and has a very grippy texture. I started out by drilling a 3/16' hole in the front right corner, making sure the nut on the back of the screw wouldn't interfere with closing the lid. Then I went to the the left front corner and did the same, then to the center front. So I put 3 screws across the front edge. At this point I realized I didn't need a dozen screws to hold it in place. I added a screw at each rear corner, again being sure they wouldn't interfere with closing the lid. The mat now holds firmly in place, no flopping around, no puckering. I can always add more screws if I feel the need, but I think it is fine how it is. I was a little concerned that the additional weight on the lid would overload the shocks and the lid would not stay up. Not the case, the shocks hold it up fine (although I do plan to replace them with Snap-On brackets when they are back in stock).

Total cost was under $15 for the mat and hardware. I'm very pleased with how it came out. Here's a couple pics.
 

Attachments

  • P1002127.jpg
    P1002127.jpg
    103 KB · Views: 4,611
  • P1002126.jpg
    P1002126.jpg
    96 KB · Views: 4,780
  • P1002125.jpg
    P1002125.jpg
    128 KB · Views: 5,727

Recoil Rob

Well-known member
Joined
Jul 18, 2011
Messages
467
Location
NY
A few months ago Sears had an industrial floor mat for $10, shipped, I cut it to size and used 3M Spray adhesive, worked just fine.
 

jtfc

Well-known member
Joined
Jul 3, 2011
Messages
148
Location
way out west somewhere
Does anyone have a way to make the lid open to 90 degrees on the 5 drawer cart? It. Would be nice to put a magnet on the lid for wrenches and such.
 

SINISTER

Well-known member
Joined
Feb 1, 2012
Messages
130
Location
Long Island
Does anyone have a way to make the lid open to 90 degrees on the 5 drawer cart? It. Would be nice to put a magnet on the lid for wrenches and such.


Just change the location of the dampers. Move the lower connecting points further back.
 

jjjrmx5

Well-known member
Joined
Dec 30, 2010
Messages
3,431
Location
Cincinnati, OH
SINISTER, do you mean the pre drilled holes about 3" from the front holes or do I need to drill some holes?

Yep--You'll need to drill new holes and move the bottom portion of the shock back since the top has only a welded tab that the shock attaches to thus with very little adjustment.

The 5dwr carts should have two holes drilled on each side of the bottom verticle support that separates the main tool area from the two screwdriver area with all the flat holes.

The early carts lke mine used the shock holes closest to the rear of the box and used smaller and shorter shocks that were prone to failre almost yearly.

From what I can tell the newer carts all have the longer gas shocks whioch use the hole farthest toward teh front of the box and those shocks tend to hold up much better.

Between early shock failure and lid verticality (and easy of flipping it all the way open) I did the switch over to the Snap On chrome basic locking hinges and just had to drill a new hole on each vertical support.

If just moving the strut, pop strut off bottom pin, push lid back til it's where you wnat it and mark and measure new holes left and right to match existing hole dia. I;d also keep the same hgt off bottom of metal, but just move them front or back as you desire.

Done. And Bob's ur uncle. LOL.
 

Attachments

  • IMG_2534.JPG
    IMG_2534.JPG
    73.1 KB · Views: 4,582
Last edited:

SINISTER

Well-known member
Joined
Feb 1, 2012
Messages
130
Location
Long Island
Don't know for sure, I don't own one. I am just speaking from a mechanical stand point on what will work. Sure you have to do some kind of modification.
 
OP
N

ndnchf

Well-known member
Joined
Jan 9, 2012
Messages
1,556
Location
Fredericksburg, Virginia
When repositioning the shock mounts, don't for get to make sure the lid will close properly also.

I do like the Snap-On lid brackets and plan to get them when they are back in stock.
 

jjjrmx5

Well-known member
Joined
Dec 30, 2010
Messages
3,431
Location
Cincinnati, OH
When repositioning the shock mounts, don't for get to make sure the lid will close properly also.

I do like the Snap-On lid brackets and plan to get them when they are back in stock.

Yep, the big problem with changing lid angle is shock travel.

I;d suggest taking a grease pencil and marking the lid shock as it sits on chrome shaft portion with a line from the shock base to the outermost point with full extension and then close the lid. The remaining grease pencil when open will tell you the travel left to raise the lid.

If you move too much to get what you want , you risk the shock bottoming out and not shutting teh lid at all as mentioned above.

Lid shocks are measured by a center to center of the ball mount in both full lock closed and full open position. Unlike the base chome elbow hinges which open to 100+ degrees on Snappy boxes (and my SO cart does just that with the elbow hinges), the shocks have a more limited or at least a lower tolerance range in many cases.

Measure how far the shocks travel when both open and closed and then you can see the room you have to make the lid rotate vertically.

:thumbup:
 
Last edited:

Danglerb

Well-known member
Joined
Sep 6, 2007
Messages
9,736
Location
SoCal
Some great ideas, needs more pictures. They all look like "do the job" working carts.

I'd rather glue than screw the top pad, less chance of catching or scratching something.

Maybe the trick with the welder in the bottom tray, put it in as you assemble the cart.
 

iajonesy

Well-known member
Joined
Feb 8, 2009
Messages
2,467
Location
Iowa
I put a Snap on sticker on the front of my 5 drawer and most people don't know the difference.

Mike
 
To avoid these ads, REGISTER NOW!
Top Bottom