To avoid these ads, REGISTER NOW!

Walker Roll-A-Car jack restoration

KMinAF

Well-known member
Joined
Mar 5, 2011
Messages
698
Location
Fairview Utah
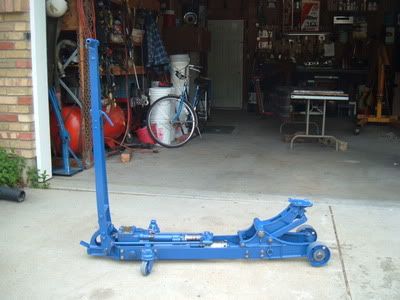
I picked up an old Walker jack a few weeks ago and have since started to restore/rebuild it. I have attached several pics and will continue to do so until the job is complete.

Here is the project:
DSCF4589-1.jpg


DSCF4588-1.jpg


Does anyone know what the two screws are for next to the name plate? One seems to be a "blind" hole and the other goes directly into the reservoir.

DSCF4586-1.jpg
 
Last edited:
To avoid these ads, REGISTER NOW!
OP
K

KMinAF

Well-known member
Joined
Mar 5, 2011
Messages
698
Location
Fairview Utah
Learned something new (I think)

Check out the two bolts that hold what looks like a collar for the ram, there is a collar for the large ram and a second for the small one. I didn't understand why they were drilled for wire and why they were only finger tight until I realized that the seal they press against is felt (maybe leather?) and when the bolts are tightened the taper of the collar expands the seal tighter against the cylinder.
Feel free to correct me if I am mistaken.
DSCF4619.jpg
 
OP
K

KMinAF

Well-known member
Joined
Mar 5, 2011
Messages
698
Location
Fairview Utah
The guy at the paint store said this is the stuff that is used on industrial equipment. I chose a blue that closely matches the blue paint that I found under the red.

DSCF4641.jpg
 
Last edited:
OP
K

KMinAF

Well-known member
Joined
Mar 5, 2011
Messages
698
Location
Fairview Utah
Here are all of the seals and parts for the ram assembly. Anyone know where I can get replacement felt seals? The "adjusting" collars that I mentioned in an earlier post are in the upper left of the picture.

DSCF4632.jpg
 

CRTDI

Well-known member
Joined
Jan 11, 2010
Messages
1,533
Nice progress on your project. Your piston and ram look to be in good shape. I'm sure this will be real sweet jack when it's all done.
 
OP
K

KMinAF

Well-known member
Joined
Mar 5, 2011
Messages
698
Location
Fairview Utah
The weather finally warmed up enough for me to paint all of the pieces. I chose a blue that was similar to the original color. I am unsure however if there were any accent colors i.e. handle or wheels an offset color. If you have info on the original color scheme please let me know.

IMG_0856.jpg


IMG_0854.jpg


IMG_0857.jpg
 
Last edited:

CRTDI

Well-known member
Joined
Jan 11, 2010
Messages
1,533
The weather finally warmed up enough for me to paint all of the pieces. I chose a blue that was similar to the original color. I am unsure however if there were any accent colors i.e. handle or wheels an offset color. If you have info on the original color scheme please let me know.


I know the jacks in this catalog are not the same as yours, but I believe the similar styled 745 and 780 models should be close examples of what your jack should look like.

http://garagejournal.com/forum/showthread.php?t=114433&highlight=walker+stars

Also, thanks to oldjacks, this thread has a pic of your model jack in a period catalog.

http://garagejournal.com/forum/showthread.php?t=85744&highlight=walker
 
Last edited:
OP
K

KMinAF

Well-known member
Joined
Mar 5, 2011
Messages
698
Location
Fairview Utah
Thanks for the posting, it looks like it was a solid blue throughout. I would love to get a reproduction of that catalog, it would make a nice accessory to the jack.

I know the jacks in this catalog are not the same as yours, but I believe the similar styled 745 and 780 models should be close examples of what your jack should look like.

http://garagejournal.com/forum/showthread.php?t=114433&highlight=walker+stars

Also, thanks to oldjacks, this thread has a pic of your model jack in a period catalog.

http://garagejournal.com/forum/showthread.php?t=85744&highlight=walker
 

Ancient Iron

Well-known member
Joined
Mar 23, 2012
Messages
1,195
Location
Nobody Knows
I have the same jack , but mine is a series "C" I was also wondering how old it is My friend has one that is similar but is mechanical . How old is that one????
 
Last edited:
To avoid these ads, REGISTER NOW!
OP
K

KMinAF

Well-known member
Joined
Mar 5, 2011
Messages
698
Location
Fairview Utah
I have the same jack , but mine is a model "C" I was also wondering how old it is My friend has one that is similar but is mechanical . How old is that one????


Check out "OldJacks" post a few pages up, it would seem to have been made around 1928
 
OP
K

KMinAF

Well-known member
Joined
Mar 5, 2011
Messages
698
Location
Fairview Utah
Just waiting on some seals which should be here soon, reassemble, one last finish coat of paint and I am done!
 

scott37300

Well-known member
Joined
May 5, 2010
Messages
3,450
Location
Wisconsin
Just waiting on some seals which should be here soon, reassemble, one last finish coat of paint and I am done!

Are you spraying your paint? I'm working on a blackhawk jack and getting ready to blast and paint it. I started a thread about painting it and getting all kinds advice. Did you spray it or brush it on? If sprayed could you describe a little about the process, primer, etc? Did you use a hardener mixed in the paint? Will the paint hold up against things like brake fluid and what not? Where did you get your paint and what were the costs.
 
OP
K

KMinAF

Well-known member
Joined
Mar 5, 2011
Messages
698
Location
Fairview Utah
Are you spraying your paint? I'm working on a blackhawk jack and getting ready to blast and paint it. I started a thread about painting it and getting all kinds advice. Did you spray it or brush it on? If sprayed could you describe a little about the process, primer, etc? Did you use a hardener mixed in the paint? Will the paint hold up against things like brake fluid and what not? Where did you get your paint and what were the costs.

I used an "entry level" HVLP spray gun that I only paid about $20.00 for and it worked just fine. I first applied a rattle can self etching primer that I had from an earlier auto body repair job. I thinned the paint down using Naptha and applied several light coats. I will apply a finish coat after it has been reassembled just to finish off all the nuts and bolts. The paint is an industrial quality that is used on heavy machinery and is as close to a powder coat durable finish that you can get. I bought the paint at Jones Paint and Glass a local contractor supply house and it cost about $15.00 a quart
 
Last edited:
OP
K

KMinAF

Well-known member
Joined
Mar 5, 2011
Messages
698
Location
Fairview Utah
After receiving the seals, I immediately placed them in ATF to soak. I began assembly a couple nights later by first installing the retaining ring, collar and seals on the ram and then inserting the ram into the housing.

DSCF4677.jpg


With the ram protruding through the opposite side I installed the cups, washers and nuts being careful to leave a little bit of play so that the cup could center itself in the bore. I then gently tapped the assy back into the bore and finished tightening the nuts.

DSCF4676.jpg


Then I installed the rope seals in the outer recesses of the collars.

ropeseals.jpg


And that is as far as I could go this evening.
 
Last edited:
OP
K

KMinAF

Well-known member
Joined
Mar 5, 2011
Messages
698
Location
Fairview Utah
The assembled resevoir and ram:

DSCF4679.jpg


I had to back track a few times to get the assembly sequence right. Here I had prematurely attached the rear handle bracket and saddle assy:

DSCF4680.jpg


To do it correctly the handle, release lever and bracket are installed as an assembly. Also note that the forward bolts in the pic are longer than the rest to accomodate the wheel brackets:

DSCF4681.jpg
 
OP
K

KMinAF

Well-known member
Joined
Mar 5, 2011
Messages
698
Location
Fairview Utah
Another back track, there are two of these little brackets (see arrow) that need to go on before installing the side brackets for the saddle.

smallbracket.jpg
 
Last edited:
OP
K

KMinAF

Well-known member
Joined
Mar 5, 2011
Messages
698
Location
Fairview Utah
Done!

DSCF4686.jpg


DSCF4690.jpg


I left the hardware bare because I liked the contrast but I worry if it will stay looking nice. Should I put a final coat over everything? What is your opinion?

DSCF4685.jpg
 

Bull

Super Moderator
Joined
Dec 12, 2005
Messages
16,189
Location
MA
Dude, that thing rules. It takes up a lot of space, but it's cool that you brought it back from the dead like that. Looks brand new.
 
OP
K

KMinAF

Well-known member
Joined
Mar 5, 2011
Messages
698
Location
Fairview Utah
So, the question is now what do I do? This is one of those projects where I really enjoyed the work. It took a long time but I learned a lot in the process and made some new acquaintances. The fun was definitely in the journey and the finished product was definitely worth the effort. I guess now I will see if I can get that Supra up and running.
 
Last edited:
To avoid these ads, REGISTER NOW!
Top Bottom