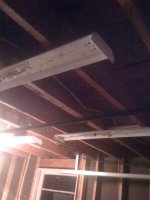
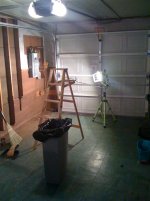
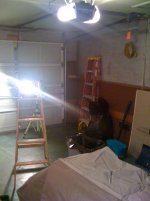
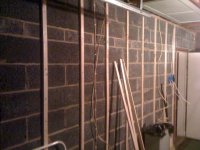
First off, I would like to thank all those that contribute to this site. Until now I have only lurked, but the information on this site helped me out tremendously when I re-fit my garage. I did the work last year and took pictures along the way. It is still a work in progress and I will continue to add to it as time and funds allow. I started with a modest attached 1-car garage that is roughly 12'x21'. What really motivated me to start this project was that I really always wanted a cool space to work on house projects, my car and motorcycles. I would prefer to have more space to work with, but I also wanted to design an efficient space for the limited size I was given. The garage was originally designed to be heated and air conditioned with a vent coming in through the house. However, there was never any insulation behind the crumbling fiber board walls and ceiling. There was also an asbestos-based tile floor that I really wanted out of the house. The project started with a brand new garage door opener. I can't believe the previous owner didn't have a garage door opener. I then began clearing out all of the clutter and demoing the existing space down to studs and bare concrete floor. You will notice that there isn't a good source of light in the garage so once down to studs I added six (6) florescent light fixtures I got on sale at Lowe's. I split the circuits up so I could vary the level of lighting in the garage. This also allows me to have the lights off that would be hidden by the garage door if I were to have it open. More pictures and info to come...

You are using an out of date browser. It may not display this or other websites correctly.
You should upgrade or use an alternative browser.
You should upgrade or use an alternative browser.
Turner's 12x21 Single Car Garage
- Thread starter rturner
- Start date


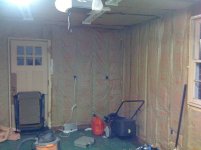
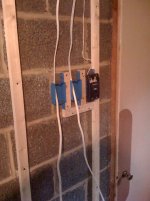
Now that I have some light to work with and all the crumbling (probably flammable) fiber board wall covering out of the house I started to wire some of the electrical work. There is nothing worse than not being able to find a close outlet so I did a little overkill here and added 2 over the bench, 1 on the ceiling for the garage door opener and 4 on each wall. You will notice in my first picture that I have two separate light switches for the two light circuits. Would have preferred to go to one box, but code didn't allow it for the shallow boxes on the wall shared with the house. At the same time I began adding furring strips to the wall to later attach the drywall. I insulated the walls and ceiling and even though the door isn't insulated the garage is 10x better insulated than it was. It is very pleasant in the hot summers and cold winters. Next I started getting rid of the asbestos-based flooring. I started using a clothes steamer to keep the tiles from breaking, but found it to be inadequate. I later switched to a wallpaper steamer rented from Home Depot. By doing it this way I kept the tiles from breaking and wet so no fibers would be released into the air. I think I broke 1 or 2 tiles, which is ultimately no big deal. With a wallpaper steamer they came right up with little effort in case anyone is wondering. See the attached pictures and look out for more to come...
Attachments
-
 13 - Floor Tile Removal.jpg144.5 KB · Views: 130
 -
 12 - Ceiling Insulation.jpg129.4 KB · Views: 81
 -
 11- Insulation.jpg136.8 KB · Views: 86
 -
 10 - Insulation.jpg149 KB · Views: 78
 -
 9 - Furring Strips.jpg144.4 KB · Views: 84
 -
 8 - Furring Strips.jpg142.2 KB · Views: 86
 -
 7 - Light Switch.jpg143.1 KB · Views: 89
Attached are a few more pictures of the process for removing the floor. I cannot emphasize enough how important it is to wear breathing protection and use a wallpaper steamer when removing these tiles. It softens the glue and also keeps them wet. When soft they don't break and even if they do the water keeps the dust from entering the air. This is not a job I would want to do again and I think my knees would agree...
more pictures and progress to follow...
more pictures and progress to follow...
Attachments
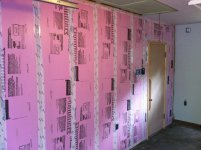
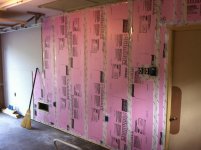
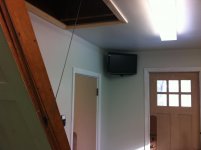
In these pictures you can see that I started insulating, taping and adding drywall to the wall that joins the garage to the house. the insulation board fits perfectly between the furring strips and the tape finished off the vapor barrier. I was rather thorough with the vapor barrier throughout the garage even though there was never any evidence of prior moisture in the garage anywhere. I thought it couldn't hurt to keep the drywall...dry. You can also see in the last picture that I added in a tv and cable hook up. I spend most of my time in the garage so I figured I needed to have a tv in there.
more to follow...
more to follow...
Attachments

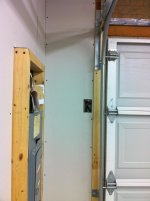
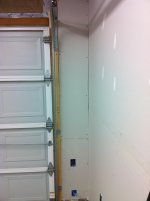
I am pretty fanatical about fit and finish and I couldn't quite decide how I wanted the drywall to meet up against the garage door opening. What I finally decided to do was 1x4's to attached the garage door frame to. The drywall would would then **** up right against the 1x4's creating a nice finish. The pictures above show either side of the garage door and how the drywall fits up next to it. I did not want to put the drywall under the brackets fearing that the weight of the door would eventually crush the drywall. I couldn't find much information on this, but I think this is the best solution I could have done. Maybe I am wrong, but so far so good and the finish is excellent...
more to follow...
more to follow...
Attachments
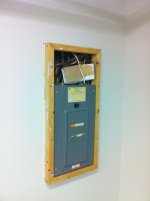
The first of these pictures shows the garage with the drywall hung, taped, sanded and painted. The floor is still unfinished, the trim not 100% done and the doors and window unfinished. I remember once I finished the drywall work it was a major step forward. The 2nd picture you will see the two doors: the left hand one goes to the basement and the house the right one to the backyard. Both doors in this picture are original and unfinished. The 3rd picture is of the lighting and ceiling completed. With the walls painted a light silver-ish color there is plenty of light for me. The last picture is of my old electrical panel. I am told this style box is not the best and should probably be replaced. At this point I do not have the funds for it and will eventually do so when I have the money. At this point I was thinking about how to make it look finished and hidden. I could not sink it into the wall any further so I boxed in around it best I could.
more updates are coming...
more updates are coming...
Attachments


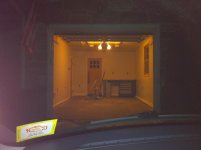
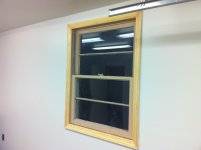
I had to come up with a solution for the garage door sensors so what I did was add a box on either side of the door. I took a stainless wall cover, drilled a hole through, added some threaded aluminum rod and mounted the sensor. The finished product works flawlessly and looks fantastic. The 2nd picture shows how the garage looks with the floor unfinished, walls painted and trim installed, but unfinished. the 3rd picture shows a steal I found at Best Buy for a 24 inch LCD/DVD combo. The price was right and it works great for the garage. My budget prevented me getting a new window for the garage so I am stuck with the old nasty single pane style original to the rest of the house. A nice cheap set of blinds will cover it up nicely. The last picture shows the yet to be finished pull down door to the attic of the house.
At this point the garage is starting to look nice and finished. More to come...
At this point the garage is starting to look nice and finished. More to come...
Attachments
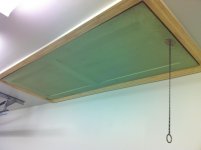


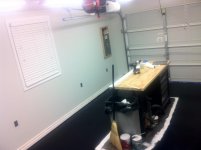
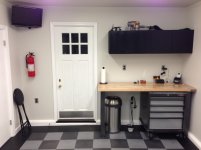
This post has a few more finishing touches. In the first picture you will see that I refinished the pull down door to the attic. At this point there is now no more ugly lime green in the entire garage, which makes me very happy. The next picture you will see that I added a Snap On retractable extension cord to the ceiling utilizing the other outlet not used by the garage door opener. This tool is invaluable even with all the outlets I added to the garage. The 3rd picture you will notice the finished light switches and opener switch. I would have preferred to have all this in one box, but the shallow boxes I used on this wall prevented it. Either way I think it looks nice the way it is. The final picture shows the Gladiator rolling box and workbench. These products were on sale at Sears and superbly made. I plan to add wall cabinets at a later date when I have some extra coin in my pocket or they go on sale. I like the look and they can take a beating.
more updates to come including the floor..
more updates to come including the floor..
Attachments


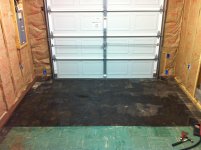
The slab in my garage was okay. It passed all the moisture tests for an epoxy covering, but there were a few cracks and imperfections that would need to be prepared and i wasn't sure I would ever get it right. So I sealed the floor with primer and then painted the floor flat black. Those with a keen eye will notice the gap I left in the molding that meets the floor. This was done on purpose...
Attachments

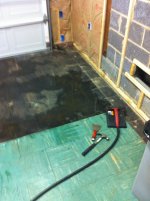
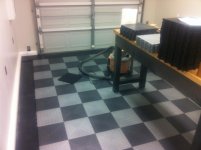
Once the floor was sealed and primed I began putting down the flooring I ordered from Race Deck. I searched around a lot and this was the best solution for me. The price was right especially with the Garage Journal discount. I couldn't believe how easy it was to lay down and had the job done in a few hours. I purposely left a space in the molding so there was no gap around the edges. The floor is designed to be free floating and will expand and contract. I took this into account and there is an inch around the entire wall area under the molding for the floor to expand and contract. The fit and finish is excellent with no gaps whatsoever. With the changes of season you can notice a little movement, but factor that in when you are laying it down. I do not have any gaps or binding with my floor.
Attachments


Attached is a picture of the cabinet I built to hide the electrical panel. I think it came out pretty nicely and it looks great even though I built it from scratch.
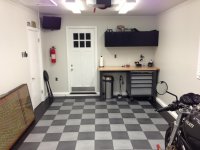
At this point the garage is basically finished. I need to hang a few cabinets when I buy them, but other than that it is a great spot for me to do projects around the house, work on my car and motorcycle. Everything has worked as designed and has held up well for about a year since I finished up. I just realize I don't have overall finished pictures of the garage with all the doors and trim, etc. painted and finished. I will try to get those up on the board soon. I am overall very happy with the way my space turned out. Even though it is a 1 car garage it gives me enough space to get my work accomplished.
I will try to continue and post updates as I get to them.
Attachments

SuperSocket
Well-known member
Looks really nice. Small but with a good layout like that you can do anything you want in that space.
DARK AGE 53
Well-known member
- Joined
- Jan 22, 2005
- Messages
- 1,002
Looking back at the first pic you posted I would say you have done a great job, look forward to seeing more updated pics.
steam_mill
Well-known member
- Joined
- Feb 21, 2010
- Messages
- 100
From another guy with a single car garage, it looks really really good!
JimVonBaden
Well-known member
Looks great! You accomplished a lot in a small space.
Just curious, why didn't you simply lay the Racedeck over the old tile?
Jim
Just curious, why didn't you simply lay the Racedeck over the old tile?
Jim
Derrickwade
Well-known member
Huge transformation, looks great! This is pretty much what im doing to my garage, which is almost the same size.
Laredo
Well-known member
Great tranfsormation! Any more recent pics?
JasonW
Well-known member
Looks great. As a fellow member of the small garage society (mine is 9 x 18) it is nice to see another member giving the standard garage guys a stylish run for their money.
Its been awhile since I updated this, but finally got around to finishing some of the work. Actually, it's been done for just about a year now, but haven't gotten around to taking any pictures. Cleaned the garage up last night and thought it was as good of a time as any to take some updated pics. Since finishing the space I use the garage for just about everything. I work on my motorcycle and even use it when I have friends over. As an attached garage, it is heated and air conditioned which makes it comfortable all year long. This board has been an invaluable wealth of information during my build. For those with a small 1 car like myself you can really turn it into a very usable space. That's not to say I wouldn't want a 2 car sized garage...
Attachments


Derrickwade
Well-known member
Nice job. I came across this thread awhile back and just figured you were done posting. Thanks for the update. The Monster looks good in there!
dubber
Well-known member
Love this single, well done with your space. I'm not a motorcycle guy but i do appreciate a sweet Ducati
EDIT: So did you have to throw out a ton of stuff? haha, that garage was pretty full prior to the revamp.
EDIT: So did you have to throw out a ton of stuff? haha, that garage was pretty full prior to the revamp.
Last edited:
Thanks for the comments guys.
The before pictures are a combination of stuff I moved in and stuff the sellers left over when I bought the house. Long story short is that I bought a shed for gardening equipment and threw a bunch of stuff away. I hate clutter
The before pictures are a combination of stuff I moved in and stuff the sellers left over when I bought the house. Long story short is that I bought a shed for gardening equipment and threw a bunch of stuff away. I hate clutter

HSpencer
ALLIANCE MEMBER
Amazing Transform!!! I am a huge fan of one car garages, although I don't personally have one myself, unless you would consider my two car with an imaginary line dividing it in half, so I have shop on one side and one car parking on the other side. (I am not sure what I just said makes any sense). You have done a great job, and I just found your thread today. You have done a whole lot of hard work, and you can be proud of the results. As I like to say: "One Cars Rock"!!