Hello All,
I have a Snap-On TechWrench TECH3FR250 that recently stopped vibrating intermittently before the appropriate torque was reached. I had to torque very carefully as there was only the beep indicating over-torque. It seemed that if I twisted the handle in a certain way as I applied torque, the vibrations would be inconsistently stronger all the way to non-existent. Seeing as how the torque wrench was 6 months out of the one year warranty and the local rep advised a ~$90 repair charge, I decided to investigate myself.
If you are within warranty or you don't want to potentially break your things, please send your defective item to Snap-On for repair. If you aren't bothered by this, please read on....
READ THE ENTIRE POST IF YOU ARE GOING TO FIX ANYTHING…. Trust me, it’s worth your while.
Here is an exploded diagram from Snap-On's website:

Even though I am tired from a long days work, I figured the problem I was experiencing could only be caused by a few scenarios:
1. Loose connection (i.e. bad solder)
2. Bad DC motor (drives the vibrating function)
3. The vibrating mechanism has become dislodged / obstructed
4. Component level failure on the PCB
5. Squirrels
Having self-taught, hobbyist level, soldering skills with modest practice I was up to the challenge. Plus, in general, I love fixing things (don't we all).
I was hoping that it wasn't #2 or #4. Number 5 would be fun to see and the other two are easy to fix. For my case it was a variation of #3 combined with, what I believe to be, a design/manufacturing flaw. It will become evident with the pictures below and further rectified by the fact I was able to fix the problem.
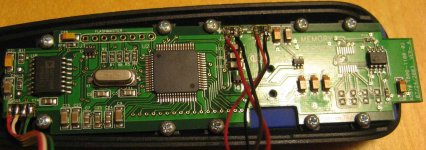
First, remove the "tamper-proof Torx" screw from the back of the torque wrench. Off lifts the display panel:

Take note of the wiring and inspect for typical PCB assembly anomalies:

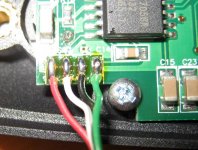
If everything looks good, you can de-solder the connections at the lower left of the display panel (taking note of the color order):

Here you will find the connections for the battery and vibration mechanism. (Notice how the connections for the vibration motor are hooked up backwards; anomalies). Since it is a simple DC motor, the backwards connections won’t hurt anything, it's just shows how much attention to detail there was during assembly:

Here's the part where I didn't take many pictures but it is pretty straight-forward. Remove the connections for the battery at the display panel (noting the colors). Then slide the entire handle assembly off of the metal shaft, making sure not to tear any wires.
Then, remove the black cap on the fore-end of the handle. Prying the release tabs inside the handle with a pocket screwdriver (from fore-end to aft-end) and pry the top of the handle off. The black handle grip will peel off as it is held lightly in place with small amounts of soft glue (surprising small amounts actually!!)
The inside of the lower handle with the top cover removed looks like this:

Taking a look at the inside of the top handle portion, you will see the problem. The vibration weight is coming in contact with the handle frame (note the gaps), preventing the rotating mass from doing its business. This is due to either a design flaw and/or manufacturing tolerance flaws:

This is how, I'm sure, it looked when the torque wrench was shipped from the factory (operational). Note the gaps again:

As you can deduce, the vibration assembly has shifted within the flimsy handle and was seized against the frame. There are a couple of solutions, the easiest being to clearance the frame to allow the rotating mass sufficient area to spin during tolerance shifts experienced throughout the normal use of the torque wrench.
A quick touch-up with my Dremel:

Now, regardless of how much flex that is incurred, the rotating assembly will not contact the upper part of the handle.
However, there is another surface that may be a contributor as well; the lower handle battery carrier. To clearance it as well, you do not have to remove it from the lower handle. I just did it for portability:

All done with the hard part! Move the motor around gingerly in the upper handle to test for any potential binding. If you are satisfied with your work, reassemble and re-solder (making note of the colors). Do not install the rubber grip yet. Test to see if the vibrating function has been restored.
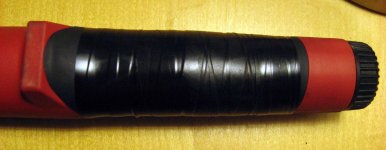
If you are successful, the last part to go on is the rubber grip. Use adhesive sparingly in a few small dots near the outermost edges of the rubber. Hold the rubber in place and allow it to dry by applying electrical tape tightly STICKY SIDE OUT. This way, you don’t leave any residue:

Forgoing all the steps above, you may be able to temporarily resolve your issue by removing the battery compartment and pushing the rotating mass towards the fore-end of the torque wrench with a thin probe. It is barely visible on the upper segment of the handle. SEE, I told you it will be beneficial to read the whole post! Man, I’m tired…. and some would say delusional……….
I am a big fan of Snap-On tools and I own many thousand dollars worth. The warranty process is painless most of the time and that’s why I don’t mind paying for it. For such a high-end brand, it kind of bothers me that the $400 TechWrench does not offer a better design or build quality/oversight for such a simple problem. I haven’t heard of any voluntary recall (I even asked the Rep about it). Hopefully my torque wrench is a “one-off” and no one else will have this problem. If you do have this problem, feel free to chime in here as well as contact Snap-On. Perhaps Snap-On will comment or at least take interest/action. After a minimum of four hours of sleep, I will be drafting an email to them soon to see if Snap-On is interested in my findings and simple solutions.
I have a Snap-On TechWrench TECH3FR250 that recently stopped vibrating intermittently before the appropriate torque was reached. I had to torque very carefully as there was only the beep indicating over-torque. It seemed that if I twisted the handle in a certain way as I applied torque, the vibrations would be inconsistently stronger all the way to non-existent. Seeing as how the torque wrench was 6 months out of the one year warranty and the local rep advised a ~$90 repair charge, I decided to investigate myself.
If you are within warranty or you don't want to potentially break your things, please send your defective item to Snap-On for repair. If you aren't bothered by this, please read on....
READ THE ENTIRE POST IF YOU ARE GOING TO FIX ANYTHING…. Trust me, it’s worth your while.
Here is an exploded diagram from Snap-On's website:
Even though I am tired from a long days work, I figured the problem I was experiencing could only be caused by a few scenarios:
1. Loose connection (i.e. bad solder)
2. Bad DC motor (drives the vibrating function)
3. The vibrating mechanism has become dislodged / obstructed
4. Component level failure on the PCB
5. Squirrels
Having self-taught, hobbyist level, soldering skills with modest practice I was up to the challenge. Plus, in general, I love fixing things (don't we all).
I was hoping that it wasn't #2 or #4. Number 5 would be fun to see and the other two are easy to fix. For my case it was a variation of #3 combined with, what I believe to be, a design/manufacturing flaw. It will become evident with the pictures below and further rectified by the fact I was able to fix the problem.
First, remove the "tamper-proof Torx" screw from the back of the torque wrench. Off lifts the display panel:
Take note of the wiring and inspect for typical PCB assembly anomalies:
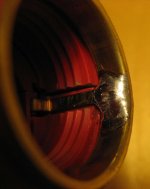
If everything looks good, you can de-solder the connections at the lower left of the display panel (taking note of the color order):
Here you will find the connections for the battery and vibration mechanism. (Notice how the connections for the vibration motor are hooked up backwards; anomalies). Since it is a simple DC motor, the backwards connections won’t hurt anything, it's just shows how much attention to detail there was during assembly:
Here's the part where I didn't take many pictures but it is pretty straight-forward. Remove the connections for the battery at the display panel (noting the colors). Then slide the entire handle assembly off of the metal shaft, making sure not to tear any wires.
Then, remove the black cap on the fore-end of the handle. Prying the release tabs inside the handle with a pocket screwdriver (from fore-end to aft-end) and pry the top of the handle off. The black handle grip will peel off as it is held lightly in place with small amounts of soft glue (surprising small amounts actually!!)
The inside of the lower handle with the top cover removed looks like this:
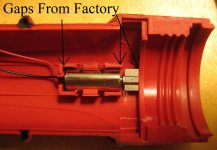
Taking a look at the inside of the top handle portion, you will see the problem. The vibration weight is coming in contact with the handle frame (note the gaps), preventing the rotating mass from doing its business. This is due to either a design flaw and/or manufacturing tolerance flaws:
This is how, I'm sure, it looked when the torque wrench was shipped from the factory (operational). Note the gaps again:
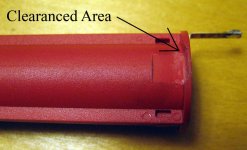
As you can deduce, the vibration assembly has shifted within the flimsy handle and was seized against the frame. There are a couple of solutions, the easiest being to clearance the frame to allow the rotating mass sufficient area to spin during tolerance shifts experienced throughout the normal use of the torque wrench.
A quick touch-up with my Dremel:
Now, regardless of how much flex that is incurred, the rotating assembly will not contact the upper part of the handle.
However, there is another surface that may be a contributor as well; the lower handle battery carrier. To clearance it as well, you do not have to remove it from the lower handle. I just did it for portability:
All done with the hard part! Move the motor around gingerly in the upper handle to test for any potential binding. If you are satisfied with your work, reassemble and re-solder (making note of the colors). Do not install the rubber grip yet. Test to see if the vibrating function has been restored.
If you are successful, the last part to go on is the rubber grip. Use adhesive sparingly in a few small dots near the outermost edges of the rubber. Hold the rubber in place and allow it to dry by applying electrical tape tightly STICKY SIDE OUT. This way, you don’t leave any residue:
Forgoing all the steps above, you may be able to temporarily resolve your issue by removing the battery compartment and pushing the rotating mass towards the fore-end of the torque wrench with a thin probe. It is barely visible on the upper segment of the handle. SEE, I told you it will be beneficial to read the whole post! Man, I’m tired…. and some would say delusional……….
I am a big fan of Snap-On tools and I own many thousand dollars worth. The warranty process is painless most of the time and that’s why I don’t mind paying for it. For such a high-end brand, it kind of bothers me that the $400 TechWrench does not offer a better design or build quality/oversight for such a simple problem. I haven’t heard of any voluntary recall (I even asked the Rep about it). Hopefully my torque wrench is a “one-off” and no one else will have this problem. If you do have this problem, feel free to chime in here as well as contact Snap-On. Perhaps Snap-On will comment or at least take interest/action. After a minimum of four hours of sleep, I will be drafting an email to them soon to see if Snap-On is interested in my findings and simple solutions.
Attachments


Last edited: