To avoid these ads, REGISTER NOW!

Restoring an old Wilton Vise-some questions

Brian.Evans

Well-known member
Joined
May 10, 2012
Messages
75
Hey all. First time poster, long time lurker. I love this forum. Great place.

I recently picked up an old Wilton 5" vise from a salvage guy. I gave $20 for it. Here's what I started with:
IMAGE_1000001117.JPG


I pulled the big pieces apart and soaked them with PB Blaster.
IMAGE_1000001119.JPG


I was able to get all the Little stuff apart with a little "judicious use of force" and some time. Then I drowned everything with vinegar for a few days.
IMAGE_1000001120.JPG


After soaking and wire brushing:
IMAGE_1000001130.JPG


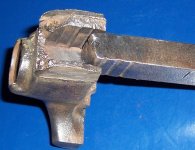
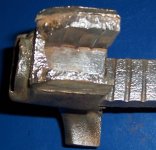
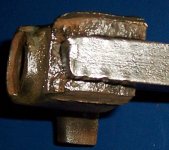
Now the problem. I saw this when I took the big stuff apart, but even with pb blaster and hitting it with a hammer, I couldn't get it to budge. I tried again after soaking in vinegar and more on blaster, but no love. I went ahead and cleaned it up in case I was missing something. See how the jaw is crooked?
IMAGE_1000001131.JPG

IMAGE_1000001133.JPG

IMAGE_1000001134.JPG


Any ideas why it's dropped and/or how to fix it? Also, any ideas on the age of this vise? All I could find info on was Wilton's bullet vises.
 
To avoid these ads, REGISTER NOW!

chappys4life

Well-known member
Joined
Apr 30, 2008
Messages
421
It looks like on the first pic there is a bead around the jaw like someone had tried welding it so it would no be crooked anymore.
 
OP
B

Brian.Evans

Well-known member
Joined
May 10, 2012
Messages
75
Actually, I forgot to mention that. When I bought it I thought it was weld too. However, when I started looking, I seeme awfully soft for a weldment. I was able to lightly pry with a cheap screwdriver and pop it right off in one piece! It looks like braze, like someone tried to braze it for some reason? There aren't any cracks in any of the metal anywhere. I'm at a loss.
 

Outlawmws

Well-known member
Joined
Aug 9, 2011
Messages
39,279
Location
The Badlands
Those two pieces are heavily pressed together. Hard to see what is what without pics at better angles and one from under and down inside. The channel may be bent, or it may simply not be seated all the way in so it can upset at that angle.
 

zekers59

Active member
Joined
May 16, 2011
Messages
33
Location
KC MO
i have the same vise....minus the swivel base. I think it's a 1975-85 ish.

Model 645

Like Outlaw says...just doesn't seem to be "SET" down in the front jaw enough.

They must have been welded to the front jaw from 'up and under' the U channel. If you can break that free, you could reweld and fix it.

My 645 has had a Hard, Hard life ...
 
OP
B

Brian.Evans

Well-known member
Joined
May 10, 2012
Messages
75
Ok gents, here are the extra pictures requested. Doesn't loil like anyone ha ever welded inside the channel, only the crappy braze job that I popped off the outside.

IMAGE_1000001136.JPG


IMAGE_1000001137.JPG


IMAGE_1000001138.JPG


IMAGE_1000001139.JPG


IMAGE_1000001140.JPG


IMAGE_1000001141.JPG
 

zekers59

Active member
Joined
May 16, 2011
Messages
33
Location
KC MO
those are good photos...

This helps me out too because the head and U-CHannel are also a touch out of alignment -- from being beat to death constantly.

I dont' have weld marks either. looks like a pressed fit. So, if you can get that front jaw and the U-channel in a larger vise and try to PRESS it in and see if it will straighten into perpendicular. My dynamic jaw is not flush and a bit twisted down on one side. You can see and feel the 'offset' every turn of the lead screw. Perhaps if I start beating a logical pattern I can help the fit and straighten things out. Looks like a plan for you too!
 

Outlawmws

Well-known member
Joined
Aug 9, 2011
Messages
39,279
Location
The Badlands
those are good photos...

This helps me out too because the head and U-CHannel are also a touch out of alignment -- from being beat to death constantly.

I dont' have weld marks either. looks like a pressed fit. So, if you can get that front jaw and the U-channel in a larger vise and try to PRESS it in and see if it will straighten into perpendicular. My dynamic jaw is not flush and a bit twisted down on one side. You can see and feel the 'offset' every turn of the lead screw. Perhaps if I start beating a logical pattern I can help the fit and straighten things out. Looks like a plan for you too!

I doubt a vise could exert the pressure needed, you would probably need a hydraulic shop press; and it is also possible the U was cast in place.

I'm saying that because I have a Columbian in "dissected" state; Not intentionally; I didn't look closely when I bought it last Saturday (it was in a pile I scooped and got it for essentially nothing so no big deal...).

This one is smaller and has a cast support arm, and the way it was made and fits, indicates it was cast in place.

Someone had broken this puppy before, and braised the jaw parts together, but did not braze the support arm. (I have no clue why, it might have stayed in one piece had they done so)

The piece will slide into place from the broken out side (It was broken in three places, and unfortunately the bottom is missing), but will not from the "insertion" hole. I believe based on how this fits, the the arm was made in advance and cast in place when the jaw was poured.

attachment.php


attachment.php


attachment.php


I think if you get it pressed square, you will want to heat the entire assembly (500 deg in the oven for a couple of hours?) and weld it, then bury it in hot sand to cool slowly. I have seen this style welded before (typically the "U" arm like you have) so I know it was done that way, whether Wilton did it or not.
 

Attachments

  • inside.jpg
    inside.jpg
    113.2 KB · Views: 523
  • Inside ribs.jpg
    Inside ribs.jpg
    113.8 KB · Views: 521
  • Fitted.jpg
    Fitted.jpg
    83.5 KB · Views: 521

Outlawmws

Well-known member
Joined
Aug 9, 2011
Messages
39,279
Location
The Badlands
BTW, on the Wilton, were the bits of brazing actually touching the cast jaw? If not, then I suspect the arm is not all the way in the jaw..
 
OP
B

Brian.Evans

Well-known member
Joined
May 10, 2012
Messages
75
The brazing was against the jaw a bit, but loose enough I could slide a screwdriver in behind it easily. I really think my channel isn't in all the way. However, for some reason, it doesn't seem to me that a hollow u-channel would be cast in place like your solid support arm. I don't have anything to back that up though. Regardless, I am taking it to work tomorrow, and our mechanic has a shop press. I'll see what I can do. Also, the family and I are headed to my parents for mothers day this Sunday, so if I can't get it done tomorrow, maybe this weekend. I wonder if heating the cast jaw with a torch would help?
 

Ign

Well-known member
Joined
Jul 7, 2006
Messages
12,769
Location
Butte Peak ND
IF IF IF the channel is straight you could close it down on something placed under the vise jaws (to remove any slop), and machine some sacrificial jaws to be parallel to one another. IF the channel is bent this won't work as the position of the jaws in relation to one another will constantly change depending upon how far open it is.

I've done this on cheap vises for customers. Works relatively well. Kind of a shame on a Wilton tho, but a last resort consideration. Use thicker jaws so you don't actually get into the casting of the vise itself, then nothing is permanent.
 

Kevin54

MEMBER EMERITUS
Joined
Jan 12, 2005
Messages
29,341
Location
Urbana, Ohio
IMAGE_1000001138.JPG


Looking at this pic, it looks like someone beat the snot out of the side and bottom of the jaw. Whatever you do, I wouldn't try beating on it anymore. It's going to take some strategically place pressure to get it back in alignment. If you can somehow make the jaw stationary, I would try to move the "C" channel. Holding it stationary will be the problem though. If you have a loader with a bucket, maybe set the jaw down on a hard surface, pin it down with the bucket, then try to work the "C" back into place. Whatever you do, you'll have to hold one or the other in a stationary position. I don't think another vise will hold it tight enough.
 
OP
B

Brian.Evans

Well-known member
Joined
May 10, 2012
Messages
75
Weeeeeell......here's what I did to it today.

IMAGE_1000001149.JPG


Stuck it in the press and clamped down, slowly heated with a torch, more pressure and more heat slowly. Left it there until it cooled completely.

IMAGE_1000001150.JPG


It's still not perfect, but it's a lot closer. Maybe I can take the rest of the slack up with slightly slanted jaws. I will see how it looks tomorrow all put together, it might not need it.
 
OP
B

Brian.Evans

Well-known member
Joined
May 10, 2012
Messages
75
This one didn't have a gauge. It was a cheaper 12 ton import no-brand press. It about maxed out the press though. A bit more and I would have stopped for fear of blowing the jack seals.
 

geologist

Well-known member
Joined
Dec 14, 2011
Messages
5,326
Finally - someone using vinegar. I've been preaching about using it to clean up rust for quite some time. Much cheaper than Evaporust.
 
OP
B

Brian.Evans

Well-known member
Joined
May 10, 2012
Messages
75
Vinegar works wonders! It's great. It isn't super caustic, you don't have to wear gloves with it, and it works! I left these pieces in for 5 or 7 days, pulledthem out and hit them very lightly with a wire cup in a drill. I think the pictures speak for themselves.

I've never used or even seen evapo-rust, but I used four gallons of white vinegar to completely cover all these parts. It costs $2.38 a gallon at Wal-Mart. I'm guessing enough Evapo-rust to make 4 gallons is a heck of a lot more than $10!
 
To avoid these ads, REGISTER NOW!

zekers59

Active member
Joined
May 16, 2011
Messages
33
Location
KC MO
Brian,

Looking good! The Hydraulic press what I was referring to as a large vise to "Press" it in tighter to straighten. Nice work - It's a good looking vise with that little anvil on the back.
 
OP
B

Brian.Evans

Well-known member
Joined
May 10, 2012
Messages
75
I just about can't wait to get it back together tomorrow! I want to fit everything together before painting just to check alignments and such.

On a related note, where can I get the bolt that holds the swivel base to the bottom of the vise? Mine is bent badly.
IMAGE_1000001154.JPG
 

Outlawmws

Well-known member
Joined
Aug 9, 2011
Messages
39,279
Location
The Badlands
Is that the center bolt, or the locking bolt?

The locking bolts usually can be replaced with a carriage bolt (sometimes you need to grind the head to a smaller diameter), if it is the center pivot bolt, I'm thinking that would be a Wilton item, or replace with a std. bolt and a sleeve for the shoulder.
 

Dale B

Well-known member
Joined
Jan 5, 2009
Messages
875
Location
Rowland Hts , SoCal
I think that is a sleeve on a reg. carriage bolt. see how the threads go right into the sleeve with no shoulder ? Hit the sleeve real hard a few times to break the rust loose , then slice off the bolt to free the sleeve...
 
OP
B

Brian.Evans

Well-known member
Joined
May 10, 2012
Messages
75
Here's where I'm at now. I decided to go with a medium blue. I thought it would be darker blue than this, but oh well. It still looks decent. I'll probably paint the letters white.

Not perfect but much much better than it was.
IMAGE_1000001160.JPG


I'm missing the ring that pulls the jaws back open when the screw is turned. Any ideas on how to fab one? Thought just taking it to a machine shop, bore a hole and a washer with a cotter key.
IMAGE_1000001161.JPG


Everything primed and painted.
IMAGE_1000001163.JPG


My little vises holding my big vise parts. Haha.
IMAGE_1000001164.JPG
 

Outlawmws

Well-known member
Joined
Aug 9, 2011
Messages
39,279
Location
The Badlands
If you local "real" hardware (Big Box need not apply...) does not have a C-Ring the size you need, it looks like a shaft collar (pulley section of that same hardware store) with couple of set screws should fit; just measure the main screw shoulder there.
 

Mavawreck

Well-known member
Joined
Jan 30, 2011
Messages
1,835
Location
Durham NC
Can you cut the threaded shaft off of the bent bolt flush to the collar, then drill out the collar and tap it for an appropriate piece of all-thread?
 
OP
B

Brian.Evans

Well-known member
Joined
May 10, 2012
Messages
75
Ok, I'm probably going to be sorry, but I couldn't wait any longer to see how she looked all together. I still want to paint the letters white, and sand the sides of the jaws and the anvil surface, but other than that and the pivot bolt, it's done. Oh, and new jaws. $25 for nice new jaws will be sweet!

IMAGE_1000001179.JPG


I guess I still need that shaft collar too. Ok, so I have a considerable amount left to do! But the paint is done!
 
OP
B

Brian.Evans

Well-known member
Joined
May 10, 2012
Messages
75
Can you cut the threaded shaft off of the bent bolt flush to the collar, then drill out the collar and tap it for an appropriate piece of all-thread?

No, no tap/die set. It's on the list of wants though. I think I'm going to try to find a similar sized bolt and sleeve.
 
OP
B

Brian.Evans

Well-known member
Joined
May 10, 2012
Messages
75
Still have to get the shaft collar and the center bolt, but the paint is done. I flipped the jaws over until I decide to spend the money on new jaws.

I like restoring vises!

IMAGE_1000001192.JPG
 

back2class

Well-known member
Joined
Jan 7, 2009
Messages
2,723
Looks good, but did you slide the "u" channel back into place in the head or did you bend the "u" channel back straight? If it just slid back up into the head I can't see this being a happy ending. The latter and I think you are all set!
 

bhalv

Well-known member
Joined
Oct 27, 2011
Messages
346
Location
Boise Idaho
so glad i just found this thread as i have the same jaw alignment problem with my 4"wilton, guess its goin in the shop press tomorrow :)
 
OP
B

Brian.Evans

Well-known member
Joined
May 10, 2012
Messages
75
I'm still a little out of line, the other side is a bit lower on the dynamic jaw, and the close side is a couple millimeters more open than the other, but all in all it is great! I've got some D2 steel I may try to make some jaws from. If I can get a machinist friend to help, I might be able to make some really nice semi-hard jaws.

As far as how I straightened the jaws, I put the dynamic jaw and channel under mild pressure. Then I started heating the dynamic jaw. As it got hot, I put more pressure on the press. More heat, more pressure. The heat expanded the jaw enough to allow the press to move the channel back into place. After verifying the alignment, I kept the jaw under pressure and allowed it to cool completely in still air. I just stuck a piece of heavy square tube in the jaws and cranked down as hard as I could. No movement. If they ever move, I'll reheat, press back in place again, and take it to a weld shop. This is only a $20 vise, I wanted to try the cheap way first.
 

stsmytherie

Well-known member
Joined
Dec 16, 2005
Messages
176
Location
VT
Great info in this thread.

Years ago I had picked up a 3.5" Wilton vise at a yard sale, along with a 3.5" Columbian, for not a huge outlay of money. Only later discovered a shifted jaw exactly like the OP's vise.

Figured it was worth trying the 20-ton press trick. I used a heat gun rather than a torch, but great results.

Cheers

https://flic.kr/p/un2Utp

https://flic.kr/p/un2Uqt

Wire brushed, cleaned, primed, and repainted.

https://flic.kr/p/tJ9dzu
 
Last edited:
To avoid these ads, REGISTER NOW!
Top Bottom