To avoid these ads, REGISTER NOW!

C-man drillpress info?

m_hatcher

Well-known member
Joined
Jan 22, 2012
Messages
473
I have been looking for a nice old drill press and a buddy sent me a link to one near him on craigslist. The ad justr states that it is old, works fine and is heavy. He included some pictures also. would anyone know anything about it. I am working on getting ahold of the guy to get some more data at the moment. Thanks

Edit: forgot to add the pictures.
5E25Z65F23E33Kd3G2c5lf01cc7027c371cd4.jpg
5Ie5Z05M63E53G33Nec5l293bff73ea2814df.jpg
5N15Ea5Jd3Lb3Je3H1c5l362e0a93e2b41fe4.jpg
 
Last edited:
To avoid these ads, REGISTER NOW!

spongerich

Well-known member
Joined
Apr 17, 2010
Messages
2,339
Location
Monroe, NY
Check the runout and free play on the spindle. Bearings are available, but you'll want to adjust the price if they need replacement.

They're great little drill presses and IMO are undervalued. I've seen them sell for anywhere from under $50 up to about $100.
 

v7guy

Well-known member
Joined
Jun 7, 2009
Messages
557
Location
Hudson valley, NY
It's a very close relative to my Dunlap.
Like the others have said, check the slop in the spindle and the pulley. I wouldn't pay more than $100 for it.
 

jtbinvalrico

Well-known member
Joined
Jan 2, 2010
Messages
1,375
Location
Tampa FL
Made from 1948 to 1957.....referred to as an "80" starting in 1950.

1948 catalog:

42576891-ac0d-56ca.jpg
 
OP
M

m_hatcher

Well-known member
Joined
Jan 22, 2012
Messages
473
I am going to go take a look at it today and I had no clue how to check runout but I did some research and I got it down now. The seller is asking $50 firm, so we will see shortly. Thanks for the catalog page.
 

jsokoly

Well-known member
Joined
Sep 13, 2010
Messages
64
Location
North Texas
I own and use one identical to that one. It is a fine little drill press. I've had it for about 20 years and I bought it from the original owner. I've got my eye on a 150 now but it needs some serious refurb. and the guy is not budging on the price....yet.
 

balane

Well-known member
Joined
May 4, 2011
Messages
2,996
Location
Pacific Northwest
Made from 1948 to 1957.....referred to as an "80" starting in 1950.

1948 catalog:

Thanks for posting that! I wish it were larger so I could read all the details but still, I'm glad to have it because it let me know what I just bought. I made a thread on it but I got the 80 model pictured in the ad for just $30. It was a basket case but it's nice now. It's really a well made drill press that runs amazingly well, definitely better than the Ryobi Taiwan DP I've been using. (Which I just sold on CL for $40.)

Here's mine, before and after in case you missed my thread. I'm happy to finally have one and I recommend you pick one up if the details work out for you. Seriously, I'm happy to finally have a good drill press, it made such a difference.

.
 

Attachments

  • original1.jpg
    original1.jpg
    73.9 KB · Views: 62
  • original2.jpg
    original2.jpg
    73 KB · Views: 65
  • good3.jpg
    good3.jpg
    110.5 KB · Views: 61
Last edited:

Outlawmws

Well-known member
Joined
Aug 9, 2011
Messages
39,123
Location
The Badlands
The most glaring difference for telling the difference between the 80 and the 100/150 is the Dia of the column. the 80 is 2-1/4 and the 100/150 is 2-3/4" IIR.

there isn't a lot of difference in basic specs between the 100 and 150
 

mrbreezeet1

Banned
Joined
Dec 6, 2010
Messages
3,694
Location
Moundsville, WV, 15 miles South Of Wheeling WV
Thanks for posting that! I wish it were larger so I could read all the details but still, I'm glad to have it because it let me know what I just bought. I made a thread on it but I got the 80 model pictured in the ad for just $30. It was a basket case but it's nice now. It's really a well made drill press that runs amazingly well, definitely better than the Ryobi Taiwan DP I've been using. (Which I just sold on CL for $40.)

Here's mine, before and after in case you missed my thread. I'm happy to finally have one and I recommend you pick one up if the details work out for you. Seriously, I'm happy to finally have a good drill press, it made such a difference.

.

try this
http://www.roseantiquetools.com/sitebuildercontent/sitebuilderfiles/craftsman1948.10.1.pdf

http://www.roseantiquetools.com/id116.html
 
OP
M

m_hatcher

Well-known member
Joined
Jan 22, 2012
Messages
473
I have been talking with the seller because I have not had a chance to go look at it yet due to work etc. It is about a 2 hour round trip and if it has not been sold by saturday then I am gonna go pick it up pending inspection.
 
OP
M

m_hatcher

Well-known member
Joined
Jan 22, 2012
Messages
473
Update:
I finally had the time to go and look at the drill press today and decided that I needed it. As far as I can tell, it could be hooked up right now and last for many years. The seller said that it was his grand fathers and that it had been used gently for what he could remember and that he himself had no use for it. It has the original cord if I am correct, and it spun right up as soon as I switched it on. I also believe that the switch is original. I am going to start tearing it down and restoring it now. The only thing I can see that may need to be replaced is the band around the motor. It seems to be past the point of fixing but we will see.

I have been reading the other treads about restoring these presses and know that I should watch out for bearing and wiring issues. I checked the run out of the quill and chuck and it seems to be quite straight but I do not have a dial indicator to properly do it. Is there anything else specific I should keep a eye out for or do? Thanks

WP_20120527 1.jpg

WP_20120527 2.jpg

WP_20120527.jpg

WP_20120527 3.jpg

WP_20120527 4.jpg

WP_20120527 5.jpg

WP_20120527 6.jpg
 
OP
M

m_hatcher

Well-known member
Joined
Jan 22, 2012
Messages
473
It has been awhile since I posted my progress on my drill press restoration. I finished up the base, table and main shaft and got it back together. I used dupli-color exact match system starting with primer then paint and then clear coat. I have not ran into any issues yet except that even with the clear coat the paint seems to be quite easy to chip. I just happened to drop a screwdriver on it and it took a nice size chip out of the finish. I don't know if I just need to be patient and let it cure longer or what but it has me worried.

WP_20120727 1.jpg
WP_20120727 2.jpg
WP_20120727 3.jpg
WP_20120727.jpg
 
OP
M

m_hatcher

Well-known member
Joined
Jan 22, 2012
Messages
473
yea the exact match system is for vehicles. It just comes in spray cans for touch ups.
On the post I first hit it with a wire wheel in a drill. Then just went from 60grit to 1000grit by hand followed by mothers polish by hand. Up close you can still see lots of imperfections on it but they were too deep to get out.
 
To avoid these ads, REGISTER NOW!

jtbinvalrico

Well-known member
Joined
Jan 2, 2010
Messages
1,375
Location
Tampa FL
That looks fantastic. I think paint generally requires waaayyy longer than we think to really harden up. Touch up the chip, don't sweat it, and get to drilling :beer:
 

toomanytoyzz

Well-known member
Joined
May 11, 2012
Messages
1,571
Location
Malvern, PA
I just got one a few weeks back and absolutely love it. I paid $100 and was the first guy in a long line of people willing to buck up for it. My model is the bigger unit (8.2 amps) and runs as smooth as silk. I just poked three holes in my welding table (1 1/2" thick) to mount my Charles Parker #975 on it. It chewed through it like butter. My Jap press wasn't even an option and would have probably been put in the scrap pile after the first hole. No comparison.

You have done a REALLY nice resto on it. I would love to, but I use my stuff too much. It would get ugly again quick.:lol_hitti
 
OP
M

m_hatcher

Well-known member
Joined
Jan 22, 2012
Messages
473
Since my last post on the DP I have taken the head unit apart and have run into a spot that I need some direction on. When I bought the DP it ran fine with no noises or vibrations, so I figured that all the bearing were in decent shape. After pulling it apart I find other wise. The bearing on the spindle pulley seem fine but the bearing(s) on the actual spindle part are not. The upper bearing on the spindle is intact but the lower one is completely gone. I know I am going to have to replace them but I am not sure how to disassemble the spindle to get to the pieces to remove/replace/restore. Anyone care to help point me in the right direction? Thanks as always.


WP_20120814 1.jpg

WP_20120814.jpg
 

jtbinvalrico

Well-known member
Joined
Jan 2, 2010
Messages
1,375
Location
Tampa FL
First order of business is to remove the chuck, then the depth gauge bracket will come off. Then you can get to the finer points of disassembling that piece.

For reference, here's some links to guide you. This is the exploded diagram, with an excellent layout of the quill and spindle:

http://vintagemachinery.org/pubs/detail.aspx?id=4779

Here's another one with some nice detail on tearing down a spindle, this one features an old Walker-Turner:

http://www.forums.woodnet.net/ubbth...mber=4978276&page=&view=&sb=5&o=&fpart=3&vc=1

Hopefully this gets you started.
:beer:
 
OP
M

m_hatcher

Well-known member
Joined
Jan 22, 2012
Messages
473
I have not had much time to work on the DP, but I got a chance to completely disassembly the spindle. I already knew that I was gonna have to replace the bearing at the bottom of the quill but as I took it apart the top bearing basically fell apart also. I checked on sears direct for the bearings and it does not have them available. Where is everyone getting their bearings.

I also am going to replace the bearings located under the pulley and the ones in the motor if anyone knows where those can be picked up also.
 

v7guy

Well-known member
Joined
Jun 7, 2009
Messages
557
Location
Hudson valley, NY
I've looked off and on for quite some time with no luck. I was figuring I would end up having to make them out of some bronze stock. Still haven't yet though.
 
OP
M

m_hatcher

Well-known member
Joined
Jan 22, 2012
Messages
473
I just got off the phone with Accurate Bearing and they were able to find me a replacement bearing for the quill with no problem. The had 2 different options to chose from which was a low quality chinese bearing that was $1.90 each or high quality for $6 each. So I ordered 2 high quality ones and he said they will be going out today USPS. I will be calling them back to order motor bearings and pulley bearings once I get to those. Thanks mrbreezeet1!
 

v7guy

Well-known member
Joined
Jun 7, 2009
Messages
557
Location
Hudson valley, NY
I'll be damned, guess I'll give them a call. I need to replace the quill bearings and the headstock bearings in mine. I can't even buy the bar and machine it for that.

Does anyone know how much room between the shaft and bearing is usually required
 

jon12345

Member
Joined
Aug 25, 2012
Messages
13
Thanks for that link. Here's the model from 1941, I think, that I picked up in the "gold country" a while back at a garage sale. The guy's garage looked like it was jack-hammered into the side of the mountain, a real cave. $40 was all it took and about $20 in extra gas it took to get it home 250 miles. Up there it must have had a tough life for many years, but it bores true holes and I use a fly-cutter with no problem. It's heavy, built to take it and I like how it is real quiet. I need a guard for the front, it was lost in the shuffle and bustle. Interesting feature on mine is the chuck is released and a 3/4 inch morse taper chuck from my lathe can be inserted. Your restore is commendable in effort and result. $50 in 2012 would be like $5 when I got mine.
 

Attachments

  • Drill press.jpg
    Drill press.jpg
    87.6 KB · Views: 23
OP
M

m_hatcher

Well-known member
Joined
Jan 22, 2012
Messages
473
I'll be damned, guess I'll give them a call. I need to replace the quill bearings and the headstock bearings in mine. I can't even buy the bar and machine it for that.

Does anyone know how much room between the shaft and bearing is usually required

At what section of the shaft and bearing are you referring to? You have to press the bearings into the quill and then press the quill onto the main shaft if that is what you are referring to.
 
OP
M

m_hatcher

Well-known member
Joined
Jan 22, 2012
Messages
473
I received my new quill bearings yesterday in the mail and they seem to be quite nice.
WP_20120921 1.jpg
WP_20120921.jpg
I only have one thing that worries me. The bearings are not super snug once in both sides of the quill. Once I had installed the bearings in both sides of the quill I proceeded to install the main shaft through the quill and all I had to do was push hard, I didnt have to use a press etc. Is this going to be a problem, once I install the washers and end cap that holds down the quill?

Requests:

1. Can anyone post up a picture of the quill gasket(part#18417) the goes between the feed stop bracket and the bottom of the quill? My DP did not have one and since Sears does not make them then I need to find a replacement. Or if anyone has a extra I would be happy to purchase it from you.
WP_20120921 2.jpg

2. My DP did not have the washers that go between the top of the quill and the quill stop. Anyone care to measure theirs for thickness so I can pick up some replacements from Lowes or HD.
WP_20120921 3.jpg
 

Attachments

  • Untitled.jpg
    Untitled.jpg
    11 KB · Views: 11
OP
M

m_hatcher

Well-known member
Joined
Jan 22, 2012
Messages
473
The old ones came off with a little work but no where as easy as the new ones went on.
 

mrbreezeet1

Banned
Joined
Dec 6, 2010
Messages
3,694
Location
Moundsville, WV, 15 miles South Of Wheeling WV
Guy over there has a Craftsman 113.24590 drill press and is looking for a v-belt.
Anyone over here have one? (that drill press)
Is it just a regular width belt?

Friends, I was given a '70's era Craftsman drill press. It is a good solid machine. The problem is it came without a v-belt. Sears doesn't stock the original and doesn't have a substitute listed. The closest I have come to finding the correct belt is a 2xl46. This belt still doesn't seat properly in the pulleys. The pulleys have a very narrow 'v'.
Anyone have an idea where I can find the correct belt for this machine?
Thanks.
 

jtbinvalrico

Well-known member
Joined
Jan 2, 2010
Messages
1,375
Location
Tampa FL
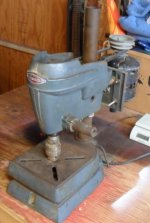
m_hatcher, I think v7guy's DP has some bronze bearings in it, whereas yours is using all ball bearings. In that sense, the two of you have dissimilar bearing replacements going on.

v7guy, I'd be willing to bet that someone over at owwm.com has machined new bronze bearings for one of these DPs and can guide you in the process and specs.

m_hatcher, here's a photo of the feed stop gasket you are referring to. Measurements are:
OD 2.062"
ID 1.625"
Thickness .122"
You can cut it from some flat rubber and trim it to fit in like this one:

IMG_2320.jpg

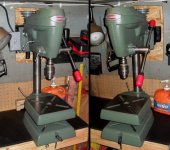
As to the washers between the top of the quill and the quill stop....your photo shows the Spindle Collar, but you are missing the Washer and the Rubber Washer (parts 18422 and 18429 on the parts diagram for this DP). This is what those parts look like installed:

IMG_2322.jpg

And opened up:

IMG_2324.jpg

The size of these two washers isn't something that has to be super-precision; if you can get close to these measurements, you should be good to go. The rubber washer could be easily made, and the metal washer can be easily modified out of another washer.

Here's the measurements of the metal washer:
OD 1.06"
ID .631"
Thickness .054"

Here's the measurements of the rubber washer:
OD 1.06"
ID .631"
Thickness .185"

Lastly, I wouldn't worry too much about the bearing fit as you have described it. The test will be whether or not you have spindle play after reassembly.
 
OP
M

m_hatcher

Well-known member
Joined
Jan 22, 2012
Messages
473
jtbinvalrico, I dont know what I would do if you didn't take the time to help out. You are a life saver man. I have the metal washer that goes between the quill stop and top to the quill but the rubber must have detoriated over the years. Thanks for the measurements, I can make the rubber ones.
 
To avoid these ads, REGISTER NOW!
Top Bottom