To avoid these ads, REGISTER NOW!

How NOT to tighten a hatchet head on a handle...

Outlawmws

Well-known member
Joined
Aug 9, 2011
Messages
39,080
Location
The Badlands
I picked up yet another Hewing style hatchet over the weekend. I get these almost anytime I can get them for next to nothing, and this was really next to nothing!

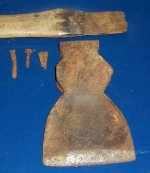
It had the handle, but it was VERY loose on it and I could see one screw in there at a glance. I wasn't sure the handle was even worth saving, but the screws (there were two of them) came out easy and then the steel wedge also came out as it was hanging out enough to get a hold of it with the vise. done!

attachment.php


attachment.php


As loose as the handle was, I still needed to drive it out with a 1/4' drift punch on the more solid places of the near ruined handle. I decided to belt sand the high spots just below the head and lose some of the top part that was all chewed up. that would get the head down to "good" wood, the rest of the handle was in decent shape despite being very old.

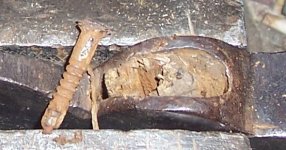
The part of the handle in the head had never had a wooden wedge installed, nor had the handle been cut for one! :wtf: So I cut a slot in the handle, and made a wood wedge for it. A note, I've found that hitting the sides of a wood wedge on a belt sander works wonders for getting it started into the slot, and the smoother sides allow it to wedge in deeper and therefore tighter.

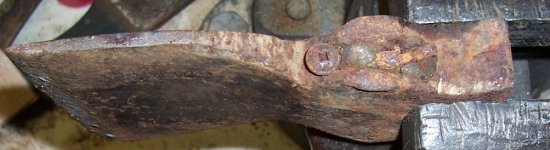
The head got an overnight bath in the E tank and came out pretty good, except for the peened top edges of the haft hole where a PO had pounded on it to "get it on the handle tighter!" (I guess they never got the concept of inertia, where all you have to do is pound straight down holding the offending handle on some concrete or a big rock and the head will drive itself back on...), so I used a high speed burr to remove the inside peening so it would not interfere with the handle installation.

Once all the rust was gone, and even the steel wedge was wire wheeled off, I pounded the head back on (using inertia...) adn then wood wedged the ahndle tight. this left about 3/4" of handle stiking out the top so I belt sanded that off and hammered in the steel wedge. Rock solid! :rocker:

attachment.php


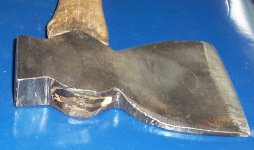
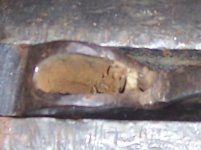
Why so much effort for an old hatchet? I like these hewing hatchets for a reason; These old ones, (I can't speak for the currently made versions...) have an inlaid hardened steel blade forged into the softer more durable main head for about 1/2 the thickness of the blade, and you can see it in this pic of the back side. you can see what looks like a shadow: that is the inlay, the hammer face also has a hardened face if you look that is about 5/16" thick. I actually have one of these that has part of that face chipped out and broken.

In any case, when sharpened on the opposite face the inlay is on the edge, and the softer metal is about 3/8" exposed (about 1/4" on the outer curve of the blade), and holds an edge much better than the ordinary hatchet.

I have one of these heads on a 30" long doe foot ax handle, and the added handle length give that nice edge a lot of head speed and they cut far better than a head that light has any reason to. That one has been my primary ax/hatchet for camping for over thirty years now.


attachment.php
 

Attachments

  • Before-1.jpg
    Before-1.jpg
    111.4 KB · Views: 2,086
  • Before.jpg
    Before.jpg
    101.1 KB · Views: 2,095
  • after.jpg
    after.jpg
    88.5 KB · Views: 2,428
  • Blade inlay's.jpg
    Blade inlay's.jpg
    120.5 KB · Views: 2,416
To avoid these ads, REGISTER NOW!

amolaver

Well-known member
Joined
Mar 10, 2009
Messages
834
thats pretty neat re: the inlaid hardened portion of the blade. never seen or heard of anything like that..

and my, my, the finished product is hardly recognizable compared to what you came in the door with! nice work!

ahm
 
OP
O

Outlawmws

Well-known member
Joined
Aug 9, 2011
Messages
39,080
Location
The Badlands
Wiss used to use inlaid blades in their larger scissors and bench style tin snips. I think that was stopped after one of the wall street "acquisitions"
 
OP
O

Outlawmws

Well-known member
Joined
Aug 9, 2011
Messages
39,080
Location
The Badlands
Yep, a Robertson, and the other long bit in the second pic is another wood screw, with the head filed into sort of a horseshoe head which was what I thought it was when I first saw the "head"; filed to flats and hammered in place...

:twak:
 

pete379

Well-known member
Joined
Dec 4, 2009
Messages
471
I've got one of those (just the head) sitting on a shelf -- it was in some of my dads stuff-- I wire wheeled it and painted it and set it on the shelf a few years back, never knew it was a "hewing hatchet" !! learn something new every day !
pete
 
OP
O

Outlawmws

Well-known member
Joined
Aug 9, 2011
Messages
39,080
Location
The Badlands
Nice restore. Do you have any tips for fitting a handle to a hatchet or axe?

The first concern for me is handle selection as seen from the end of the handle, which way are the wood rings going? they should be in line with the long axis of the eye in the head, and in line with the direction of swing. Anymore it's a **** shoot what you will find in the handle bins, as they simply toss then through automated machinery.

The eye of the head should be one of two types, tapered, or a "double taper” meaning it is tightest in the middle of the head, and had room for some taper of the handle at both ends.


  • If it is of the tapered type the part of the handle that goes into the head should be restively straight for the distance of the head at least before swelling out to provide a stopping point for the head. The small and of the taper is the end you insert the handle into so that after it is wedged, the head will be captured by the taper of the wedged end.

  • If it is the double taper, type head, the part of the handle the inserts into the handle should have a slight taper also, adsn be able to fit at leas part way into the head before things start getting tight. That way once it is firmly driven on (using inertia, not a hammer...) and wedged it is wedged in both directions.


In both cases if the handle gets too tight to soon shave it down a bit so it doesn't. You can use a pocket knife, draw knife, wood rap or coarse file, or a belt sander but do it so the head goes on to the handle straight.

Make sure there is a thin saw cut the long ways down the middle of the head section of the handle, to just past center of the head for a double taper, and nearly to the bottom for a single taper head. A coarse toothed hack saw can do this, or a back saw is a good choice. Power saw blades of almost any description are too thick, with the possible exception of a band saw.

Most factory provided wood wedges are rough sawn. Sand it smooth and it will go deeper and easier into the handle. I belt sand these.

If the handle cut slot is pinched closed, you can open it a little with a wood chisel, just enough for the wedge to start. The wedge then gets hammered in TIGHT; until it won’t go anymore. Cut or belt sand the excess handle and wedge off pretty much flush, and then use one or two steel wedges across the line of the wood wedge. Drive them in flush. This can be at a slight angle. This wedges the handle in the lengthwise direction most steel wedges will have barbs on then to help keep them from backing out.

Some like to soak the head and handle in boiled linseed oil overnight. it's supposed to prevent the wood from drying out and shrinking, loosening the head. I think it is partly dependent on your local weather/humidity, and where it is stored. I have bought hammers, hatchets and axes with dried out handles, but none of the ones I have installed or bought new have dried out where I live, unless I leave then outside in the sun a lot (shovels picks and rakes way too much...)
 
Last edited:
OP
O

Outlawmws

Well-known member
Joined
Aug 9, 2011
Messages
39,080
Location
The Badlands
I've got one of those (just the head) sitting on a shelf -- it was in some of my dads stuff-- I wire wheeled it and painted it and set it on the shelf a few years back, never knew it was a "hewing hatchet" !! learn something new every day !
pete

The flat side and only being sharpened on one side is what makes it a hewing tool. Used for making the side of logs flat, in the manual labor days. They actually made then right and left handed, but I think that's partly an accident of which manufacturer, as no one company I know of currently does both, but I have three lefties and the rest (eight) are righties.
 

metaldad

Well-known member
Joined
Aug 2, 2011
Messages
7,730
Location
nw indiana
that is very interesting, Outlaw. inlaid blades, righty and lefty.
and thanks for the in depth 'how to'
 

Bruce Lancaster

Well-known member
Joined
Apr 3, 2006
Messages
1,642
When I pick up a broken hammer or axe from the junkyard or fleamarket if I do not need it immediately I toss it on top of the furnace. That way I see it when winter arrives, as a like to set handles when the humidity has been around nothing for a while. Makes me feel like any changes in the future will be towards tighter.
 
To avoid these ads, REGISTER NOW!

71flh

Banned
Joined
Jun 15, 2011
Messages
379
I'm loving this thread, since I love hammer (and similar cutting) type tools.

BTW, I went to the local ACE today in my quest for hardwood wedges. They seemed green and soft so I'm guessing (not much) poplar. Next I think I'll try the not so local place where I can get hardwood, or the surplus building supply. Maybe a bit of old flooring?
 
OP
O

Outlawmws

Well-known member
Joined
Aug 9, 2011
Messages
39,080
Location
The Badlands
I'm resurrecting this after near 7 years as I did another hatchet, this one as a camp hatchet for tent stakes and pulling them, as well as cutting the occasional limb or splitting firewood. Mostly because the claw on this one seems to be about perfect for pulling stakes. Much better than the average cutting pounding tool.

I also wanted it to have a much longer handle than the ones that are made for this handle eye style. (10" to a foot vs. the 18" handle I picked)

But the first job was getting the junk out of the old busted off handle remnant!

First "wedge" I pulled: a Square nail! :headscrat

attachment.php


Second was a wood screw! :wtf:

attachment.php


I also pulled a chunk of wood that almost looked like another bit of metal. Aster that a tap with a punch and most of the remaining wood just fell out:

attachment.php


I forgot to make any "in process" shots of reshaping the handle for the tapered eye vs. the oval Ball Peen Handle shape the handle started with. this handle was made for the big up to 48 oz. BP hammer heads so the 20 oz hatchet head should be an easy load. A good thing as this particular handle was less that ideal for the heavier heads as the grain was 90 degrees from where it should be...

Here it is shaped and the head well seated. I still need to wedge it but I already tested it. swings well and bites well!

attachment.php


I may do something for a better grip near the end of the handle. I'm debating that with myself.
 

Attachments

  • 1 Nail.jpg
    1 Nail.jpg
    117.1 KB · Views: 1,471
  • 2 screw.jpg
    2 screw.jpg
    86.8 KB · Views: 1,472
  • 3 Tap.jpg
    3 Tap.jpg
    51.7 KB · Views: 1,467
  • 4 almost done.jpg
    4 almost done.jpg
    114.2 KB · Views: 1,480
OP
O

Outlawmws

Well-known member
Joined
Aug 9, 2011
Messages
39,080
Location
The Badlands
TX, It depends.

If its just a little off I'll use an old school round honing stone. If its like this last one, I might use files to do the rough cutting as the metal is relatively soft for the average hatchet or ax. On this last one I tried a 1" strip sander and touched it up with a light slow touch and kept it cool. That was sweet!


The inlaid blades are tough with that hardened steel insert - a file won't cut it. You can use a file on the softer metal the inlaid part is in if needed, BUT the inlay is VERY hard. I've just been patient with hand sharpening stones and used coarse ones when I needed to remove a lot of metal. Graduating to fine as needed.

I will probably give the strip sander a try on one of the inlaid blades, BUT being very careful with keeping it cool

What I WON'T use is a grinding wheel or mini grinder. They cut too fast, too harshly, and it's hard to keep from burning the edge.
 

NC Rick

Well-known member
Joined
Oct 26, 2017
Messages
302
Location
Asheville
Thank you for the handle and hatchet education, a fun and well written read which I hope I can remember half of. I found a similar hatchet in the Woods late last year and cleaned it up and installed a new handle. I noticed I couldn’t file it to sharpen it and that made me happy. I thought it was a “carpenters hatchet
Money isn’t as nice looking as yours nor do I think it is as old. I like it’s flat cutting edge and the thin profile and keen edge. It will be nice for small starter wood and things one might use a large knife for. I nearly wa t to re-work the handle after reading your explanations. Thanks!
 

anythingyoucanimagine

Well-known member
Joined
Feb 6, 2019
Messages
423
Location
New England
Some like to soak the head and handle in boiled linseed oil overnight. it's supposed to prevent the wood from drying out and shrinking, loosening the head. I think it is partly dependent on your local weather/humidity, and where it is stored. I have bought hammers, hatchets and axes with dried out handles, but none of the ones I have installed or bought new have dried out where I live, unless I leave then outside in the sun a lot (shovels picks and rakes way too much...)

Actually Swel-Lock is the best. It swells the wood and locks it into it's swollen dimension. So when you bang in the kerf wedge, just put a few drops of Swel-Lock down the kerf slot, then on the wedge. Then yes, BLO (boiled linseed oil). I have a few old ammo cans full of BLO. Once a head is securely on a haft/handle it gets dunked into a bucket of BLO for a week or three.

Linseed oil hardens through a process of oxidation (just like rust) so as it oxidizes, it gets hard and both protects the wood, waterproofs any metal (usually it gets worn off) and swells the wood in the eye of the tool.

For handles/hafts there's HH (House Handles) and also Tennessee Hickory. I love the guys at HH but honestly everyone says their quality has gone downhill a bit over the past few years. (this is my experience too) Tennessee Hickory has been awesome. Unless you are a real hard-core collector, it probably doesn't matter.

HH and TH make a ton of stuff for all kinds of bigger vendors. When you buy direct from HH or TH you can pay an extra buck or two and get a "hand picked" piece. It's worth it every time. Someone walks out to the pile and picks out a handle with a perfect grain pattern. You can also pay another buck or two and they will sand off the poly. That's worth it too because all their handles are HUGE (fat/thick) when they come. You'll have to shape and shave them down to the eye/tool you have. Having the poly gone saves a ton of time.

Check out An Axe to Grind .PDF by US Forestry Service:

https://www.fs.fed.us/t-d/pubs/pdfpubs/pdf99232823/pdf99232823Pdpi72pt04.pdf

The book that PDF references covers a lot. A draw knife and Nepalese Kukri knife make quick work of a hickory haft.

I don't have any "wall hangers". My three best axes are a 1945 US Army Plumb (issued to my grandfather's brother), a 1958 Plumb Boy Scout (my dad's) and a 1939 Collins Legitiumus 5lb. The 5lb is pretty rare. Her great grandfather was a tool & die maker in CT, was his axe. They all get used, sharpened then dumped back into ammo cans full of BLO.

If you ever pick up an old tool that's a little loose (and it hasn't been basterdized with screws in the eye/kerf wedge), usually a couple day bath in BLO will tighten it up.

The real purists would NEVER use metal as part of their kerf wedges. Everything should be wood. FYI: All those "real purists" who ***** about people using metal wedges... they carry a metal wedge in their pocket when they are out in the woods :) It's considered "acceptable" by most to use a wooden kerf wedge and then an angled metal wedge to lock the wooden kerf wedge into place. Poplar makes great kerf wedges. Hickory too but poplar with Swel-Lock is really easy. (if you Google Swel-Lock you can easily find how to home-brew your own and not pay what they want for name brand)

edit:

I noticed I couldn’t file it to sharpen it and that made me happy. I thought it was a “carpenters hatchet

If you have a vise, wrap the handle in a towel and then use two blocks of wood and clamp the hatchet/axe handle in the vise solid. When you sharpen an axe/hatchet you push the file into the blade (so if you push too far or slip you'll cut your hand). You can also use light oil and a whet stone (Google it) or lots of people use those red/green/blue/black diamond stones. Just be careful --a dull knife is a dangerous knife and a sharp knife is a safe knife. If you do it right you could land yourself a trip to the ER for stitches. If you can shave the hair off your arm then you are good. There are videos out there of the old timers sitting down at giant whet wheels sharpening axes. The top of the wheel always spins towards them. I don't know why I can't find the full PDF. It's free/published by US Forestry Service.

https://www.fs.fed.us/t-d/pubs/pdfpubs/pdf99232823/pdf99232823Pdpi72pt03.pdf

Take a look at that first page picture. The poll (back, blunt part) is at the palm of his hand and the blade is facing the wheel which is spinning towards the blade. When you sharpen with a file or stone, that is the direction you want to be moving in, at the blade, not away from it.
 
Last edited:

rick carpenter

Well-known member
Joined
Jan 20, 2011
Messages
3,763
Location
Huntsville, East Texas
(I guess they never got the concept of inertia, where all you have to do is pound straight down holding the offending handle on some concrete or a big rock and the head will drive itself back on...), so I used a high speed burr to remove the inside peening so it would not interfere with the handle installation.


If the handle cut slot is pinched closed, you can open it a little with a wood chisel, just enough for the wedge to start. The wedge then gets hammered in TIGHT; until it won’t go anymore. Cut or belt sand the excess handle and wedge off pretty much flush, and then use one or two steel wedges across the line of the wood wedge. Drive them in flush. This can be at a slight angle. This wedges the handle in the lengthwise direction most steel wedges will have barbs on then to help keep them from backing out.


Some like to soak the head and handle in boiled linseed oil overnight. it's supposed to prevent the wood from drying out and shrinking, loosening the head. I think it is partly dependent on your local weather/humidity, and where it is stored. I have bought hammers, hatchets and axes with dried out handles, but none of the ones I have installed or bought new have dried out where I live, unless I leave then outside in the sun a lot (shovels picks and rakes way too much...)


Good write-up, but there are a couple of things I like to do different. When I go to final seating of the head, I lightly tap the ax down like you describe but just enough to hold the head on when turned upside down. Then I turn the ax upside down and whack the knob with a hard rubber or wood mallet until the head is fully seated. This does not run the risk of splitting the handle as does 'piledriving' onto a hard surface.

I let the entire wedge soak in a jar of BLO for a few days until I start fitting the head, and then I place the eye end of the handle down into the jar and let them soak for a day or so longer. Then I do as above to seat the head and but I only pound the wedge in half way. After a week, I pound the wedge in fully then cut it and the handle with 1/4" protruding which helps lock the eye on as the exposed wood expands. Then I pound in the steel wedge(s).

Finally, if the handle is straight like for a double-bit ax or a sledge hammer, I shape a shallow tapered 'waistline' into the handle about 2-3" above the knob end. This helps me grip it better whether swinging it properly or using the sledge like a ram.
 

neophyte

Well-known member
Joined
Apr 23, 2012
Messages
9,526
Location
Pennsylvannia
Wiss used to use inlaid blades in their larger scissors and bench style tin snips. I think that was stopped after one of the wall street "acquisitions"

I believe Bessey still manufactures snips with ultra hard inlaid steel cutters which they call “Offset, extra hard, high tolerance”.
Other German companies may as well.
The Snips usually have purple handles.

Wiss and Midwest both manufscture “Soecial Hardness” snips for cutting materials like Stainless, Titanium, and Inconel.
I don’t think the snips have inlaid cutters, but maybe modern steel alloys, combined with induction and laser hardening, or maybe cryo hardening of the alloys makes it unessesary to inlay the cutters.
Midwest still makes cable cutters with separate ultra hard M2 blades, but the blades appear to be screwed on rather than welded.

As for axes, japanese axes are still made with hard steel forge welded to softer steel or iron body and eye. Japanese hammers are made this way as well for traditional woodworking tools.
 

rlitman

Well-known member
Joined
Oct 18, 2010
Messages
24,576
Location
Long Island
...The inlaid blades are tough with that hardened steel insert - a file won't cut it. You can use a file on the softer metal the inlaid part is in if needed, BUT the inlay is VERY hard...

Most likely, it is inlaid with the same steel used for files, chisels and plane iron tips. How hard it ends up depends on the heat treatment.

I can say that I own several pairs of Wiss 20 shears with inlaid blades, and all can be sharpened with a sharp single cut mill file (but they're just barely soft enough for this). Of course, if a file skates on it, then the stone is the next option, but I don't encounter edges that hard in most scissors, because such hardness in a narrow angle edge usually means it will chip too easily. In an axe or hatchet, the grind can be a little convex, and the edge is a less acute angle to begin with, so a higher hardness can be used.

I believe Bessey still manufactures snips with ultra hard inlaid steel cutters ...

Wiss still makes inlaid shears to this day:
https://www.amazon.com/dp/B005LBMFCY/?tag=atomicindus08-20

They've just been declining in popularity ever since Fiskars hit the market with their cheaper and lighter orange plastic handled shears in 1967, and everyone started copying that design as soon as the patents ran out.

Today, most people have trouble cutting with inlaid shears, as they require a firmer grip to get a sufficient shearing action compared to springy stamped sheet steel blades that are bent towards each other on a crazy curve.
 
To avoid these ads, REGISTER NOW!
Top Bottom