To avoid these ads, REGISTER NOW!

aka Larry's Erection...with graphic pictures!

aka Larry

Well-known member
Joined
May 2, 2012
Messages
8,011
Location
Eastern, NC
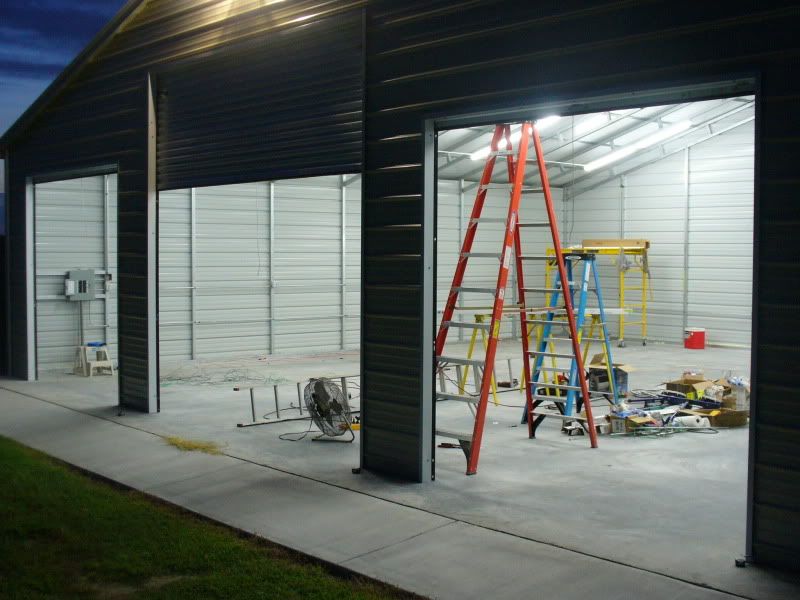
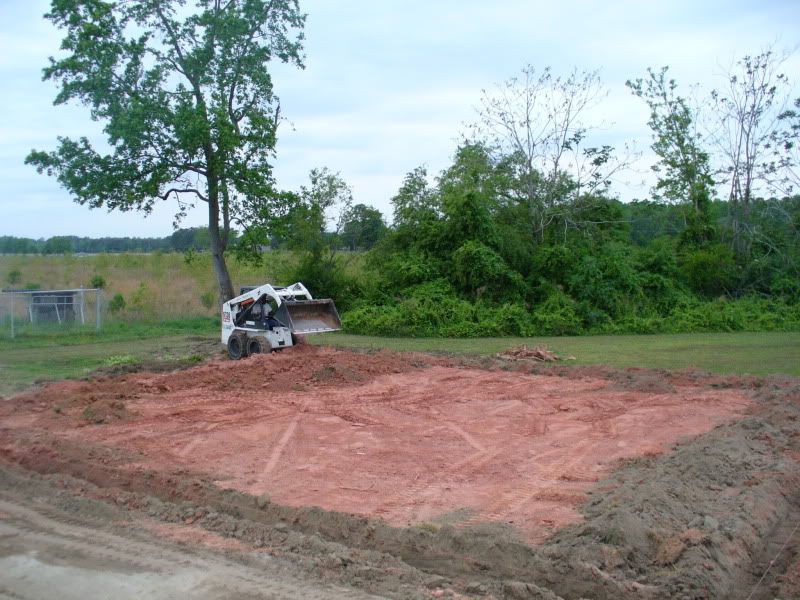
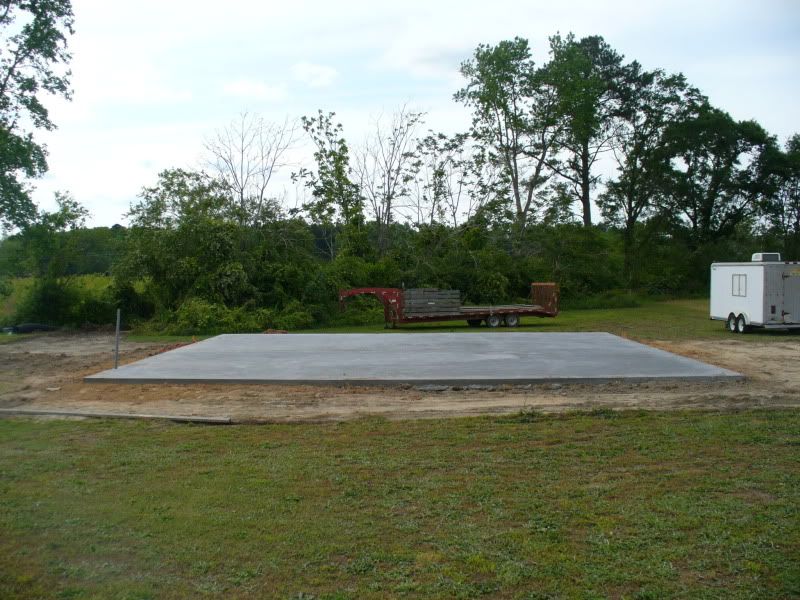
I had a small teaser in my introduction thread (picture of the slab), but now that I have something to actually post about, here goes!

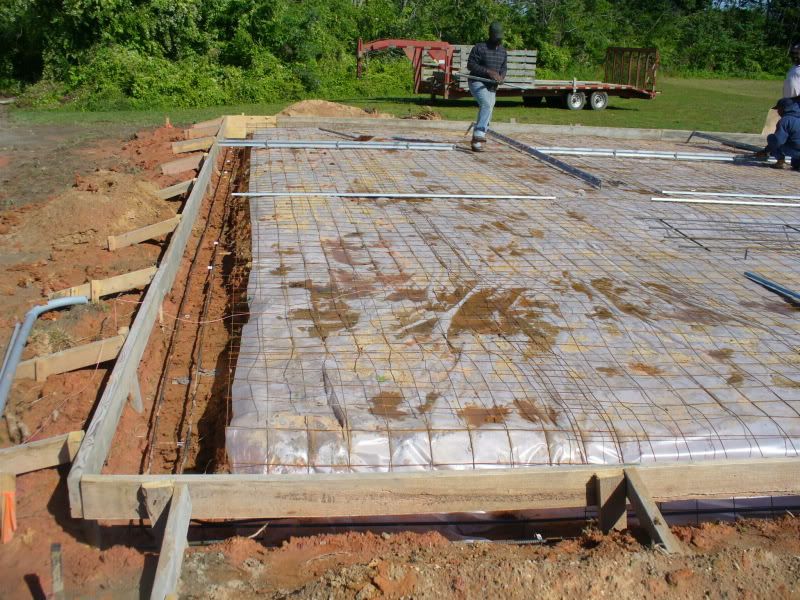
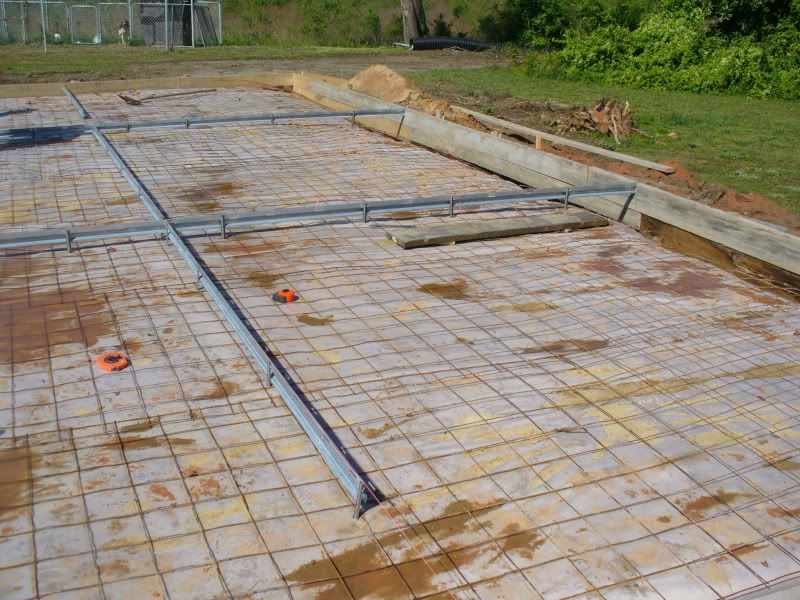
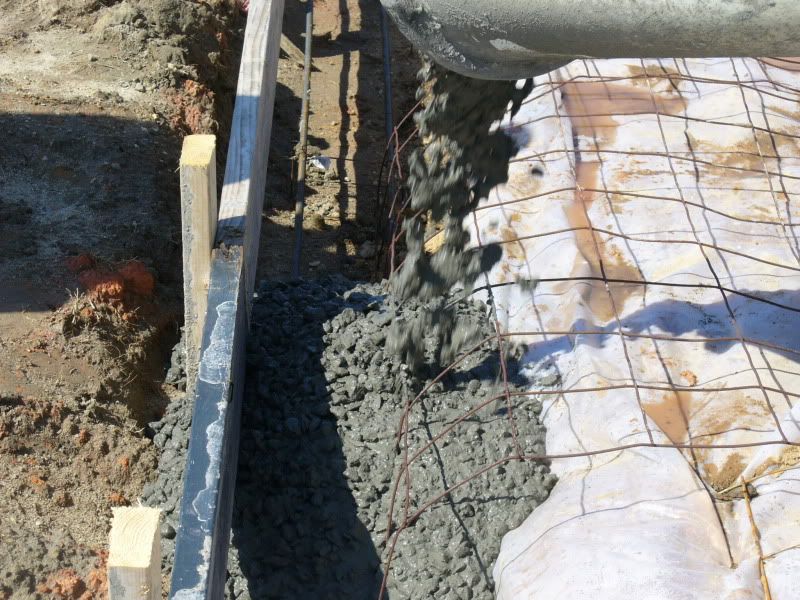
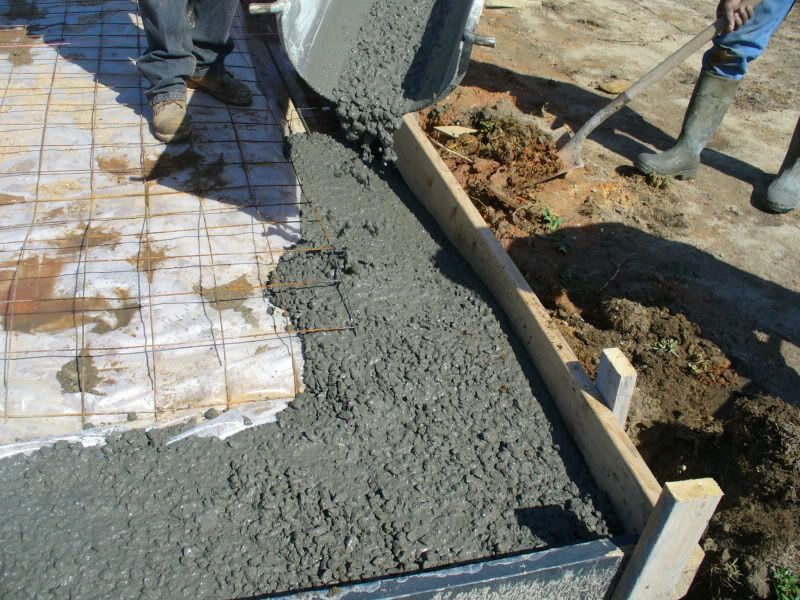
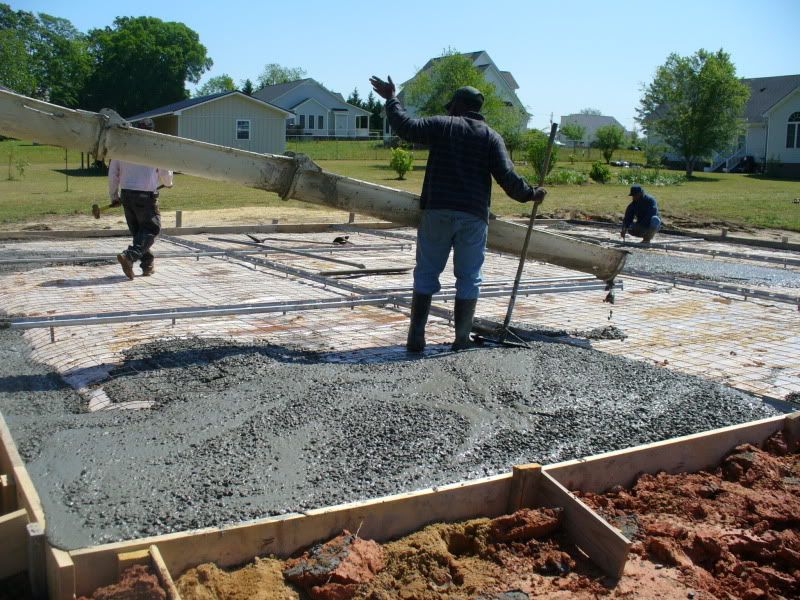
First up, the slab construction. The size is 40’x40’. I used 3,000 PSI concrete with 6”X6” WWF. Per the county code, the perimeter footing is 12"x12" with the slab portion at a minimum of 4" thick. I also used #4 rebar in the perimeter footing for extra strength. For the control joints I used metal strips called that my concrete guy called “keyway".

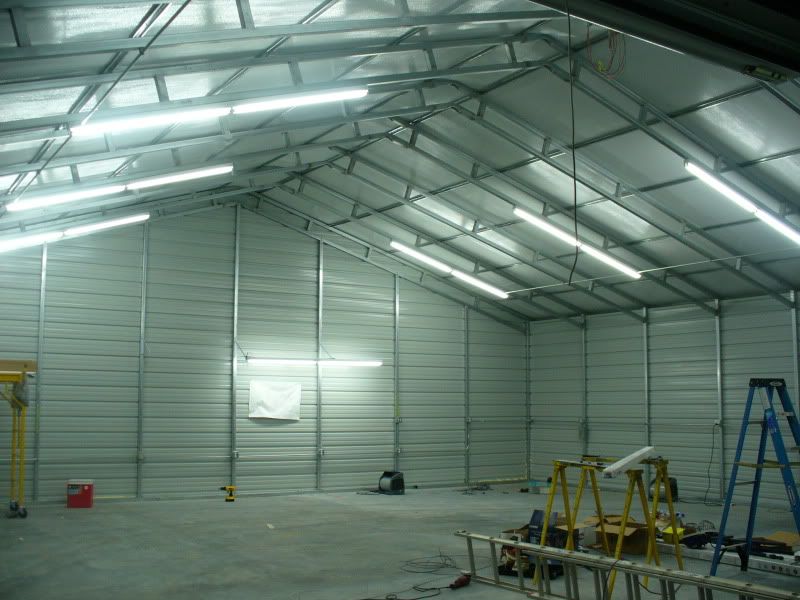
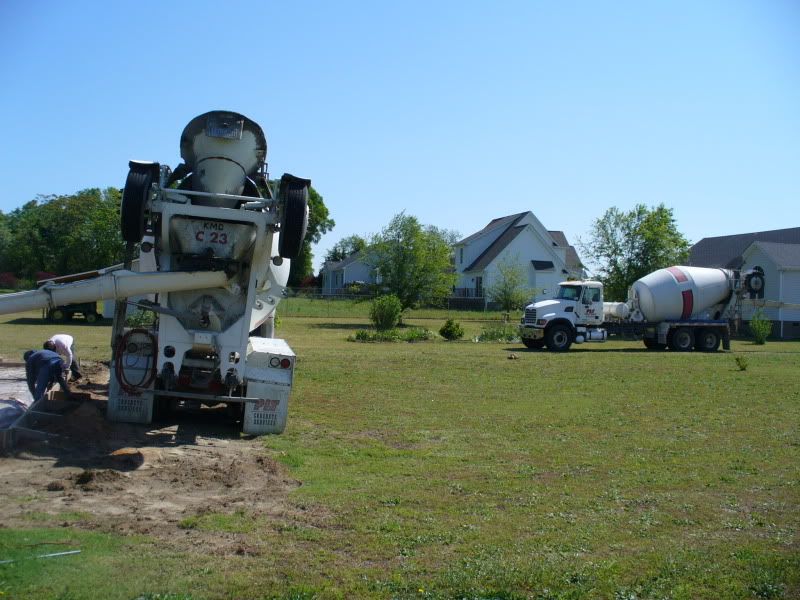
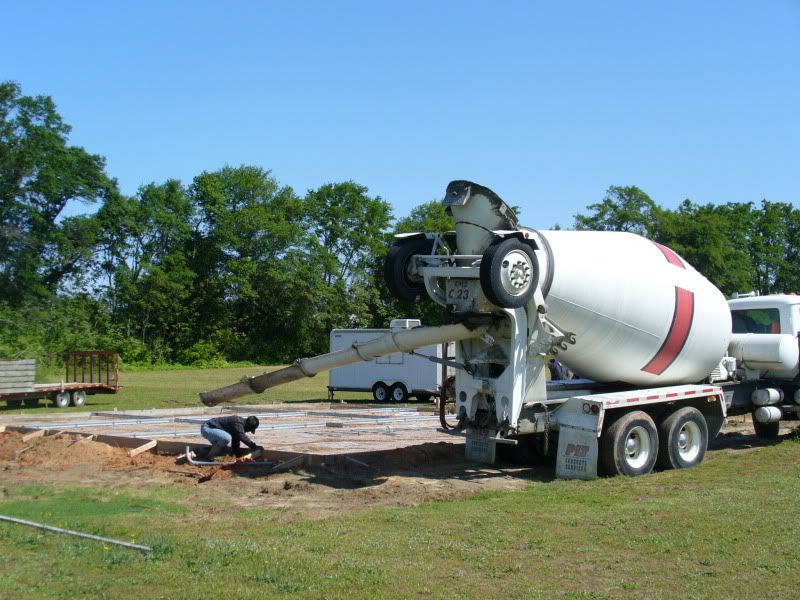
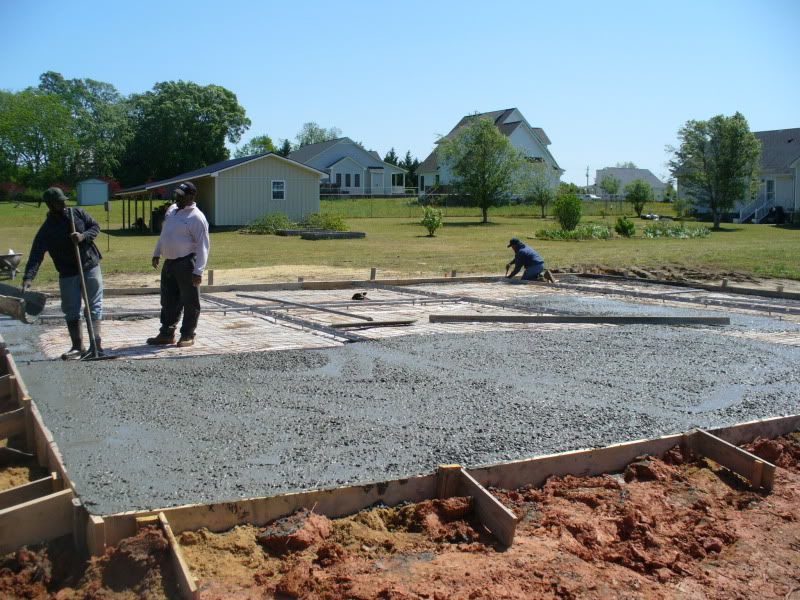
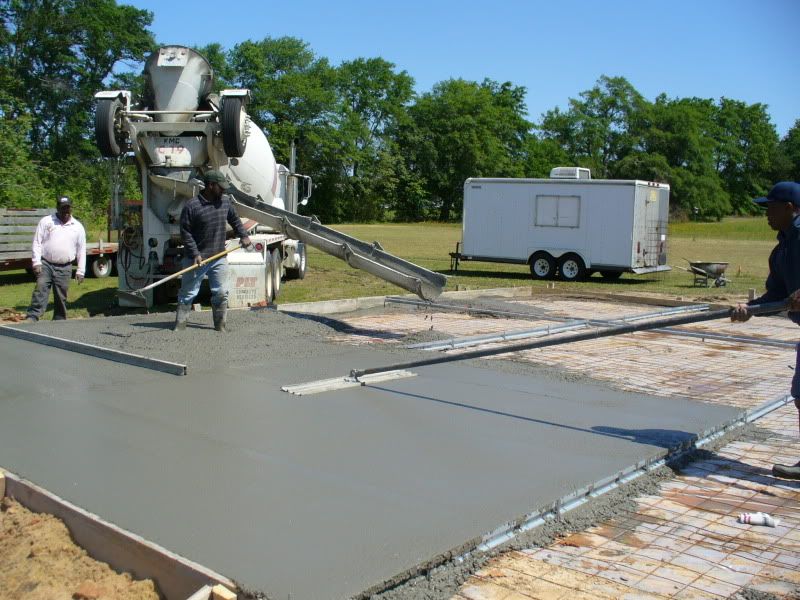
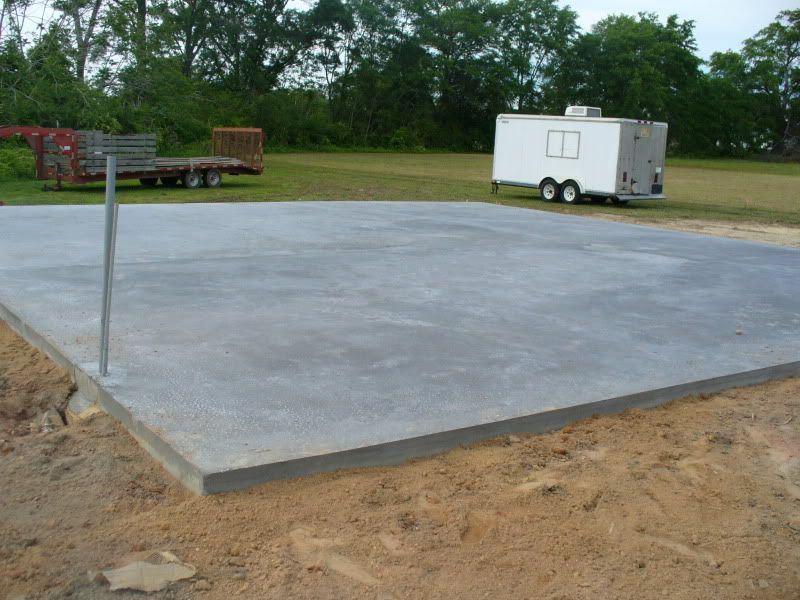
A few pics of my progression thus far:


P1050327.jpg


P1050329.jpg


P1050330.jpg


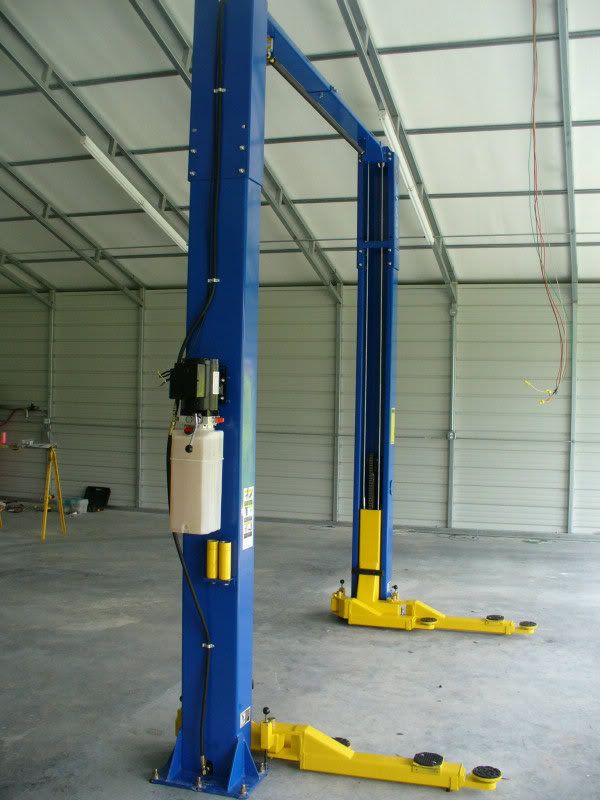
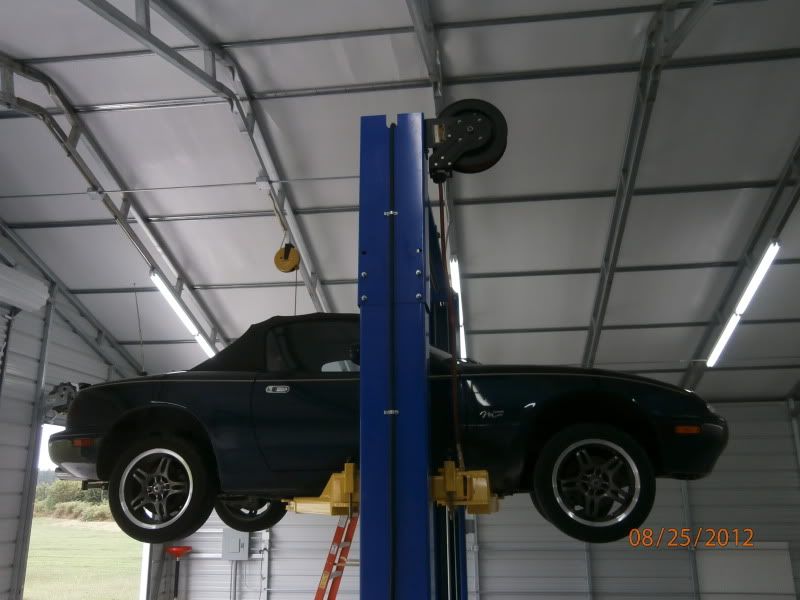
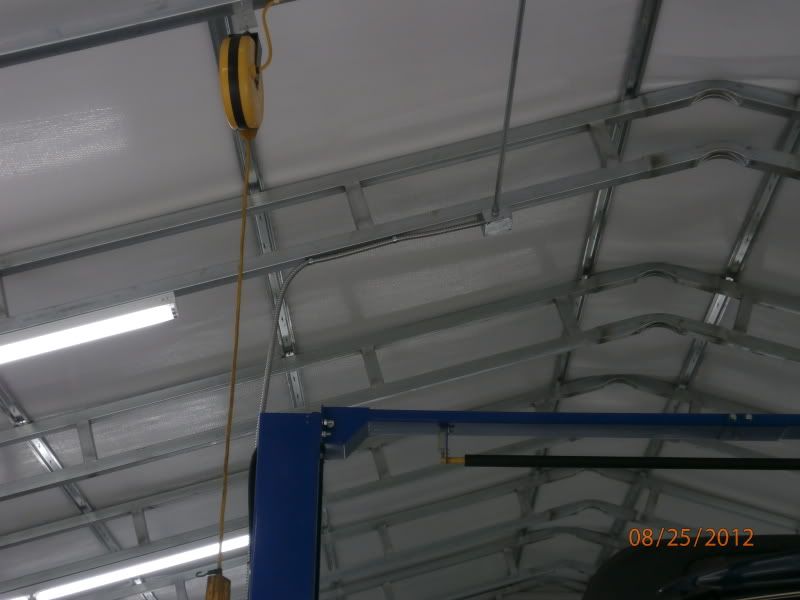
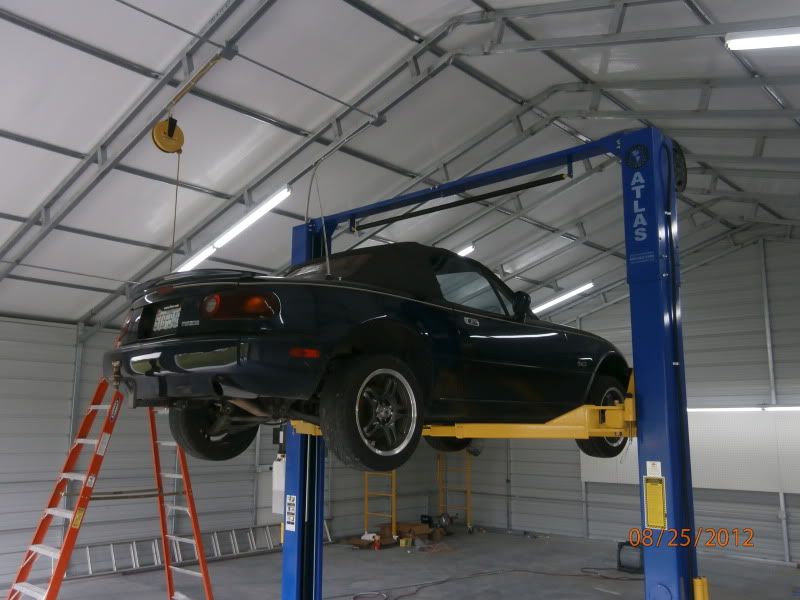
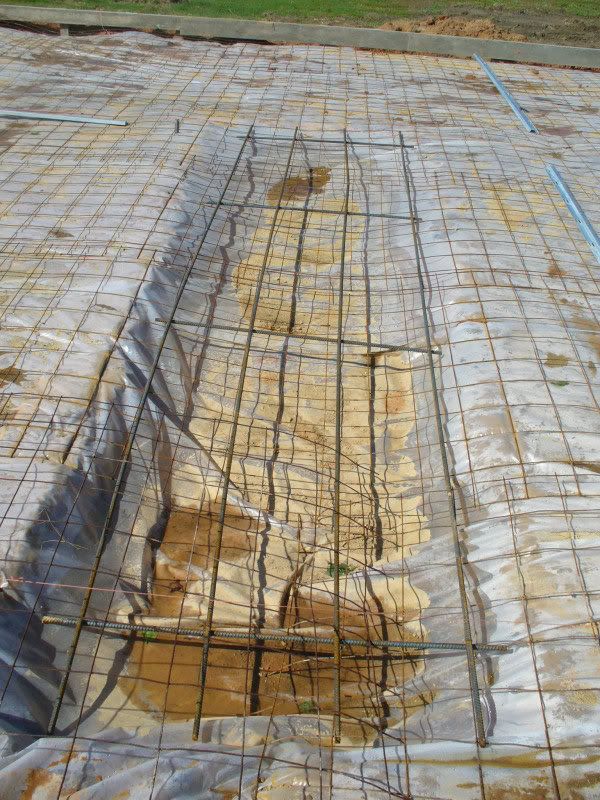
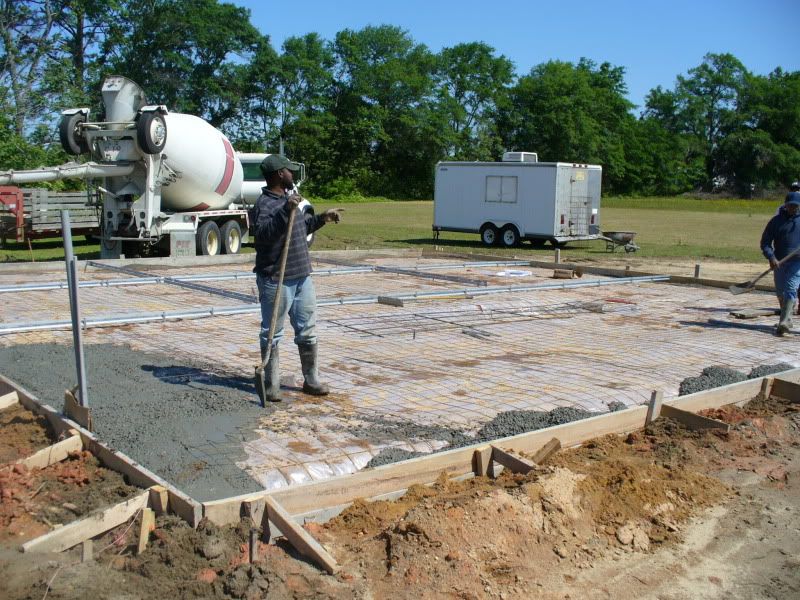
This 12" thick section with a #4 rebar grid is the area where my new 2-post lift will stand. I know the manufacturer's specs say 4" minimum, but I'm not really a fan of 'minimum'.
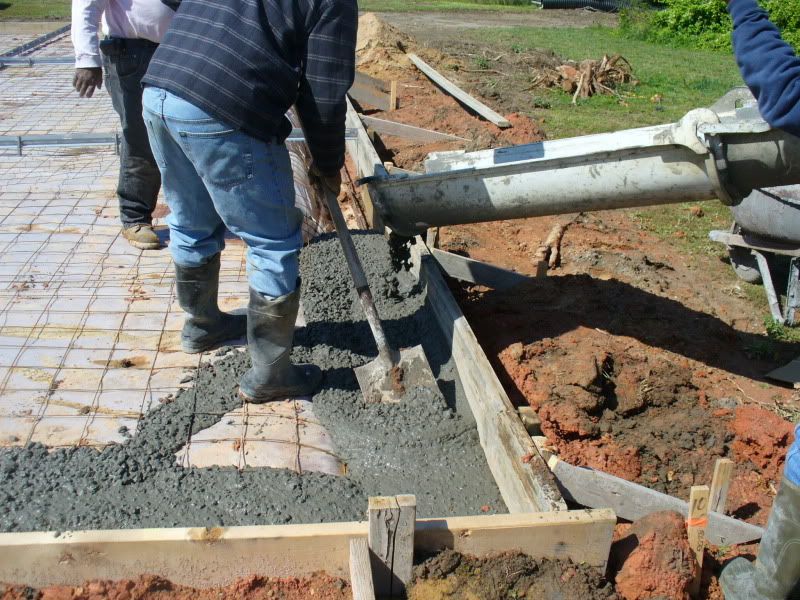
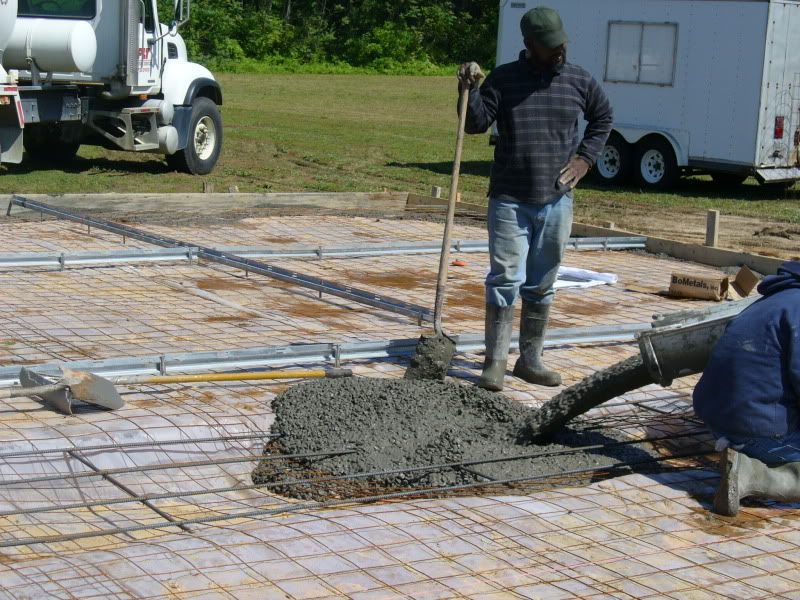
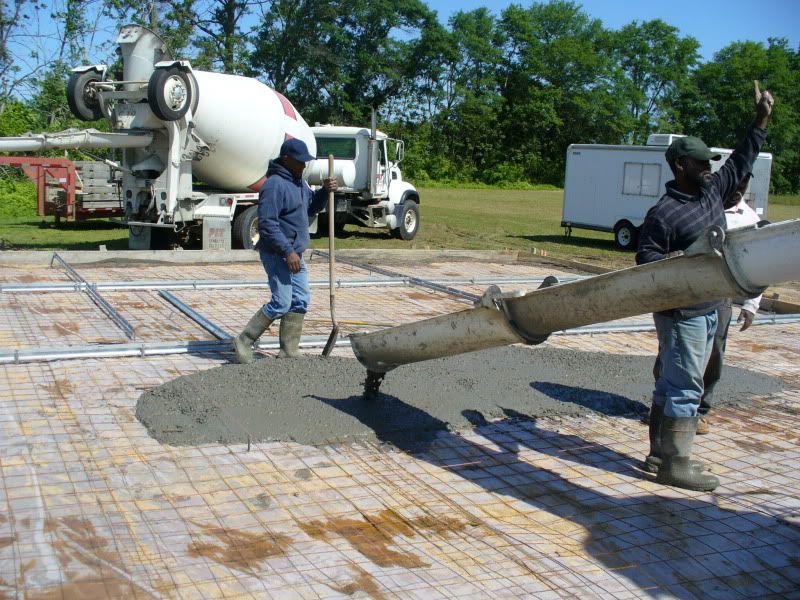
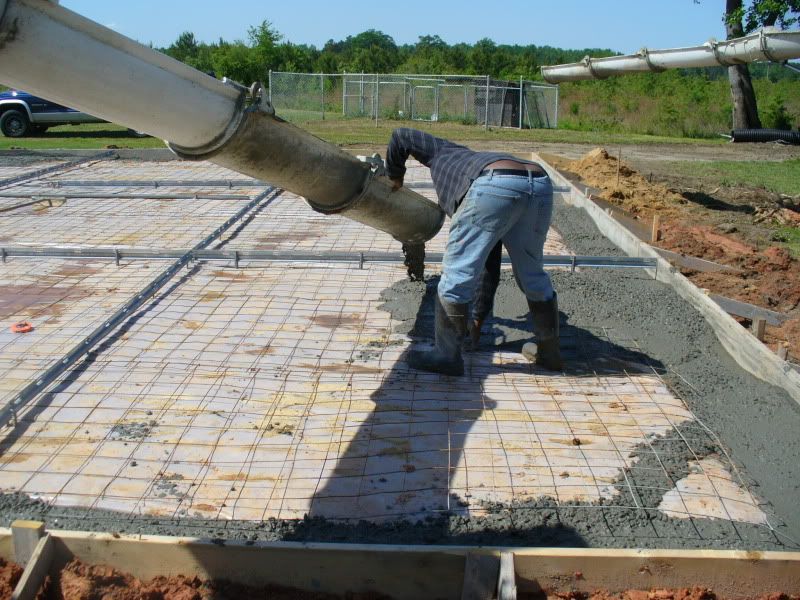
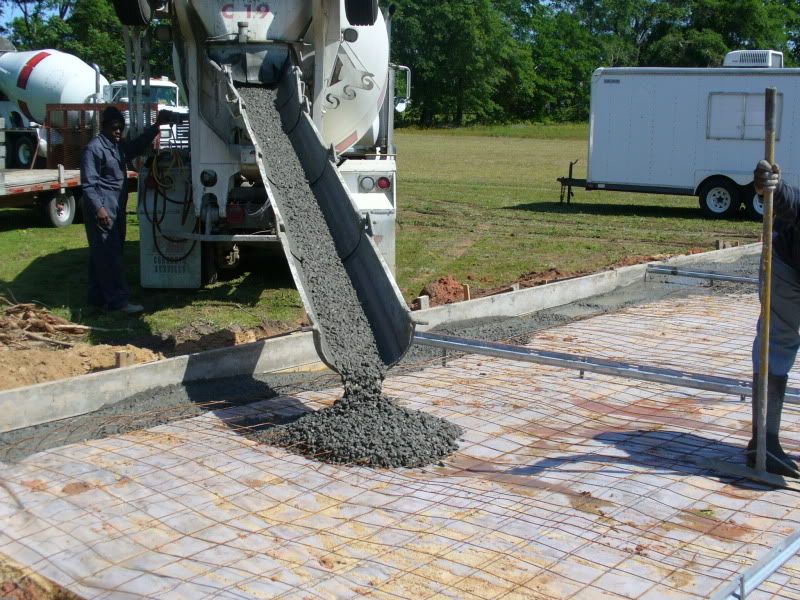


P1050331.jpg


P1050332.jpg


P1050333.jpg


P1050334.jpg


P1050335.jpg


P1050336.jpg


P1050337.jpg


P1050338.jpg


P1050339.jpg


P1050340.jpg


P1050341.jpg


P1050342.jpg


P1050343.jpg


P1050344.jpg


P1050345.jpg


P1050346.jpg


P1050347.jpg
 
Last edited:
To avoid these ads, REGISTER NOW!
OP
A

aka Larry

Well-known member
Joined
May 2, 2012
Messages
8,011
Location
Eastern, NC
After the slab was completed, I ran into a few issues with the county building inspector. That and other factors delayed the project about 4 weeks total, but I got it worked out and the contractor finally got started late Monday afternoon.

Three guys with no kind of crane or scaffolding did it all. They worked fast. It only took them a total of about 26 hours. I was happy with their work in the end as well.

So without further suspense, here are the pics of my erection!


P1050371.jpg

P1050372.jpg

P1050374.jpg

P1050375.jpg

P1050376.jpg

P1050377.jpg

P1050378.jpg

P1050379.jpg

P1050380.jpg

P1050381.jpg

P1050382.jpg

P1050383.jpg

P1050384.jpg

P1050387.jpg

P1050388.jpg

P1050389.jpg

P1050390.jpg
 
OP
A

aka Larry

Well-known member
Joined
May 2, 2012
Messages
8,011
Location
Eastern, NC
True to my word I put my MIL's name on her new home away from home, a bat house! It's now hanging on the rear wall of the building. Yes, I sent her the picture, and no she wasn't happy about it. That is what I call a win-win!


P1050385.jpg


P1050386.jpg
 

mscribellito

Well-known member
Joined
Apr 22, 2012
Messages
157
Location
SC
Nice building, looks like you will have lots of space for projects. I plan on putting something like that up once I get some property!
 
OP
A

aka Larry

Well-known member
Joined
May 2, 2012
Messages
8,011
Location
Eastern, NC
Is it getting any insulation or are you in a warmer climate?

The roof is insulated already. The walls may be in the future, but there are plenty of more pressing items to buy (like a lift!) before that.

BTW, I'm NC and it's "hot as two rats f*cking in a wool sock with the end tied-up" right now. 104F here tomorrow. I'll still take it over a cold climate anyday of the week and twice on Sunday.
 

aar0s

Well-known member
Joined
Jan 22, 2010
Messages
1,905
Location
So.Il.
Is it getting any insulation or are you in a warmer climate?

Im going to guess that by the look of that soil he's in the south somewhere, possibly south Alabama or maybe Georgia. Id still insulate to keep the heat out.

Love the metal building though, and the bat house, still have the plans for that laying around? Ive been wanting one!

Bah! i was too slow at typing! he beat me to the answer.
 

ed_v

Well-known member
Joined
Sep 15, 2007
Messages
1,418
Location
Kentucky
Larry, your erection is stunning! I wish I could spend many days enjoying it.

I was a little worried about clicking on this thread. I have no interest in Larry's erection, but his garage is pretty nice :lol:


There are lot of those type garages being sold a lot around here lately. I see a few side of the road dealers that sell sheds and carports advertising them. I like the way they look and they seem like they'd go up fast.

Keep us updated and thanks for sharing.

Ed
 

NUTTSGT

Super Moderator
Staff member
Joined
Sep 14, 2009
Messages
50,855
Location
Northern Central Ohio
The roof is insulated already. The walls may be in the future, but there are plenty of more pressing items to buy (like a lift!) before that.

BTW, I'm NC and it's "hot as two rats f*cking in a wool sock with the end tied-up" right now. 104F here tomorrow. I'll still take it over a cold climate anyday of the week and twice on Sunday.

They use the foil bubble stuff ?
 

carhunter

Well-known member
Joined
Nov 8, 2010
Messages
793
Location
southern Ohio
That's a pretty neat structure - I've never seen that galvanized light truss design before.
Anyone know how it compares dollar/sf-wise to a stick built or pole building?

Glad it went so quickly - I'd bet dealing with the inspectors was the worst part!
 
OP
A

aka Larry

Well-known member
Joined
May 2, 2012
Messages
8,011
Location
Eastern, NC
Very nice and clean looking three doors is perfect and yes please let us know the cost if you want to don't mean to pry into your business but it would really help me to know

I have no secrets about the costs. Thus far it looks like this:

Concrete work (labor and materials, which includes fill dirt because the left side needed to be raised almost 18") was about $7,000.00. My budget was $5000.00, but I added a 3' ramp and pad for the side door, which raised the cost, but the fill dirt was the big overrun.

The building itself was just under $12,000.00 which includes everything seen in the pictures.

So I'm sitting at $19,000.00 right now with the electrical still to come.
 

STClurker

Well-known member
Joined
Mar 8, 2008
Messages
2,081
Location
st. cloud, MN
you should tear it down, its not good to have an erection that lasts over three hours. :D LOL. now your going to put electricity IN your erection? nothing good can come of that.


sorry, couldn't help myself. looks good, are those roll up garage doors though?
 

ncautoshop

Well-known member
Joined
Aug 22, 2011
Messages
252
Does the crew travel? Im looking for something similar in western nc

Sent from my DROID BIONIC using Tapatalk 2
 
OP
A

aka Larry

Well-known member
Joined
May 2, 2012
Messages
8,011
Location
Eastern, NC
Nice looking foundation and building. Not heard of a 12"x12"x12" footing, what's the 3rd 12"?

Duh...oops! It's just 12" wide x 12" deep. :eyecrazy:


Does the crew travel? Im looking for something similar in western nc

Sent from my DROID BIONIC using Tapatalk 2

They probably won't have to travel nearly as far for you. They are based out of Hickory, NC. PM me if you want their contact info.
 
To avoid these ads, REGISTER NOW!

Shoottx

Well-known member
Joined
Jan 30, 2011
Messages
314
Location
Plano Tx
BTW, I'm NC and it's "hot as two rats f*cking in a wool sock with the end tied-up" right now. 104F here tomorrow. I'll still take it over a cold climate anyday of the week and twice on Sunday.


Do you know what Ice tea in the sinuses feels like! And I needed a clean monitor after that description of heat.


Oh and a nice garage.
 

ncautoshop

Well-known member
Joined
Aug 22, 2011
Messages
252
Im in Boone! Send me their info.

Sent from my DROID BIONIC using Tapatalk 2
 
OP
A

aka Larry

Well-known member
Joined
May 2, 2012
Messages
8,011
Location
Eastern, NC
pictures not showing today whats up

I apologize for the dead links guys. Apparently I exceeded my free bandwidth per month limit on my Photobucket account. On top of that I can't currently pay for more space because my debit card got hacked last week and I'm waiting for a new one.

Stay tuned as the pics should be back up by Wednesday.
 
OP
A

aka Larry

Well-known member
Joined
May 2, 2012
Messages
8,011
Location
Eastern, NC
Update. Sorry it was too dark for pics, but I'll get some this weekend.

I un-boxed all the fixtures Wednesday night, removed the knockouts, and added the conduit couplings. I also used some scrap metal to build a jig to be sure they were all straight and perfectly in-line with each other when installed.

My co-worker came over last night and we started installing the 8' fluorescents onto the ceiling trusses. My homemade jig, I have to say, was the ****. We were able to just snap it onto the beam (it held itself in place) and drill pilot holes for the screws. No measurement required! It took longer to move the ladders than it did to install the actual fixtures. I was glad to have the extra hands though. That sped up the progress drammatically.

By the time we were done we had installed (8) fixtures and the 1/2" EMT conduit that runs between them.

Next up, more conduit runs for receptacles and switches.

Stay tuned...
 
Last edited:
OP
A

aka Larry

Well-known member
Joined
May 2, 2012
Messages
8,011
Location
Eastern, NC
Update.

I got a liittle more done after work today and was able to get a few pics.

First, here is my little jig I made to pre-measure the mounting holes for the fixtures. I used some scrap angle and a piece of 1/2" EMT.


P1050391.jpg


P1050393.jpg


Here's the fixtures in place with the conduit between them:


P1050396.jpg


Here is my first attempt with the bender. It took me a while, and I had to trim the conduit a few times due to the odd angle, but I got it done and fits perfectly. Don't give me a hard time about using the stand-off clips vs. offset bends. I think it looks neat just like it is.


P1050394.jpg


P1050395.jpg
 
OP
A

aka Larry

Well-known member
Joined
May 2, 2012
Messages
8,011
Location
Eastern, NC
Update 8-3-12.

As of this past Wednesday I finally have power! The electrician finally came and connected my shop to the house.


080102_120700.jpg


I finally have all of the EMT conduit installed and I'll be pulling wire tomorrow. By Sunday I should have lights !!!!!!!!!
 
OP
A

aka Larry

Well-known member
Joined
May 2, 2012
Messages
8,011
Location
Eastern, NC
Weekend update.

I got started early Saturday morning at 7:00 and worked until 8:30 pulling wire. Sunday the boss was out of town so again I started at 7:00 and worked pulling more wire and connecting the outlets and light switches. Finally I got them all buttoned up and connected to the breaker panel at about 7:30 last night.

Once all the connections were made it was time to label the cabinet.


P1050404.jpg


The next task was to connect the last security light. With the security light finished, all that was left was to flip the big switch to see if all my hard work was done correctly or not. I was so nervous about it something not working right, I took a 30 minute break to just to get my head around it.

Finally it was time to just do it. I tested it all and.....


BAM!


P1050406.jpg


It *all works! To say I was relieved was an understatement. Here are a few more pics:


Here is a shot with just the security lights


P1050405.jpg


Finally a shot of the inside showing how bright it is. I'm very happy with the result.


P1050408.jpg


*One of the light fixtures above the workbench did not work. I checked the connections and couldn't find anything wrong. There was power going to the ballast and the bulbs were good. Most likely the ballast is bad. It happens, but I have the receipt and I'll get a replacement this week.


Next up...THE LIFT!!!!!!!!!!!!!!!!!!
 

ishiboo

Well-known member
Joined
Oct 27, 2010
Messages
9,481
Location
Oshkosh, WI
I don't believe GE breakers are a rated replacement for a Homeline panel, and I know Homeline breakers aren't rated for a GE panel... that doesn't look like a legal install. Also, if it's a Homeline panel, I don't think the twin GE breakers fit very well and that may be a danger as well.

Cheap breakers are so cheap you might as well make it legal and proper.
 

DEEDDUDE

Well-known member
Joined
Jan 9, 2012
Messages
161
Location
Beach City, Texas
The building turned out real nice. Looks like you have plenty light. I'll have to wait till I get home to go back through the thread to see all the pictures again. I did see the labels on the electrical panel. Real nice. :thumbup:
 
OP
A

aka Larry

Well-known member
Joined
May 2, 2012
Messages
8,011
Location
Eastern, NC
I installed 2"x2" wood furring strips last night for mounting the pegboard above the workbench. The plan is to have 4' x 20' of pegboard on this wall, which should leave room for hanging lots of stuff. As you can see I still have two small sections to be cut and added top the framed areas on the ends.

A few pics of the pegboard install:


P1050413.jpg


P1050414.jpg
 
OP
A

aka Larry

Well-known member
Joined
May 2, 2012
Messages
8,011
Location
Eastern, NC
Back at it this morning.

I removed the ceiling-mounted air hose reel and drop light from my attached garage today to transfer them to the new shop. My new Rapidair piping hasn't shown up yet, but I'll be ahead of the game when it does arrive.

After mounting the air hose reel to the right side lift post, I hung the drop light reel and got that wired up. Next, I cut the remaing pegboard sections and got those mounted to finish that. Finally I replaced the non-working light fixture above the workbench area, so that area is ready for the workbench.

I decided that I had this lift for two days and had yet to use it so I moved my Miata in position just to give it a try. I probably ran it up and down 15 times just because I was so excited to finally have a lift.

Here are a few pics:


Completed pegboard/workbench area:


P8250006.jpg


Hydraulic pump and motor, and my outlets I added to the lift post:


P8250008.jpg


Here you can see the air hose reel mounted at the top of the lift post:


P8250012.jpg


Drop light reel hanging from one of the overhead trusses:


P8250014.jpg


My Miata in the air:


P8250013.jpg
 
To avoid these ads, REGISTER NOW!
Top Bottom