To avoid these ads, REGISTER NOW!

"Aero-1946" at work - pics of a German hobby workshop project

Aero-1946

Well-known member
Joined
Jul 20, 2012
Messages
186
Location
Germany
Hello,

we would like to invite you to our small workshop near Cologne in Germany. Here we have made in the last five years a private project. Every Saturday we worked together learning how to shape aluminium and how to rivet.
We started in 2007 with a cabinet and later we made a couple of toolboxes.
For the next time we plan to show here at GJ to document the production of some of our toolboxes. With a lot of pics and every week exactly what hat happend.
We know, here at GJ there are a lot of specialists for sheet metal work and aircraft. So please, help us with if you have the knowledge we have to learn.

Aircraft furniture
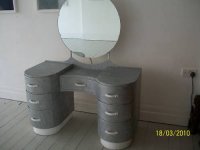
View media item 22950Our first type of aviation cabinet

View media item 22951Aircraft furniture: Aviation cabinet, backside


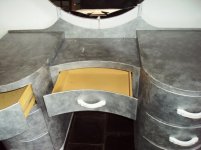
View media item 22952Aviation cabinet, view inside

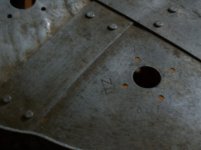
View media item 22953Aircraft furniture: Aviation cabinet, detail: grip

View media item 22983Aviation cabinet: all the parts made from aluminum (Aircraft furniture)

View media item 22991Aircraft furniture: Aviation cabinet, view from below. Before adding the doors


Aircraft furniture
View media item 22955Aviation cabinet, dimensions in Centimeters
 
Last edited:
To avoid these ads, REGISTER NOW!
OP
A

Aero-1946

Well-known member
Joined
Jul 20, 2012
Messages
186
Location
Germany
Actual we plan to produce 20 toolboxes, because we will visit the AEROPUCES October 2012 at Paris to show our new stuff.
So we started with some aluminium AlMg3 sheet metal, 0,8 and 1,0mm thickness. We buy them in 1000x2000mm dimensions.
Our metal shears is an old cast iron model, bought second hand. Most importand is the measurement device, we improvised on the table. It is not 100% exact, 1mm+- is a possible mistake.
When we started with our toolbox project we made also a detailed documentation. That is absolutly necessary!!! After a year and a lot of modifications and many mistakes you never have a chance to remember every detail and dimesion.

View media item 23098
View media item 23100
View media item 23101
View media item 23102
View media item 23103
View media item 23099Werkzeugkiste = Toolbox, construction manual
 
Last edited:
OP
A

Aero-1946

Well-known member
Joined
Jul 20, 2012
Messages
186
Location
Germany
After cutting every sheet metal part of the former toolboxes we have to drill the holes. For that we use an iron former plate. In one step we drill four aluminium sheets. We use CLECOs to fix. They are extremly helpful and I do not know, how we could live without them. They were widely used in the aircraft industry. Because we use 4mm solid rivets, we drill also 4mm. We bought a lot of air drills, mostly from DESOUTTER. Normaly we use one hole as a former plate for the second sheet. So we reduce the amount of drilling and both holes are in the right position. To fix the parts of the toolbox together we drill in some cases both holes NOT together. To have a good result you have always be very exact when drilling the former plate. But without there is no chance to make good quality with maintainable effort.
Reinhard modified a small cutting machine to an corner cutter. Very helpful and time saving - and more exact.

View media item 23105
View media item 23106
View media item 23107
View media item 23109
View media item 23108
 
Last edited:

Red Leader

Well-known member
Joined
May 15, 2011
Messages
2,689
Location
Denver, CO
MachinePunk is gonna love your stuff. By the way, how'd you come up with your name, as is there any significance to it?


Keep showing us more of your killer project!
 

smschriefer

Well-known member
Joined
May 28, 2009
Messages
842
Location
Yorktown, VA
Ryan did a write up on your toolboxes about a year ago. It got rave reviews from all of us. I for one hope you get lots of sales in Paris! Your craftsmanship is outstanding! I would suggest you visit the Fabrication & Techniques section of the forum as there are a number of very talented people that can be of assistance. One person that jumps to mind immediately is Nastyzen. He has incredible metal crafting skills.
 

Revere Cycles

Well-known member
Joined
Jul 21, 2012
Messages
242
Location
Rochester, NY
Awesome stuff! I think there is a thread on here with some GJ members who have purchased your tool tote. Can't wait to see more!
 

EdT

Well-known member
Joined
Sep 21, 2010
Messages
1,104
Location
North Georgia
Great stuff!! I especially like the aesthetic of the large cabinet. I've never seen a guillotine metal cutter like that here in the US. I'll be watching to see your process for forming the end panels for the tool box with the logo and step downs. Thanks for taking the time to post this information. I know it's a lot of extra work.
 
OP
A

Aero-1946

Well-known member
Joined
Jul 20, 2012
Messages
186
Location
Germany
Hi Red Leader,
our name has the following significance: at the end and in the first years after WW2 a lot of aircraft companys searched for new products because there was a reduced need for aircrafts. In the US, for example aluminium canoes went in production. In France chairs of GASTON VIORT were produced, clearly in aircraft technology and from Salon de Provence, a town with great Air Force History. In the UK were some former aircraft factories making kitchen and bedroom furniture. In Germany you will find several things, for example suitcases and cars (Messerschmitt Kabinenroller). It was only a short time because these specialists were much to expensive and searched for better jobs. That´s why 1946 was a special date for the use of aircraft technology in new fields. And AERO is easy to remember and will be understood in a lot of countrys.
 

Attachments

  • 12.10.2008 027.jpg
    12.10.2008 027.jpg
    88.4 KB · Views: 934
  • Flugzeugsessel, 4.7.09 001.jpg
    Flugzeugsessel, 4.7.09 001.jpg
    31.8 KB · Views: 985
  • !BotZPE!CGk~$(KGrHqYOKkQEu,nHsYE4BLoiML86i!~~_12.jpg
    !BotZPE!CGk~$(KGrHqYOKkQEu,nHsYE4BLoiML86i!~~_12.jpg
    12.9 KB · Views: 1,399
  • Leipzig 12.10.2008, 3.jpg
    Leipzig 12.10.2008, 3.jpg
    92.4 KB · Views: 779
  • Leipzig 12.10.2008, 2.jpg
    Leipzig 12.10.2008, 2.jpg
    141.8 KB · Views: 846
  • Flugzeugschrank, .6.2010 001.jpg
    Flugzeugschrank, .6.2010 001.jpg
    74.2 KB · Views: 1,022
  • 12.10.2008 028.jpg
    12.10.2008 028.jpg
    145.2 KB · Views: 870

shopnut

Well-known member
Joined
Feb 22, 2006
Messages
4,237
Location
Florida
Thanks for sharing Aero-1946.

Your work is fasinating so please keep updating this thread with the many techniques you've developed along the way (if you don't mind sharing it with the rest of the world). And continue to explain the various tools/machines that make your job easier.
 

A_Pmech

Well-known member
Joined
May 8, 2007
Messages
8,002
Location
IL
Great photos!

The shear is interesting. I've never seen a hand shear of that size before over here. The panel clamping arrangement looks effective!

I'm looking forward to seeing the next installment.
 
To avoid these ads, REGISTER NOW!
OP
A

Aero-1946

Well-known member
Joined
Jul 20, 2012
Messages
186
Location
Germany
Hello t.ruckus.rex,

you have asked for some details of my dresser. It has been made by the famous HAWKER AVIATION in the 40´s. Surface is complete aluminium and riveted to the basic sheet iron construction. I bought it as an example and to learn how they made them. But it is unimpressive and more or less simple made nevertheless good loocking. For a pic of a polished sample use "hawker aviation dresser" at Google pictures. Mine is covered with a thick layer of silver shining color and unrestored until now.
 

Attachments

  • Hawker Aviation 1.jpg
    Hawker Aviation 1.jpg
    84.2 KB · Views: 688
  • Hawker Aviation 2.jpg
    Hawker Aviation 2.jpg
    141.4 KB · Views: 646
  • Hawker Aviation; 1987, Heft 3.jpg
    Hawker Aviation; 1987, Heft 3.jpg
    104.7 KB · Views: 535
OP
A

Aero-1946

Well-known member
Joined
Jul 20, 2012
Messages
186
Location
Germany
Saturday, 4. August:
we started to shape some of the aluminium sheets with our profiling machine. It is a simple technic, which was widely used in the aircraft industry for small scale production. These cast iron milling machines are the same as been used for woodworking. Our is second hand (and brazed by Reinhard) from a beehouse producer and unusual small. Normaly they are +-1/3 bigger and also the engine. But the method is always the same.
Funktion: There is a stick in the middle of the desktop, coming from the bottom side. That will touch the master plate. Directly above the stick there is the cutter which could be lifted with the help of the foot.
We use a 8mm cutter with one cutting edge and 20.000RPM. Dry cutting.
In the old literature it is said maximum thickness of the aluminium about 10mm. We use a iron cover plate to reduce vibrations and to make handling more easy. The master plate must be smooth, so we used aluminium or Bakelite. We tested the same method with a simple hand milling machine for our cabinet. It works but our "new" machine is better for our purposes. Laser cutting - clearly - is faster and more perfect. But we prefer the classic methods of the middle of the 20´s century.

View media item 23118
View media item 23120
View media item 23110
View media item 23114
View media item 23111
View media item 23113
View media item 23112
 
Last edited:
OP
A

Aero-1946

Well-known member
Joined
Jul 20, 2012
Messages
186
Location
Germany
Again Saturday, 4. August:
we also shaped the sheets with our beading machines. The black one was our first, bought in 2009, not expensive and we use it mostly to form one side, if two sheet overlap. In total we are now owning three, two small and one much bigger. We prefer the big one, because it works better with strong or thick metal sheet. It has also a special feature I will show in our next project.
These beading machines were used in aircraft production but also in a lot of other business, because of their universal function. Since we have them, we do not want to miss them.
When planning the toolbox, we decided to mark them with MADE IN GERMANY and so we delegate a company nearby to produce a marking punch for us.
The number punch came from an internet auction.

View media item 23133
View media item 23126
View media item 23127
View media item 23129
View media item 23130
View media item 23131
View media item 23132
(End of 4.8.2012)
 
Last edited:
OP
A

Aero-1946

Well-known member
Joined
Jul 20, 2012
Messages
186
Location
Germany
Third day, 11.8.2012. Part 1:
We started embossing the end pieces. For that we work with an old press, which had formerly been used for cutting joints and gaskets. Our press tool is electro weldet, one side is milled, on the other side there are wire parts brazed. And then testing, polishing again and again. Each aluminium sheet is maked "oben" = top. So we are shure, the arrangement is identical and the holes for the rivets are on the right place. The bedstops are for the same purpose. The mold must be greased for each pressing. The two screws were necessary to separate both sides, because they normaly strongly seized. The tool is heavy: 52kg.

View media item 23073Aviation toolbox, pressing the front ends

View media item 23074
View media item 23075
View media item 23076
View media item 23077
View media item 23078
View media item 23079
 
Last edited:
OP
A

Aero-1946

Well-known member
Joined
Jul 20, 2012
Messages
186
Location
Germany
Last edited:
OP
A

Aero-1946

Well-known member
Joined
Jul 20, 2012
Messages
186
Location
Germany
Third day, 11.8.2012. Part 3:
We use two different sheet metal bender. One (the first) in the workshop and seldon an other one, which stays in the cellar.
For most of the items we have built, it was absolutly necessary to repeat every step with the same angle and at the same point. And if you try to change something, you have to measure it. So with both machines we could measure the angle and how deep is the sheet inside. You will see at the old machine, these devices are improvisational (sawblade and parts of a calliper).
We use in some cases our big press to finish the edging in on step.

View media item 23080
View media item 23081
View media item 23082
View media item 23089
View media item 23090
View media item 23091
 
Last edited:

kidatari

Well-known member
Joined
Jan 14, 2007
Messages
104
Location
So. NH
Really enjoying this thread! Thanks for showing your tools and methods.

The press die that you use to get your logo embossed on the end-plates is very interesting!
 
OP
A

Aero-1946

Well-known member
Joined
Jul 20, 2012
Messages
186
Location
Germany
We will not work on next Saturday because of making a bike trip (Reinhard) and visiting a flea market (Rolf). So I thought, I will instead of our actual project show how we made the feets of our cabinet in 2009/2010. It was only a small detail, easy to overlook, but important for that project. The cabinet is very leight, but with high mechanical load capacity. To have the gap between the doors always in the same dimension, it is essential to angle the cabinet horizontally. So we needed adjustable feets. Easy to buy - if you like, but we did not. First we thought about sand casting. But we decided to press them.

View media item 23059Aviation cabinet, complete made from aluminum. Our first aircraft furniture.

View media item 23060Aviation cabinet, view from the underside (when cleaning with high pressure water)

View media item 23061On pic 3 you see the lower molding tool and a foot with his M8 thread rod.

View media item 23062pic 4: Detail of the molding tool with the hole for the thread rod when pressing.

View media item 23063pic 5: Labeling "AERO-1946" and "MADE IN GERMANY"

View media item 23064
View media item 23065pic 7:
1 = mantle for lower molding tool and cover plate
2 = lower molding tool
3 = cover plate for the molding tool
4 = molding blank
5 = thread rods
6 = finished feets
7 = first prototype of the molding tool without labeling
 
Last edited:
OP
A

Aero-1946

Well-known member
Joined
Jul 20, 2012
Messages
186
Location
Germany
View media item 23066Pic 8: some results of our experiments:
1 = molding tools inside the mantle
2 = cracked molding blank
3 = feet witout labeling and to much material. Thee aluminium rod was too long.
4 = before pressing: the thread rod in the drilled hole of the molding blank aluminium rod

View media item 23067pic 9: Our improved manually operated hydraulic presss

View media item 23068pic 10: Industrial furnance for tempering the aluminium before pressing

View media item 23069pic 11: Old Capstan lathe. Very helpful for speed and accurateness

View media item 23070pic 12: Tool 1 for define the length, tool 2 is a center drill, tool 3 is a 8mm drill

View media item 23071pic 13: Threaded sleeve before final thread cutting

View media item 23072pic 14: Feets (of an early prototype) with threaded sleeve fixed with blind rivets.
 
Last edited:

maddawg308

Banned
Joined
Jul 19, 2012
Messages
513
Location
Front Royal, VA
Hate to say this, but you guys have a knowledge of bending aluminum into shapes, there is a lucrative market out there for guys who can do this in making replica WWII items for the collector and living history crowd. There were a lot of interesting containers that the Germans used in WWII that were made out of formed aluminum, used for carrying stick grenades, mines (MINEN), tools, as well as accessory boxes for WWII vehicles. Originals AND repros bring big money. Might be something to look into, however, since you ARE in Germany, there might be laws against making repro items like that. I know FOR SURE that you cannot emboss or paint the original markings on the items, that is a felony in Germany. But I'm not sure about making authentic repros WITHOUT the markings. Just an idea, I'm in the military collector field, I see how much WWII German stuff, even repro items, are bringing and it's SICK money.
 
OP
A

Aero-1946

Well-known member
Joined
Jul 20, 2012
Messages
186
Location
Germany
Hello maddawg308, thanks for the tip, but when starting our project we decided to "design" our own items. That makes it much more interesting for us. To have an idea, to discuss, to solve the problems and to have a result which is widely new. We both have our jobs, working five days a week - and on saturday doing our own thing. I think it brings more satisfaction than to replicate existing items.
 
OP
A

Aero-1946

Well-known member
Joined
Jul 20, 2012
Messages
186
Location
Germany
Fourth day, Wednesday 22.8.2012
We worked for five hours in the afternoon.
If ever possible we use a squeezer, easy to handle and not so noisy. But we bought also some rivet guns which are helpful to rivet difficult to reach rivets.

View media item 23167Riveting the center wall.

View media item 23168
http://www.garagejournal.com/forum/picture.php?albumid=2263&pictureid=23168
Shaping the ends of the handle with a self made tool for our rivet gun. For that we screwed also a heavy metal part as a bucking bar to the tube. Grease is necessary.

View media item 23169
View media item 23170
View media item 23171
View media item 23173
View media item 23172
Aviation toolboxes, after mounting the ends (with the before assembled handle) to the base.
 
Last edited:

NASTYZEN

Well-known member
Joined
Jun 11, 2010
Messages
2,823
Location
St-Colomban,Que. Canada
Wow! I somehow missed this thread.
I've seen your toolbox and cabinets somewhere else before, but had no idea it came from a small hobby shop.
You guys sure have sheet metal skills. Quite impressive!:thumbup:
I really enjoy your use of older machinery and techniques. Like others, it's the first time I've seen the type of sheer you use.
I had a German partner from Frankfurt when I was in Toronto. What a dumkopf he was next to your top notch work.
Thank you for sharing, now subscribed.

Claude:beer:
 
To avoid these ads, REGISTER NOW!
Top Bottom