To avoid these ads, REGISTER NOW!

My 80,000BTU Mr. Heater Big Maxx heater install

ForceFed70

Well-known member
Joined
Apr 27, 2010
Messages
3,441
Location
BC, Canada
Inspector passed it on friday and she fired up no problem. So I decided I can finally share some pictures. Nice to finally have heat.

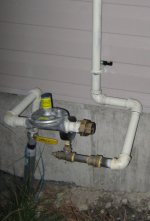
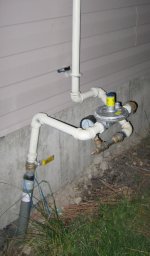
I started with just a gas riser outside of the garage. I had a gas line run by a professional while we were running all of the other utilities from the house to the garage.

Per code, you must have a 5-joint swing arm (you must use 5 90* fittings) to allow for movement in any direction between the riser and the black iron pipe going into the building.

attachment.php
 

Attachments

  • Riser Piping1.jpg
    Riser Piping1.jpg
    145.4 KB · Views: 1,519
To avoid these ads, REGISTER NOW!
OP
F

ForceFed70

Well-known member
Joined
Apr 27, 2010
Messages
3,441
Location
BC, Canada
Another shot of the riser plumbing. What you can't see in these pictures is where the gas line enters the building. In short, it climbs the exterior wall and enters in the attic.

In this shot you can see the pressure guage attached after the regulator. This is because the inspector wanted me to show him a pressure test as I was installing more than 5' of gas line. Code says the pressure test must show it holding 15PSI for 15minutes. I did 30PSI and it sat for a few days.

You'll notice that the paint is in poor condition and not complete. A 2nd coat was applied after the inspector had seen the pressure test and final connections were made.

Also, I'm sure that some of you have noticed the pressure regulator and are wondering what it's for. The pressure regulator is required because pressure at the riser is 2PSI. Typical gas line pressure is 7"-11" of water colum (often called 1/2PSI). The regulator drops the pressure from 2PSI to 1/2PSI. I could have stayed with the 2PSI pressure and put a smaller regulator at each appliance but I prefer to just use a large "whole building regulator" and not have to worry about installing a bunch of little regulators. If anyone is interested, I can explain why the pressure at the riser is 2PSI (there is a good reason I promise) but it doesn't really pertain to the heater install.

EDIT: Bonus points for whomever can identify what's wrong in this picture
EDIT 2: brewchief got it. The regulator vent protector is missing/not installed.


attachment.php
 

Attachments

  • Riser Piping2.jpg
    Riser Piping2.jpg
    144 KB · Views: 1,487
Last edited:
OP
F

ForceFed70

Well-known member
Joined
Apr 27, 2010
Messages
3,441
Location
BC, Canada
So here's a pic of the heater in the garage. As you can see, the heater is pointed to one side of the garage. That's because 1 side of the garage is dedicated to storage while the other is dedicated for workspace. Since I plan to only turn on the heater when I go out to work on the garage I wanted the heater to point towards the workspace so that I'd have the warm air blowing in that direction until the garage comes up to temperature.

The heater is hung on 3/8" threaded rod. The threaded rod made for a real easy install as you could move/bend the rods a little as needed.

attachment.php
 

Attachments

  • Heater-Front.jpg
    Heater-Front.jpg
    123.4 KB · Views: 1,498
OP
F

ForceFed70

Well-known member
Joined
Apr 27, 2010
Messages
3,441
Location
BC, Canada
Here's the heater from the rear.

Unfortunately, in this picture the gas line is capped off for the pressure test but I think it should be pretty apparent as to what the final connection will look like. As you can see, a drip leg, shutoff valve, and coupler were used. All are required by code.

You can also see where the thermostat and 120V AC power connections were made. There is a disconnect (light switch really) on the wall behind the heater. This (a service disconnect) is also required by code. The 120V AC line is located within a flexible conduit as bare romex is not permitted.

All connections were made on the back of the heater. I did not have to open the access panel. Apparently this is new with the transition from the 75,000 to 80,000 BTU model aa with the older model the connections were made inside of the heater?

You can also see some of the venting. On the back of the heater I used a 4" T instead of a 90* bend. This was at the request of the inspector. He likes to be able to take off the cap at the bottom of the T and look up into the vent to check for obstructions.

EDIT: Bonus points to whomever can point out what's wrong in this picture. Inspector had me change something I had done wrong.

attachment.php
 

Attachments

  • Heater-Rear.jpg
    Heater-Rear.jpg
    86.3 KB · Views: 1,587

rponfick

Well-known member
Joined
Feb 27, 2012
Messages
80
Beautiful installation. Looks like you need heat where you are in Canada.

What is the altitude where you live. I just installed the same unit and I am at Denver altitude (5200'). I am experiencing the same issues as you for proper gas pressure to the unit. The installation instructions have a table for adjusting the operating pressure downward as altitude increases. Did your inspector mention anything about adjusting that? I called my local utility and they said to definitely turn down the operating pressure.

Our gas is at a little higher BTU content already and he said you can burn out the heating tubes. Mine glow a dull red at the first bend of the heat exchanger and that scares me.

I just ordered a manometer from Amazon for less than the cost of a service call from a plumber.

Stay warm. Ralph
 
Last edited:
OP
F

ForceFed70

Well-known member
Joined
Apr 27, 2010
Messages
3,441
Location
BC, Canada
Another shot from the back of the heater, this one showing the venting.

I used about 22" of single wall "C-vent" then transitioned to double wall "B-vent" about 8" before passing through the ceiling. Code says minimum of 6" to combustibles for C-vent and 1" to combustables for B-vent. Code also says that if vent is to pass through an un-heated space (an attic for example) that you must either insulate the vent or use a double wall (B-vent) vent. Everyone just uses B-vent cause it's easier.

You can see the lower firestop AKA ceiling thimble.

Also, you can see a cover for the fresh air inlet that the inspector made me install. He was worried that my garage was too airtight for the heater to vent properly so he made me allow a path for fresh combustion air to enter the garage. So: this inlet allows fresh air from the attic to be drawn into the garage. Personally, I don't think it would have been a problem but you've got to make the inspector happy.

attachment.php
 

Attachments

  • Heater-Rear2.jpg
    Heater-Rear2.jpg
    36.8 KB · Views: 1,453

Highbeam

Well-known member
Joined
Feb 15, 2011
Messages
2,292
Location
Mt Rainier foothills, WA
The first bonus, I'm stumped you're not hooked up yet obviously.

Second bonus, your flue piping is upside down. Wood stoves vent as you built, but gas the other way.

Guesses of course but thanks for the quiz.

I am jealous of your heat and is the line run at 2 psi so that you could use a smaller pipe?
 
OP
F

ForceFed70

Well-known member
Joined
Apr 27, 2010
Messages
3,441
Location
BC, Canada
And finally, A shot of the attic space.

Here you can see the gas line as it comes accross the attic space then heads down to the unit heater. It's 1" black iron pipe which should leave me lots of capacity for other gas appliances. The ultimate goal is to have an apartment above the garage so wanted to size the gas supply with capacity for everything.

You also see the top side of the firestop. This firestop is rated as a vent support (thicker metal) so I was able to put a clamp around the B-vent and use the firestop to support the weight of the vent.

You can also see the other side of that fresh air inlet to the garage below. I used 6" metal C-vent to keep the insulation from covering the vent hole.

attachment.php
 

Attachments

  • Attic 2.jpg
    Attic 2.jpg
    111.4 KB · Views: 1,428
OP
F

ForceFed70

Well-known member
Joined
Apr 27, 2010
Messages
3,441
Location
BC, Canada
Beautiful installation. Looks like you need heat where you are in Canada.

What is the altitude where you live. I just installed the same unit and I am at Denver altitude (5200'). I am experiencing the same issues as you for proper gas pressure to the unit. The installation instructions have a table for adjusting the operating pressure downward as altitude increases. Did your inspector mention anything about adjusting that? I called my local utility and they said to definitely turn down the operating pressure.

Our gas is at a little higher BTU content already and he said you can burn out the heating tubes. Mine glow a dull red at the first bend of the heat exchanger and that scares me.

I just ordered a manometer from Amazon for less than the cost of a service call from a plumber.

Stay warm. Ralph

Thanks Ralph.

My elevation is approx 1400' It's not high enough to warrent any special steps/changes for the installation. I think you can adjust the pressure at the regulator inside of the unit heater to compensate for elevation extremes but to be honest, I don't really know.

If your heater is a "Mr Heater" brand you could try calling their tech support. It's actually pretty good.
 
OP
F

ForceFed70

Well-known member
Joined
Apr 27, 2010
Messages
3,441
Location
BC, Canada
The first bonus, I'm stumped you're not hooked up yet obviously.

Second bonus, your flue piping is upside down. Wood stoves vent as you built, but gas the other way.

Guesses of course but thanks for the quiz.

I am jealous of your heat and is the line run at 2 psi so that you could use a smaller pipe?

The 1st bonus is tricky. I'll give you a hint "something is missing"

2nd bonus: The venting is not upside down but you're sorta on the right track.

Yes, 2PSI was used so that I could get away with smaller pipe. I didn't want to install a 2nd gas meter cause my gas company charges me $20 a month just to send me a bill (more if I actually use any gas). So gas comes to the shop from the house. But there is over 150' of gas line required to make that happen. Going to a 2PSI system allowed me to use 1" pipe underground. Anything over 1" gets expensive in a hurry.
 
Last edited:
OP
F

ForceFed70

Well-known member
Joined
Apr 27, 2010
Messages
3,441
Location
BC, Canada
Looking good.
What is on top of the all-thread above the ceiling?

Thanks.

I put 2x4's across the bottom cord of the trusses and drilled holes for the all-thread. From there it's just a large washer and a couple of nuts. You can sorta see it in the attic picture I posted although most of the framing is covered in insulation.
 
OP
F

ForceFed70

Well-known member
Joined
Apr 27, 2010
Messages
3,441
Location
BC, Canada
Unfortunately I don't have any pictures of the roof.

It's a standard setup consisting of adjustable roof flashing, storm colar, and rain cap.

One thing to keep in mind is that there is code as to how high the vent must stick out above the roof. Technically in my installation with Canadian code I should have had it stick up over 6' above the roof.

Luckily my inspector let me get away with having it just 3' above the roof. 6' would have looked horrible and would have required additional supports (metal support wires).
 
OP
F

ForceFed70

Well-known member
Joined
Apr 27, 2010
Messages
3,441
Location
BC, Canada
And some final words of wisedom:

Don't buy the Mr. Heater vent kit. It's ****. They use the absolute cheapest materials they can find just to save $10. I swear the rain cap was made out of tinfoil. They give you a wall thimble in a verticle venting kit and tell you to use that in the ceiling (I suppose it will work but it's Micky Mouse as hell). They also must use the same kit for the smaller heaters as they provide 3" to 4" transition that I wasn't able to use.

I only used 1/2 of the components provided in the kit. You are much better off going to a HVAC place and ordering the various venting pieces required. They are all very common items that any supply place will stock and you'll get much better quality materials.
 

brewchief

Well-known member
Joined
Sep 20, 2008
Messages
2,370
Location
Michigan
I don't see any type of fitting in the vent on the regulator, should have either one of the little cap deals they come with or a couple ******* and elbows so it points down, looks to me like the wrong fitting on the sealtite, appears to be a greenfield fitting rather then a water tight one that is designed for sealtite.


The 5 elbow thing must be a Canadian thing, never seen it done on purpose here.
 

jvitez

Well-known member
Joined
Nov 30, 2009
Messages
2,429
Location
Big Sky Country, Canada
An air vent from the attic? You mean an air vent INTO the attic? Hot air rises. What the heck?

What was the point of a vapour barrier and air sealing the attic if you're forced to put a big hole in it? Putting a hole through the wall would leave your attic space without warm air blowing in potentially causing condensation and rot. Our old house had a flexible duct in a U shape right next to a mid-efficiency furnace fed from a permanently open grille in the wall, all for combustion air. But straight through into the attic? Wow.

Maybe BC has much difference codes than the prairies?

BTW: the 5 elbow code must also be a BC thing, due to earthquake risk along the Pacific coast.
 
To avoid these ads, REGISTER NOW!

Dallas64

New member
Joined
Sep 19, 2012
Messages
2
On the second bonus photo, would it be the zipties on the all threads securing the power cable?
 
OP
F

ForceFed70

Well-known member
Joined
Apr 27, 2010
Messages
3,441
Location
BC, Canada
I don't see any type of fitting in the vent on the regulator, should have either one of the little cap deals they come with or a couple ******* and elbows so it points down,

Got it! In the picture I had removed the vent limiter but had yet to install the vent protector.
 
OP
F

ForceFed70

Well-known member
Joined
Apr 27, 2010
Messages
3,441
Location
BC, Canada
An air vent from the attic? You mean an air vent INTO the attic? Hot air rises. What the heck?

What was the point of a vapour barrier and air sealing the attic if you're forced to put a big hole in it? Putting a hole through the wall would leave your attic space without warm air blowing in potentially causing condensation and rot. Our old house had a flexible duct in a U shape right next to a mid-efficiency furnace fed from a permanently open grille in the wall, all for combustion air. But straight through into the attic? Wow.

Maybe BC has much difference codes than the prairies?

BTW: the 5 elbow code must also be a BC thing, due to earthquake risk along the Pacific coast.

Yes, I agree. And to be honest, I think I'm going to cover that vent somehow and keep a close eye on things.

I was told that the "5 joint swing arm" is required due to expansion and contraction of the metal. But earthquake protection also makes a lot of sense.
 

JimL

Well-known member
Joined
Jul 12, 2005
Messages
271
Location
Indiana
Sorta. What exactly do you think is wrong with the T?

And no, the orientation of the regulator is not the problem.

It shouldn't be there. Just an elbow. It is a power vent, no need for anything to help the draft.
 
OP
F

ForceFed70

Well-known member
Joined
Apr 27, 2010
Messages
3,441
Location
BC, Canada
It shouldn't be there. Just an elbow. It is a power vent, no need for anything to help the draft.

Yes, a 90 would have been fine.

The inspector requested a T so that it would be possible to remove the cap and look up the vent to check for obstructions. He also said it's good to trap any material that may fall down the vent instead of having it end up in the heater itself. He did tell me that he wouldn't fail me if I just used a 90.
 

rponfick

Well-known member
Joined
Feb 27, 2012
Messages
80
Maybe the "T" is a good place for condensation (if there is any) to go also, rather than into the furnace back itself.

Ralph
 
OP
F

ForceFed70

Well-known member
Joined
Apr 27, 2010
Messages
3,441
Location
BC, Canada
Maybe the "T" is a good place for condensation (if there is any) to go also, rather than into the furnace back itself.

Ralph

Yup. That's definately another reason. Forgot to list it.

The T is a code requirement for some horizontal venting applications (commercial installs I think) just for this reason.
 
OP
F

ForceFed70

Well-known member
Joined
Apr 27, 2010
Messages
3,441
Location
BC, Canada
EDIT: Bonus points to whomever can point out what's wrong in this picture. Inspector had me change something I had done wrong.

attachment.php

OK. Enough stringing you guys along. The problem in the picture is that the cap on the T is installed upside down. It needed to be flipped and installed more like a "plug". Makes me feel better that the guys on GJ also didn't pick it out.
 

KCarGuy

Well-known member
Joined
Feb 5, 2009
Messages
2,075
Location
50 miles outside Chicago, illinois
The Only other thing that i might have done is installed a Flat Washer, Lockwasher and Nut to the top of your unit also.
I realize that you have Double Nutted the Threaded Rod below the unit, but you may get a small amount of vibration that could cause it to be noisy.
My unit is also hung by Threaded rod.
I Sandwiched the unit with 2 Washers, Lockwashers and Nuts...and Sliced a section of rubber hose to wrap around the existing threaded rod.
Mine runs very quite without vibration.
Just thought that I would throw that in.
 

rponfick

Well-known member
Joined
Feb 27, 2012
Messages
80
I did the same as Kcarguy, nuts on each side of the support bracket.

Being ****, I added a few more nuts and bolts where the L shaped suspension bracket is screwed to the heater unit itself. I am not a big fan of the sheet metal screws that hold the whole thing together. The unit is subject to a bit of vibration from the motors, so I don't want them to loosen over time.

Awaiting my manometer from Amazon to see where my operating gas pressure is at. A lot of heat seems to go up the vent pipe, and I suspect I'm operating at a higher temperature than I should be.

Ralph
 

kenfath

Well-known member
Joined
Oct 17, 2006
Messages
358
Location
Upland, CA
OK. Enough stringing you guys along. The problem in the picture is that the cap on the T is installed upside down. It needed to be flipped and installed more like a "plug". Makes me feel better that the guys on GJ also didn't pick it out.

^^^^????^^^^ Huh? Could you kindly provide a pic of the way the cap is supposed to be installed.
 

KCarGuy

Well-known member
Joined
Feb 5, 2009
Messages
2,075
Location
50 miles outside Chicago, illinois
My 75K Unit is hung in a 30x25 2 story garage, with an open staircase that leads upstairs to a 17x25 room. The entire Garage is well insulated and drywalled.
And I have had my heater for years.
It keeps my garage very comfy, even in January and February Chicago winters.
(not counting last year...cause it was very mild)
Sure is easier to fire up a 1967 Toro snowblower in a warm garage!!!
 

SuperD

Well-known member
Joined
Jan 6, 2013
Messages
88
Location
Okanagan BC
Yes, a 90 would have been fine.

The inspector requested a T so that it would be possible to remove the cap and look up the vent to check for obstructions. He also said it's good to trap any material that may fall down the vent instead of having it end up in the heater itself. He did tell me that he wouldn't fail me if I just used a 90.

Was the inspector "Gary" , from the BC Safety Branch? I called him the other day, was very helpful with suggestions on the phone.
 
To avoid these ads, REGISTER NOW!
Top Bottom