To avoid these ads, REGISTER NOW!

AttiCat insulation and drywall

Pcoghlan

Well-known member
Joined
Oct 2, 2012
Messages
75
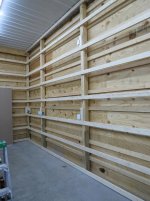
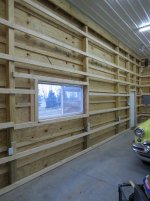
I am looking to insulate the walls of my nice new 28*36 (14' walls) with spray in AttiCat from HD. Comparing the prices of this to companies that come out and spray in foam and the difference is shocking. I am not trying to get THE best results, simply something that allows me to keep a moderately warm workshop when it is 20 degrees outside.

I am planning on hanging the bottom level of drywall and then spraying the insulation in behind it. Then the next row of drywall up and so on until I reach the ceiling.

Has anyone taken this approach and if so are there pitfalls or things I need to consider?

Paul
 
To avoid these ads, REGISTER NOW!

Steevo

Well-known member
Joined
Aug 18, 2009
Messages
8,738
Location
43.49600, -112.04300
it is a very messy operation and takes longer than you expect.

You need a vapor barrier behind the sheet rock, so you are actually better off to staple the 4~6 mil plastic sheeting over the studs, and fill the stud cavities through slits cut in the plastic to poke the hose in, so you can watch the fill rate and coverage. Then you slap some vinyl tape over the slits you used for the hose, and sheet rock over it.

Watch this:
 
Last edited:

Steevo

Well-known member
Joined
Aug 18, 2009
Messages
8,738
Location
43.49600, -112.04300
The vapor barrier should be toward the "warm" side of a wall.
Good question about how to do it with girts. Maybe a picture would help.
I don't know that I have heard of anyone using blown-in with pole/girt construction before.
 
OP
P

Pcoghlan

Well-known member
Joined
Oct 2, 2012
Messages
75
OK, thanks. yes, the girt thing is what throws a spanner in the works.

Spraying it down behind the drywall is easily done but the vapor barrier requirement makes that difficult as I doubt it would hold across that width.

I might end op having to add vertical framing...

The image here shows the current setup.

Paul
 

Attachments

  • girts.jpg
    girts.jpg
    139 KB · Views: 234

KPSquared

Well-known member
Joined
Aug 18, 2010
Messages
2,750
Location
Wetaskiwin, Alberta, Canada
Vapor barrier ALWAYS needs to be on the warm side. Taped at the seams and sealed at the bottom with Acousti-seal. At least around here.

Blowing in on a big span like that could be tough. What are you hanging the drywall on?
 
OP
P

Pcoghlan

Well-known member
Joined
Oct 2, 2012
Messages
75
I was planning on hanging the drywall onto the poles, 8' apart. They are the vertical poles you see in the image above.

Paul
 

Steevo

Well-known member
Joined
Aug 18, 2009
Messages
8,738
Location
43.49600, -112.04300
I was planning on hanging the drywall onto the poles, 8' apart. They are the vertical poles you see in the image above.

Paul


So, you are think about hanging 8'sheets. horizontally, with only the ends supported where they are screwed onto the posts?

I doubt that will work out well.
The sheets will bow badly, especially if you shoot insulation behind them, which will push outward on them.
The ends of the sheets will probably fracture under that kind of weight, and break away from their screws.
You will have nothing to hang anything on, except at the post locations, because you can't fasten to just floating sheet rock.

Seeing your layout, my best recommendation for preparing it for drywall would be to stand up false framed walls in each "bay" between posts, using 2x4 framing. Shoot the bottom plate into the floor, and nail the top and sides to your posts and beams. That would give you vertical supports for future wall-attached shelving, cabinets, brackets, etc. It would also provide you structure on which to staple up the plastic sheeting so you can blow in your insulation behind it.

By the way, I love that Buick!
Is that a 55?
Three portholes, so I am guessing a "Special"?
 
Last edited:
OP
P

Pcoghlan

Well-known member
Joined
Oct 2, 2012
Messages
75
Jeez, helpful on drywall AND knows Buicks!

Yes, a 55 Special. A particularly clean one at that...

Thanks a million, the bay framing makes absolute sense AND reverts things to a more traditional setup.

Paul
 

Steevo

Well-known member
Joined
Aug 18, 2009
Messages
8,738
Location
43.49600, -112.04300
Jeez, helpful on drywall AND knows Buicks!

Yes, a 55 Special. A particularly clean one at that...

Thanks a million, the bay framing makes absolute sense AND reverts things to a more traditional setup.

Paul


That Buick is a clean original?
What a creampuff!
Beautiful!
 

Highbeam

Well-known member
Joined
Feb 15, 2011
Messages
2,292
Location
Mt Rainier foothills, WA
http://www.pole-barn.info/images/post-frame-construction.jpg


I already have a vapor barrier on the outside, I need another one inside?

Paul

Paul, what are you referring to when you say you have a vapor barrier on the outside? I don't see one in the photo and if you are referring to the house wrap between the sheeting and the siding, that is not a vapor barrier which is a good thing for you since you do not want a VB on the cold side of the wall.
 
To avoid these ads, REGISTER NOW!

Falcon67

Well-known member
Joined
Jun 11, 2009
Messages
18,371
Location
Merkel, TX
Seeing your layout, my best recommendation for preparing it for drywall would be to stand up false framed walls in each "bay" between posts, using 2x4 framing. Shoot the bottom plate into the floor, and nail the top and sides to your posts and beams. That would give you vertical supports for future wall-attached shelving, cabinets, brackets, etc. It would also provide you structure on which to staple up the plastic sheeting so you can blow in your insulation behind it.

Agree here - except I'd use batts because they will not settle. The AttiCat will and is really for flat blow in as in an attic. I would not personally use fluffy blow in a wall. If your idea of cold (like here) is 20F, R13 batt will do better than you might thing.

Nice Buford BTW. ;)
 

nwav8tor

Well-known member
Joined
Feb 21, 2012
Messages
239
Location
Spokane, WA
If you don't want to use plastic as a vapor barrier, you can use a special primer that also acts as a vapor barrier. Simply paint it on the sheetrock after insulating and before final paint. However, if the sheetrock isn't installed yet, i'd just go with the plastic.

Any reason you want to blow-in the wall insulation rather than using rolls or batts? Either of those would certainly be easier than blow-in and you can get the faced insulation for vapor control.

If you do go with the blow-in and horizontal drywall sheets, how do you plan to insulate behind the last/upper sheet? It'd be difficult to properly get the insulation behind the sheetrock and attach it. If you're going to have to drill holes in that final sheet for the blow-in hose, you could also just install the sheets vertically and drill the holes at the top. Just insure any framing behind the drywall does not have any horizontal bracing that blocks the insulation from going all the way to the floor.

If you use a hole saw to cut the hose access, you can mud the "plug" back into place after blowing-in the insulation OR you can make a depression into the insulation and fill the hole with expanding foam, trim it flat with a long serrated knife after it dries and then smooth over with mud.

Let us know how you decide to proceed and how it turns out.

Paul
 
OP
P

Pcoghlan

Well-known member
Joined
Oct 2, 2012
Messages
75
Not exactly speeding along am I? The drywall is going up Wednesday.

I had additional framing put up, see photos.

Still trying to work out how to get a vapor barrier in place. I am using the Atticat stuff. The cost was just too good to pass up on. for the 28*36 with 14 foot ceiling and 8 inch depth (should be more than sufficient) is was $1k.

Kind of surprised my drywall guys are not mentioning a vapor barrier. Maybe they think, it is a workshop, no big deal.

I am thinking I will go grab the plastic and staple it in place for the initial row of drywall. They can then fix the boards, spray down behind and move up to next level.

I will post photos as this comes together.

I have LOVED having this place to work on my budding hot rod (which you can just see in one photo) but the weather, damn cold! the heater has been struggling to keep the place above 60 when it is 12 outside. Hoping that will all change after Wednesday.
 

Attachments

  • IMG_0706.jpg
    IMG_0706.jpg
    139.1 KB · Views: 148
  • IMG_0702.jpg
    IMG_0702.jpg
    140 KB · Views: 118
  • IMG_0705.jpg
    IMG_0705.jpg
    140.9 KB · Views: 110
  • IMG_0704.jpg
    IMG_0704.jpg
    135.2 KB · Views: 98
  • IMG_0703.jpg
    IMG_0703.jpg
    140.2 KB · Views: 100

nwav8tor

Well-known member
Joined
Feb 21, 2012
Messages
239
Location
Spokane, WA
Just be sure to overlap and seal the edges of the plastic vapor barrier as you work upwards before screwing on the drywall and insulating behind it. When you get to the last (highest) horizontal row of sheetrock, you'll need to ptaple the plastix in place and then cut slit "Xs" for inserting the hose through to blow-in the insulation. Once the insulation is in, then attach the last pieces of drywall...

Looks like it'll be a sweet set-up,

Paul
 
OP
P

Pcoghlan

Well-known member
Joined
Oct 2, 2012
Messages
75
No vapor barrier above the roof. Seen multiple sources that say a well sealed metal ceiling doesn't massively need one. I know lots of people will have strong opinions one way or the other but regardless, it is up now so lets not open that rat's nest.

nwav8tor, thanks. I will be grabbing some plastic sheet this AM and some staples or whatever is used to fix it and leave it for the drywall guys. Spoke to them yesterday and they said, and I quote..."we have never installed a vapor barrier in any workshop in the last 15 years"... for the sake of a $80 roll of plastic I will likely have them do it anyway. Did some reading yesterday on the pros and cons of vapor barriers and see that it is FAR more important that the wall is sealed to prevent airflow than the amount of moisture due to diffusion. Am using mold resistance green drywall which should help too...BUT, there WILL be a vapor barrier.

Paul
 
OP
P

Pcoghlan

Well-known member
Joined
Oct 2, 2012
Messages
75
The panels are overlapped and fixed every 12 inches and there is caulking around the perimeter of the ceiling. Is it absolutely airtight, I doubt it. Will it be OK, I suspect so. I will be here in the US another 4-5 years and it will certainly outlive that period.

Its kind of what I meant in my prior post. Everyone has different needs. I don't need it to last 20 years and certainly dont want to pay 400% more to have it do so....
 

Highbeam

Well-known member
Joined
Feb 15, 2011
Messages
2,292
Location
Mt Rainier foothills, WA
Thanks Paul. I had read in the install for my metal siding that you are supposed to lay a bead of caulk in the overlap but I certainly didn't do that and I thought you might have. I know that my metal siding is not air tight.

Life cycle is important. If you are only going to own this barn for 4-5 years then you may be money ahead to skip some things. Is the return on investment for insulation less than 5 years? If not, skip it.
 

Kevin54

MEMBER EMERITUS
Joined
Jan 12, 2005
Messages
29,341
Location
Urbana, Ohio
You won't have any problems with a plastic vapor barrier and it's a good thing to use it.

The Pole Barn looks to be very well constructed with having plywood holding it together. How about some more pics of the outside and inside.

And the Buick looks great too!!!!
 
To avoid these ads, REGISTER NOW!
Top Bottom