To avoid these ads, REGISTER NOW!

Pimpin' My Drawers...

dps

Well-known member
Joined
Mar 13, 2007
Messages
610
After enjoying the advice and opinions here, I decided to clean up my old mis-matched and incomplete wrenches and start anew. I've always enjoyed hand tools as objects of art in themselves, not just as means to an end, and decided to elevate my new stuff to the full status of man jewelry.

With the exception of a couple of adjustable wrenches, everything was replaced with Craftsman. Most of it is Pro, but I also have a set of raised panel combo's because of their 6 point box. The raised panels were also essentially free since they were part of a set of all 6 point sockets (which I also wanted) that were cheapest to buy as the kit. I ebayed the other kit stuff that I didn't want.

The Craftsman brand is perfect for me, all the quality I'm sure I'll ever need as a hobbyist. They're close, well stocked, and friendly.

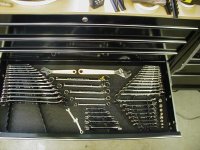
Below is a "before" picture as they were arranged in the drawer. The blank space is where the largest wrenches will go when they arrive. I spent a fair bit of time re-arranging to get everything to fit, and to look nice. I also tried to give precedence of position to the reversible ratchets. I didn't grow up with these, but they seem like the wrench I'd grab first most of the time.
 

Attachments

  • wrenches before.jpg
    wrenches before.jpg
    66.5 KB · Views: 1,957
To avoid these ads, REGISTER NOW!

PoorOwner

Well-known member
Joined
Feb 10, 2007
Messages
5,032
Location
CA
nice, are those the craftsman foam holder? Can you cut them to length?

can you post a link to those holders?

Thanks
 
OP
D

dps

Well-known member
Joined
Mar 13, 2007
Messages
610
Below is the "after" of the SAE drawer. The wrench racks are from Ernst. They work pretty well because you can use the portion of them that is the correct size/spacing for the best fit. I trimmed off the extra part(s). I also trimmed off the upper portion of the teeth on them as they stuck up further than they needed to, and looked less obtrusive shortened. In the case of the ratchets, I also had to modify the racks so they were less steeply pitched as the heavy heads otherwise always want to flip over.

The lining is felt. It's applied over 1/4" foamcore which is generally in shapes that make sense for getting them in and out of the drawers as well as making it easier to replace any section that might need it in the future because of either wrench changes (highly unlikely- I think this will be all I ever need) or in case a piece gets dirty.

Dirt is less likely because everything is raised off the drawer base, either by the Ernst racks or by foam blocks that hold and align the deep offsets and the adjustables. I wanted to be sure to be able to reach into a drawer with oily hands to grab a wrench knowing that I could retrieve any of them without touching any more than perhaps the adjacent wrenches for later cleaning.
 

Attachments

  • wrenches after.jpg
    wrenches after.jpg
    38 KB · Views: 1,966
OP
D

dps

Well-known member
Joined
Mar 13, 2007
Messages
610
These are pics of the metric drawer, pretty much the same thing. We debated on using a different color of felt (the felt is cheaper than the spray glue used to affix it). My wife has the good grace to pretend she cares about such stuff and listens to me present the situation. On one hand, I like the understated, nicely coordinated look of one color. On the other, there's a hot magenta color that I think will look great with chrome and want to give it a try. Plus there's usually only one drawer open at a time, so it's not as if there will be a visual clash. We'll see, there's plenty of drawers to go, and although it is a bit time consuming, it's cheap and easy to do.
 

Attachments

  • metric wrenches drawer.jpg
    metric wrenches drawer.jpg
    36.2 KB · Views: 1,531
  • metric wrenches.jpg
    metric wrenches.jpg
    37.4 KB · Views: 1,171

64merc

Well-known member
Joined
Jan 24, 2008
Messages
2,816
Location
Texas
If my setup looked like that, I wouldn't use them. It looks really nice man!!
 

Stanger

Well-known member
Joined
Oct 25, 2006
Messages
1,298
Location
Alton, IL
Very nice. I wish I had the space to do that. I also wish I had those tools. Merkava is going to mess himself when he sees this.
 

PoorOwner

Well-known member
Joined
Feb 10, 2007
Messages
5,032
Location
CA
Did you just put the felt over the foam in the foam racks in the very first post?
It's looking so good like a jeweller's box man
 
OP
D

dps

Well-known member
Joined
Mar 13, 2007
Messages
610
Oh sure, I'll use them; although I don't have an extra car to work on at the moment, it's on the list. That's why I can have the money to buy the tools since I'm not spendin' it on a car yet. Kind of like the kids/tools debate others have had; spend it while you can... In the meantime I've got all kinds of other projects to use 'em on, though I admit I'll probably never use those big guys but they were just too cool to pass up.

I think Merkava will appreciate the display, but it probably won't take him over the edge since they're Cman instead of S.O.
 
OP
D

dps

Well-known member
Joined
Mar 13, 2007
Messages
610
Thanks, Poor Owner. The jewelry box effect is what I was after. Also, felt is extremely forgiving and easy to work with compared to any other fabric or vinyl. A few details:

I used a spray adhesive to attach the felt directly over the Ernst racks, then trimmed it to shape. Then the racks are stuck to the foamcore, which is a stiff board, not something soft. Also, the foam that I sculpted the other pieces with was styrofoam, so there's nothing mushy in the drawers, although the felt itself has a little bit of cushioning and makes a nice sound when you drop a wrench back into place.
 

PoorOwner

Well-known member
Joined
Feb 10, 2007
Messages
5,032
Location
CA
Yesterday I was transfering my wrenches from the old box to a new one..
I thought I had done a pretty good job laying them on the default liners, now I feel it's not worthy after seeing your pictures :(

For some reason my wrenches always end with brake fluid, grease, grime, coolant.

I think you must have some special hanling protocol: wrenches used on a job is placed on a tool cart that goes to a parts washing facility to remove all grease, then it is steam cleaned, dried in a convection oven setup, then carefully placed back into the box :p
 
OP
D

dps

Well-known member
Joined
Mar 13, 2007
Messages
610
Added miniature wrenches drawer. Lots of room to add some hex wrenches in the future, and maybe some decent spoke wrenches. The old T-bird script from my second car (great curved back seat and an 8-track made for some fine evenings as a 16 yr. old) can sit there in the meantime.
 

Attachments

  • mini wrench drawer.jpg
    mini wrench drawer.jpg
    56.7 KB · Views: 1,467

wilbilt

Banned
Joined
Aug 17, 2006
Messages
5,602
Location
NorCal
I had a "Madman Muntz" convertible 4-track/8-track player in my '67 Chevelle. Those were the days.
 

dxdexter

Well-known member
Joined
Aug 1, 2006
Messages
1,923
I think your drawers look absolutely great. It makes a nice tidy and professional look. Its probably not something I will do since it would look like hell after a few months of work.
 

kwyjibo

Well-known member
Joined
Apr 8, 2008
Messages
737
very nice!!
the holders for the hex wrenches in post #16, home-made? or does Ernst makes those too? (don't see them on their site) I was thinking about modifying some of their srcrewdriver holders to store T-handled hex/torx/etc in a drawer.
 
OP
D

dps

Well-known member
Joined
Mar 13, 2007
Messages
610
Thanks, guys. Since I'm a hobbyist, I don't have to be time efficient, so everything gets wiped down before it goes back in. As I mentioned above, I'm really being careful in the design of everything so that I can reach in with dirty hands and grab any tool without coming close to touching the felt liner. I also try to make everything easy to grasp; it is one of my pet peeves with the design of some tool packaging that you can't actually lift out the tool. Yet they advertise the package as something you would want to use as an organizer in your drawer. Snap-On and Facom are some of the biggest offenders, it has nothing to do with cost.

By the way, the process of wiping the stuff down is a bit simpler than the process PoorOwner suggests! :)

kwyjibo, the holders were cut out from a previously used wrench holder: http://www.sportys.com/acb/showdetl.cfm?&DID=10&Product_ID=594&CATID=2&test=testpl

The front, center pair of racks was also sliced off of that piece.
 
To avoid these ads, REGISTER NOW!

Jokeman

Well-known member
Joined
Jul 14, 2005
Messages
394
Location
Boston
Holy Hell, that is impressive. All that blue felt would be black really quick with my grubby mitts though.
 
OP
D

dps

Well-known member
Joined
Mar 13, 2007
Messages
610
I'm almost finished with my ratchets and sockets, and thought I'd put up a couple of pictures. It was fun figuring out how I wanted to arrange everything. It's a 3 1/2" drawer, so the deeps could stand up, but decided I liked it better with them horizontal. That left room to make a rolling tray that could be a partial second level to make up for the inefficiency of laying the deep sockets on their side.

The sockets are the Craftsman 6 point set with the addition of a couple of spark plug sockets. In the first picture the tray is covering the metric sockets:

socketdrawer1.jpg


In the second picture the tray is rolled down to the other end, covering the fractional set. There are a couple of holes to fill with a 20 and 22 deep in 12pt.

socketdrawer2.jpg


I figured that I would rarely need instant access to both metric and fractional, so having the tray cover one or the other should be okay. They are laid out from left to right as 1/2" deep metric, 1/2" metric, 3/8" metric, 3/8" deep metric, and across the top in descending 1/4" metric. The right half of the drawer is the fractional mirror.

The entire 1/4" set and ratchets is always exposed along with the center gray rack which is a set of wobble extensions and u-joints and adapters.

socketdrawer3.jpg


The ratchets are Craftsman slim profiles and Princess (from a Canadian friend- thanks Dex!) roto ratchets in quick release with another set of extensions with q.r. They haven't had racks made yet (though they're pretty easy to pick up already) because I haven't settled on their final arrangement. I'm hoping that this combination will cover me almost all the time as I wouldn't probably purposely turn into a ratchet collector.
 
Last edited:

car99r

Well-known member
Joined
Jun 7, 2008
Messages
338
Location
Charleston, IL
Very Impressive!

Did you mold the foam and then cover it or is that a bought material that you covered? It is hard to see the detail of the liners in the pictures. Got anything closer up?
 
OP
D

dps

Well-known member
Joined
Mar 13, 2007
Messages
610
The breaker bars are Pittsburgh, the center set is from Northern Tool as are the locking extensions in 3/8 and 1/2. The 1/4 are from KD. Can't tell a difference.

On this drawer everything is constructed of 1/4" foamcore (like a sandwich of stiff foam covered with posterboard) cut into various shapes, sometimes laminated, then wrapped with felt. I'll try to take some close-ups tomorrow.
 

car99r

Well-known member
Joined
Jun 7, 2008
Messages
338
Location
Charleston, IL
The breaker bars are Pittsburgh, the center set is from Northern Tool as are the locking extensions in 3/8 and 1/2. The 1/4 are from KD. Can't tell a difference.

On this drawer everything is constructed of 1/4" foamcore (like a sandwich of stiff foam covered with posterboard) cut into various shapes, sometimes laminated, then wrapped with felt. I'll try to take some close-ups tomorrow.

Thank you!

It appears some of the sockets are just laying right on the felt?
 

dxdexter

Well-known member
Joined
Aug 1, 2006
Messages
1,923
Looks great. I like the way you are using the typically unused upper portion of the drawer with the sliding tray. How is it mounted??

Are the handles on the breaker bars exactly the same as the Princess Auto roto ratchets? Both HF, Northern Tool and PA probably get their tools from the same source.
 
OP
D

dps

Well-known member
Joined
Mar 13, 2007
Messages
610
All of the drawers base pieces started off as a piece of 1/4" foamcore the size of a drawer. Then I cut that into smaller sections that would hold some set of tools, like all the metric combo wrenches for example. That was to more easily work with smaller pieces and for any future repair or replacement or even adding another tool.

quarterinchfoamcore.jpg


The foamcore was then cut out for things like sockets that just needed a shallow cutout to hold them in place. "Racks" like the one for the deep sockets and the breaker bars were built up out of additional layers of foamcore and laminated.

cut-outs1.jpg


For bigger or deeper pieces like the offset wrench rack, I used regular styrofoam cut with an electric knife and routed with a fluted bit in a Dremel. The styrofoam is more of a pain to work with because of the mess and because it can't be sprayed with the upholstery adhesive I used or it would melt.


offsetrack.jpg
 
OP
D

dps

Well-known member
Joined
Mar 13, 2007
Messages
610
Here's some shots of the tray. I used aluminum window rollers on the end of the tray that is to the front of the drawer. They ride on a track of U shape aluminum that's sold for edging 1/4" plywood.

tray1.jpg


The rear edge of the tray is lined with felt and then will just ride on the back edge of the drawer. I discovered that the final turn-down edge on the back of the tray was unnecessary and added friction. I snipped it off.


tray2.jpg


The wheels riveted to the tray:

tray3.jpg


A trial fitting of the track to make sure it's high enough to clear the stuff below and low enough to make sure the top edge of the tray is low enough to avoid rubbing the GripLatch protrusions at the top of the drawer front.

trialfitting.jpg


The first time I mounted the track, I used a strong double-sided foam tape. Not strong enough and the track sagged after a week. Removed it, cleaned it up and epoxied and clamped it to the inside drawer front. Un-movable now.

I was pleasantly surprised at how easily the tray glides from one side to the other; I thought the friction at the rear edge would slow things down, but it works better loaded up than empty. I'm going to use another tray for my screwdriver drawer when I get some more time and mostly money for a new set (I love sets!) of screwdrivers.

Dex, I think you are right about the same place doing all of those, all Taiwanese. Those Princess ratchets really feel good though, 72 teeth, perfectly polished chrome. They were a great deal, I believe.
 
Last edited:
OP
D

dps

Well-known member
Joined
Mar 13, 2007
Messages
610
...wow, weird to edit a post in the middle of a format change on the board!
 
OP
D

dps

Well-known member
Joined
Mar 13, 2007
Messages
610
It appears some of the sockets are just laying right on the felt?

The only things just laying there now are the ratchets and extensions in the tray which I haven't made anything for yet. Everything else is reasonably secure and doesn't move opening and closing drawers. I don't move the chest, but I think I could and stuff would stay in place.
 

Pantera

Active member
Joined
Feb 19, 2006
Messages
28
Location
New Jersey
WOW very nice. It can really gets you thinking about what you can do to a toolbox! Keep the pics coming..!
 

Stuey

Well-known member
Joined
Jan 8, 2008
Messages
11,034
Location
28m above sea level
:Homer:, DOH

I was thinking along the lines of the foam you find in those hard tool cases, like the Pelican cases. Wrong frame of mind.

Thanks
I think that that foam is a bit too soft for this type of application. Harder tool foam would be great as well, but is often very very costly as it's usually only available in large quantities. Thus, I assume it's just ordinary Elmer's foam core. I could be wrong!
 

glenni

Member
Joined
Jun 2, 2008
Messages
7
Where did you find the alum tray?
Does the tray sag at all when loaded with tools?
 
OP
D

dps

Well-known member
Joined
Mar 13, 2007
Messages
610
Where did you find the foamcore?

Do you leave room, to dremel out more for when you add tools?

Stuey is right about the foamcore; it's just standard stuff from any art or office supply store. The confusion may come from the word "foam", I'm only using stiff versions of products with the word "foam" in them. The whole thing could be done with wood, for example, it would just take longer to cut and shape things. In fact, the rack that holds all of the 1/4" deep sockets at an angle is a piece of wood.

I also looked into using the spongy kinds of foam, and in fact have a largish, expensive piece of neoprene laying around that I was going to use. I didn't do it partly because I couldn't find any colored foam that I liked except one place where the minimum order was $400. Also a potential problem is that many of the foams break down over time, especially in a corrosive (to them) environment which includes most solvents that are common in the garage. The advantage to using one of these kinds of foam is that they are washable if they get dirty.

I'm not sure what you mean about "do I leave room" for adding more tools. You can see that most of the drawers are pretty densely packed with things that really don't change. There are a few small, odd spaces left over that I stick junk in, but probably not big enough to hold anything except in the socket drawer where I have a small die-cast of a car I used to have that could be replaced with 3 large metric sockets (23,24,25) later on. And I do have another drawer in my 26" box for "leftovers" like 19/32 sockets, a plain ugly 3/8 ratchet, stuff you might need someday, just not ready for the give away pile yet.

Glenni, the tray is 20 gauge galvanized steel, and is a fairly easy project if you have a brake. It doesn't sag at all; it could hold a lot more weight with no problem.

Thanks Pantera, will post 'em as I do them. Next is probably the screwdriver drawer or the pliers drawer. But my pliers drawer is a little too tight in a single 26" drawer, and I don't have any space to expand until I get an upper box for my 41" chest, so I have to build up some dough (like so many here!) for another box or some nicer quality tools.

pliersdrawer.jpg
 
Last edited:
To avoid these ads, REGISTER NOW!
Top Bottom