I need the wisdom of the group regarding a stairway problem.
My garage is 20' x 40', 2 cars wide and 2 cars deep with 2 single front doors and 1 double back door to a service alley which is not paved. Above the front 20 x 20 there is a loft space fully floored 10 '8" above ground level and along one half of the back (10 x 20) there is a partially floored cat walk area which is 12' 4" above ground level.
Digression #1
We moved in ten years ago after the six month renovation of an old house that included an addition, rewiring, reroofing, replumbing, new HVAC, residing the house with Hardyplank and the aformentioned garage which was elled to the front of the very inadequate 20' x 22' garage which at the time was lower that the ground water table. The contractors were waay over budget and six weeks past the move in (drop dead) date when we ran them off. I say this not to whine, but to empathize with anyone who has been or will be there. It was relatively easy to get rid of them. We had a weekly settling up on Thursday afternoons with th job boss. That last Thursday we said "There's no more money, this is the last check you'll be getting." When he enumerated the list of things yet to finish, we told him that depending how much character he and the crew had we expected that work would be done, but there would be no more checks(--the materials had all long since been delivered and were distributed across the property).
They came half a day on Friday mostly to collect job site work boxes tools etc. After that we never saw them again.
Digression #2
My dream garage was open to the front and back. The structral steel for the second floor loft was scattered across the property. I had rented garage space for my two classic cars and fortunately was able to keep that going. The space became a staging area for the clean up of salvage construction material; doors yet to be finished and hung, siding and metal roofing that were to become a 6' x 20' tool shed, sheets and sheets of OSB with a small corner or edge cut off and the tossed to the side, and buckets and bags of fasteners and nails of every description.
Slow forward about five years--Oh and at this point I should say that although I've watched numerous episodes of This Old House, I'm no Bob Vila. I have average to below average (no shop classes) handyman skills and at the time had just started a new white collar job that required full time concentration. Fortunately my wife's family has some talented contractors, although none of them were within a thousand miles of us.
OK, slow forward about five years. After trim, baseboards, paint, wall paper, tiling in the bathroom (horrible all night team project), landscaping, and liife, I had many new power tools some skills and was ready to start in the garage. Doors had been installed early on but no electricity. Working with a college guy who had some construction experience, we installed the joists for the loft and had enough left over to do half of the back half of the garage, ergo the half back cat walk. The level is higher in the back because I had reasoned if I got a four post lift I wanted to be able to stand under it. We didn't have to go for hardware even once. The salvaged OSB trimmed to widths that would screw to the joists gave us just enough to do two layers of deck in the loft. Bonus- a garage renovation family room up the street was being demo'd for an addition and we got enough 3" tounge and groove heart pine flooring to put on a third layer. Salvaged 105 siding and wall studs, windows that had replaced, and suplus standing seam metal roofing ("Order 15% extra to allow for waste, the set up fee is very expensive") were used for a two door three window 20" x 6' tool shed--didn't want any of that stuff in the garage. Again we didn't need to buy anything except the pegboard for the inside walls and the treated 1" decking for the floor. Oh and we buillt a twenty five by thirty Choice Deck deck because we were starting to have leisure time again and wanted to enjoy sitting in the back yard.
Back to the main issue. In the garage, now electrified, loft access was by extension ladder, not bad but not ideal. After pouring six inches of cement in the old garage to get it up to ground level and insulating and siding both spaces, it was time to have proper stairs.
I started by trying to get pull down attic stairs, but the 10'8" height and the lack of anything to attach them to was a problem. (Pictures below)
Stairs that pull down like a fire escape seemed to be another option but lack of local availability and lack of interest by anyone contacted via internet killed that option.
So working with materials paid for and still left over, I set out to build what is seen in the pictures. Stout 6" galvanized, sandwiched around 2"x6" with width determined by umpteen pieces of "scrap" which was apparently the result of ordering the wrong length for the original job; these were doubled and used as treads. Just a technical note; my stairs are not actually stairs, the are technically a ship's ladder. Stairs must conform to the 7 11 rule- 7" of rise and 11" of width for the foot on the tread. Ship's ladders do not conform to code for places of permanent residence. Fortunately they are OK for a storage loft and for simplicity I'll just call them stairs. Originally the bottom two feet were to have folded up out of the way but shakey stairs modified that plan and they are now permanently 12'6" long. The doodad at the bottom to prevent floor damage was also not in the original plans.
Originally I planned to use the type of stretchy spring that the old solid garage doors use to raise the stairs when not in use. No one including the physics department at the local college was able to give me the formulas necesary to calculate just what sort of springs I would need-and my wife pointed out that if the stairs were pulled down and the spring were ever to fail, either my Speedster or me would have siginificant damage.
So we went with a hoist. It's supposed to stay braked when off but just in case we fabbed a swinging safety bar.
So you think I would be happy but FINALLY here's where I need help.
1 Note the tape on the floor under the lowest stair tread. That's what I need to fit my car in the back bay. Looks like it ain't gonna happen.
2 Note how far the stairs need to swing to go up. Althogh I do have rear access to a back alley it drops off somewat steeply to a dirt road. So, if the stairs are up, the loft can't be accessed without backing out both cars, or pulling the back car (always clean) into the dirt alley. Conversely if the stairs are down, see #1. In this regard the extension ladder was much easier. Instead of having it oriented back to front, I could just stand it up straight in a side to side orientation, and come and go as I pleased.
3 With all that loft storage I'd like to keep extraneous stuff out of the main garage floor area and upstairs. At times becase of bulk or wieght--not mine(!), the item to be stored--makes climbing or descending the stairs hazardous. I have thought that mechanical assistance with a sled type device that would go up or down the stairs would be very handy.
4 Looking at where that would go (see lame photo of the extension cord), it occurs to me that if the hoist was relocated to I beam above that location, it could pull the stairs up or down along the angle in which the stairs are oriented. It's 8' to the I beam and about 13'6" straight up to the peak. What I don't know is what sort of C channel with or without rollers is out there to accomplish this. Also I know that lifting the stairs too high would cause a top heaviness that would put sheer stress on the C channel roller thingamajig and there has to be an engineering type out there who can tell me what the best lift height for least sheer would be. That of course would determine if it was feasible. An added benefit is that if if failed, it would come crahing down, but not on my car, and ingress egress and access to the loft would no longer be a problem.
Photo 1 Current top attachment. Could be pushed a foot closer to the I beam
Photo 2 View from top down showing how to gain 12-14" of lower floor space.
Photo 3 Ground view of ut oh tape marks needed for car to fit
Photo 4 Hoist currently hooks here, but if hoist is monted on . . .
Photo 5 I beam 8' above top of stairs, it could not only raise stairs,
but also be used to pull sled up stairs
Photo 6 Another angle and attempt to depict entire stair case
Photo 7 Current up and safety locked position. Hoist is directly above steel plate behind second step. This is also the lower I beam seem in Photo 5, 10 feet out from the top of the stairs and no use in assiting with lifting storage materials
Random facts
Agreed the above is long winded but it took me ten years to get to this point.
Galvanized wall covering over the 6" of bat insulation occurred because with Katrina and Rita in the Gulf of Mexico, I happened upon a resident in a nearby neighfborhood here in Texas who had just had an old out builiding taken down. When I asked him what he was going to do with all the tin stacked on the curb he told me he hoped somebody would take it all before the hurricane got to town. Turn the rusty side in and cover it with signs and it doesn't look half bad. I have had to keep my eye out for additional pieces for sale but now that's done too.
Yes that's Race Deck, the next big project. I thought hard about Epoxy-Coat, but there's so many tire tracks from when the steel was erected and old oil spills I just doubted I could get good even reliable coverage, and it's only been 10 years, I'm not yet ready for another contractor.
Been lurking for a long time, you guys are great, thanks in advance for your help. Now let's see if I can get the pictures attached
My garage is 20' x 40', 2 cars wide and 2 cars deep with 2 single front doors and 1 double back door to a service alley which is not paved. Above the front 20 x 20 there is a loft space fully floored 10 '8" above ground level and along one half of the back (10 x 20) there is a partially floored cat walk area which is 12' 4" above ground level.
Digression #1
We moved in ten years ago after the six month renovation of an old house that included an addition, rewiring, reroofing, replumbing, new HVAC, residing the house with Hardyplank and the aformentioned garage which was elled to the front of the very inadequate 20' x 22' garage which at the time was lower that the ground water table. The contractors were waay over budget and six weeks past the move in (drop dead) date when we ran them off. I say this not to whine, but to empathize with anyone who has been or will be there. It was relatively easy to get rid of them. We had a weekly settling up on Thursday afternoons with th job boss. That last Thursday we said "There's no more money, this is the last check you'll be getting." When he enumerated the list of things yet to finish, we told him that depending how much character he and the crew had we expected that work would be done, but there would be no more checks(--the materials had all long since been delivered and were distributed across the property).
They came half a day on Friday mostly to collect job site work boxes tools etc. After that we never saw them again.
Digression #2
My dream garage was open to the front and back. The structral steel for the second floor loft was scattered across the property. I had rented garage space for my two classic cars and fortunately was able to keep that going. The space became a staging area for the clean up of salvage construction material; doors yet to be finished and hung, siding and metal roofing that were to become a 6' x 20' tool shed, sheets and sheets of OSB with a small corner or edge cut off and the tossed to the side, and buckets and bags of fasteners and nails of every description.
Slow forward about five years--Oh and at this point I should say that although I've watched numerous episodes of This Old House, I'm no Bob Vila. I have average to below average (no shop classes) handyman skills and at the time had just started a new white collar job that required full time concentration. Fortunately my wife's family has some talented contractors, although none of them were within a thousand miles of us.
OK, slow forward about five years. After trim, baseboards, paint, wall paper, tiling in the bathroom (horrible all night team project), landscaping, and liife, I had many new power tools some skills and was ready to start in the garage. Doors had been installed early on but no electricity. Working with a college guy who had some construction experience, we installed the joists for the loft and had enough left over to do half of the back half of the garage, ergo the half back cat walk. The level is higher in the back because I had reasoned if I got a four post lift I wanted to be able to stand under it. We didn't have to go for hardware even once. The salvaged OSB trimmed to widths that would screw to the joists gave us just enough to do two layers of deck in the loft. Bonus- a garage renovation family room up the street was being demo'd for an addition and we got enough 3" tounge and groove heart pine flooring to put on a third layer. Salvaged 105 siding and wall studs, windows that had replaced, and suplus standing seam metal roofing ("Order 15% extra to allow for waste, the set up fee is very expensive") were used for a two door three window 20" x 6' tool shed--didn't want any of that stuff in the garage. Again we didn't need to buy anything except the pegboard for the inside walls and the treated 1" decking for the floor. Oh and we buillt a twenty five by thirty Choice Deck deck because we were starting to have leisure time again and wanted to enjoy sitting in the back yard.
Back to the main issue. In the garage, now electrified, loft access was by extension ladder, not bad but not ideal. After pouring six inches of cement in the old garage to get it up to ground level and insulating and siding both spaces, it was time to have proper stairs.
I started by trying to get pull down attic stairs, but the 10'8" height and the lack of anything to attach them to was a problem. (Pictures below)
Stairs that pull down like a fire escape seemed to be another option but lack of local availability and lack of interest by anyone contacted via internet killed that option.
So working with materials paid for and still left over, I set out to build what is seen in the pictures. Stout 6" galvanized, sandwiched around 2"x6" with width determined by umpteen pieces of "scrap" which was apparently the result of ordering the wrong length for the original job; these were doubled and used as treads. Just a technical note; my stairs are not actually stairs, the are technically a ship's ladder. Stairs must conform to the 7 11 rule- 7" of rise and 11" of width for the foot on the tread. Ship's ladders do not conform to code for places of permanent residence. Fortunately they are OK for a storage loft and for simplicity I'll just call them stairs. Originally the bottom two feet were to have folded up out of the way but shakey stairs modified that plan and they are now permanently 12'6" long. The doodad at the bottom to prevent floor damage was also not in the original plans.
Originally I planned to use the type of stretchy spring that the old solid garage doors use to raise the stairs when not in use. No one including the physics department at the local college was able to give me the formulas necesary to calculate just what sort of springs I would need-and my wife pointed out that if the stairs were pulled down and the spring were ever to fail, either my Speedster or me would have siginificant damage.
So we went with a hoist. It's supposed to stay braked when off but just in case we fabbed a swinging safety bar.
So you think I would be happy but FINALLY here's where I need help.
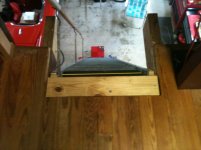
1 Note the tape on the floor under the lowest stair tread. That's what I need to fit my car in the back bay. Looks like it ain't gonna happen.
2 Note how far the stairs need to swing to go up. Althogh I do have rear access to a back alley it drops off somewat steeply to a dirt road. So, if the stairs are up, the loft can't be accessed without backing out both cars, or pulling the back car (always clean) into the dirt alley. Conversely if the stairs are down, see #1. In this regard the extension ladder was much easier. Instead of having it oriented back to front, I could just stand it up straight in a side to side orientation, and come and go as I pleased.
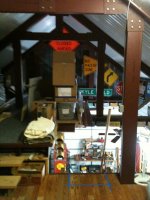
3 With all that loft storage I'd like to keep extraneous stuff out of the main garage floor area and upstairs. At times becase of bulk or wieght--not mine(!), the item to be stored--makes climbing or descending the stairs hazardous. I have thought that mechanical assistance with a sled type device that would go up or down the stairs would be very handy.
4 Looking at where that would go (see lame photo of the extension cord), it occurs to me that if the hoist was relocated to I beam above that location, it could pull the stairs up or down along the angle in which the stairs are oriented. It's 8' to the I beam and about 13'6" straight up to the peak. What I don't know is what sort of C channel with or without rollers is out there to accomplish this. Also I know that lifting the stairs too high would cause a top heaviness that would put sheer stress on the C channel roller thingamajig and there has to be an engineering type out there who can tell me what the best lift height for least sheer would be. That of course would determine if it was feasible. An added benefit is that if if failed, it would come crahing down, but not on my car, and ingress egress and access to the loft would no longer be a problem.
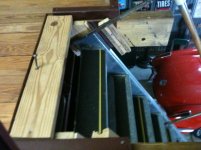
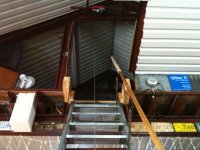
Photo 1 Current top attachment. Could be pushed a foot closer to the I beam
Photo 2 View from top down showing how to gain 12-14" of lower floor space.
Photo 3 Ground view of ut oh tape marks needed for car to fit
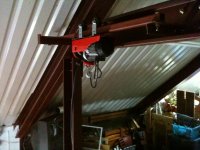
Photo 4 Hoist currently hooks here, but if hoist is monted on . . .
Photo 5 I beam 8' above top of stairs, it could not only raise stairs,
but also be used to pull sled up stairs
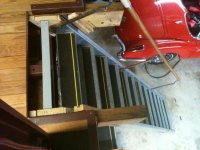
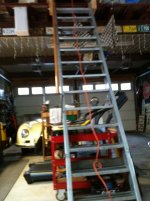
Photo 6 Another angle and attempt to depict entire stair case
Photo 7 Current up and safety locked position. Hoist is directly above steel plate behind second step. This is also the lower I beam seem in Photo 5, 10 feet out from the top of the stairs and no use in assiting with lifting storage materials
Random facts
Agreed the above is long winded but it took me ten years to get to this point.
Galvanized wall covering over the 6" of bat insulation occurred because with Katrina and Rita in the Gulf of Mexico, I happened upon a resident in a nearby neighfborhood here in Texas who had just had an old out builiding taken down. When I asked him what he was going to do with all the tin stacked on the curb he told me he hoped somebody would take it all before the hurricane got to town. Turn the rusty side in and cover it with signs and it doesn't look half bad. I have had to keep my eye out for additional pieces for sale but now that's done too.
Yes that's Race Deck, the next big project. I thought hard about Epoxy-Coat, but there's so many tire tracks from when the steel was erected and old oil spills I just doubted I could get good even reliable coverage, and it's only been 10 years, I'm not yet ready for another contractor.
Been lurking for a long time, you guys are great, thanks in advance for your help. Now let's see if I can get the pictures attached
![IMG_0781[1].jpg](/forum/data/attachments/180/180150-988c3698dc050d74e2d1399055bc9bb7.jpg)
![IMG_0783[1].jpg](/forum/data/attachments/180/180188-8c262770069935a42f74d32a95fd9e9a.jpg)
![IMG_0786[1].jpg](/forum/data/attachments/180/180238-1d81fb1820283fd26cd425134811a0fc.jpg)

![IMG_0789[1].jpg](/forum/data/attachments/180/180441-2917059fd5a123cb8d7fa26c29935d57.jpg)