

I just completed my DIY garage floor using Legacy Industrial products. I will attempt to outline the process here. After researching for over a month I decided to go with the Legacy products partly because of good reviews I found on this forum. I was also experiencing information overload from my research and the many product reviews of all the various products available. It was just time to pull the trigger. I live in South Louisiana and even though it is February the weather was favorable for me to get it done.
I have an attached 2 car garage that is approx. 420 square feet. I decided to go with Legacy's HD system. One kit was not enough so I had to purchase the kit for 600 sq feet ($309) which you can see here
http://legacyindustrial.net/cart/legacy-hd-system-600-sq-ft-p-202.html
I also included the optional primer +$155 and the optional clear coat +$249
I purchased chips separately from a company named Original Color Chips. I purchased 20 pounds of their Black Marble Sparkle Blend at a total cost, including 2 day fed ex shipping, of $179. I wasn't sure I wanted to do a heavy coverage when I ordered the epoxy kit from Legacy so I did not purchase additional chips. They ship each 300 sq ft. kit with 1 pound of chips. I finally decided I wanted as full a coverage as I could afford. Even though my square footage called for 50 pounds of chips to achieve a heavy coverage I purchased what I could afford. I like the black and white metallic blend and the chips were available, the price was right and I could get them in 2 days.
I'm glad I had the extra product to work with. One of the most difficulty areas of the job as a 1st time diy-er was figuring out how much epoxy primer, epoxy and urethane top coat to roll out so that I had enough for the entire job. Because I purchased enough for 600 sq ft. I didn't really have to worry about that.
I did 2 1/2 days of prep work to the floor. Pressure wash/degrease, acid etch twice, pressure wash again, fill holes, and cracks, grind high spots and areas that still did not quite look etched enough.
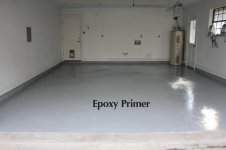
Day ONE: Coating the floor the epoxy primer. Mixed each single batch per instructions. Simple enough. Applied the primer to the floor by pouring an 8"x4' foot ribbon and rolling with paint roller. Because I was working by myself I wasn't sure I wanted to paint the concrete skirting. I was worried it would take too long and the product I had mixed would begin to harden on me. The primer has a longer pot life than the HD epoxy so I decided to paint the skirting with the gray epoxy primer only. When I finished rolling the first mixed batch of primer I stopped and mixed the second batch to finish the floor. I had enough left over to go over some areas that I didn't quite cover well enough the first time. Particularly the vertical surface of the skirting.
NOTE: I did purchase the professional spike shoes so I could walk in the wet areas while working.
DAY 2: The HD Epoxy Coat. The HD Epoxy coat was mixed using the same method as the epoxy primer. I mixed 1 batch at a time. This has a shorter pot life than the primer and since this coat gets the chips I knew I had to work at a good pace. I did not HD Epoxy coat the skirting as previously mentioned. I thought the primer would be good enough. I think it requires a 2 man crew to try and epoxy coat the skirting while trying to do the chips and roll the floor all while the clock is ticking on the epoxy set up time. I rolled areas about 6 foot wide by 6 foot deep and then stopped and distributed the chips using the toss in the air method. I'll explain more about the chips later. The HD Exoxy rolled out similar to the primer but I could tell when it was staring to thicken or harden toward the 30 minute mark. I had enough product to complete the garage floor with about a 1/4 gallon left over.
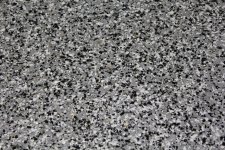
DAY 2 CONTINTUED: The Chips. I purchased 20 pounds of chips as previously stated. I wanted as close to heavy or full coverage as possible. Legacy shipped 1 pound with each kit so I had 22-23 pounds of chips total. I mixed legacy's black and white chips in with the chips I purchased from originalcolorchips.com and then separated the total amount of chips into 4 equal bags. I used each bag to cover a 1/4 of my garage. I wanted to make sure I had a few chips left over from each quarter of my garage so I could go back over any areas that needed additional chips. I would work a 6x6 area and then roll out more epoxy for the next section and work that area with chips until completion.
DAY 3. The Urethane Top Coat. This sounds like the easiest part of the job but it is tricky. It was difficult to tell exactly where where I was rolling and I had a fear of running out of product. This is much thinner than epoxy and I was surprised at how fast I was using the product. Because I had 2 gallons when I was finished with the 1st gallon I was almost exactly at the 1/2 way point of the garage. I was careful not to lay down too much on the 2nd half until I was sure I had every inch coated then I went over a couple of spots again. I do have some low spots in my garage that are glossier than other areas because the urethane pooled but it is not dramatic enough for me to be dissapointed over.
THE RESULTS: I have attached the photos. Unfortunately I did not take a photo before I started the prep work. The floor was almost black compared to this photo of the prepped floor. I have to say I am extremely pleased with the results. The decision to go with heavy chips was a good one for me. I like the look and my wife is pleased . It was raining when I took these and I had not installed my new overhead light yet so trust me when I tell you that these photos do not do it justice. Also the camera did not pick up the metallic chips. The floor looks like a granite or terrazzo floor.
Feel free to ask me any questions and I will do my best to answer them.
EDIT: In an attempt to try and capture the metallic flake I took a few more photos but the camera just doesn't pick them up. The metallic silver shows up as brown. There are no brown chips. I installed a new flourescent light so the lighting is better in these photos. Still not natural day light but pretty good.
I have an attached 2 car garage that is approx. 420 square feet. I decided to go with Legacy's HD system. One kit was not enough so I had to purchase the kit for 600 sq feet ($309) which you can see here
http://legacyindustrial.net/cart/legacy-hd-system-600-sq-ft-p-202.html
I also included the optional primer +$155 and the optional clear coat +$249
I purchased chips separately from a company named Original Color Chips. I purchased 20 pounds of their Black Marble Sparkle Blend at a total cost, including 2 day fed ex shipping, of $179. I wasn't sure I wanted to do a heavy coverage when I ordered the epoxy kit from Legacy so I did not purchase additional chips. They ship each 300 sq ft. kit with 1 pound of chips. I finally decided I wanted as full a coverage as I could afford. Even though my square footage called for 50 pounds of chips to achieve a heavy coverage I purchased what I could afford. I like the black and white metallic blend and the chips were available, the price was right and I could get them in 2 days.
I'm glad I had the extra product to work with. One of the most difficulty areas of the job as a 1st time diy-er was figuring out how much epoxy primer, epoxy and urethane top coat to roll out so that I had enough for the entire job. Because I purchased enough for 600 sq ft. I didn't really have to worry about that.
I did 2 1/2 days of prep work to the floor. Pressure wash/degrease, acid etch twice, pressure wash again, fill holes, and cracks, grind high spots and areas that still did not quite look etched enough.
Day ONE: Coating the floor the epoxy primer. Mixed each single batch per instructions. Simple enough. Applied the primer to the floor by pouring an 8"x4' foot ribbon and rolling with paint roller. Because I was working by myself I wasn't sure I wanted to paint the concrete skirting. I was worried it would take too long and the product I had mixed would begin to harden on me. The primer has a longer pot life than the HD epoxy so I decided to paint the skirting with the gray epoxy primer only. When I finished rolling the first mixed batch of primer I stopped and mixed the second batch to finish the floor. I had enough left over to go over some areas that I didn't quite cover well enough the first time. Particularly the vertical surface of the skirting.
NOTE: I did purchase the professional spike shoes so I could walk in the wet areas while working.
DAY 2: The HD Epoxy Coat. The HD Epoxy coat was mixed using the same method as the epoxy primer. I mixed 1 batch at a time. This has a shorter pot life than the primer and since this coat gets the chips I knew I had to work at a good pace. I did not HD Epoxy coat the skirting as previously mentioned. I thought the primer would be good enough. I think it requires a 2 man crew to try and epoxy coat the skirting while trying to do the chips and roll the floor all while the clock is ticking on the epoxy set up time. I rolled areas about 6 foot wide by 6 foot deep and then stopped and distributed the chips using the toss in the air method. I'll explain more about the chips later. The HD Exoxy rolled out similar to the primer but I could tell when it was staring to thicken or harden toward the 30 minute mark. I had enough product to complete the garage floor with about a 1/4 gallon left over.
DAY 2 CONTINTUED: The Chips. I purchased 20 pounds of chips as previously stated. I wanted as close to heavy or full coverage as possible. Legacy shipped 1 pound with each kit so I had 22-23 pounds of chips total. I mixed legacy's black and white chips in with the chips I purchased from originalcolorchips.com and then separated the total amount of chips into 4 equal bags. I used each bag to cover a 1/4 of my garage. I wanted to make sure I had a few chips left over from each quarter of my garage so I could go back over any areas that needed additional chips. I would work a 6x6 area and then roll out more epoxy for the next section and work that area with chips until completion.
DAY 3. The Urethane Top Coat. This sounds like the easiest part of the job but it is tricky. It was difficult to tell exactly where where I was rolling and I had a fear of running out of product. This is much thinner than epoxy and I was surprised at how fast I was using the product. Because I had 2 gallons when I was finished with the 1st gallon I was almost exactly at the 1/2 way point of the garage. I was careful not to lay down too much on the 2nd half until I was sure I had every inch coated then I went over a couple of spots again. I do have some low spots in my garage that are glossier than other areas because the urethane pooled but it is not dramatic enough for me to be dissapointed over.
THE RESULTS: I have attached the photos. Unfortunately I did not take a photo before I started the prep work. The floor was almost black compared to this photo of the prepped floor. I have to say I am extremely pleased with the results. The decision to go with heavy chips was a good one for me. I like the look and my wife is pleased
. It was raining when I took these and I had not installed my new overhead light yet so trust me when I tell you that these photos do not do it justice. Also the camera did not pick up the metallic chips. The floor looks like a granite or terrazzo floor.Feel free to ask me any questions and I will do my best to answer them.
EDIT: In an attempt to try and capture the metallic flake I took a few more photos but the camera just doesn't pick them up. The metallic silver shows up as brown. There are no brown chips. I installed a new flourescent light so the lighting is better in these photos. Still not natural day light but pretty good.
Attachments


Last edited:


