To avoid these ads, REGISTER NOW!

40'x90'x12' Build in South Carolina, Shop #2

Modifieddriver

Well-known member
Joined
May 29, 2009
Messages
820
Location
Moonville, South Carolina
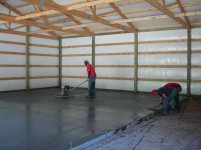
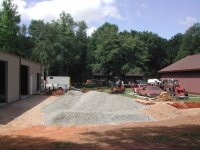
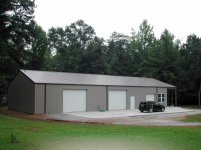
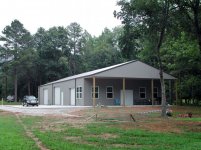
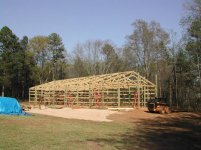
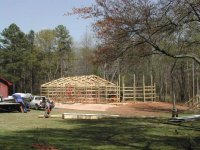
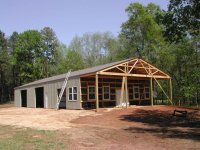
Doing a 3,600 sq. ft. shop/storage/studio here in South Carolina.

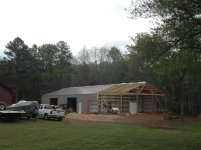
My wife gets 30'x40' and I get the rest, 60'x40'.

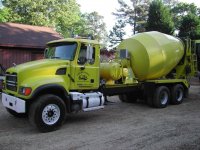
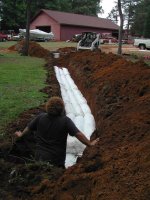
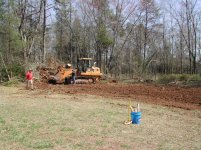
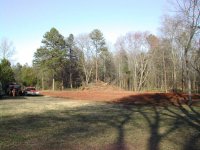
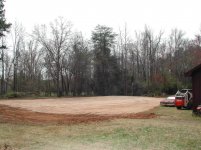
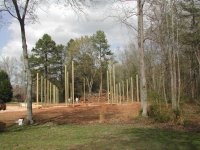
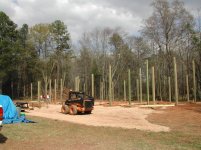
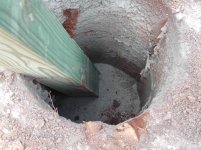
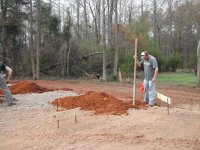
Grading started a couple of weeks ago. Had to stop because of rain last Thursday. Back at it yesterday and today digging holes and setting the posts.

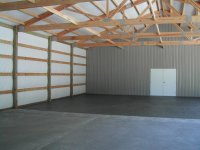
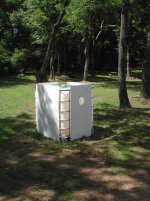
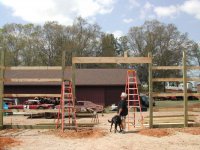
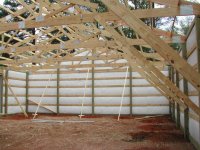
Plans include an outside porch for my wife, bathroom, inside partition wall to separate our activities.

I call this shop #2. Shop #1 is already in the back yard. It's a 34'x64'x10', 2,176 sq. ft. Right now it's only used for vehicle/parts storage. I rent a 2,000 sq. ft. building I use as a shop and storage. Plan is to complete shop #2 and equip shop #1 for serious work. Then transfer stuff outa' the rental building to both shops #1 & #2. It's gonna' be a busy summer.

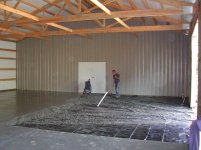
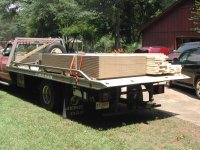
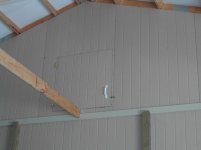
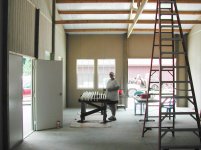
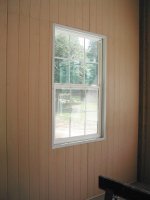
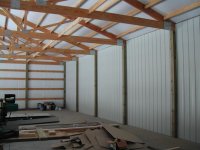
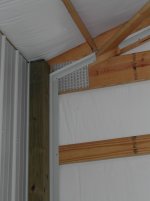
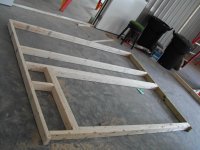
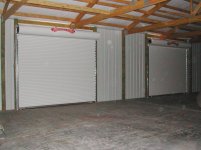
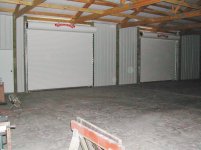
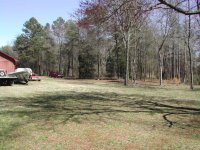
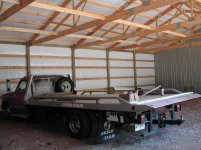
Here's some pics of what's going on. I'll update as we move along. My wife is more excited about this than I am. That's a good thing.
 

Attachments

  • Building Project 027.jpg
    Building Project 027.jpg
    153.6 KB · Views: 300
  • Building Project 040.jpg
    Building Project 040.jpg
    147.6 KB · Views: 250
  • Building Project 004.jpg
    Building Project 004.jpg
    147.1 KB · Views: 279
  • Building Project 001.jpg
    Building Project 001.jpg
    152.8 KB · Views: 312
Last edited:
To avoid these ads, REGISTER NOW!
OP
M

Modifieddriver

Well-known member
Joined
May 29, 2009
Messages
820
Location
Moonville, South Carolina
Here's a few more pics where they set the poles today.

There will eventually be a total of 36 poles. Each is set about 42+" in the ground

Bottom of each hole was tamped. Then an 80lb. bag of concrete mix is poured in each hole. Pole is set and dirt tamped again as it's being filled. Pic of pole in the hole isn't leveled or centered. So far, every pole is right dead in the center of the hole.
 

Attachments

  • Building 4513 023.jpg
    Building 4513 023.jpg
    148.9 KB · Views: 323
  • Building 4513 021.jpg
    Building 4513 021.jpg
    146.6 KB · Views: 297
  • Building 4513 020.jpg
    Building 4513 020.jpg
    151.4 KB · Views: 286
  • Building 4513 004.jpg
    Building 4513 004.jpg
    150.2 KB · Views: 302
  • Building 4513 013.jpg
    Building 4513 013.jpg
    135.5 KB · Views: 413
  • Building 4513 002.jpg
    Building 4513 002.jpg
    150.3 KB · Views: 305
  • Building 4513 001.jpg
    Building 4513 001.jpg
    152.7 KB · Views: 322
Last edited:
OP
M

Modifieddriver

Well-known member
Joined
May 29, 2009
Messages
820
Location
Moonville, South Carolina
Moving right along on this build.

Posts up. They set the last truss this morning.

My wife calls this a BAG. Big *** Garage
 

Attachments

  • 009.jpg
    009.jpg
    147.4 KB · Views: 419
  • 008.jpg
    008.jpg
    141 KB · Views: 454
  • 006.jpg
    006.jpg
    153.9 KB · Views: 501
  • 011.jpg
    011.jpg
    147.2 KB · Views: 415
  • 001.jpg
    001.jpg
    150.1 KB · Views: 408
OP
M

Modifieddriver

Well-known member
Joined
May 29, 2009
Messages
820
Location
Moonville, South Carolina
Here's some updated pics from earlier in the week and today.

This crew of four is pretty good. They pre-drilled all the siding so all the screws are in a straight line. Drew strings on the roof for the same purpose. Also have templates and guides made up to for consistent uniformity.

Installed my exterior personnel door, and the twin 6' wide doors. One of those goes to the outside and the other separates my wife's work place from mine. The interior wall between is also up and insulated. The wall is covered with the same metal as used on the exterior walls. Everything is trimmed out with a J-trim.

When they left today all but 23' of roof was installed. Six Pella windows will be installed tomorrow. I anticipate they'll be done with their part of the build by Friday.
 

Attachments

  • 027.jpg
    027.jpg
    145.7 KB · Views: 503
  • 007.jpg
    007.jpg
    136.5 KB · Views: 562
  • 001.jpg
    001.jpg
    110.8 KB · Views: 470
  • 030.jpg
    030.jpg
    146.1 KB · Views: 540
  • 004.jpg
    004.jpg
    144.7 KB · Views: 462
  • 003.jpg
    003.jpg
    139.7 KB · Views: 727
Last edited:

vic m

Member
Joined
Sep 15, 2011
Messages
15
Location
North Carolina
Wow! Been lurking here for a while and you, Four-fingered Frankie, get my first post!

The used parts/tire-testing business must be doing better in this economy than I thought.

Nice looking build; I bet you'll be happy to have everything in one place.

See you in September at the "village".

Your tenant, Vic
 
OP
M

Modifieddriver

Well-known member
Joined
May 29, 2009
Messages
820
Location
Moonville, South Carolina
Wow! Been lurking here for a while and you, Four-fingered Frankie, get my first post!

The used parts/tire-testing business must be doing better in this economy than I thought.

Nice looking build; I bet you'll be happy to have everything in one place.

See you in September at the "village".

Your tenant, Vic


Vic,

Don't know about money from parts and testing, but my banker loves me. I should've retired earlier than I did. Now I actually have a few $dollars$.

Have to order the overhead doors today or tomorrow. Be using a semi-industrial slatted door that rolls into a drum (canister) with chain operated lift. No electric for me, just something else to break. Two 12' wide x 10' tall and one 8' x 8'.

Also, I only went up to Charlotte on Saturday. I didn't set-up to sell. I spent $6 up there. A $1 can of Dr. Pepper and the $5 mystery box from Tim (remember that from last Sep ?)

How was the Texas Round-Up?
 
Last edited:
OP
M

Modifieddriver

Well-known member
Joined
May 29, 2009
Messages
820
Location
Moonville, South Carolina
Still making progress on the build.

Interior wall constructed that goes from floor to peak of roof. Used the same metal as the outside.

Debated doing this wall in white or this color. Decided to break up the room color with the darker metal. I really like the result.

First vehicle in the shop area is my roll back truck. Had several sheets of wall covering/siding material on the back that we wanted to keep dry.

That's already been installed in my wife's section to cover the truss. Insulation will be installed behind it with a service door to get into what will be an attic over the outside porch. Eventually her part will get completely lined with this siding. Not sure of the name, but it has a simulated wood texture, is primed and not too expensive when considering other products.

PELLA brand Thermostar windows are installed and the crew will probably finish the exterior metal and trim tomorrow.

OVERHEAD DOOR Salesman will be here tomorrow morning to make sure we get the correct size doors.

I really like those 6' double walk through doors on the front porch and between the two shop spaces. Can't remember the brand name, but it's all excellent quality stuff. Nice latching hardware and weather-stripping.
 

Attachments

  • 021.jpg
    021.jpg
    147.3 KB · Views: 560
  • 018.jpg
    018.jpg
    112.1 KB · Views: 336
  • 016.jpg
    016.jpg
    103.3 KB · Views: 339
  • 014.JPG
    014.JPG
    134.5 KB · Views: 359
  • 009.jpg
    009.jpg
    103.2 KB · Views: 372
  • 005.jpg
    005.jpg
    127.5 KB · Views: 406
  • 006.jpg
    006.jpg
    118.2 KB · Views: 456
Last edited:
OP
M

Modifieddriver

Well-known member
Joined
May 29, 2009
Messages
820
Location
Moonville, South Carolina
Looks like your wife got all the windows! :)


Yes, see got all the windows. I didn't want any. She'll also get ceiling fans, wall covering, hot and cold water and a bathroom.

This building, Shop #2, will primarily be a storage for me. Shop#1, I think it can be seen in a few pics, will be my primary work shop. It has windows mounted high and they're real long. The l-o-n-g work bench will be going under them. #1 has 2,176 sq. ft. and a partial attic.

Usually I'm always working with the door open and a few lights on. Us old timers need the power of electricity. Night/winter will be door closed and most lights on.

Building inspector came by today to give approval on framing. He liked the heavy trusses. Plumber coming tomorrow, had to get a permit for him today.

Also had everything treated for termites today.

Hope concrete work will start late this week.
 
Last edited:
OP
M

Modifieddriver

Well-known member
Joined
May 29, 2009
Messages
820
Location
Moonville, South Carolina
Looks good! Why did you choose wood over steel?


Or do you mean why did I choose steel over wood for Shop #2 ???? Shop #1 was built 20+ years ago.

Here's Reasons for Post Steel Building:

#1: Covenant changed so we weren't obligated to build garage in same style as house. Shop #1 has the same siding, similar roof pitch, roof and eve/gable overhang as the house.

#2: Cost of stick construction, as we did with Shop #1 costs more than post steel.

#3: Maintenance costs of post steel building is less than an all wood building. No painting for 20 years. Shop #1 needs painting every 5-6 years.

#4: The post steel building provided more flexibility to the style building we wanted.

#5: The building crew was known for great quality workmanship with this type construction.

#6: The speed of construction was quicker and fewer subs to deal with.

These and a few more items are the reason we did post steel rather than all wood.
 
OP
M

Modifieddriver

Well-known member
Joined
May 29, 2009
Messages
820
Location
Moonville, South Carolina
Here's an up dated picture as of Wednesday afternoon.

Building crew packed up and left late yesterday. They'll be back for a few items, but 99% of their work is done.

Finished the siding, installed a weather vane, hung gutters and down spouts, reinforced the trusses and cut an access door into the porch attic.

If I had to rate this building crew, I'd have to say they are excellent++ .

Fit, finish, and thinking ahead to the next step of construction impressed me. I would highly recommend these folks to anyone wanting a shop built.

Also had the plumbing stubbed in yesterday. The termite treatment was done Tuesday. O/H doors were ordered Monday.

Concrete work should start later this week, or next week.

I added a few pics from early in the week that show the layout of the house, Shop #1, Shop #2 and all my "stuff" in the yard that has to be organized.

It's gonna' be a long summer!!
 

Attachments

  • 015.jpg
    015.jpg
    127.1 KB · Views: 506
  • 022.jpg
    022.jpg
    153.2 KB · Views: 504
  • 020.jpg
    020.jpg
    118.5 KB · Views: 567
  • 005.jpg
    005.jpg
    129.7 KB · Views: 621
  • 006.jpg
    006.jpg
    130.6 KB · Views: 534
  • 001.jpg
    001.jpg
    117.9 KB · Views: 731
Last edited:
OP
M

Modifieddriver

Well-known member
Joined
May 29, 2009
Messages
820
Location
Moonville, South Carolina
Weather here isn't cooperating. Bad rains over the weekend have slowed things down.

We were supposed to pour concrete this week, but it's not gonna' happen. Ground is too wet for the heavy concrete trucks to have access to the building.

Overhead Garage Door Company called and wanted to schedule an installation date. Had to tell them I'm on hold until the floor is done.

Plan now is for concrete early next week. We'll have about 65 yards to do, to include 16' aprons, side walk, etc.. So, it'll be done in stages.
 
OP
M

Modifieddriver

Well-known member
Joined
May 29, 2009
Messages
820
Location
Moonville, South Carolina
very nice, looks like your shop space to living space ratio is just about right :)

I agree, I think we're at a 2:1 ratio here.

If I put up a shed roof off shop #1 that's 16' x 50' to keep "stuff" in the dry, I'll be about where I need to be.

One of my old racing buddies lives in Lutz. Name is Will Cagle, you know him? He has a summer residence up here on a lake near Spartanburg. He'll be up in a week or two.
 
Last edited:
OP
M

Modifieddriver

Well-known member
Joined
May 29, 2009
Messages
820
Location
Moonville, South Carolina
Things finally dried up around here to get concrete trucks in and out of our property without damaging the ground or even worse, getting stuck.

I rented a compacting machine to tamp the dirt, stone/gravel next to the bottom boards. Turns out that was probably wasted effort That dirt was already compacted pretty firm.

Then using a 2x4 I tamped the dirt around all the posts. I'm glad I did that. In some cases there was 2-3" of compaction. Time and effort well spent.

The building floor will be done in three stages. Then the outside aprons will de done in a couple of stages.

Day started out in the 50's and ended in the 70's. Perfect for concrete work.

We're using a 3,500# concrete mix. The 4 mil black plastic was used as a moisture barrier. My concrete folks used a BobCat to move the mix into the back portions of the building.


Here's pics of Day#1 Concrete floor pour. This is a 30' x 40' area, or half of this shop area. It took right at 16 cu. yds. @ $88/yd.. As you can see, there's a taper from where the O/H door will seal to the outside and eventual 24' apron. Hopefully this will prevent water standing in front of and/or running under the bottom door seal.
 

Attachments

  • 041.jpg
    041.jpg
    143 KB · Views: 302
  • 040.jpg
    040.jpg
    139.3 KB · Views: 291
  • 030.jpg
    030.jpg
    141.2 KB · Views: 251
  • 026.jpg
    026.jpg
    146.1 KB · Views: 284
  • 022.jpg
    022.jpg
    153.3 KB · Views: 246
  • 024.jpg
    024.jpg
    155.2 KB · Views: 213
  • 014.jpg
    014.jpg
    145.8 KB · Views: 232
Last edited:
OP
M

Modifieddriver

Well-known member
Joined
May 29, 2009
Messages
820
Location
Moonville, South Carolina
Here's Day#2 for concrete work. Finished the inside of my 40' x 60' shop area.

Today started in the 60's and finished in the mid-80's. Not a cloud in the sky.

They pulled a few chalk lines on the already poured section and then cut the expansion joints. They came out perfectly straight.

This section went somewhat faster than Day #1. Finished up about 30 minutes earlier. Higher temperatures shortened the cure time a little.

Taking a day off for another job on Thursday. Friday the crew will be back to pour my wife's 20' x 40' work area, along with a 10' x 40' covered out side patio/work area.
 

Attachments

  • 058.jpg
    058.jpg
    136.7 KB · Views: 270
  • 057.jpg
    057.jpg
    136.5 KB · Views: 248
  • 056.jpg
    056.jpg
    137.4 KB · Views: 221
  • 050.jpg
    050.jpg
    150.7 KB · Views: 236
  • 048.jpg
    048.jpg
    145.3 KB · Views: 256
  • 047.jpg
    047.jpg
    148 KB · Views: 243
  • 045.jpg
    045.jpg
    151.5 KB · Views: 215
Last edited:
OP
M

Modifieddriver

Well-known member
Joined
May 29, 2009
Messages
820
Location
Moonville, South Carolina
Last Thursday was plumbing day.

A crew of four came in and equipment included a Bobcat with bucket & trencher and a John Deere Excavator.

These guys hustled for a full day.

Laid water line from house to garage #1 and new garage #2. This included 4 hydrant style outdoor spigots. As seen in pic, these are placed in a PVC short pipe with water entering at the bottom. Then the pipe is filled with gravel to create a drain sump. This drains the spigot so it won't freeze in the winter.

Had to hook up sewer line to back side of shop #1 for toilet, sink and floor drain. Then hook up to shop#2 for toilet and 2 sinks.

I think it's over 400 feet from the house to the back side of shop #1. A bunch of 3/4" PVC pipe was used.

There's a pic of the leach field material used. This doesn't require gravel back filling.
 

Attachments

  • 020.jpg
    020.jpg
    140.3 KB · Views: 302
  • 030.jpg
    030.jpg
    147.1 KB · Views: 298
  • 025.jpg
    025.jpg
    148.3 KB · Views: 192
  • 024.jpg
    024.jpg
    147.5 KB · Views: 199
  • 009.jpg
    009.jpg
    154.3 KB · Views: 205
  • 003.jpg
    003.jpg
    152.4 KB · Views: 196
  • 017.jpg
    017.jpg
    153.1 KB · Views: 193
Last edited:
OP
M

Modifieddriver

Well-known member
Joined
May 29, 2009
Messages
820
Location
Moonville, South Carolina
After all that is was time to dig for the septic tank and leach field.

I made my own tank. It's a 275 gallon chemical tank. Plastic tank, a steel tube frame and rests on it's own steel pallet, I put 16 gauge sheet steel on the sides with self tapping sheet metal screws and fabricated a diamond plate steel top with a clean out access trap door. The top underside is reinforced with a steel channel perimeter frame and a couple of channel cross members. Painted everything with two brushed on coats of Rustoleum, front and back sides.

Installed 4" in and out flanges for the sewer pipe. Probably reduced the volume of the tank to 200 gallons. Plenty big enough for it's intended purpose.

I must have a high water table. At 6 feet down we struck water. Dumped about a foot of gravel in the hole and and set the tank. Filled it with water so it wouldn't collapse, hooked up the lines and back filled with more gravel.

We ran 50' of this new style leach field line. The size of the septic tank and leach field are sized for limited use. Between two shops, two people and some occasional visitors, we figure this is more than adequate. Because of the grade level difference and distance, a hook up to the house septic wasn't feasible.

Then they finished up with more back filling and re-grading.

Busy day. Crew worked about nine hours. Now we have to get prepared for the inside hook ups for toilets and sinks. Then water gets turned on.

Fortunately it rained a bunch yesterday. This helped settle the back filled soil over the freshly buried lines.

Next step is spreading that crush and run gravel to prepare grade for 24' concrete aprons. We'll be doing that off shop #1 and #2.

More fun. Just have to wait for things to dry up again to get concrete truck back there.
 

Attachments

  • 044.jpg
    044.jpg
    152.3 KB · Views: 202
  • 027.jpg
    027.jpg
    150.4 KB · Views: 227
  • 042.jpg
    042.jpg
    148.9 KB · Views: 242
  • 040.jpg
    040.jpg
    148.5 KB · Views: 272
  • 041.jpg
    041.jpg
    145.3 KB · Views: 238
  • 029.jpg
    029.jpg
    150.8 KB · Views: 285
  • 014.jpg
    014.jpg
    149.3 KB · Views: 263
To avoid these ads, REGISTER NOW!
OP
M

Modifieddriver

Well-known member
Joined
May 29, 2009
Messages
820
Location
Moonville, South Carolina
Here we go with project updates:

The wet weather has slowed things down. We picked the wrong year to do this project :( . It's put us weeks/month(s) behind schedule. But we're still making good progress.

I had more crush&run gravel brought in to level the grade for the concrete apron outside the overhead door openings. Then we finally had a break in the weather to pour on a Friday.

In parallel to that I used my roll back to pick up building supplies to finish the interior walls for Sally's 20 x 40 part of the building. And then another trip to pick up roofing/siding and trim metal for my 40 x 60 side and a 20 x 60 shed roof off shop #1, the dark brown building.

I had the prior crew that put up the building come back. This crew is GOOD. No FDAing (flop dicking around). They put in four full days of work and will be back to do the previously mentioned shed and interior finishing of shop #1.

Sally wanted a textured wood paneling. This is an exterior composite siding that worked perfect for this application and was economical. I had a colored custom metal base mold made to get the panels off the concrete floor. As you can see, the panels had to be spaced out from the horizontal wall girts. This room was quite labor intensive. And the way the panels step overlap, there was significant waste. There's even an access door to the area over the porch.

Here's pics of the apron pour and interior finishing on Sally's side:
 

Attachments

  • DSCN6179.jpg
    DSCN6179.jpg
    133.8 KB · Views: 319
  • DSCN6180.jpg
    DSCN6180.jpg
    135.3 KB · Views: 317
  • DSCN6165.jpg
    DSCN6165.jpg
    134.4 KB · Views: 292
  • DSCN6146.jpg
    DSCN6146.jpg
    152.4 KB · Views: 265
  • DSCN6163.jpg
    DSCN6163.jpg
    148.1 KB · Views: 288
  • DSCN6157.jpg
    DSCN6157.jpg
    148.3 KB · Views: 275
  • DSCN6150.jpg
    DSCN6150.jpg
    150.1 KB · Views: 271
Last edited:
OP
M

Modifieddriver

Well-known member
Joined
May 29, 2009
Messages
820
Location
Moonville, South Carolina
Here's some more pics of Sally and her part of the building. She's priming and painting 1" x 4" and 1 1/2" x 1 1/2" trim boards. These are for where the paneling meets the trusses and around the two double personnel doors. Also have a pic of the attic access door. The handle was something I had in my stash. You can see the 1" x 4" trim in this pic.

I also had some custom made colored metal molding made for around the windows. This are double pane Pella windows and deserved a nice trim. trimmed these out. 1 1/2" x 3" L-shape with a turned edge hem to the inside of the outside flange. Like the base mold, a worth while investment, especially at the price I paid.
 

Attachments

  • DSCN6196.jpg
    DSCN6196.jpg
    135.9 KB · Views: 202
  • DSCN6181.jpg
    DSCN6181.jpg
    141.7 KB · Views: 204
  • DSCN6177.jpg
    DSCN6177.jpg
    141.8 KB · Views: 205
  • DSCN6176.jpg
    DSCN6176.jpg
    140.8 KB · Views: 206
  • DSCN6194.jpg
    DSCN6194.jpg
    147.3 KB · Views: 188
  • DSCN6195.jpg
    DSCN6195.jpg
    143.6 KB · Views: 169
Last edited:
OP
M

Modifieddriver

Well-known member
Joined
May 29, 2009
Messages
820
Location
Moonville, South Carolina
Here's some more project update pictures.

As Sally's side of the building was nearing completion the crew started on installing polar white metal liner panels in my side.

This included pre-cut to proper length vertical metal J-mold up each 6 x 6 post and across the top of the gable. I had all the metal wall panels pre-cut to 12', and many incrementally cut for the end wall, which were then cut at the roof pitch angle.

The fit and finish is outstanding. Again, this crew did a GREAT job.

Next was an insulated bathroom enclosure and over head doors.

But first, here's the liner pics:
 

Attachments

  • 026.jpg
    026.jpg
    135.1 KB · Views: 141
  • 027.jpg
    027.jpg
    133.6 KB · Views: 148
  • 031.jpg
    031.jpg
    136.4 KB · Views: 142
  • 058.jpg
    058.jpg
    137.4 KB · Views: 133
  • 049.jpg
    049.jpg
    140.2 KB · Views: 153
  • 046.jpg
    046.jpg
    135.9 KB · Views: 150
  • 045 - Copy.jpg
    045 - Copy.jpg
    136.9 KB · Views: 157
OP
M

Modifieddriver

Well-known member
Joined
May 29, 2009
Messages
820
Location
Moonville, South Carolina
To continue with progress pics:

Here's where we framed up for the small bathroom enclosure.

Bought a $66 pre-framed door at Home Depot, another $10 for the hardware. Also bought a roll of 24" insulation for the 8' walls and ceiling. The partition wall and outside wall were already insulated. So it only made sense to do this so the room could be heated with a small space heater in the winter.

I had enough metal siding and liner panels for the outside and inside walls. We'll be doing the ceiling the same way but have to install a ceiling light fixture first. The small mezzanine is OSB. Notice the metal trim around the top. Finished off real nice.

We already bought a new toilet. Found a perfect sized used vanity/sink for $5. included the fixture. Sally's painting that right now. It will be installed in the near future along with a 110v 2 1/2 gallon mini-tank hot water heater.

We bought a few 1930's era items out of an old downtown house undergoing renovation. Included was an old time pivoting mirror medicine cabinet. Sally's doing a restoration on this.

Next up are over head doors.
 

Attachments

  • 056.jpg
    056.jpg
    139.1 KB · Views: 91
  • 054.jpg
    054.jpg
    136.8 KB · Views: 99
  • 044.jpg
    044.jpg
    135.8 KB · Views: 83
  • 041.jpg
    041.jpg
    135.7 KB · Views: 93
  • 039.jpg
    039.jpg
    134.7 KB · Views: 88
  • 029.jpg
    029.jpg
    129.5 KB · Views: 81
  • 028.jpg
    028.jpg
    135.3 KB · Views: 83
OP
M

Modifieddriver

Well-known member
Joined
May 29, 2009
Messages
820
Location
Moonville, South Carolina
Another update, this time for the over head door installation.

Yes, We're finally in the dry.

OVERHEAD DOOR COMPANY had a crew of four come out to install the three roll-up doors.

Two are 12'w x 10'h and the one for Sally is 8' x 8'.

These are the individual slat type door that roll up like a window shade.

I already had this style on shop #1, liked them and decided to use the same.

These aren't insulated, but here we don't have harsh winters. I'm more concerned with keeping heat out rather than keeping heat in. The white exterior should help do that. Most of the time we'll be working with the doors open for ventilation anyway.

I went with the door covers that clean-up the look on the inside.

The installers still have to return to install the weather striping and make a few adjustments.

No tracks on the ceiling, no shop light blockage when they are up, and if damaged you just replace the needed repair slats. Also have a chain operated gear drive raising mechanism. Effort is minimal, so no power assit lift is needed.

Here's the pics:
 

Attachments

  • 001.jpg
    001.jpg
    146.6 KB · Views: 145
  • 002.jpg
    002.jpg
    147 KB · Views: 131
  • 003.jpg
    003.jpg
    142.2 KB · Views: 131
  • 006.jpg
    006.jpg
    133.9 KB · Views: 176
  • 010.jpg
    010.jpg
    145.8 KB · Views: 226
  • 014.jpg
    014.jpg
    150.3 KB · Views: 234

Omphaloskeptic

Well-known member
Joined
Oct 11, 2008
Messages
2,346
Location
Ultima Ratio, Wa.
Congratulations on getting the building buttoned up! The building exterior looks very nice also.

I imagine another 'bonus' about the R/U doors is that they should stay in the position you stop them at if they are installed properly? I've wondered how they are able to get a good seal at the top of the frame. In my area of the country, the nasty swirling wind gusts would probably set the individual slats rattling and banging away in the 'Jeezuz-Breezuz'! lol
 
OP
M

Modifieddriver

Well-known member
Joined
May 29, 2009
Messages
820
Location
Moonville, South Carolina
Congratulations on getting the building buttoned up! The building exterior looks very nice also.

I imagine another 'bonus' about the R/U doors is that they should stay in the position you stop them at if they are installed properly? I've wondered how they are able to get a good seal at the top of the frame. In my area of the country, the nasty swirling wind gusts would probably set the individual slats rattling and banging away in the 'Jeezuz-Breezuz'! lol

Thanks for the positive comments.

Yes, the doors stop where you want them. There's a tension rod/spring on the roll to adjust the force needed to open and close. I often just open the doors just far enough to get ventilation or to just clear my head walking in and out. The door partially down gives some sun shade.

At the top, they will install a "whisker" strip. An aluminum extrusion with what looks like a narrow brush with bristles about 3-4" long crimped in it. Kinda' like a super long car window snow brush.

As the door goes down the roll gets smaller and the door moves away from the header. The brush seal will straighten out and still maintain contact with the door. Now this isn't a weather tight seal, but it'll keep dust, birds, etc. from coming in. On the sides, a normal O/H door flat rubber seal is used.

I really haven't noticed much rattling on my other shop doors that I've had for 20+ years. One is 16'w x 9'h, the other is 12'h x 8'h. But then again, my hearing is about all gone, so I'm not a good judge, even with my hearing aids in :(.
 
Last edited:

banana cognac

Active member
Joined
May 26, 2013
Messages
25
Location
845, New York
I agree, I think we're at a 2:1 ratio here.

If I put up a shed roof off shop #1 that's 16' x 50' to keep "stuff" in the dry, I'll be about where I need to be.

One of my old racing buddies lives in Lutz. Name is Will Cagle, you know him? He has a summer residence up here on a lake near Spartanburg. He'll be up in a week or two.

Holy ****, you're friends with Will Cagle? That guy is a racing legend up my way. I'm a regular at Orange County in NY, and although he was way before my time, the name is still spoken about often. I've wrenched on a big block for the last couple season and help on a sportsman car now. I'm in the process of cleaning out the garage to make into my race shop.

Where did you race in NY? I'm going to have to search around a bit, but if you haven't posted some of the vintage stuff from your collection I would love to see it.

I'm definitely subscribed for this build :thumbup:
 
Last edited:

panthersteve

Well-known member
Joined
Jun 30, 2013
Messages
134
Location
Ipswich, Qld, Australia
Great looking shed, I wish I had the space and dollars for something like that :thumbup:

One question though, looking at the pics of the concrete going in I couldn't see any reinforcing steel going in the slab, was there any ?

Steve
 
OP
M

Modifieddriver

Well-known member
Joined
May 29, 2009
Messages
820
Location
Moonville, South Carolina
Thanks for the :thumbup:.

I decided to do this now, before I get any older. Plan for the future and you'll get there.

We didn't put any wire or steel in any of the cement for a few reasons.

The grade required very little fill. I had washed gravel brought in as a base over hard compacted South Carolina red dirt. Then compacted the base even more.

We used 3,500 psi cement. Cut expansion joints. And remember, with the post construction, the concrete doesn't have to support any building load. Only has to support what I put on top of it.

We really think the wire was a waste. Time will tell. If it lasts 20 years, then the next guy can worry about it ;).


Great looking shed, I wish I had the space and dollars for something like that :thumbup:

One question though, looking at the pics of the concrete going in I couldn't see any reinforcing steel going in the slab, was there any ?

Steve
 
OP
M

Modifieddriver

Well-known member
Joined
May 29, 2009
Messages
820
Location
Moonville, South Carolina
Holy ****, you're friends with Will Cagle? That guy is a racing legend up my way. I'm a regular at Orange County in NY, and although he was way before my time, the name is still spoken about often. I've wrenched on a big block for the last couple season and help on a sportsman car now. I'm in the process of cleaning out the garage to make into my race shop.

Where did you race in NY? I'm going to have to search around a bit, but if you haven't posted some of the vintage stuff from your collection I would love to see it.

I'm definitely subscribed for this build :thumbup:


I'm originally from within 4 miles of Kenny Tremont. Ken Sr. was my racing mentor when I first got started in the late 60's. I initially primarily ran at Lebanon Valley, but then went to other tracks to run like Fonda, Rolling Wheels, Weedsport, etc. In '75 I focused on running in Canada and made good money doing it. For some reason, I've never made it to Middletown.

Can't say I raced against Cagle, but I was on the track with him at the same time he was, if you know what I mean ;). He promoted Orange County after he got hurt at Weedsport.

He's still sharp and has an incredible memory. He and his wife, Barb, are senior citizen versions of Ken and Barbie. Their appearance is always perfect. I'm always quizzing him about the old days.

You know the Hager Bros. orange and white #65 and/or #56 ?
 
To avoid these ads, REGISTER NOW!
Top Bottom