To avoid these ads, REGISTER NOW!

My new 30'x32' Race Shop Build

j20000

Active member
Joined
May 20, 2011
Messages
28
So I've been browsing this site for a few years, hoping to have one of these threads someday, and here I am. This isn't going to be one of those "Epic" build threads, because this garage is being built out of necessity. Here's a little background. My Dad and his buddies started racing dirt track cars in 1985, and they raced until 2003 when they decided to call it quits and sell everything. I was still in the Marine Corps at the time, so when I got out in 2007 I decidced to buy my own car, and get everyone out of retirement and start racing again. The owner of our race shop, one of the original guys that started the race team (my Dad's best friend since 1st grade), passed away in december after a 5 year battle with cancer. a few weeks ago his brother called us up and said that we had 8-12 weeks to be out of the garage. I didn't really want to be at the house I own right now for ever, so I didn't really want to build here, but I didn't have a choice. I'm trying to build this garage for fairly cheap, becuase this isn't something that I was saving for or anything, it just kind of came up. I'd like to build it myself, but between work, racing, and having 2 kids (2yrs & 10mos), I don't have the time to do it as quickly as I'd need to. I'm building a 30x32 pole building because I can build up to 1000sf in my township without a permit. I originally had a 30x40 planned until I found that out...so I had to downsize in order to expedite the process. So anyways...onto the build pics:

Sorry for these first few crappy cell phone pics my Mother-in-Law (who watches my kids during the day) sent them to me.

Step 1: Remove 3 trees (which sucked because my back neighbor is kind of messy and this allows me to see his house...for now)

IMG_3870_zps64617175.jpg

IMG_3872_zps88078511.jpg

IMG_3873_zpsc604dabe.jpg


Step 2: Move shed and excavate. The shed was going to be in the way where it was, and I built it like a bomb shelter, so I knew it would withstand the move.

IMG_4038_zpsde5f2a89.jpg

IMG_4039_zps3119cd12.jpg

IMG_4117_zpscdc8ad0d.jpg

IMG_4118_zps3dae5caa.jpg


Step 3: Build a retaining wall so that I can extend my driveway.

IMG_4005_zps37171d5c.jpg

IMG_4113_zpsd1ca12af.jpg

IMG_4115_zps84e1fb2b.jpg

IMG_4120_zps7124b7ea.jpg


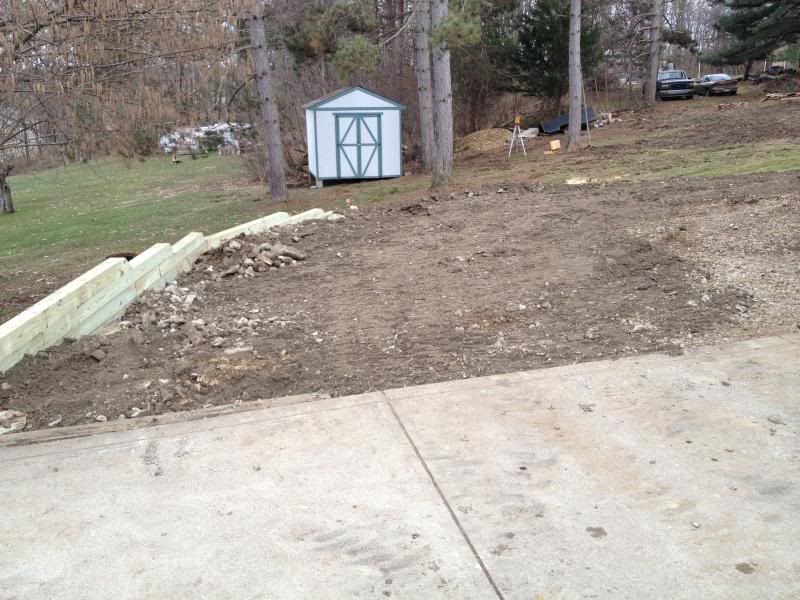
Step 4: Build a temporary driveway/building pad for the crew to not trash my driveway with mud.
IMG_4116_zps7396e094.jpg

IMG_4119_zpsfe21683c.jpg


Now my F350 and my winter beater explorer both fit in the driveway.
IMG_4122_zpse42481af.jpg


Step 5: Construction starts

Holes drilled for posts, and steel delivered. (kind of depressing that little pile of steel is for my whole building)
IMG_4155_zpsbe6f1675.jpg


Lumber/Trusses/Insulation showed up
IMG_4161_zpsaf79d826.jpg


They started building on Friday afternoon, then I get a call that they screwed up and somehow they laid the building out 1' out of square and they had to take all of the posts out, redrill the holes, and they'd be back in the morning to start again. No big deal...I'd rather it be right. So on saturday I left in the morning for racing practice because the season was starting the following week, and I came home to this later that night:
IMG_4237_zps05c30bc7.jpg


Man door, header, and all of the soffit's built
IMG_4249_zps0c814f42.jpg


Roof Insulation/Steel going on:
IMG_4251_zps0af6f7da.jpg


Steel almost done
IMG_4267_zps8899c750.jpg


Inside: As you can see I have a lot of fill that needs placed on the left side, but I have a sanitary easement that run through my yard for my neighbors sanitary line, so I couldn't dig down as much on the right side as I needed to in order to level the building.
IMG_4269_zps6e7a4707.jpg


Then I went to California for the week on vacation, and came home to see that they had everything wrapped up on the building.
IMG_4449_zpscc68ee32.jpg


Now I have to get about 5 tri-axles of fill in to bring the left side of my yard/driveway up so that I can start getting ready for concrete. I'm going to do 2" rigid foam, wire mesh, and PEX tubing for radiant heat. Hopefully I'll be ready to pour in about 2 weeks. I'm considering pouring the driveway too because my wife wants me to so that the kids can ride their bikes on it and stuff since I stole most of the back yard...We'll see.

I'm a project engineer for a large commercial contractor, so I'm having a few of our concrete guys come down to help me out with the floor pour. I'm not doing anything fancy, probably just add a densifier and shine it up a little with a buffer pad.

And in case anyone is wondering what's going in it...
IMG_4226_zps1126351c.jpg

DSC02114_zpsa6706d36.jpg


And I'll probably put the Mustang out there for the winter.
IMG_3812_zps5e9195c8.jpg
 
To avoid these ads, REGISTER NOW!
OP
J

j20000

Active member
Joined
May 20, 2011
Messages
28
I live near Pittsburgh, and race all around this area, but mostly at a track called Pittsburgh's Pennsylvania Motor Speedway (PPMS). It's a big and super fast 5/8 mile track.
 

K2Orion

Well-known member
Joined
Dec 22, 2011
Messages
58
Location
STL
Radiant floor heat in a building you're not gonna stay in? I like your style!!
Asphalt is probably too expensive, but you might check anyway. Might be a good choice for between your existing driveway and the new shop/apron.
 
OP
J

j20000

Active member
Joined
May 20, 2011
Messages
28
Well I figured now that I'm building this garage, I'll be here a little longer than I wanted to, and I've heard nothing but great things about radiant heat...so I had to do it.
 
OP
J

j20000

Active member
Joined
May 20, 2011
Messages
28
All of my PEX showed up today, along with my manifolds, and pressure tester. I started ordering some misc. stuff like ceiling fans and tool boxes too. The electric company dropped off the new 400amp meter socket for my house, so I can have the 200amp service pulled out to the shop. So I have a busy 2 weeks ahead of me because I'm shooting to pour the floor on May 4th. I have to get the electric service pulled out there, plumbing, backfill, insulation, wire mesh, and PEX. Looks like I'll probably be taking a few days off of work next week.
 

Rickkal

Member
Joined
Jan 31, 2012
Messages
13
Where abouts near Pittsburgh? I live a few miles from the track towards McDonald and work in Pittsburgh.
I'm in the process of planning a build myself...tired of cleaning snow off and moving cars to plow the driveway all winter.
 
OP
J

j20000

Active member
Joined
May 20, 2011
Messages
28
Yes. That's a late model (crate late model actually).

Rickkal, I'm in Findlay Twp...just up the road from you.
 

Rickkal

Member
Joined
Jan 31, 2012
Messages
13
Who built your building? I'm looking at doing a 3 car garage under 1,000 sq ft for the same reason you did...under that size only requires a zoning permit
 
OP
J

j20000

Active member
Joined
May 20, 2011
Messages
28
No Vern...never heard of him. I've been around racing since I was a little kid...and I've never heard of him. How old is he? Lol.

Thanks Cobra...nice GT500
 
OP
J

j20000

Active member
Joined
May 20, 2011
Messages
28
Rick, I'll pm you his number...I bought the building through a company in Canton, Oh called Allwood Structures...and they sub out the labor. However I wasn't 100% satisfied with how their office people handled stuff...but I'm completely happy with the builder. He can give you the building turn key without the middle man.
 
OP
J

j20000

Active member
Joined
May 20, 2011
Messages
28
Never heard of him either! lol. I'm 31, so I'm a little bit behind you. lol.
 

Vernmotor

Well-known member
Joined
Jan 12, 2008
Messages
1,318
Location
Mt.vernon oh
OK they run real well with the modified's and they both have late models but don't race them much. Danny was the king 25 years ago LOL..
 
OP
J

j20000

Active member
Joined
May 20, 2011
Messages
28
Alright...sorry for a little lull in the action...I didn't forget about you guys...It's just that all of this work took place from Thursday-Saturday. I was busy to say the least!

Thursday: Dig trenches for electric and water, run conduit for electric, run water line from my house to the garage, and backfill trenches, and bring site/building up to finished grade. I also roughed in the plumbing for the bathroom. (this all happend after I got home from work!) Bedtime: 2:30am

Friday: Start time:7:00am - I took off work because I was pouring concrete on Saturday, so I worked all day on the garage. I got the insulation down and taped, got the wire mesh and rebar in and all tied together, then put down 1000' of PEX, I formed up the garage door opening, and went to bed at 2:00am.

Saturday: Woke up at 5:30am to finish up a few things before concrete showed up at 7:30am. First 10yd truck took about an hr to unload since I had to wheelbarrow to the back half of the garage. Finished with the 2nd truck of 7yds around 10am. Finishers wrapped up around 12:30pm, so I cut my grass and cleaned up my yard for my daughters birthday party on Sunday. Then I loaded up the racecar and went racing at 5:00pm. Got home at 1:00am, work up on Sunday at 7:30 to get things ready for the party. Sleep is over rated! lol. I'm still recovering from last week.

Plumbing roughed in (yes I set it in limestone...I just don't have any pics of that)
IMG_4583_zps8286342e.jpg


I used recycled concrete to bring everything up to grade, since I had to bring in 160T of fill, it was the cheapest way to go.
IMG_4595_zpsfba286da.jpg


I threw up a form around the left side, since it's so much of an angle, I haunched the floor over there so that it's thicker/stronger, and will look like a foundation wall from the outside. That way I wouldn't have a super steep hillside against the garage.
IMG_4598_zpse476cddd.jpg


2" Ridged Foam and wire mesh down. You can kind of see, but I sleeved the water line under the garage slab so that if anything ever happens to it, I can slide that one out and just slide a new one in.
IMG_4624_zps97b54739.jpg


I didn't have all of the rebar in for this pic, but I threw some L bars in there, with 3 sets of straight bars on them to strengthen the haunched area.
IMG_4625_zps4168c611.jpg


Pex tubing in. My fingers are still raw from pulling zip ties!
IMG_4626_zps670411fa.jpg


17 yards of concrete poured. That haunched area ate up a little more than I thought. I wanted the floor power troweled, but the guys I had helping finish my concrete broke the power trowel the day before. So it just got hand troweled. It's not the end of the world, but I hate seeing trowel marks. Althought it's not as bad now that it's dry.
IMG_4633_zps65e652a2.jpg


There was a little concrete left over, so I poured a little 4'x4' pad outside of the door. We always called our old garage X-World (since our racecar number is 93x), so I named this one X-World²
IMG_4635_zps90019cc1.jpg
 
OP
J

j20000

Active member
Joined
May 20, 2011
Messages
28
So far this whole process from the time I stuck the first shovel in the ground until now has been about 6 weeks. And I'm beat! lol
 
To avoid these ads, REGISTER NOW!

bizkit10

Member
Joined
Jan 19, 2012
Messages
21
Nice shop and latemodel. I just retired last season from racing dirt latemodels, here in the south.
 
OP
J

j20000

Active member
Joined
May 20, 2011
Messages
28
Thanks...I'd love to come down south and race on some red clay tracks someday.
 
OP
J

j20000

Active member
Joined
May 20, 2011
Messages
28
OK, it's been a while since I posted anything, but with it being racing season, progress is kinda slow. It's getting there though. I added more insulation, got all of the electrical roughed in, the panel complete, and the service upgraded to a 400amp service to my house (200 split off to the garage). All of the drywall is up (except for the bathroom), now I have to get the water tied into my house so I can button up the bathroom and finish the drywall, and hang a ceiling. I didn't want to move anything into here until it was completely finished, but I had to get some stuff out of the old shop before it disappeared into the wrong people's hands, so I'm stuck working around it.

Bathroom framed in, and electrical roughed in. I built it 8' tall with a 2x6 ceiling so I could use it for storage. That room will house the water heater, compressor, radiant heat equipment, and a toilet and urinal.
IMG_5122_zps9a54a0e0.jpg


IMG_5194_zps64a0d171.jpg


IMG_5610_zps94770407.jpg


Got the exterior lights up
IMG_5741_zps58b7481d.jpg


Still have some cleaning up to do out here, build a little wall on the right, and landscape.
IMG_5767_zps6673f4d1.jpg


IMG_5770_zps8ccd90b2.jpg


20 light fixtures (40 T8 bulbs total) and (4) 56" ceiling fans...this place shouldn't be dark, or hot.
IMG_5735_zps17ccdc34.jpg
 
Last edited:

Graham08

Well-known member
Joined
Dec 10, 2007
Messages
713
Location
Iron Station, NC
Very nice! I've been meaning to get to PPMS one of these days. Sounds like a pretty cool track. What are you doing for a ceiling in there?
 

e-tek

Well-known member
Joined
Dec 19, 2007
Messages
10,690
Location
Saskatoon, SK
Mine is 24 x 40 so although you may find it a little tight putting 2 long cars in there end to end, the extra width you have will be awesome. With 24 feet I couldn't put a compressor room like that in and still park 2 cars, but you should be able to no problem.

SHOP%2520003.JPG
 

banana cognac

Active member
Joined
May 26, 2013
Messages
25
Location
845, New York
That's a real sharp looking late model and the garage looks great too. I'm from Southern NY and wish they ran crate lates around here; I could definitely run one in the same price range as a crate sportsman. I actually just purchased my first street stock a couple of weeks ago with plans to run it at Orange County in Middletown.

I can't wait to see when you have the interior all done up, I'm sure it's going to be bitchin'
 

drg5490

Well-known member
Joined
Dec 10, 2012
Messages
120
Hey could you take a pic of the left side where you had the form for the slope? I'm in the same situation here, just wanted to se how it turned out...thanks
 
OP
J

j20000

Active member
Joined
May 20, 2011
Messages
28
Thanks guys!

Graham, check it out sometime. It's a big, wide, fast 5/8 track. Good racing most nights. Haven't decided what I'm doing yet..long story but they screwed up my trusses and didn't give me the load I wanted. I'm fighting with them now. May do metal, or possibly even just Masonite. Gotta be something light.

E tek, I definitely won't be able to fit them end to end...a dirt late model is 17' long and 7.5' wide. So once the cabinets and shelves are in...two side by side will even be tight...with working room.

Banana, it's definitely the only way I could afford to race. My dad and his buddies used to race open motor Late models, but I just can't swing that kind of money for a motor.
 
OP
J

j20000

Active member
Joined
May 20, 2011
Messages
28
Hey could you take a pic of the left side where you had the form for the slope? I'm in the same situation here, just wanted to se how it turned out...thanks

I'll see what kind of pics I have, but I basically cut the right side down as far as I could, and still have enough cover in front of my neighbors sanitary line. I ended up bringing about 6 Tri-axles of recycled concrete in and building up the pad, then 2 more tri-axles of shale to build against the pad to help hold it in. It was all compacted in like 6-8" lifts. Then I just closed in the bottom of the poles with plywood to act as a form and I haunched that side of the slab. Once I strip the plywood off, it'll look like the building was built on a concrete foundation. I used some #4 rebar in the haunched area, and to tie it in to the 4" part of the slab. That haunch does eat up some concrete though. Like 5 extra yards.
 
OP
J

j20000

Active member
Joined
May 20, 2011
Messages
28
Alright...It's been a WHILE since I posted any pictures. I pretty much finished up enough to move in, but as you all know, it seems like none of us are ever "done". Here are some pics of the shop now.

Installing OSB for the ceiling


Here's the lift I built to put the OSB up, it worked great and I was able to do it by myself. Just lift the bar up, put the locks in, then go up and nail it up.


OSB up, and almost painted, and some lights up.


Cabinets installed


The other side, more cabinets


Cabinets with Temp. workbench until I get a piece of steel cut, bought a small HF toolbox to supplement my other boxes.


Bathroom floor down, toilet and urinal installed


Compressor and hot water tank installed


PEX Manifold installed


Minor set back. I had a small leak from the hot water tank to the sink, didn't leak until the water was on for like 2 days, small repair, and everything was fine.


Pinstriped the wall, I think it really helped set off the red stripe.


Compressor hard piped. PEX run through the walls to a few air connections around the shop


I made these nice air outlets around the shop.


Finished piping the radiant heat. (Don't mind that some of it is a little crooked...I wasn't finished securing the pipes yet)


Another shot of the workbench area


Looking straight into the shop, don't mind the mess, I was still building at the time


Got the car moved in


Got a few truckloads of limestone delivered. I still have some landscaping and stuff to do.


I lost the garage once already for my 3 year old daughter's Frozen party (you can see I still have grass to plant)


Hanging out with Bigfoot


I have a few more cabinets and shelves and stuff up, that I don't have pictures of, but I'm still working on getting organized, and moved in and situated. I'm sure I'll never REALLY be done. But it's so much nicer being in this new garage compared to the old one. Thanks for looking.
 
Last edited:

Eriehunter

Well-known member
Joined
Mar 14, 2014
Messages
189
I live near Pittsburgh, and race all around this area, but mostly at a track called Pittsburgh's Pennsylvania Motor Speedway (PPMS). It's a big and super fast 5/8 mile track.

Ever been up to Erie to race? or Raceway 7?
 
OP
J

j20000

Active member
Joined
May 20, 2011
Messages
28
I have been to Raceway 7...we raced there a few times in 1999. That's the last time I've been there.

Side note, I don't know why my pics aren't working. They're linked to photobucket.
 
OP
J

j20000

Active member
Joined
May 20, 2011
Messages
28
Thanks Welder...I updated the pics. All of the other forums that I'm on, you can just click the picture button and paste the link.

Justin, it was just an R10, vinyl faced vapor barrier/Insulation. I added R13 to that on the walls, and R30 in the ceiling. The garage is very well insulated. It stayed around 65* all winter, right where I had it set, with the radiant heat pump barely ever running. Also, now that it's been hot a few days this spring (85*+) it's stayed around 70-72* inside with the doors kept closed.
 
To avoid these ads, REGISTER NOW!
Top Bottom