To avoid these ads, REGISTER NOW!

Beautiful Cutting Board - out of wood from the scrap bucket...

DoghouseForge

Well-known member
Joined
May 11, 2013
Messages
374
Location
Lakeland, Fl
My neighbor is a retired finsih carpenter and is always building something cool in his shop. He has a large pastic tub in which he tosses the "shorts", or "scraps" where I come from... :lol2:

I asked him if I could take them to make a cutting board out of and he gladly said yes... So this is what I made....

I used my 10"table saw and cut the sections into 2 " strips. Next I moved the Blade(fine finsh) to about 1/8" from the fence. This let me run all the edges and clean up the random pieces as best I could. Some of the pieces were not 90deg. to start with, and I honestly couldnt figure out exactly how to correct that. In my rookieness I thought that simply running the 4 sides on the equally measured blade setting would correct that but instead it just cuts an equal copy of the angle you started with. :dunno:

I suppose you could use a carpenters square, mark a new 90 and cut the line, but I didnt think of that at the time so i decided to wing it. :lol:

Anyway, i put the "puzzle" together and got out the glue and clamps.


In the future I will use 2 clamps on the top and 1 clamp on the bottom so it pulls force equally. Instead as you can see I tried to put all three on top and the result was terrible. It caused a slight bow in the surface that I would later have to get corect with the sander.

Dry and pretty disappointing...


I used a square and marked off the sides to be cutt at the widest points possible.


Hope was slightly lifted at this point..slighty...


Holy Sanding! I used the 36grit 3x21 belt to really get after all the unevenness. I actually think I might be winning!


***funny side story*** I went to the store with the ingenious idea that "I'll buy a planer and that will fix this thing right up" ..:lol: I had no idea a planer was so much money! Needless to say, I did not buy a planer and went back to sanding...

So my slacker attempt at leveling all the sides went ok at best. I had some pretty big gaps but my shopmate Jarrid offered a cool fix. Mixing the saw dust from the board with the woodglue created homemade fast dry wood filler.. I took advantage of this technique!


so that dried and I resanded it down. I then had to do a second run of filler to get the final seams... It added another hour but it was totally worth it. Since I was working on several things it seemed silly to rush it.

anyway, after sanding up to 80grit


I used the palm sander and rolled the edges. I like this look, one day Im gonna try to make one with perfect edges and alignment but for my first one this is an awesome technique to bleand in my amatureness. ;)


After sanding up to 220grit

side one


side two


I used a food grade Butcher block oil and sealer.


Then waited 12 hours or so and wet sanded up 400grit.
Another coat was applied and it also was allowed to dry for about 6 hours.
Then I wet sanded it up to 2000grit...

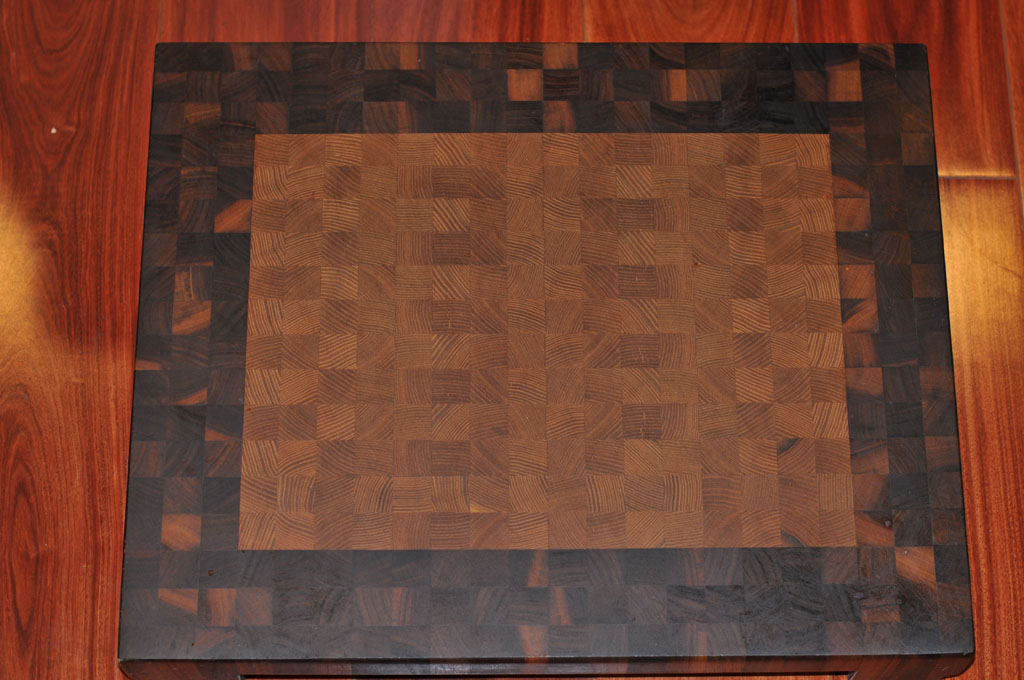
Turned out way better than it looked like it would in the beginning, and its smooth as glass.


How it looks with some of the knives I made this weekend. I love how the handles match colors in the board.


So lessons learned to save you the trouble -

1. - 90deg doesnt come from measuring the blade distance really carefully:headshake

2. - Planers are really expensive

3 - Use your clamps in opposition to avoid the curve

4 - Just keep sanding ...its bound to turn into something:lol2:

5 - If I can make it out of wood anyone can...

6. - Use the endgrain of the wood instead of the long grain for a harder, longer lasting cutting surface.

Thanks for checking it out!

JP
 
Last edited:
To avoid these ads, REGISTER NOW!

nine4gmc

Well-known member
Joined
Mar 24, 2012
Messages
14,357
Location
Dallas
I saw it in the other thread when you first unclamped it... I gotta say, very impressed with the final result!! :beer:
 
OP
D

DoghouseForge

Well-known member
Joined
May 11, 2013
Messages
374
Location
Lakeland, Fl
I saw it in the other thread when you first unclamped it... I gotta say, very impressed with the final result!! :beer:

Ha! i was doubtfull as well...give me some steel and a fire and ill make you whatever you want. Wood is different....

I'll hopefully have the "Cleaver" finished tomorrow or wednesday and then I'll post up the weekends blacksmithing stuff as well.

Thanks!

JP
 

srmofo

Well-known member
Joined
Oct 15, 2009
Messages
6,161
Location
SW ohio
Find A Used Jointer On Craigslist. That's How You Square Up Wood Before Cutting. Turned Out Well Though
 

mobiledynamics

Well-known member
Joined
Mar 14, 2010
Messages
5,034
Location
Gotham City
Here's one of mine

choppingblock.jpg
 
OP
D

DoghouseForge

Well-known member
Joined
May 11, 2013
Messages
374
Location
Lakeland, Fl
That's an amazing one. I hope I can figure out the jointer and give it another attempt. Thanks for the tip on the glue as well!

Thanks
JP
 

rlitman

Well-known member
Joined
Oct 18, 2010
Messages
24,578
Location
Long Island
Looks excellent. Good thing you didn't buy a planer. That vertical grain is hell on planer knives. It'll want to jump and chatter. Ruins knives, and tears all sorts of chips out.
 
OP
D

DoghouseForge

Well-known member
Joined
May 11, 2013
Messages
374
Location
Lakeland, Fl
JP,
That looks great !
Looks like there is some decent knife handle material available from your neighbors cutoffs too !

Craig

ahh...i wish.. almost every scrap piece is less than 3" long so the long grain, which is whats needed to make the handles out of, isnt quite long enough. The only way to cut it long enough is to have the grains running up and down through the handles and Im concerned that it wont be strong enough in that direction...

That wood is expensive so its a double bummer... but hey, in another month there will be enough scrap to make another board. So at least theres that.

Any of you wood guys have an opinion on the above theroy..Am I correct that the wood wont have enough strength to serve as a kinfe handle. I just feel like it would break easy..???

Thanks again

JP
 
OP
D

DoghouseForge

Well-known member
Joined
May 11, 2013
Messages
374
Location
Lakeland, Fl
Looks excellent. Good thing you didn't buy a planer. That vertical grain is hell on planer knives. It'll want to jump and chatter. Ruins knives, and tears all sorts of chips out.

The only planer big enough to fit that board was a $600 dewalt and thats not even close to an option for a secondary hobbie like this.. but thanks for the info about the end grain being to course. makes good sense...

The 3x21 belt sander actually did a pretty efficient job at bringing it down. If I can get better at cutting the blocks even in the first place it should be even easier next time...

Thanks
JP
 

mustanginky

Well-known member
Joined
Jul 30, 2011
Messages
473
not too bad. i made two like this in wood shop in high school. one for my mom and one for my stepmom. came out pretty nice, good save btw!
 

Amitygravel

Well-known member
Joined
Mar 26, 2010
Messages
1,188
Location
Claremont Illinois
JP ,
I believe you're right about grain direction and strength but ..
just do stick tangs with segmented handles.
I save all scraps of materials. Nickel silver , copper, aluminum,stainless and brass sheet stock can be used along with fiber spacer material in between regular handle material for highlights. I've used woods with the grain running perpendicular to the tang , but they were pieces 3/8 " or less thick.
Now gluing all that stack together can be a real test of patience and dexterity befor the 5 minute epoxy kicks!
Great stuff man , thanks for posting your work !

And a belated "Welcome" to the Garage Journal !

Craig
 

Attachments

  • IMG-20121111-01450.jpg
    IMG-20121111-01450.jpg
    142.4 KB · Views: 129
To avoid these ads, REGISTER NOW!
OP
D

DoghouseForge

Well-known member
Joined
May 11, 2013
Messages
374
Location
Lakeland, Fl
I had been thinking of doing some segmented handles and you just sealed the deal. I can use aluminuim plate and brass plate in between...Thanks!

JP
 

onewaydave

Well-known member
Joined
Sep 28, 2009
Messages
961
Location
Down the road from Dorothy and Toto
Turned out nice. Glad the planer was so expensive, 'cause you don't want to plane (power planer) wood across the grain (end grain). If, as I imagine, the pieces you started with were short, it wouldn't have helped because most planers want about 10+ inches or so.

By hand at that point, a hand plane would be the tool of choice.

Wood can be squared on a table saw, with some fore thought and planning.

Dave.
 
OP
D

DoghouseForge

Well-known member
Joined
May 11, 2013
Messages
374
Location
Lakeland, Fl
Wood can be squared on a table saw, with some fore thought and planning.

Dave.

That's interesting you mentioned this. My neighbor was just telling me this evening that he would teach me to use the table saw to square things up. I went over to ask about a craigslist jointer I found but he basicly blew off the idea. Said that you dont need more than a table saw, router jig, and drill press to build anythig...

If you saw the stuff he makes his argument is pretty convincing...

Thanks

JP
 

rlitman

Well-known member
Joined
Oct 18, 2010
Messages
24,578
Location
Long Island
You can use the tablesaw. It is a little dangerous, but is possible for smaller pieces.

To level a really bad board, the best way is to make a jig that uses a router.
 

drmarkr

ALLIANCE MEMBER
Joined
Feb 5, 2006
Messages
4,202
Location
Tucson
Crosscut looks really nice when turned....gives it an iridescent appearance when you rotate the pen. There's some very sweet wood in that piece! Great job!!

Pen out of cross cut Hack berry:

DSC_0065%25201-26-2013%25209-03-04%2520PM.JPG


DSC_0065%25201-26-2013%25209-03-52%2520PM.JPG
 
OP
D

DoghouseForge

Well-known member
Joined
May 11, 2013
Messages
374
Location
Lakeland, Fl
I was thinking it would be cool to make rolling pins out of the crosscut scraps. I Was going to use a hole saw to cut out circles , glue them in a random order for color, and the sand in theshape... like a big version of your pens...

Those look great by the way...


Thanks
JP
 
Last edited:

tiggen

Member
Joined
Jun 27, 2011
Messages
18
OP, that block is aweosome! So much better than the manufactured one I bought (which I love, it just doesn't look as cool).
 

davidB382

Well-known member
Joined
Jan 18, 2010
Messages
104
Location
Memphis, TN
Did the variation in colors come from different wood species, or were some of the scraps already stained when you got them?
 
OP
D

DoghouseForge

Well-known member
Joined
May 11, 2013
Messages
374
Location
Lakeland, Fl
Did the variation in colors come from different wood species, or were some of the scraps already stained when you got them?

Did the variation in colors come from different wood species, or were some of the scraps already stained when you got them?

Wow! Blast from the past... lol, I cant believe you dug this up.

Its all natural coloring. The exotic stuff doesn't need stain. The Finishing I use now days is watco butcher block oil and sealer.

The blacksmithing journal linked in my signature has some woodwork in the most recent update post and about a month back. Learning to tune up the saws, use the right blades, and most importantly...."the Aggiemethod" have improved the craftsmanship slightly above this thing. Lol

in truth I've made alot nicer boards since then but we still have this one on the counter and it gets used everyday. There's beauty in its imperfections....

thanks ,

JP
 

davidB382

Well-known member
Joined
Jan 18, 2010
Messages
104
Location
Memphis, TN
Thanks for the response, I'll have to check that out. I don't have access to exotics, but my FIL has lots of odd pieces of more typical woods sitting around. I'm interested in maybe giving one a shot. Would staining some of the pieces prior to glue up be a bad idea? Or is that not a concern once the oil and seal has been properly set up? I ask because I think it would make a more visually interesting board in the end (assuming it was even half way usable with my minimal woodworking knowledge).
 
OP
D

DoghouseForge

Well-known member
Joined
May 11, 2013
Messages
374
Location
Lakeland, Fl
Thanks for the response, I'll have to check that out. I don't have access to exotics, but my FIL has lots of odd pieces of more typical woods sitting around. I'm interested in maybe giving one a shot. Would staining some of the pieces prior to glue up be a bad idea? Or is that not a concern once the oil and seal has been properly set up? I ask because I think it would make a more visually interesting board in the end (assuming it was even half way usable with my minimal woodworking knowledge).


You might want to check around, there has to be food safe stain out there but I dont think I would use the normal minwax/cabot type stains.

you are going to seal it but since its food grade you have to condition or refurb it every now and then. My board gets used everyday and washed likewise so its just about ready to get resanded and re sealed. So at this point i would be affraid that the oil based stain chemicals wouldnt be sealed off from my food. Plus i dont really know if the sealer I use will penetrate the wood after the stain has set.

Check out this site and see if you can find something like it near you. Also "woodcraft" is a national chain I believe so you might find one near you. Since these sites and store sell by the board foot you can literally buy 1' of each type and then just use the miter saw to make them the same height. If you were going to mix and match and develope a repeating pattern the thickness would be an issue but if your going to keep it random it wont matter. Just lay them together untill its the size you want. Theres links below for some boards and some square stock. you can slap whatever you want together if your going for the mixed look.

http://www.amazonexotichardwoods.com/category/PUR-46.html

http://www.woodcraft.com/Product/2021177/44777/Exotic-Combo-Pack-15-x-15-x-12-5-piece.aspx

There were some other post about the learning curve to this stuff that I dont know if you read but make sure you use top and bottom boards. Clamp them together and make a sandwich out of the butcher block, then clamp all four sides into each other. if you dont use the top and bottom stabilizing boards to keep it flat it will bind up and you will have a curved board. My first few had this and it adds a years worth of sanding to get it even. Plus you waste a ton of your thickness.

One other wood choice to consider is to go to the big Home improvement stored and buy red oak and poplar. you can use these as your main filler and add in the exotics from the links above. A little exotic goes along way... I mostly use oak, poplar, and walnut to fill my pieces and then stripe the fancy stuff. still looks great but less painfull on the pocket book.

if you have other questions Il be glad to help just ask. If i dont know the answer somebody reading will...:thumbup:

JP
 

Hawk

Well-known member
Joined
Oct 21, 2009
Messages
1,019
Location
Kannapolis, NC
Great work on the board. I know it is late to the party but to use the scraps, if you have a router, get a jointer bit to join the short pieces together to make whatever length you need. I do not have any pics but I use to make multicolored handles out of mixed stock.
 
To avoid these ads, REGISTER NOW!
Top Bottom