
pendragon1998
Well-known member
DIY inexpensive, customizable, aluminum pliers rack for toolboxes UPDATED 1/15
HOW TO BUILD A SIMPLE, INEXPENSIVE, 100% CUSTOMIZABLE, ALUMINUM PLIERS STORAGE RACK FOR A TOOLBOX DRAWER
SEE UPDATE AT THE BOTTOM OF THIS POST - JAN 2015

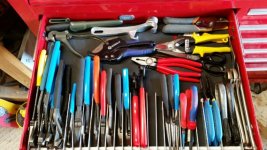
Like many of you, I've been on the lookout for a good way to organize the pliers in my toolbox drawer. I don't have as many pliers as many of you, but I was still running out of (organized) room in my small 2" deep drawer in my HF red 5-drawer toolcart. I looked at or tried several different approaches: nested, laying flat; wire coils; a bent section of wire clothes rack or the similar PliersRack available for sale; and also the plastic pliers rack. I wasn't happy with any of them. Laying them flat takes up too much room; wire spring coils or wire racks don't seem to hold the pliers in place very well; and I don't like plastic holders for durability concerns.
Last night, a very simple solution occurred to me. I've never seen anybody doing it this way, but I'm sure now that I post it, a dozen folks will come out of the woodwork saying they've had this setup for years. Anyway, I hope this is helpful:
MATERIALS (QTY) - [APPROXIMATE PRICE in 2013]:
36" x 1-1/4" x 1/16" aluminum rulers (2 rulers yielded twelve 6" partitions) - [$3.00/ea]
3/8" x 10" bolt (1) - [$1.25]
3/8" nut (1) - [$0.12]
3/8" flat washers (110) - [$5/100 washers)
MY COST: $12.87+tax (6" x 12 partition rack)
* I could have probably used a smaller diameter threaded rod and fasteners - 1/4" would be fine, I think.
TOOLS REQUIRED:
Hacksaw with a metal-cutting blade, or power tool of your choice.
Drill or drill press with 3/8" bit suitable for drilling aluminum.
Appropriate vise or clamps to hold ruler during drilling and cuts.
Metal hand file for deburring and radiusing sharp corners.
Wrench for tightening the nut
Measuring tape (or use the ruler) to determine the length and width of desired rack.
PROCEDURE:
1) Determine how wide you want your rack to be, how long you want each partition to extend, and how close together your partitions will be. This is where you can be creative.
2) Cut the ruler with the hacksaw into desired divider lengths, allowing room at one end for the washer to sit against the ruler.

3) Deburr cut surfaces on the dividers and radius the corners so you don't cut yourself later.
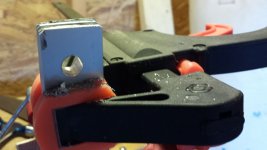
4) Stack a group of dividers so that they are flush on one end. Clamp into a vise and drill a 3/8" hole straight through the dividers, allowing room for the washers. Repeat for all dividers. I drilled 6 at a time with a hand drill.

5) Run the bolt through a divider, add enough washers to create desired width, then add the next divider. Repeat. When complete, add the last divider and tighen the nut in place.
CONCLUDING THOUGHTS:
The best part of this is you're not limited to your original configuration. If you subsequently decide you'd rather re-organize your pliers, or if you add new pliers, you can add new partitions. I can also change the partition width to customize for each tool handle width; narrower handles need fewer spacer washers, thicker handles just get more.
I was limited by the depth of my drawer. At 2" deep, I can't stack some of those pliers on their side or the drawer won't close. On a deeper drawer, you could get them all stacked neatly. If you wanted to include the larger pliers in the rack, you could locate a wider ruler (perhaps 2" wide), and offset the hole for the rod so that the rulers all sit flush on the drawer bottom. The wider ruler would accommodate tools with broad grips, like larger adjustable pliers and tin snips.
There are probably several alternative sources for both the threaded rod and the spacers. I got a good deal on 3/8 washers at Lowes, so that's what I used, but a 1/4" rod and washers would take up a less room at the front of the box.
I hope y'all find this useful. I had fun putting it together!

UPDATE (January 2015):
I have updated my process for making these pliers racks with what I've learned.
Instead of a bolt and washers, I have been happier using a piece of 1/4-20 threaded rod (72" for $3.20) and divided with segments of 1/4" ID 160-PSI PEX Pipe (60" for $1.76).
PROCEDURE:
I ganged up my aluminum rulers for the cuts, making them ~ 5" (longer or shorter depending on how long the items were I was placing in the rack). Once the rulers are cut to size, I drilled them out to 1/4", just wide enough for the threaded rod, but not the PEX pipe, to pass through. Using a PVC cutter ($11.98). I cut out small lengths of PEX pipe, as wide as I wanted for my tools. The threaded rod was easily cut to size with a hacksaw, and is long enough to take care of several drawers. You can create wide or narrow lengths depending on the size of your tools. It's not quite as easily adjusted as the original washers method, but PEX pipe is dirt cheap, and with the cutter, you can always take length off of a segment if it's too wide. I fastened the ends of the threaded rod with 1/4-20 hex nuts to hold everything in place, and then placed the assembled rack into the drawer and loaded it up.

RACKS FOR HAND FILES
I had a number of hand files that I needed to store in my box, but I didn't want them rubbing each other or taking up extra room by being layed flat. I felt that aluminum divider blades would be unsatisfactory, since the files would rub on those as well. I hit on the solution of cutting up strips of an old clipboard ($0.75) made of masonite (a 3'x7' panel of masonite can be had for under $10). Once I sawed out the strips, I ganged them together, sanded the cut sides, and drilled a 1/4" hole through for the threaded rod. I cut very narrow PEX sections and assembled as above. It's a little raggedy, but works well. My hand file rack in the photo below is not full, so it's not spread out quite right. I wish I'd cut the dividers much shorter for the smaller files; I may not do that.

Notes:
1. Kobalt makes a crappy PVC cutter for $11.98, but I don't wholeheartedly recommend it. It worked, but it's not a particularly well made tool. Plus the COO is not USA.
2. Prices current as of 01/2015.
HOW TO BUILD A SIMPLE, INEXPENSIVE, 100% CUSTOMIZABLE, ALUMINUM PLIERS STORAGE RACK FOR A TOOLBOX DRAWER
SEE UPDATE AT THE BOTTOM OF THIS POST - JAN 2015
Like many of you, I've been on the lookout for a good way to organize the pliers in my toolbox drawer. I don't have as many pliers as many of you, but I was still running out of (organized) room in my small 2" deep drawer in my HF red 5-drawer toolcart. I looked at or tried several different approaches: nested, laying flat; wire coils; a bent section of wire clothes rack or the similar PliersRack available for sale; and also the plastic pliers rack. I wasn't happy with any of them. Laying them flat takes up too much room; wire spring coils or wire racks don't seem to hold the pliers in place very well; and I don't like plastic holders for durability concerns.
Last night, a very simple solution occurred to me. I've never seen anybody doing it this way, but I'm sure now that I post it, a dozen folks will come out of the woodwork saying they've had this setup for years. Anyway, I hope this is helpful:
MATERIALS (QTY) - [APPROXIMATE PRICE in 2013]:
36" x 1-1/4" x 1/16" aluminum rulers (2 rulers yielded twelve 6" partitions) - [$3.00/ea]
3/8" x 10" bolt (1) - [$1.25]
3/8" nut (1) - [$0.12]
3/8" flat washers (110) - [$5/100 washers)
MY COST: $12.87+tax (6" x 12 partition rack)
* I could have probably used a smaller diameter threaded rod and fasteners - 1/4" would be fine, I think.
TOOLS REQUIRED:
Hacksaw with a metal-cutting blade, or power tool of your choice.
Drill or drill press with 3/8" bit suitable for drilling aluminum.
Appropriate vise or clamps to hold ruler during drilling and cuts.
Metal hand file for deburring and radiusing sharp corners.
Wrench for tightening the nut
Measuring tape (or use the ruler) to determine the length and width of desired rack.
PROCEDURE:
1) Determine how wide you want your rack to be, how long you want each partition to extend, and how close together your partitions will be. This is where you can be creative.
2) Cut the ruler with the hacksaw into desired divider lengths, allowing room at one end for the washer to sit against the ruler.
3) Deburr cut surfaces on the dividers and radius the corners so you don't cut yourself later.
4) Stack a group of dividers so that they are flush on one end. Clamp into a vise and drill a 3/8" hole straight through the dividers, allowing room for the washers. Repeat for all dividers. I drilled 6 at a time with a hand drill.
5) Run the bolt through a divider, add enough washers to create desired width, then add the next divider. Repeat. When complete, add the last divider and tighen the nut in place.
CONCLUDING THOUGHTS:
The best part of this is you're not limited to your original configuration. If you subsequently decide you'd rather re-organize your pliers, or if you add new pliers, you can add new partitions. I can also change the partition width to customize for each tool handle width; narrower handles need fewer spacer washers, thicker handles just get more.
I was limited by the depth of my drawer. At 2" deep, I can't stack some of those pliers on their side or the drawer won't close. On a deeper drawer, you could get them all stacked neatly. If you wanted to include the larger pliers in the rack, you could locate a wider ruler (perhaps 2" wide), and offset the hole for the rod so that the rulers all sit flush on the drawer bottom. The wider ruler would accommodate tools with broad grips, like larger adjustable pliers and tin snips.
There are probably several alternative sources for both the threaded rod and the spacers. I got a good deal on 3/8 washers at Lowes, so that's what I used, but a 1/4" rod and washers would take up a less room at the front of the box.
I hope y'all find this useful. I had fun putting it together!
UPDATE (January 2015):
I have updated my process for making these pliers racks with what I've learned.
Instead of a bolt and washers, I have been happier using a piece of 1/4-20 threaded rod (72" for $3.20) and divided with segments of 1/4" ID 160-PSI PEX Pipe (60" for $1.76).
PROCEDURE:
I ganged up my aluminum rulers for the cuts, making them ~ 5" (longer or shorter depending on how long the items were I was placing in the rack). Once the rulers are cut to size, I drilled them out to 1/4", just wide enough for the threaded rod, but not the PEX pipe, to pass through. Using a PVC cutter ($11.98). I cut out small lengths of PEX pipe, as wide as I wanted for my tools. The threaded rod was easily cut to size with a hacksaw, and is long enough to take care of several drawers. You can create wide or narrow lengths depending on the size of your tools. It's not quite as easily adjusted as the original washers method, but PEX pipe is dirt cheap, and with the cutter, you can always take length off of a segment if it's too wide. I fastened the ends of the threaded rod with 1/4-20 hex nuts to hold everything in place, and then placed the assembled rack into the drawer and loaded it up.
RACKS FOR HAND FILES
I had a number of hand files that I needed to store in my box, but I didn't want them rubbing each other or taking up extra room by being layed flat. I felt that aluminum divider blades would be unsatisfactory, since the files would rub on those as well. I hit on the solution of cutting up strips of an old clipboard ($0.75) made of masonite (a 3'x7' panel of masonite can be had for under $10). Once I sawed out the strips, I ganged them together, sanded the cut sides, and drilled a 1/4" hole through for the threaded rod. I cut very narrow PEX sections and assembled as above. It's a little raggedy, but works well. My hand file rack in the photo below is not full, so it's not spread out quite right. I wish I'd cut the dividers much shorter for the smaller files; I may not do that.
Notes:
1. Kobalt makes a crappy PVC cutter for $11.98, but I don't wholeheartedly recommend it. It worked, but it's not a particularly well made tool. Plus the COO is not USA.
2. Prices current as of 01/2015.
Attachments


Last edited:


