To avoid these ads, REGISTER NOW!

Quincy X2 Air Compressor Restoration

p0lar

Well-known member
Joined
Jun 15, 2013
Messages
141
I'm starting this thread to document the rebuild and restoration of a Quincy X2 I sourced recently from Craigslist. I've been looking for a little while for an X8 (or any smaller Quincy compressor - simply to build a portable), but when I spotted this compressor, labeled as '110 air compressor', I knew right away what it was. One phone call later, and with very little haggling (~50% off), and I arranged to pick it up the next day. I've noticed a trend that people tend to always go with way more air than is necessary to get smaller jobs done - don't get me wrong, I have a pair of QR-25 Model 240s in my garage currently (one close to full restoration, and the other virtually scrap), a Model 325 ROC 7 awaiting rebuild, and a QT-7.5 that's destined to be the workhorse; despite that, I'm still after a smaller portable unit.. just because.

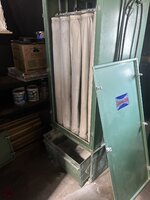
Here's the original ad (with the seller's identifying information removed):
attachment.php


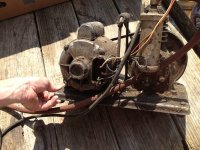
And the original photos:
attachment.php

attachment.php
attachment.php

attachment.php


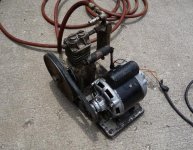
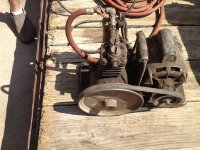
I'll admit that when I saw it, it looked very, very rough, but it sounded good and turned very smooth. I didn't bother plugging it in as there were multiple nicks/cuts/lacerations in the power cable that looked like they might bring about undesirable results.

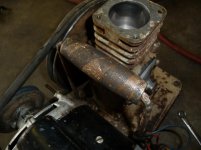
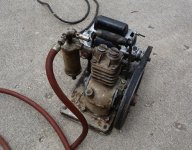
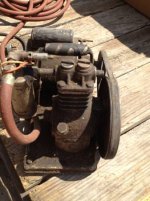
So, on the way home, I took it by a car wash and pressure washed and scrubbed it, being mostly careful to avoid the motor. Here are the results thereafter.

Here are a few shots:

attachment.php


attachment.php


attachment.php


attachment.php


attachment.php


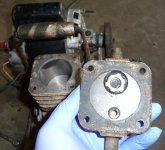
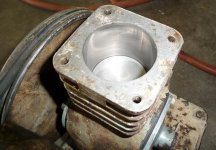
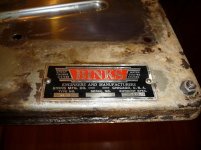
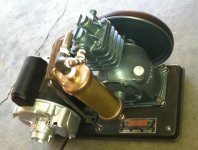
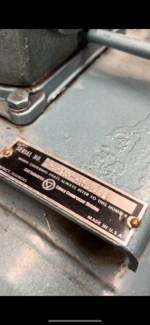
When I got home, I couldn't help myself - I had to see what the internals looked like. The results astounded me. This says 'X2 - 88' on the crank case; however, it has sleeved bearings internally, of which the only record I could find, documentation-wise, was from 1950. Has this compressor really been running since then with only this little wear to its piston and cylinder walls? All I did was wipe some crud off the top of the piston with a paper towel soaked in acetone - seriously, nothing more.

attachment.php


attachment.php


attachment.php


So, without further ado, the plans are to cut new gaskets for the crank end caps, inspection plate (bottom), and head, clean up the valves/lap the seats/discs, and thoroughly clean the internals. I'm not going to even bother disassembling the piston, wrist pin, or connecting rod to the crank - it simply works too well to necessitate any updates, in my humble opinion.

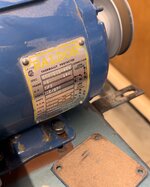
Oh, and before I forget, specifications using a 3/4 HP motor turning the pump at 900 RPM, it should produce 1.83 CFM @ 100 PSI, maxing out at 150 PSI. I'm planning to clean up its original tote-mount, and maybe find something that will let me transform it to fill a tank and roll with a handle. As-is, it was still spitting air out the air chuck at the end of the hose.

So, let the rebuild commence!

P.S. Thanks, GJ, for fueling my compressor/vise/<insert_tool_here> addiction. Seriously.
 

Attachments

  • CL_ad.jpg
    CL_ad.jpg
    19.8 KB · Views: 1,259
  • x2_post_wash_1.jpg
    x2_post_wash_1.jpg
    147.6 KB · Views: 1,245
  • x2_post_wash_ID.jpg
    x2_post_wash_ID.jpg
    150 KB · Views: 1,255
  • x2_original_4.jpg
    x2_original_4.jpg
    50.2 KB · Views: 1,236
  • x2_original_3.jpg
    x2_original_3.jpg
    48.4 KB · Views: 1,231
  • x2_original_2.jpg
    x2_original_2.jpg
    27.9 KB · Views: 1,230
  • x2_original_1.jpg
    x2_original_1.jpg
    35.2 KB · Views: 1,229
Last edited:
To avoid these ads, REGISTER NOW!
OP
P

p0lar

Well-known member
Joined
Jun 15, 2013
Messages
141
Re: Quincy X2 Restoration

Reserved for future rebuild progress and photos.
 

Attachments

  • x2_post_wash_handle.jpg
    x2_post_wash_handle.jpg
    74.4 KB · Views: 46
  • x2_post_wash_head_1.jpg
    x2_post_wash_head_1.jpg
    73.3 KB · Views: 1,201
  • x2_post_wash_cyl_2.jpg
    x2_post_wash_cyl_2.jpg
    102 KB · Views: 1,198
  • x2_post_wash_cyl_1.jpg
    x2_post_wash_cyl_1.jpg
    107.1 KB · Views: 1,202
  • x2_post_wash_5.jpg
    x2_post_wash_5.jpg
    146.8 KB · Views: 1,236
  • x2_post_wash_4.jpg
    x2_post_wash_4.jpg
    147.8 KB · Views: 1,238
  • x2_post_wash_3.jpg
    x2_post_wash_3.jpg
    147.7 KB · Views: 1,250
Last edited:
OP
P

p0lar

Well-known member
Joined
Jun 15, 2013
Messages
141
Re: Quincy X2 Restoration

Here's what the progress this evening turned up:

attachment.php


It's a Binks SP 1/4. Now, I'm not sure if that means 1/4 HP, but SP absolutely is Spray Pump. This is a Quincy X2, without a doubt, but it looks as if Binks outsourced their pumps to Quincy at some point (common knowledge), the big question is, when? Many of the fasteners on this machine are square. I'm guessing it's got to be somewhere in the 50s, maybe early 60s, based on its sleeved crank bearings and hardware. I couldn't find a serial number on the plate, but it was very difficult to get all the paint off without damaging the plate. I used a combination of acetone on top and a degreaser to finally get it wiped clean.

Fascinating!

Another big question on my mind is the pump speed in RPM. If this is an 1800 RPM motor, and has a 3.5" motor pulley driving an 8" pump pulley, it should be spinning near 800 RPM. However, if it's a 900 RPM motor, the pump would be driven closer to 400 RPM. Both are plausible for the pump, but I can't imagine any spray pump being worth a discussion at ~0.82 CFM.
 

Attachments

  • Binks_tag_1.jpg
    Binks_tag_1.jpg
    98.7 KB · Views: 1,052
Last edited:
OP
P

p0lar

Well-known member
Joined
Jun 15, 2013
Messages
141
Re: Quincy X2 Restoration

And just one more, because I need more room, for more photos - everyone loves photos.
 

andrewagner

New member
Joined
Oct 14, 2013
Messages
1
I am restoring a compressor similar to yours (Painting unit Type SP-1/4). However, it has a different electrical engine. What exactly would the original colour of the compressor be? Any help is greatly appreciated.
 
OP
P

p0lar

Well-known member
Joined
Jun 15, 2013
Messages
141
I am restoring a compressor similar to yours (Painting unit Type SP-1/4). However, it has a different electrical engine. What exactly would the original colour of the compressor be? Any help is greatly appreciated.

I believe mine was some kind of a tan colour, but it's difficult to say since there was so much overspray everywhere.

I finally completed that restoration, well.. really it was a 'working' restoration since I put it to good use. It is arguably one of my favourite tools in the garage. The safety relief valve slowly discharges air at ~40 psi, and if I hold it down, the 1/3 HP motor struggles at anything beyond ~100 psi, but it does work as intended and is fantastic for small chores.

I'd say the best part is the sound it makes. I'll see if I can find a photo of it...

Edit:

attachment.php
 

Attachments

  • Quincy X2.jpg
    Quincy X2.jpg
    141.3 KB · Views: 998
Last edited:

WWIIjeep

Well-known member
Joined
May 30, 2012
Messages
1,240
Location
Arizona
This is a Quincy X2, without a doubt, but it looks as if Binks outsourced their pumps to Quincy at some point (common knowledge), the big question is, when? Many of the fasteners on this machine are square. I'm guessing it's got to be somewhere in the 50s, maybe early 60s, based on its sleeved crank bearings and hardware.

Binks used Quincy pumps for 40 or 50 years, and may even still use Quincy pumps. And AFAIK, the X-2 pumps have always had sleeved crank bearings, or at least, all the ones made before the 1980s did.

Your unit is definitely pre-1960s. I'd guess 1940s. Nice job on the restoration! :thumbup:


Another big question on my mind is the pump speed in RPM. If this is an 1800 RPM motor, and has a 3.5" motor pulley driving an 8" pump pulley, it should be spinning near 800 RPM. However, if it's a 900 RPM motor, the pump would be driven closer to 400 RPM. Both are plausible for the pump, but I can't imagine any spray pump being worth a discussion at ~0.82 CFM.
I believe mine was some kind of a tan colour, but it's difficult to say since there was so much overspray everywhere.

I finally completed that restoration, well.. really it was a 'working' restoration since I put it to good use. It is arguably one of my favourite tools in the garage. The safety relief valve slowly discharges air at ~40 psi, and if I hold it down, the 1/3 HP motor struggles at anything beyond ~100 psi, but it does work as intended and is fantastic for small chores.

I doubt your motor is original to the Binks setup. It looks like a 60s-vintage Westinghouse appliance motor, and is most likely 1800 RPM.

OEM specs for the Binks/Quincy X-2 with 1/3 HP motor as follows:

Free air (displacement): 1.8 CFM
Actual delivery @ 40-55 PSI: 1.2 CFM
Pump speed: 570 RPM

Since your motor isn't original, the motor pulley likely isn't either, and hence why your pump speed is higher than specified for the pump, and why the motor struggles at higher pressure.

IIRC, Quincy's OEM color in the past was tan or light brown. On Binks equipment, the Quincy OEM color was painted over with a light metallic green, which was the Binks OEM color back in the day.

The relief valve is set at 40 PSI because your compressor was intended to be used as a portable rig with a bleeder-style spray gun, specifically, the old Binks Model 8 spray gun, which was matched to the output of the pump.
 
OP
P

p0lar

Well-known member
Joined
Jun 15, 2013
Messages
141
Binks used Quincy pumps for 40 or 50 years, and may even still use Quincy pumps. And AFAIK, the X-2 pumps have always had sleeved crank bearings, or at least, all the ones made before the 1980s did.

Your unit is definitely pre-1960s. I'd guess 1940s. Nice job on the restoration! :thumbup:

Thanks! The most difficult part was probably repairing the centrifugal start capacitor disconnect as one of the springs had broken and it would require a gentle nudge to get going as it was in an odd position. The rest of the motor internals were spotless, I should grab a photo of those too. I did replace one of the motor bushings, though it wasn't really required.

I doubt your motor is original to the Binks setup. It looks like a 60s-vintage Westinghouse appliance motor, and is most likely 1800 RPM.

Oddly, I have seen images online with exactly the same motor, so I'm not saying it is or isn't original, but it does beg the question. The motor internals are definitely of the same era from what I could tell.

OEM specs for the Binks/Quincy X-2 with 1/3 HP motor as follows:

Free air (displacement): 1.8 CFM
Actual delivery @ 40-55 PSI: 1.2 CFM
Pump speed: 570 RPM

Since your motor isn't original, the motor pulley likely isn't either, and hence why your pump speed is higher than specified for the pump, and why the motor struggles at higher pressure.

Agreed, and that was on my mind, though.. if it was designed to run at 40 PSI, they could artificially increase the output at the design pressure by upping the pulley size with no regard for efficiency at 100 PSI.

IIRC, Quincy's OEM color in the past was tan or light brown. On Binks equipment, the Quincy OEM color was painted over with a light metallic green, which was the Binks OEM color back in the day.

Agreed.. I think it was a tan colour based on what I saw underneath. I didn't bother trying to replace it and just used some leftover paint from a Yost vise restoration I did a while back. I do have a 1959 Quincy 325 that I had the colour matched on, though.. and it looks similar. I'll get to that one soon enough, heh...


The relief valve is set at 40 PSI because your compressor was intended to be used as a portable rig with a bleeder-style spray gun, specifically, the old Binks Model 8 spray gun, which was matched to the output of the pump.

Yeah, at 40 PSI, it's actually JUST RIGHT to fill most tires, use as a light blow-gun and maybe inflate a portable air mattress, heh. Most of all, it has a very neat sound.

Might anyone have a spare filter assembly they would be willing to part with? Mine was missing when rescued... :sad:

Edit: One other thing, I did NOT put a braided 2-conductor power plug on it (as was common in that era) as I planned to put it into use and simply cannot emphasize originality over safety. This one uses a molded 3-prong 110 VAC plug that is grounded to the motor chassis. I also fabricated a new cover plate for the motor wiring and connected it using right-angle female spade plugs.
 
Last edited:

StudeShop

New member
Joined
Jun 30, 2014
Messages
1
Greetings. I'm new to this forum, so forgive me if I do this "wrong".

(I tried posting a "quick reply", but it didn't seem to work - hopefully this isn't a duplication...)

I have what appears to be another Quincy Air Compressor (marked as "X2-36"). It is an inheritance from my deceased father-in-law's shop. Seems to work fine, but I am curious about what sort of maintenance it requires.

Any advice would be appreciated.

Thanks!
 
OP
P

p0lar

Well-known member
Joined
Jun 15, 2013
Messages
141
Greetings. I'm new to this forum, so forgive me if I do this "wrong".

(I tried posting a "quick reply", but it didn't seem to work - hopefully this isn't a duplication...)

I have what appears to be another Quincy Air Compressor (marked as "X2-36"). It is an inheritance from my deceased father-in-law's shop. Seems to work fine, but I am curious about what sort of maintenance it requires.

I'd say if it's not leaking, but working well, just change the oil. You could remove the concentric ring valves and clean them out, but you may cause other unforeseen concerns when reassembling.

I basically went through everything on mine except putting new rings in, but the cylinder looked absolutely mint.

Good luck!
 

BMAQCY

Member
Joined
Nov 7, 2011
Messages
6
I work at Quincy Compressor and would love any photos and stories of our compressors that you would like to share to post on our website and on our new blog site, myquincystory.com. You can email me directly at [email protected] or post them online at myquincystory.com. Thanks in advance!
 

bobarvid

New member
Joined
Dec 2, 2014
Messages
4
Re: Quincy X2 Restoration

Hey guy's,
This is my first post on this site as well as any where else. Subject is a X2-12 air compressor. Markings on tank are worn with only "Brown" visible. Reading from this site and "Quincy X2 Air Compressor Restoration" post pictures I believe that I have a 'Quincy'.
Problem is that in the cold the motor dosn't turn as it should. So I installed a 1 H.P. 3450 RPM motor and now everything shakes. Question: should I leave the 3450 RPM motor or re-install old motor? I'm guessin it was a 1750 RPM motor. It has major issues with wire insulation and I guess should be replaced. I don't want the expense of getting another 1750 RPM motor. Cai I live with the 1 H.P. 3450 RPM motor without it damaging the compressor?
Please advise,
Bobarvid
 
OP
P

p0lar

Well-known member
Joined
Jun 15, 2013
Messages
141
Re: Quincy X2 Restoration

Hey guy's,
This is my first post on this site as well as any where else. Subject is a X2-12 air compressor. Markings on tank are worn with only "Brown" visible. Reading from this site and "Quincy X2 Air Compressor Restoration" post pictures I believe that I have a 'Quincy'.
Problem is that in the cold the motor dosn't turn as it should. So I installed a 1 H.P. 3450 RPM motor and now everything shakes. Question: should I leave the 3450 RPM motor or re-install old motor? I'm guessin it was a 1750 RPM motor. It has major issues with wire insulation and I guess should be replaced. I don't want the expense of getting another 1750 RPM motor. Cai I live with the 1 H.P. 3450 RPM motor without it damaging the compressor?
Please advise,
Bobarvid

You would need to slow down the pump RPM to about half by installing a smaller diameter motor pulley (1/2 the original diameter). It should run fine otherwise, but bear in mind that 1HP is a large motor for an X2.

I recently acquired an X8 that spins and sounds beautifully - I'll eventually get to its restoration, probably sometime after I tackle the QR-25 5105 I also snagged that's going to become the garage workhorse!
 
To avoid these ads, REGISTER NOW!

bobarvid

New member
Joined
Dec 2, 2014
Messages
4
hx pOLar for the info.
I virtually know little about compressors especially the old ones.
I understand that older units may work better that the new stuff we can buy today. As I wanted a compressor, having little money I came across this X2 on a 11.5 gal tank, and it was working. After some cleaning and inspection I noticed that the motor wiring was suspect and replaced the motor with one I already had. After reading your comments I sleeved the bad wiring in the original motor and will reinstall it for a trial run.
Originally when I first fired this setup up it was running slow, and I presumed it was due to cold weather ( I'm in Canada). After doing some reading it may have been working as it should. I had noticed the worn wiring and had assumed that it may have been shorting out, which could have explained it's slowness.
I have tried to get some background on this X2, however information is slow in coming. Any idea how old this unit is? Would this type of unit be suitable to run air driven nailers or any modern air tools? Or should I just accept that this unit is old and underpowered for todays tools?
Comments?
 
OP
P

p0lar

Well-known member
Joined
Jun 15, 2013
Messages
141
hx pOLar for the info.
I virtually know little about compressors especially the old ones.
I understand that older units may work better that the new stuff we can buy today. As I wanted a compressor, having little money I came across this X2 on a 11.5 gal tank, and it was working. After some cleaning and inspection I noticed that the motor wiring was suspect and replaced the motor with one I already had. After reading your comments I sleeved the bad wiring in the original motor and will reinstall it for a trial run.

The usual cause for a single phase motor not to fire up is that it is unable to engage a start capacitor. In most cases, the start capacitor is engaged by default, and by centrifugal force is disengaged. Sometimes the mechanical linkage loses a spring, gums, or has debris that prevents that disengagement. I'd say the second most probable cause that I've discovered was bearing/bushing wear. Unless a motor spins ultra-smooth and turns absolutely perfectly free from encumbrance, I like to replace both bearings with sealed bearings. It's usually inexpensive, and not difficult to do as long as you pay attention to detail and re-assemble in the order you disassembled. Lastly, what I've found are actually motors that were run too hot for too long, which is almost always a death sentence. You may have gotten lucky [sic] that something is shorting to ground and throwing a breaker - I say that loosely as it's quite dangerous (ha!) but easily corrected if no other major damage is present.


Originally when I first fired this setup up it was running slow, and I presumed it was due to cold weather ( I'm in Canada). After doing some reading it may have been working as it should. I had noticed the worn wiring and had assumed that it may have been shorting out, which could have explained it's slowness.

Was the motor running slow or the pump? If the pump, while connected to the motor obviously, then a simple oil change might help. In Canada, I'd consider running a SAE 20 oil rather than the recommended SAE 30. The viscosity difference may help that condition. If it was the motor, again, check the bearings. If they're not sealed, there's an outside chance you can simply clean and re-lube them. If that small debugging measure helps, I'd replace them entirely with sealed (ZZ) bearings.

I have tried to get some background on this X2, however information is slow in coming. Any idea how old this unit is? Would this type of unit be suitable to run air driven nailers or any modern air tools? Or should I just accept that this unit is old and underpowered for todays tools?
Comments?

The date on the X2 is a difficult one to know for sure. I was never able to discern when mine was made. Most of the larger QR-25 models have serial numbers. You can still contact Quincy with that serial number and they can give you a 'born on' date, which is interesting.

I'm sure the X2 can still run any tool that a modern compressor of its output can run. It really comes down to the motor's HP rating. The X2 is not much, if any, less efficient than any other modern single-piston compressor. With a 3/4 HP motor, it's not going to achieve 2 SCFM @ 100 PSI. 100 PSI is also as high as it should realistically be run. I'd say any tool that pulls less than 1.5 SCFM is fine.. past that, and you're begging the question of practicality.

You can buffer the output with a larger tank, but you're just not going to be running a D/A sander, die grinder, buffer, etc. for more than (very) short bursts. You'll spend most of your time waiting, it won't be fun.

If you want more power from 115 VAC, consider sourcing an X8 (If you're lucky enough to stumble across one). With a 1.5HP motor, it makes over 5 SCFM @ 100 PSI. To get past 6 SCFM, you almost certainly need to upgrade to 230 VAC and > 2 HP.
 

bobarvid

New member
Joined
Dec 2, 2014
Messages
4
X2-12 status:
I re-installed old motor (no I.D. so I can't tell what it is although it's 1750 or less R.P.M. motor), wiring sleeved so as not to short...all working well.
Charged tank incrementally to 80 PSI and no leaks, retains pressure.
Thanks for all the advice.
Bob
 

Attachments

  • X2 end.jpg
    X2 end.jpg
    138.7 KB · Views: 78
  • X2 motor wired.jpg
    X2 motor wired.jpg
    140.8 KB · Views: 68
  • X2 side.jpg
    X2 side.jpg
    143.4 KB · Views: 85
  • quincy x2-12.jpg
    quincy x2-12.jpg
    141.3 KB · Views: 93

jdj72083

Member
Joined
Apr 27, 2016
Messages
7
I work at Quincy Compressor and would love any photos and stories of our compressors that you would like to share to post on our website and on our new blog site, myquincystory.com. You can email me directly at [email protected] or post them online at myquincystory.com. Thanks in advance!
bbfb8a30baaeb496d081150a8fd08e2d.jpg

Sent from my XT1093 using Tapatalk
 

Gulf Earl

New member
Joined
Jul 29, 2016
Messages
1
Hello. I am currently rebuilding a Quincy X2 model number 100. The casting stamp reads X2-58 which I am told is the casting batch number. I have all the replacement springs and discs for the head, but I am missing the timken bearings for the crankshaft (group number 110317). According to the manual these part numbers are no longer used by quincy or Pacific air. the crankshaft reads .752 so I imagine a .750 bearing would be pressed on. The cup and carrier that the bearings rest in are confusing me though. Has anybody replaced the bearings on an X2 crankshaft?
 

md21722

Well-known member
Joined
Nov 30, 2015
Messages
1,840
Location
Mt Juliet, TN
I think its great what folks to do these old compressors, but I'm assuming its a hobby at best? I bought a Quincy X2 compressor with 3/4 HP motor that needed only a new copper discharge tube for $20. Mine had a cast iron flywheel. I'm guessing it was from the 1960s or 1970s. Once the tank looked like it had cold war era rusty water in it, blocked drain, I scrapped the whole thing. Maybe I'm a heathen.
 

lzenglish

Well-known member
Joined
Sep 3, 2009
Messages
616
Location
California
Hello all. I just picked up a little "X2-23", and would love to know what the X2, and 23 numbers stand for? I have looked on the Quincy Web Site. and do NOT see any Info on it. Let me know if you can help me. PICs will follow.

EDIT: My Pics, "X2-23", Better Late Than Never!IMG_1252.JPG

Thanks
 

Attachments

  • IMG_1246.JPG
    IMG_1246.JPG
    610.2 KB · Views: 12
  • IMG_1254.JPG
    IMG_1254.JPG
    294.4 KB · Views: 18
Last edited:

B_Bimmer

Well-known member
Joined
May 7, 2015
Messages
1,871
Location
Eastern Iowa
In my experience with quincy the first part is the model number and the second number is the record of change. The bigger the number the later it was made, tracking minor parts changes. Someone previously in this thread referred to it as the casting batch number, not sure what is accurate for these older pumps.
 

lzenglish

Well-known member
Joined
Sep 3, 2009
Messages
616
Location
California
In my experience with quincy the first part is the model number and the second number is the record of change. The bigger the number the later it was made, tracking minor parts changes. Someone previously in this thread referred to it as the casting batch number, not sure what is accurate for these older pumps.
Thanks For Your Reply.
 

lzenglish

Well-known member
Joined
Sep 3, 2009
Messages
616
Location
California
In my experience with quincy the first part is the model number and the second number is the record of change. The bigger the number the later it was made, tracking minor parts changes. Someone previously in this thread referred to it as the casting batch number, not sure what is accurate for these older pumps.
Absolutely Correct, as Verified by Quincy Yesterday !

LZ
 

oly

New member
Joined
Dec 1, 2023
Messages
3
I’m new to this forum.
I picked up an older Quincy x2 compressor.
It was connected to 3 phase, so I replaced it with a single phase.
Seems to run very smooth and quiet!
Is there any value to this?
I’ll try to send a video.
 

oly

New member
Joined
Dec 1, 2023
Messages
3
Here is what I have
 

Attachments

  • IMG_1408.jpeg
    IMG_1408.jpeg
    326.2 KB · Views: 22
  • IMG_1407.png
    IMG_1407.png
    2.7 MB · Views: 18
  • IMG_1406.png
    IMG_1406.png
    2.8 MB · Views: 17
  • IMG_1409.png
    IMG_1409.png
    2.9 MB · Views: 19

honcho

Well-known member
Joined
Feb 2, 2011
Messages
2,289
Location
Near Sodom & Gommorah (aka Wash. DC)
Bringing back an old thread as I unearthed in my Jungle of Junk(tm) a Quincy X2 that I picked up a few years back. When I picked it up, I guessed it was for an HVAC application but I really don't have a clue. I either need to define a use for it or find it a new home. Any suggestions from the GJ experts?
 

Attachments

  • IMG_9508.jpeg
    IMG_9508.jpeg
    1.4 MB · Views: 7
  • IMG_9510.jpeg
    IMG_9510.jpeg
    745.4 KB · Views: 10

oly

New member
Joined
Dec 1, 2023
Messages
3
Does anyone know anything about this dust collector system?
It was used in a dental business where they make molds for dentures.
 

Attachments

  • IMG_9684.jpeg
    IMG_9684.jpeg
    651.6 KB · Views: 6
  • IMG_9686.jpeg
    IMG_9686.jpeg
    501.4 KB · Views: 5
  • IMG_9690.jpeg
    IMG_9690.jpeg
    674.4 KB · Views: 4
  • IMG_9689.jpeg
    IMG_9689.jpeg
    308.5 KB · Views: 4
  • IMG_9687.jpeg
    IMG_9687.jpeg
    609.3 KB · Views: 4
To avoid these ads, REGISTER NOW!
Top Bottom