To avoid these ads, REGISTER NOW!

Wilton C2 resto and a Rock Island too

Gert

Well-known member
Joined
Feb 21, 2012
Messages
139
Location
Netherlands
So, here's the story.
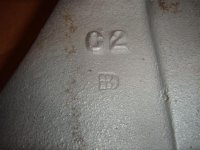
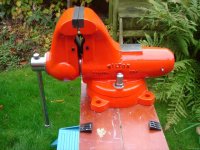
Since I became a member of GJ (feb 2012) I started searching Dutch CL in search of a Wilton vise. Guess what, none found. Just cheap China vises, a lot of Heuer vises. But no Wilton. A couple of weeks ago I found a Rock Island that became mine for 75 euro's. A bit rusty but looking good with even some green paint (original ?). I stopped searching Dutch CL. But two weeks later I searched once more, just in case. And there it was - a Wilton C2. Got it for 25 euro's ($34) because of a broken jaw and a missing end cap which was mentioned in the advert. I am planning to restore them completely during the coming winter and will update every now and than. The Wilton first.

Photo from the advert.
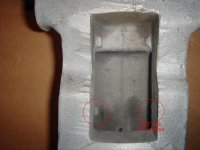
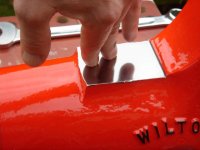
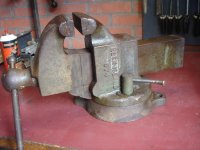
The yellow lines mark the broken jaw.
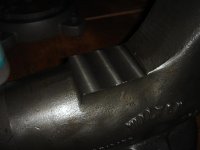

The broken jaw

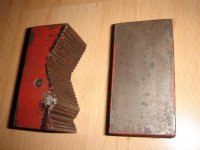
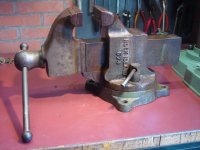
This is the Rock Island

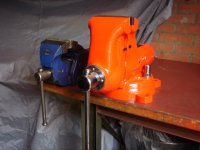
Here is the Wilton on my workbench. Pipe jaws are mounted upside down (wrong).

A very faint date: 12-31-64

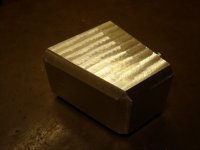
Let the resto begin - removal of the remaining good jaw. The screws are completely damaged and it is no longer possible to use a screwdriver. I chose to remove the screws the brutal way - cut a new slot. No worries about the jaws, both the broken one and the 'good' one will be replaced by new ones.

And remove them with a impact screwdriver

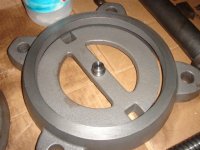
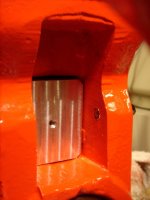
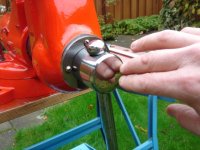
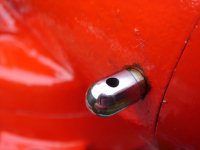
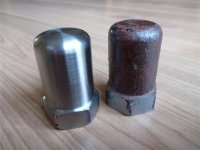
The screw-things that lock the swivel base are interesting as they have no pin/handles through them so you can lock and unlock the base by hand. Maybe I will make the handles. For now I cleaned them on my lathe. First one finished.

So far for now.
Cheers, Gert
 

Attachments

  • Wilton c2 advert (Small).jpg
    Wilton c2 advert (Small).jpg
    49.2 KB · Views: 16
  • P1020439 (Small).JPG
    P1020439 (Small).JPG
    38.5 KB · Views: 11
  • DSC02533 (Small).JPG
    DSC02533 (Small).JPG
    61.9 KB · Views: 13
  • DSC02487 (Small).JPG
    DSC02487 (Small).JPG
    67.2 KB · Views: 14
  • DSC02470 (Small).JPG
    DSC02470 (Small).JPG
    56.6 KB · Views: 11
  • DSC02394.jpg
    DSC02394.jpg
    138.8 KB · Views: 15
  • DSC02473 (Small).JPG
    DSC02473 (Small).JPG
    74 KB · Views: 15
Last edited:
To avoid these ads, REGISTER NOW!

cclfn

Well-known member
Joined
Jul 31, 2012
Messages
308
Location
NW
I like the thread waiting for the next stage.

Wes
 
OP
G

Gert

Well-known member
Joined
Feb 21, 2012
Messages
139
Location
Netherlands
Ready for sandblasting. Delicate parts will get protective tape, as well as the thread of the spindle.
 

Attachments

  • DSC02535 (Small).JPG
    DSC02535 (Small).JPG
    58.5 KB · Views: 13
Last edited:

oldldh

Well-known member
Joined
May 22, 2012
Messages
3,700
Location
Fairhope, AL
American Iron in the Netherlands???:dunno:

Who'da thunk it???:lol_hitti

When you get through with your restorations, you will have a pair of "as good as it gets" clampers!!!:thumbup::thumbup::thumbup:

Ya dun gud, Bubba!!!:drool::drool:
 

tedsters

Well-known member
Joined
Oct 29, 2012
Messages
1,443
Location
Michigan
nice vises that C2 looks like it is in super nice shape great find and pretty darn good deal on the 2 also
 

RogueFab

Well-known member
Joined
Jun 27, 2013
Messages
430
Location
Oregon
Nice pair of vises. I would keep them both too! What did you do to clena that on the lathe? emry cloth? Or did you use a cutting tool?
 
OP
G

Gert

Well-known member
Joined
Feb 21, 2012
Messages
139
Location
Netherlands
Nice pair of vises. I would keep them both too! What did you do to clena that on the lathe? emry cloth? Or did you use a cutting tool?

I gonna keep them for sure.
I removed about 0.2 mm (0.008 inch) with a cutting tool as there was too much pitting from rust. Finished with several grades of sandpaper.

American Iron in the Netherlands???:dunno:
I was surprised too !
 
Last edited:
OP
G

Gert

Well-known member
Joined
Feb 21, 2012
Messages
139
Location
Netherlands
Returned from sandblasting

Interesting detail - BD - makers mark?
 

Attachments

  • DSC02545 (Small).JPG
    DSC02545 (Small).JPG
    44.7 KB · Views: 13
  • DSC02546 (Small).JPG
    DSC02546 (Small).JPG
    57 KB · Views: 13
Last edited:
OP
G

Gert

Well-known member
Joined
Feb 21, 2012
Messages
139
Location
Netherlands
At this point I need some help from you.
If you look into the hole for the pipejaws there are only two small edges (or protrusions or whatever they are called) that support the lower side of the pipejaw. One is broken. I cannot imagine these two small protrusions can hold the clamping force. Both the static jaw as the movable jaw look like this.
Any clue?

There are no holes in the pipejaws
 

Attachments

  • DSC02549 text.jpg
    DSC02549 text.jpg
    145 KB · Views: 11
  • DSC02551 (Small).JPG
    DSC02551 (Small).JPG
    52.2 KB · Views: 12
Last edited:

KMScott

Well-known member
Joined
Feb 14, 2012
Messages
4,642
Location
Daufuskie Island, South Carolina
Hi Gert
I wish you was next door, I could help you a couple of ways, one way would be to tack weld a block on the back of the pipe jaws and have the casting support the pipe jaws, yes I know it is not a good idea to weld on tool steel but I have done this many times repairing cores and cavities in injection molds with a TIG welder, a tack is all you need. another thought would be to add a 3/8 pin all the way through the casting like they did in the earlier Combination vises when they used to pin in the jaws. But the pin could be positioned where the jaw is backed up or resting on it. This would take a machine shop and a careful dimensions. The Pipe jaws should be floating and not be a ridged mount like the newer vises. The pipe jaws that have through holes and pinned in have plenty of clearance for the pin and this allows the pipe jaw to float and locate on the bar or pipe you are clamping. The newer pipe jaws have a clip and this is why they used the clip. If I was helping you I would machine a small pocket where the set screw sets in with a carbide drill (5/16:18 set screw pocket a .343 pocket) since the set screws have left a good marking and then not tighten the set screw and allow some floating action. Let them wobble some. Just my two cents.

Kevin
 
OP
G

Gert

Well-known member
Joined
Feb 21, 2012
Messages
139
Location
Netherlands
Thanks for the suggestions for the pipe jaws Kevin.
I like the idea of welding a block at the back of the pipe jaws. I think epoxy glue will work as well.
But to make it look more original two pins through each pipe jaw would be best, but I think that is the most challenging option and I feel a little discomfort drilling in the vise. Anybody know what the diameter of the pins is?

In the meantime I made a centerpin for the swivel base.
 

Attachments

  • DSC02557 (Small).JPG
    DSC02557 (Small).JPG
    58.8 KB · Views: 8
Last edited:

rusty65

Well-known member
Joined
Mar 20, 2012
Messages
2,279
Location
Pekin,IL
Your restoration is coming along great! I enjoy seeing old iron being made useable again.


Sent directly from the Snap On Kool Aid factory.
 
OP
G

Gert

Well-known member
Joined
Feb 21, 2012
Messages
139
Location
Netherlands
A little update. Received some wonderful new jaws from KMScott. Thanks Kevin!
Here they are mounted temporary.

I found the horse shoe washer was far from original. I decided to make a new one. The old one right, the newly made left:

The anvil of the C2 was covered with dings so I milled it flat. Sorry for dark picture:
 

Attachments

  • DSC02601 (Small).JPG
    DSC02601 (Small).JPG
    52.5 KB · Views: 13
  • DSC02603 (Small).JPG
    DSC02603 (Small).JPG
    37.9 KB · Views: 13
  • DSC02587 (Small).JPG
    DSC02587 (Small).JPG
    59.8 KB · Views: 15
Last edited:

autopts

Well-known member
Joined
Jul 4, 2009
Messages
2,268
A little update. Received some wonderful new jaws from KMScott. Thanks Kevin!
Here they are mounted temporary.


I found the horse shoe washer was far from original. I decided to make a new one. The old one right, the newly made left:


The anvil of the C2 was covered with dings so I milled it flat. Sorry for dark picture:

Gert, that C2 was definitely worth the wait. Its a beauty
 
OP
G

Gert

Well-known member
Joined
Feb 21, 2012
Messages
139
Location
Netherlands
Sorry for the long wait.
It's finally finished.
Primer with anti-rust.

I made some alu blocks to fill the room behind the pipe jaws
 

Attachments

  • 3.JPG
    3.JPG
    102.6 KB · Views: 12
  • 23.JPG
    23.JPG
    64.3 KB · Views: 13
  • 22.JPG
    22.JPG
    76.3 KB · Views: 15
  • 1b.JPG
    1b.JPG
    120.6 KB · Views: 16
  • 1a.jpg
    1a.jpg
    73.5 KB · Views: 12
Last edited:
OP
G

Gert

Well-known member
Joined
Feb 21, 2012
Messages
139
Location
Netherlands
And here she is in all her glory:
 

Attachments

  • DSC03700 (Small).JPG
    DSC03700 (Small).JPG
    121.6 KB · Views: 21
  • DSC03713 (Small).JPG
    DSC03713 (Small).JPG
    64.9 KB · Views: 14
  • DSC03711 (Small).JPG
    DSC03711 (Small).JPG
    64.4 KB · Views: 17
  • DSC03708 (Small).JPG
    DSC03708 (Small).JPG
    71.8 KB · Views: 16
  • DSC03707 (Small).JPG
    DSC03707 (Small).JPG
    90.6 KB · Views: 17
  • DSC03706 (Small).JPG
    DSC03706 (Small).JPG
    98.3 KB · Views: 19
Last edited:
OP
G

Gert

Well-known member
Joined
Feb 21, 2012
Messages
139
Location
Netherlands
Some more details:
 

Attachments

  • DSC03716 (Small).JPG
    DSC03716 (Small).JPG
    56 KB · Views: 12
  • DSC03720 (Small).JPG
    DSC03720 (Small).JPG
    82.2 KB · Views: 12
  • DSC03715 (Small).JPG
    DSC03715 (Small).JPG
    45.3 KB · Views: 12
Last edited:
To avoid these ads, REGISTER NOW!
OP
G

Gert

Well-known member
Joined
Feb 21, 2012
Messages
139
Location
Netherlands
And some more :drool:

I had to make new pins as the old ones where broken.
I chose to let them stick out and made an attachement so I can remove them with a slide-hammer.

Also made some washers
 

Attachments

  • DSC03718 (Small).JPG
    DSC03718 (Small).JPG
    75.7 KB · Views: 11
  • DSC03745 (Small).JPG
    DSC03745 (Small).JPG
    67.8 KB · Views: 11
  • DSC03748 (Small).JPG
    DSC03748 (Small).JPG
    40.8 KB · Views: 9
  • DSC03744 (Small).JPG
    DSC03744 (Small).JPG
    63.7 KB · Views: 8
Last edited:
OP
G

Gert

Well-known member
Joined
Feb 21, 2012
Messages
139
Location
Netherlands
Ready to rock and roll next to a Record nr 4.
For some reason the colour in the pictures is a bit lighter than real. It's RAL 3020 - which is red but the photo's look more like orange.

Now it's time to work on the Rock Island.
 

Attachments

  • DSC03724 (Small).JPG
    DSC03724 (Small).JPG
    73.2 KB · Views: 12
  • DSC02414 (Small).JPG
    DSC02414 (Small).JPG
    89 KB · Views: 7
Last edited:

drivesitfar

Well-known member
Joined
Oct 23, 2013
Messages
36,034
Location
Pacific Northwest
Gert: you may have taken a while to finish your Wilton C2, but you did a helluva job. it looks bright orange on my laptop so hard to believe it's really red.

i have a couple questions. can you tell me why you have that nice pice of steel put back behind the pipe jaws? i haven't taken my C2's pipe jaws out yet, but i thought they were just one piece inside that space.

also would you mind posting your restoration over on the Vise Repair 101 thread and take up several posts to show all your pictures of that awesome vise and the work you did? i'd really be curious how you decided to make the pins to hold the vise nut in place because i think Wilton could have improved that part of their vises. some members have actually put threaded pins in there so they could just use an Allen wrench to remove them the next time.

just curious if you still live in the Netherlands and how did you get a pair of KMScott's jaws shipped to you? i just saw that an airline going through Iceland has $99 airline tickets from US to Europe which might be worth a trip or two just to trade some stuff because i hear shipping would almost cost that much. i really don't know for certain so would like to hear more about shipping to and from Europe.

NICE JOB!!!!
 

BJ42LX

Well-known member
Joined
Dec 29, 2010
Messages
2,811
Location
WNY
And some more :drool:

I had to make new pins as the old ones where broken.
I chose to let them stick out and made an attachement so I can remove them with a slide-hammer.


Gert, business opportunity: Make up a few dozen (hundred?) of those pins for all us Wilton guys who find bent, rusted and mangled pins when doing our own vise restorations.

Just a thought...

That C2 is mint.
 

zkling

Well-known member
Joined
Jan 23, 2007
Messages
16,939
Just DAMN, that very nice!!! :thumbup: One of if not the best looking restored wilton on here. Only thing you may want to add are rubber bumpers (finger savers) to the handle ends to keep them nice.
 
Last edited:

balane

Well-known member
Joined
May 4, 2011
Messages
2,996
Location
Pacific Northwest
That's a gorgeous job, just excellent. You can be proud of that one. My camera has a difficult time with red too for some reason. I adjust color hue in photoshop to get it looking more accurate to the real item.

.
 

Attachments

  • red.jpg
    red.jpg
    113.8 KB · Views: 80
Last edited:

CNGsaves

Well-known member
Joined
Sep 26, 2012
Messages
13,233
Location
KS and OK
Simply AWESOME !!!

You've earned YOU **** for now owning the hottest Wilton C2 worldwide!!

Thanks for sharing, and keep up excellent work. :thumbup:
 
OP
G

Gert

Well-known member
Joined
Feb 21, 2012
Messages
139
Location
Netherlands
Thanks for all your kind words. It really makes me proud as it's my first vise-resto.

Davefr Thanks. Took me about 4 hours to do the lettering. Just with a little paintbrush and a steady hand. The letter G from Chicago happened to be the most difficult to do right.

drivesitfar The piece of aluminium behind the pipe jaw is a kind of replacement for broken ridges that originally hold the lower part of the pipe-jaw. I've explained it with pictures in the Vise Repair 101 thread as you requested.
About the jaws from Kevin - he was so kind to send them to me by post.
And yes, I still live in Holland. Born and raised here and plan to stay here for a long time :beer:

BJ42LX Thanks for the idea of the business opportunity to make some more pins for other Wilton fans. The idea is good, but there's a lack of time issue thingy.

zkling This C2 definitively needs finger savers. I have found them on eBay but did not order them yet. Guess I could not wait to show the pictures...

KMScott Thanks Kevin. I couldn't do it without your jaws!
 
Last edited:
OP
G

Gert

Well-known member
Joined
Feb 21, 2012
Messages
139
Location
Netherlands
That's a gorgeous job, just excellent. You can be proud of that one. My camera has a difficult time with red too for some reason. I adjust color hue in photoshop to get it looking more accurate to the real item.

.

Now it has the right colour. Spot on. Thanks for the tip :rocker:
 

Hako86

Well-known member
Joined
Jan 23, 2013
Messages
207
Location
Netherlands
Awsome restoration! Ready to use :beer:
I wish there were some more of these awsome vises around here in Holland :(
 

G20-Budo

Well-known member
Joined
May 31, 2013
Messages
987
Location
Chandler, AZ
Gert - That's an incredible vise restore, you can be proud of for the rest of your life. Every time you go out in the shop, and look at it.. I'm sure you smile from ear to ear! :D
 
To avoid these ads, REGISTER NOW!
Top Bottom