Picked this up a bit back, was about a mid 90's red matco which is a IR 2340. shed stored and humidity had really made it pretty ugly but the drain was always left cracked tank was clean, nothing major but lots of surface rust specs all over everything. I'd have left it but the garage is multi use (no cars so decided to brighten it up a bit).
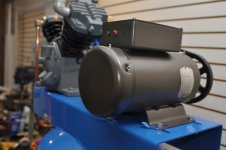
This was a quick cleanup, came out much better than i was expecting. Quick sand of the tank and wire wheel, multi tool sanding around the legs. Spray bomb primer surfacer, then rattle can blue. At that point I was really regretting not shooting it with auto paint as it looked like a@#, but i just didn't have a block of time to get my stuff out to do it. But a quick wet sand, then cut and polish with the rotary and i'm happy how it turned out, couple things here and there but they'll be covered by a decal of some sort.
Pump was wire brushed, sanded a few chips here and there...just needed a light touchup, Went darker grey, with some black.
What i find interesting is these came with baldor 5hp 3450 rpm (and the catalog number is an IR number) and it looks beefy compared to the motors on the new ones. Maybe it's not i dunno, Anyone familiar with these? I mean it just doesn't look like your typical 3450rpm motor you see on the newer compressors (wegs, emerson,etc), it's longer, fan cooled on the back behind the cover, and has zerk fittings for the bearings, 3 capacitors though, 2 i assume are run capacitors. Runs quite smooth for 15 years old and i know the guy used it a good bit. Amp meter at full load right on the money.
it looked pretty bad, aluminum end caps were nasty. I did a quick sand,degrease, and rattle can with what i had on hand. Dissembled to paint, and checked out,cleaned, packed the bearings and blew everything off inside, which insides it was very clean.
Disassembled the pressure switch, krylon that, same grey paint on the switch after disassembly. Just tried to clean all the crud off the copper, not turn it into a show queen...it'll turn soon enough. But there was a bit of degreasing to do so i cleaned the copper up a little.
Few more odds n ends left, cleaning belt guard, a few other things.