To avoid these ads, REGISTER NOW!

A newbie's epoxy floor rework

Gozo

Well-known member
Joined
Oct 10, 2013
Messages
249
Location
Central VA
I've been reading posts and planning to redo the ugly garage floor. Finally have the time arranged to get the floor taken care of. I have the epoxy kit from Legacy and just need to get to it. The floor was acid washed and painted with one part Behr epoxy followed by the Behr clear sealant a year ago. It looked great for about a month until the area under the tires started to peel up. It wasn't hot tire pickup, just pickup. The surface was porous and where ever water collected, it de-laminated the paint. The floor is 30+ years old and has various high and low spots. The whole floor looks like this. Not a pretty sight. The center drain only drains from the right side of the garage, the left has mild high spots that keep the water going in the wrong direction. The plan is to grind down the high spots, fill the low spots, prep grind the floor to open the surface and get the old paint off. Then will prime, epoxy coat, then clear urethane coat. I'll post progress and insights discovered.
 

Attachments

  • peeling_.jpg
    peeling_.jpg
    143.5 KB · Views: 255
  • tirepullup_.jpg
    tirepullup_.jpg
    57.1 KB · Views: 218
To avoid these ads, REGISTER NOW!
OP
G

Gozo

Well-known member
Joined
Oct 10, 2013
Messages
249
Location
Central VA
Grinding is not clean work!

Started grinding the old epoxy paint off the low spots and tried to bring down the high spots. I'm using a HF 4 1/2" angle grinder with the diamond cup wheel. The key to not gouging the floor is to keep the cup flat with the floor. Maybe it would be easier with a wider wheel, but this is what I have. I made a leveling bracket to hold the wheel flat to the floor. It has lag bolts as adjusting feet on the bottom of the wood for adjusting the face angle and does pretty well in the flat areas, but bites into the high areas and I have to tip it to get into the dips. It makes a back breaking job a bit easier.
The amount of super fine dust it makes is incredible! Make sure to wear not only goggles, but a mask suitable for fine dust, and hearing protection. A hat is a good idea as well. I taped up the shelves and cabinets to keep as much dust out as possible, but I'm sure some will get through.
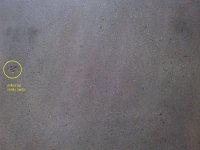
After a day of this, I settled to lower the worst of the high spots and ground out drainage troughs from the low areas to the drain. The more I crawled around on the floor, the more wiggles and undulations in the floor I noticed. It's only about 450 sq ft of floor, but at a few square inches at a time; it seems bigger. I looked into renting an Edco, but it was a pricey and you had to buy your own dymaserts. It would probably take a year to grind this flat with a cup wheel. The goal is have a decent surface that's easy to keep clean, to get the floor to drain away from the wet cars (my wife's car brings in buckets of water from the rain - it always has a puddle right under the driver door, where the just happens to be a low spot), and look fairly decent for a reasonable number of years.
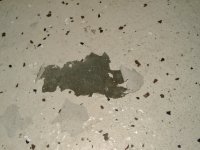
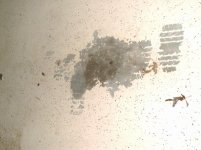
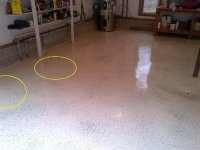
You can see where some high areas were ground down, the low areas were ground and filled with Legacy HD-110, and some of the smooth dirty areas were cleaned out. To get the high areas down with the surrounding floor, I had to get deep into the aggregate layer. It looks nice, but it is not going to happen to get the whole floor like that.
The HD-110 is interesting stuff; it's much more watery than I expected, almost like milk in consistency. You mix it with the sand but I couldn't get even 1/2 of the sand mixed before the stuff would be too thick to trowel down. Because I used it "epoxy rich", it didn't go as far as anticipated.
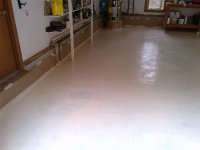
Will probably take another day or so to get the major areas smooth, do the edges along the walls, clean out the old cement based crack filler and epoxy patch. Next step after than will be to rent a Diamabrush and get the rest of the floor prepped. At least that's not a back breaking, bent over process.
 

Attachments

  • anglegrinder_.jpg
    anglegrinder_.jpg
    145.5 KB · Views: 400
  • highgrind_.jpg
    highgrind_.jpg
    61.4 KB · Views: 317
  • grind_fill_.jpg
    grind_fill_.jpg
    137.6 KB · Views: 343
  • grind_to_aggregate_.jpg
    grind_to_aggregate_.jpg
    117.2 KB · Views: 278

LegacyIndustrial

ALLIANCE MEMBER
Joined
Jun 7, 2010
Messages
7,993
Location
deerfield, IL
Looking good. I like the 2x4 grinder fixture!!
If you mix the all the aggregate it is awesome for deeper depressions with more of an edge. Can even be molded very nicely.

Feather finishing, like you are doing, is much easier with less aggregate, as you mentioned.

Spray your trowel with windex or equal glass cleaner on the final pass, it will really close the material down nicely.


Sent from my iPad using Tapatalk HD
 
Last edited:
OP
G

Gozo

Well-known member
Joined
Oct 10, 2013
Messages
249
Location
Central VA
Dancing with the diamabrush

Stayed up late last night (I hate long days after the fall time change) to get the cracks cleaned out and filled. The concrete patch from yesterday hardened up overnight. Not much of a feathered edge due to the sand grains. Rented the Diamabrush prep tool and Clarke floor machine from HomeDepot. What a "fun" machine. It's a lot more to handle than I thought. The first 20 minutes was spent dancing around the floor with it, and it was leading. The key to controlling this thing is finesse. It goes right when you lift the handle up and left when you press down. It takes a while to find the happy medium, and only a mild lean up or down to drive the thing. I expected it to work just like the videos. Well it does not. It took about 8 hours of back and forth, round and round to get the surface prepped. The brush was labeled 25 (I'm guessing the grit size - it looked about that) and seemed to have been almost new when I rented it. Hard, old, undulating floors don't just "sparkle right up". Even though the machine does most of the work, it works up a sweat. (And my back still aches from bending over the angle grinder yesterday and fighting with the monster today.) The grinding did smooth out the edges of the filled in patch spots. In the pictures, it looks like the patches are dirty, but that's the sand face exposed. It still seems solid and well adhered with no pickup at the edges (which feathered nicely). I maybe wore about 1/16" or so from the Diamabrush during the whole process. There were some small soft areas in the floor where it appears that the concrete was eaten away and only the sand was left. It may have been from the old acid prep, stuff leaking from years ago, or spots of crappy mixing in the original pour 30 odd years ago. These were drilled out with a 3/16" carbide bit, down to solid concrete. I'll filled these in and will and touch up with the cup wheel when hardened. The weather is supposed to be clear and in the mid 60's during the day and low 50's at night for the next few days. I did the first few of what will likely be many vacuum runs, pulled the plastic down and started taping up the edges with the hope of starting to get some of the Legacy boxes opened up and on the floor soon.
 

Attachments

  • edge_.jpg
    edge_.jpg
    45.3 KB · Views: 269
  • ground_down_.jpg
    ground_down_.jpg
    47.5 KB · Views: 257
  • drillout_.jpg
    drillout_.jpg
    87.3 KB · Views: 261
OP
G

Gozo

Well-known member
Joined
Oct 10, 2013
Messages
249
Location
Central VA
The primer goes down

Got everything smoothed out and the final few vacuumings done. Did the final few with the household vacuum with a clean "sub-micron antibacterial bag" with the beater brush and did a good job on the last of the fine dust. (Yes, I put a fresh bag in before moving it back to the house.) I rolled a sticky lint roller over the floor and it came up clean. I am so glad to be done with the dusty stuff. Laid down the primer coat. The temperature was 64F and no breeze (no having to chase leaves out of the garage). The Legacy HD standard epoxy primer mixed up without problem using the drill paddle mixer. I made 1/2 batches (used measuring buckets) and figured to cover 1/4 of the floor with each batch. The primer is thicker than I thought, kind of like a heavy cream, and didn't roll on like a wall paint. I don't know why I would expect it to be like a wall paint but I did, and it's not. Poured out a ribbon around the 1/4 of the floor and did the cut in with a 2" chip brush. Rolled the rest out and really had to work at it to get it to spread. It was a combination of it being thick and the floor sucking it up as quick as it could get it down. Be sure to use a strong roller pole. I used an aluminum extension pole and it curved quite a bit while pushing down and pulling to spread the primer around. Only covered about 3/4 of the expected area. The next batch got me moving to get it poured over a greater area in thinner ribbons so I wouldn't have to push it around as far. The 2 gallons should have covered 600 sq ft, but just barely did the 450. I re-rolled over the areas that sucked up as best as possible, but you can see it's thinner in these spots as it just sucked it up again. There are many tiny holes where the porosity was such that the primer seeped in and blew a bubble open, mostly over the patching compound areas. You can see the absorbed thin areas over the patch near the garage door and some of the pits are just visible; these were rolled over 2 or 3 times as material allowed. I'll see how these do as the primer hopefully levels somewhat. I'm concerned that the epoxy base coat will run short and I'll have a bare spot in some corner. Once this is ready for a recoat, I'll find out!
 

Attachments

  • primed_.jpg
    primed_.jpg
    136.1 KB · Views: 253
  • thin_over_patch_.jpg
    thin_over_patch_.jpg
    131.5 KB · Views: 230
OP
G

Gozo

Well-known member
Joined
Oct 10, 2013
Messages
249
Location
Central VA
Almost there! Epoxy & flakes down

The primer doesn't look as patchy after it dried. Maybe more just soaked in so it looks more even. A spider (genus arachnis epoxycus) crawled on the then wet primer and got glued into the floor. Got it out of the coating but the world has one less spider today. Got the epoxy base coat mixed and down this afternoon. It's almost just as thick as the primer. Also mixed it up in measured batches to cover 1/4 of the floor in a batch. It is listed to have a pot life of 30-45 minutes. Set a kitchen timer to 18 minutes, 3 to mix the stuff and 15 to get it down and spread. You have to move FAST. I was flying with the cutting in and moving like a madman while the timer ticked away. Went "ding" just as I finished the area. I was pleased and surprised the I had enough to get it on evenly. A squeegee may have made the spreading easier, I couldn't say as I didn't have one to try. Back rolled a few times over the next 5 minutes or so and put on the spike shoes. Make sure to cut off the excess strap so it doesn't drag into the wet epoxy! Spread the flakes by tossing them in the air. It made more clumps than the posts claim. I wound up casting small pinches and got better control over the coverage. Stayed about a foot or so from the paint edge against the yet to be coated areas. Then on to the next 15 minute coating sprint. Wear a hat or a sweat band, I worked up quite a sweat. Just had enough to get all areas coated with maybe a cup of epoxy to spare. If I were doing the spec'd 600 sq ft, I don't think I could have spread it that thin and covered it all. Since I only have a bout 3/4 of that, not an issue. Didn't look half bad when done. I circled the areas in the picture that were low and filled with patch material on the picture. You can't even tell when looking at it either direct or the light reflection off it. I propped the garage doors open a bit over the edge with a nail, point down on the bare concrete just past the edge of the tape.
Just as the stuff set up to tacky later this evening, I pulled up the masking tape at garage door end of the floor where it goes out to the apron. I used a plain HF masking tape. I find the crappy tape doesn't work well for making as it pulls of the paint under it because its so sticky (which is what I want - sticky). I've read many posts about bleed under the tape, but there were only a few very minor spots that I could either live with or touch off with a grinder or Dremel tool. On to the clear urethane once the epoxy is ready!
 

Attachments

  • epoxied_.jpg
    epoxied_.jpg
    91.3 KB · Views: 280
  • tapeedge_.jpg
    tapeedge_.jpg
    133.1 KB · Views: 294
OP
G

Gozo

Well-known member
Joined
Oct 10, 2013
Messages
249
Location
Central VA
It's done!

The spec sheet for the HD epoxy says 10-14 hours to topcoat. I figured it would need much more as it's in the low 60's vs. 70's. Checked it last night before going to bed and it was dry and hard. Rather than wait until the morning and risk the clear coat not adhering, I rolled the HD-365VOC down last night. This stuff is a pleasure to work with compared to the epoxy. Long pot life so I could take my time. It does smell strongly so use a respirator rated for solvents. I was surprised that I couldn't smell it all with the respirator on. If your garage is attached to the house, make sure to tape the seams around the door to keep the fumes out. I had the garage doors and windows open. It's clear and disappears when on the floor and has a bit more shine than the naked epoxy surface so you can see where you put it down by the reflection. I also kept track where I was at by mentally using a grid system by counting the cinderblocks. I did miss a few spots and in afterthought, if doing it again, I'd but grid markings on the masking paper so I could track rolling from B4 to B12 or such. Tried mixing the anti-slip into the top coat, but because of the size they seemed to separate out quickly. I used the coarse granules. I threw on the anti-slip granules by making a shaker out of the top with a 1/8" drill. The shaker top put then at around 3 or 4 per sq inch. Used less than a 1/4 of the jar for the whole. Ran the the roller over them to get some coverage over the top. This morning, catching the light differently, I touched in the few missed areas. I had a bit more than a quart left over which I put in a fresh smaller can for touchups if needed. The coarse granules are a bit "ouchy" on bare feet, the medium may hvae been better, but I'm more concerned about slippage than softness.
I think it came out well. I'll give it a few days before putting the other water heater in and the drain grate. I'll probably get a new one as the old one is kinda crappy and rusty. Probably a week before parking on it? What's the usual wait time? I'd rather stay out longer and not have it peel up than vice-versa.
 

Attachments

  • clear_coat_.jpg
    clear_coat_.jpg
    145.6 KB · Views: 301
To avoid these ads, REGISTER NOW!

PeggySull

New member
Joined
May 9, 2015
Messages
2
I hired a garage floor specialist to epoxy my garage floor and the job was done so poorly I will need to have it redone (little to no prep, discolorations, cracks around the edges of the entire garage). It was supposed to be a 2 day process involving many steps. The contractor's crew of 1.5 people (the .5 person mainly talked to a neighbor) and said they were done in 3 hours!

I am a senior citizen trying to sell my home and what I want to know is what the new contractor (when I find him or her) should do to redo the floor. I don't want to be fooled twice!

Thanks for any feedback anyone can give.
 

Shea

Well-known member
Joined
Sep 19, 2012
Messages
2,865
Location
California
Peggy, were you given a quote or signed a written contract stating the job description, what type of concrete prep, the type of coating materials used, how many coats, and etc?
 

PeggySull

New member
Joined
May 9, 2015
Messages
2
Shea, the contract reads: 1. Thoroughly clean existing concrete to be repaired. 2. Patch any inconsistencies with high strength material if structural or reface material if not. 3. Leaving saturated surface dry, then mix and apply Miracote with a roller. 4. Aply Miraseal HDWB sealant. 5. Clean the job site, etc.

The verbal contract was a power wash then dry first, then #2, then prepare and prime surface, then the rest as written above

Luckily, the contract says that I pay nothing if not 100% satisfied. I am paying nothing. Everyone who sees it is aghast.

However, this has put me behind in getting the house sold since this was an integral piece of work that needed to be completed asap.

So I'm struggling to find someone who can work with the applied expoxy to create a durable and attractive floor. It is a buyer's market here (as in most places in the US), so having this is critical to my getting back at least my downpayment on the home.

Thanks so much for replying.
 

James-W

Well-known member
Joined
Feb 3, 2013
Messages
12,432
Location
Southeastern Wisconsin
However, this has put me behind in getting the house sold since this was an integral piece of work that needed to be completed asap.

So I'm struggling to find someone who can work with the applied epoxy to create a durable and attractive floor. It is a buyer's market here (as in most places in the US), so having this is critical to my getting back at least my down payment on the home.
Not really trying to steer you away from doing the epoxy floor, but maybe in this particular case it would be easier, and a whole quicker, if you were to put down plastic floor tiles. The floor would look good and would be done fairly quickly.
 
Last edited:
OP
G

Gozo

Well-known member
Joined
Oct 10, 2013
Messages
249
Location
Central VA
Long term follow up since I'm already logged in vs. lurking... The floor still looks great and holding well. I've dropped lots if tools and pipes and such on the floor and no peeling or breakout problems. I hose it out 2 or 3 times a year and maybe some soap and brush to wash off the brown leaf stains in the fall and that's about it. I for one am pleased with the epoxy coating.
 
OP
G

Gozo

Well-known member
Joined
Oct 10, 2013
Messages
249
Location
Central VA
Longer long term follow up. Getting delamination and peeling of the top coat in spots. Some areas under tire parked spots, others just in random spots. Sent request to Legacy asking on how best to do prep and spot repair. I really don’t want to grind up the epoxy as that’s still holding up great. Will let y’all know what comes up.
 
OP
G

Gozo

Well-known member
Joined
Oct 10, 2013
Messages
249
Location
Central VA
Wow. It’s been almost 10 years since I started on this project.

Lessons learned: the HD-365VOC does protect the epoxy from yellowing. However, by absorbing the UV, it yellows itself. And breaks down. Wherever the sun hit the floor, more in the areas where it lingers longer, it delaminated. Been doing it for a few years and I finally got fed up.

Well, I used the same old angle grinder that I used for the initial prep work (that HF bottom of the line tool just keeps on truckin’) with a wire wheel and got up the top coat. Came up easy in the sunny areas and I could tell where to stop as there was a definite change in adhesion. The epoxy and flakes didn’t get affected much at all by the wire wheel. Scrubbed the floor well, did a solvent wipe, and applied Nohr-S polyurea. Will see how it does over time. Hopefully more than 10 years; I’m getting to old for this.
 
OP
G

Gozo

Well-known member
Joined
Oct 10, 2013
Messages
249
Location
Central VA
One year follow up on the recoat with the Nohr-S polyurea: nothing to report (which is good). No lift up, peeling, yellowing, etc. Boring is good in this case.
Probably won’t be able to do a long term follow up in 10 years; the wife wants to move somewhere warmer after I retire. It was 103 here 2 weeks ago. How much warmer does she want?
 
Last edited:
To avoid these ads, REGISTER NOW!
Top Bottom