

Well I've got the first half of the garage finished. To summarize from my last thread,
http://www.garagejournal.com/forum/showthread.php?t=22183
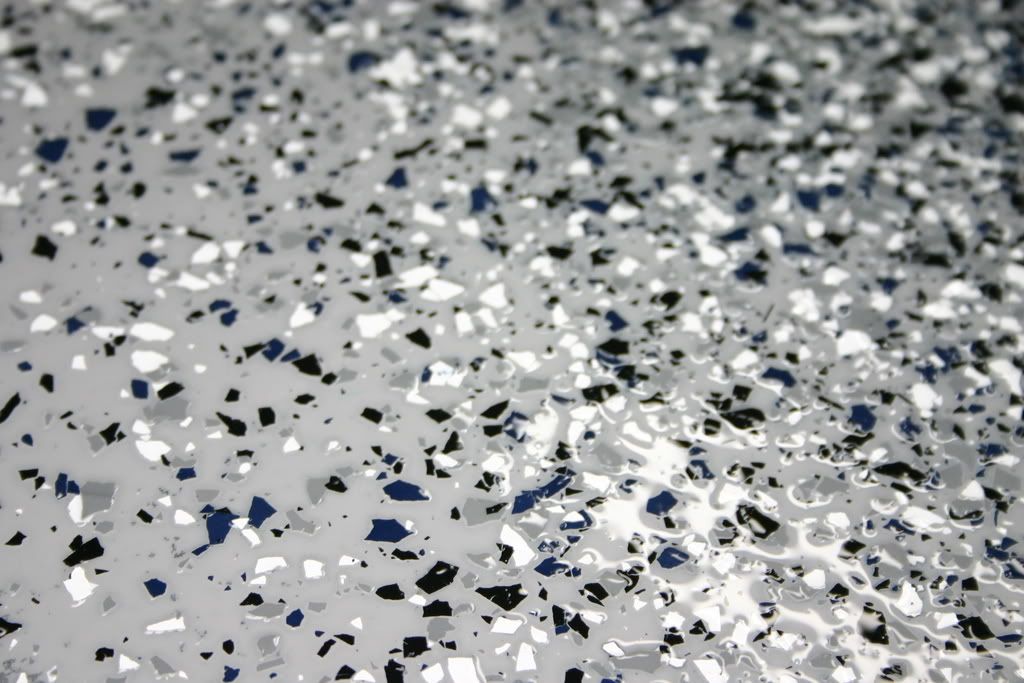
This side of the garage is 300sf and has a cinder block surround. I choose the light gray epoxy and white, black, ash gray, and navy blue flakes. Coverage rate is .05#/sf.
Saturday morning was spent cleaning the garage and removing as much dust from the room as possible. I even went around with my leaf blower to get dust out of the overhead. I let everything settle out and vacuumed everything in reach, walls and all.
I got to start applying the Bondtite Saturday evening and mixed several small batches for the cinder blocks and the cut in. I was really paranoid about the epoxy setting up while I was trying to apply it so I worked like a mad man. It doesn't set up quite that fast. Temp was only 70deg so that helped. I poured the Bondtite into aluminum baking trays after mixing and used 3" chip brushes to apply. For my small room in the garage I made another small batch and used a 9" roller, then a larger batch for the rest of the floor and a 18" 1/4" nap Wooster roller. For some reason the Bondtite took quite a while to fully harden. It's supposed to be tack free in 8-12 hrs but was probably 14-16 before it was ready to walk on. Kinda of screwed up my schedule as I had to wait to lay the Liquatile till Sunday night.
The Liquatile was applied pretty much the same way on the block wall. It took a lot more than planned to get the proper coverage. Probably since the walls are porous and I used a brush instead of a roller. The walls came out pretty smooth though and look great. After I got the block and a cut in applied, I tossed the flakes. The walls reject a lot of chips so I had to so coverage by look. I had the best results by throwing the chips at the wall with some force so they would stick. After the wall and cut in was done I let it sit for about 30 min then used a light blast of air to blow off the loose chips from the edge and swept them up. I then mixed a small batch and did the floor in the room and did the same with the chips but didn't wait the 30 min. I had 2 of the 3qt kits ready to mix for the rest of the floor and worked one at a time. I did everything by myself and didn't have any problems. I used the squeegee to spread the epoxy then back rolled it. The squeegee was a great choice and made spreading evenly very easy and quick. I wish you could use on e with the bondtite. I got to the last 10sf before i felt the roller start to tack up. It happened very quick and you'll know when it's about done for. Luckily it held out for that last 30 seconds. Chip application was mostly overhand throw. The velocity makes the chips spread pretty well. I used the spike shoes to get to a few places that needed a bit more attention. A few places got the hand shake application to fill in.
There was a few places that got a bit more chips than I wanted. I taped a 6" scraper/drywall blade to a broom handle and scraped the floor. The spots that were to heavy rejected a bunch of the chips when scraped and evened out to the rest of the floor. I had a bit extra on the top of the block wall and in the corners and edge but the extra came out with the scraper. I tried sweeping but gave up quick and cleaned up the loose chips with the shop vac.
The final coat of bondtite went on pretty much the same way except I did the floor in a single 1 gal batch. I did get the wife to spot me for the floor coat. It's pretty much a requirement to have a spotter because you can't see **** from the angle your rolling from. The top coat is easier to do than the primer coat, and the bondtite seems to go further even though Wolverine calls for the same application rate. It seemed like my primer coat was a little thicker and I'm wondering if I might have used to much which is want caused the long drying time. Maybe I did a bad calculation. Even being an Engineer, simple screw up happen. I'm figuring by the time I get home from work today the floor should be able to be walked on. I'll start moving stuff on the weekend and start the process over for the other side.
I was on the wall about using antislip on the top coat. I actually picked up some sharkgrip from Shermin Williams. I was planning on mixing it in before speading the bondtite but forgot until I was in the process of rolling. I was going to broadcast it like the chips at that point but the wife talked me out of it. With the amount of chips I applied, you can tell the floor has a bit of texture to the surface and I think it will be fine. If I think it's to slick, I'll do the sharkgrip on the other side of the garage, but I doubt I will.
I forgot to mention my adventure in filling to expansion joint with I flex. It was my bonehead moment of the weekend. I mixed up a batch of 16oz and poured it out. I went to mix a second batch and the hardener didn't want to pour out as easy. Well the bottom of the hardener can was filled with the filler/grout stuff. I didn't stir it before use. So like a mad man scooped out as much of the fist batch as I could (about 50%) and put it back in the cup. In a second cup I mixed up a second batch with the filler this time then mixed them together and reapplied. I got the joint mostly filled but not level with the floor which is why I didn't coat past it with this side of the garage. The I-flex did harden up quite a bit but will still take a slight fingernail impression. If this isn't right I've already resigned myself to having to cut it out and buy a new kit of I-flex.
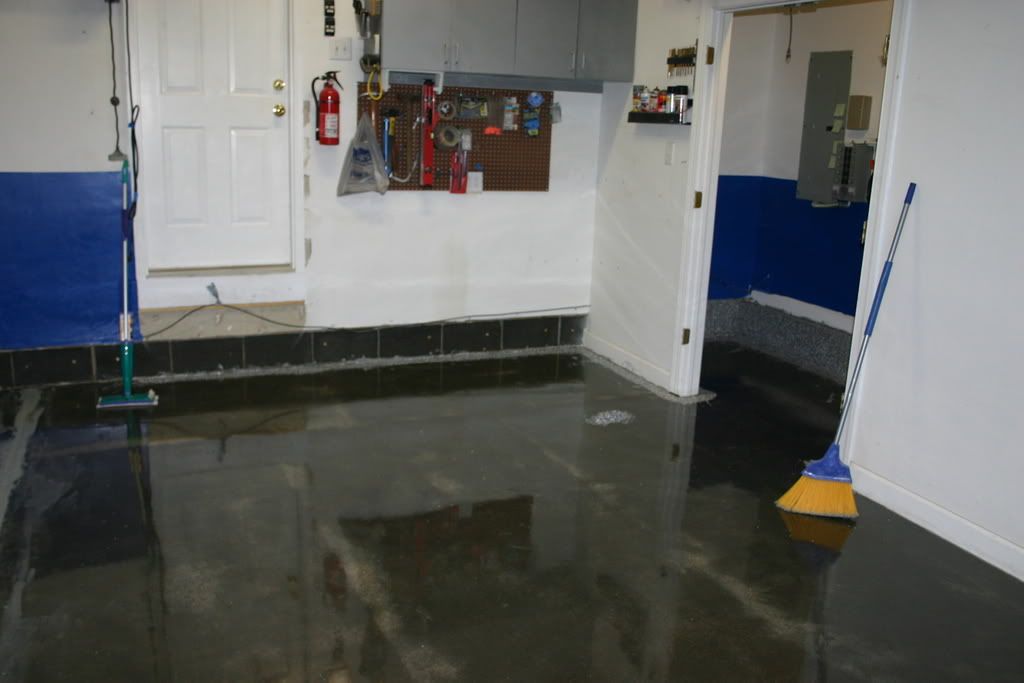
Well now that you bored out of your mind here's some pics.


Here's the full album
http://s160.photobucket.com/albums/t162/tojan19/Epoxy floor/
http://www.garagejournal.com/forum/showthread.php?t=22183
This side of the garage is 300sf and has a cinder block surround. I choose the light gray epoxy and white, black, ash gray, and navy blue flakes. Coverage rate is .05#/sf.
Saturday morning was spent cleaning the garage and removing as much dust from the room as possible. I even went around with my leaf blower to get dust out of the overhead. I let everything settle out and vacuumed everything in reach, walls and all.
I got to start applying the Bondtite Saturday evening and mixed several small batches for the cinder blocks and the cut in. I was really paranoid about the epoxy setting up while I was trying to apply it so I worked like a mad man. It doesn't set up quite that fast. Temp was only 70deg so that helped. I poured the Bondtite into aluminum baking trays after mixing and used 3" chip brushes to apply. For my small room in the garage I made another small batch and used a 9" roller, then a larger batch for the rest of the floor and a 18" 1/4" nap Wooster roller. For some reason the Bondtite took quite a while to fully harden. It's supposed to be tack free in 8-12 hrs but was probably 14-16 before it was ready to walk on. Kinda of screwed up my schedule as I had to wait to lay the Liquatile till Sunday night.
The Liquatile was applied pretty much the same way on the block wall. It took a lot more than planned to get the proper coverage. Probably since the walls are porous and I used a brush instead of a roller. The walls came out pretty smooth though and look great. After I got the block and a cut in applied, I tossed the flakes. The walls reject a lot of chips so I had to so coverage by look. I had the best results by throwing the chips at the wall with some force so they would stick. After the wall and cut in was done I let it sit for about 30 min then used a light blast of air to blow off the loose chips from the edge and swept them up. I then mixed a small batch and did the floor in the room and did the same with the chips but didn't wait the 30 min. I had 2 of the 3qt kits ready to mix for the rest of the floor and worked one at a time. I did everything by myself and didn't have any problems. I used the squeegee to spread the epoxy then back rolled it. The squeegee was a great choice and made spreading evenly very easy and quick. I wish you could use on e with the bondtite. I got to the last 10sf before i felt the roller start to tack up. It happened very quick and you'll know when it's about done for. Luckily it held out for that last 30 seconds. Chip application was mostly overhand throw. The velocity makes the chips spread pretty well. I used the spike shoes to get to a few places that needed a bit more attention. A few places got the hand shake application to fill in.
There was a few places that got a bit more chips than I wanted. I taped a 6" scraper/drywall blade to a broom handle and scraped the floor. The spots that were to heavy rejected a bunch of the chips when scraped and evened out to the rest of the floor. I had a bit extra on the top of the block wall and in the corners and edge but the extra came out with the scraper. I tried sweeping but gave up quick and cleaned up the loose chips with the shop vac.
The final coat of bondtite went on pretty much the same way except I did the floor in a single 1 gal batch. I did get the wife to spot me for the floor coat. It's pretty much a requirement to have a spotter because you can't see **** from the angle your rolling from. The top coat is easier to do than the primer coat, and the bondtite seems to go further even though Wolverine calls for the same application rate. It seemed like my primer coat was a little thicker and I'm wondering if I might have used to much which is want caused the long drying time. Maybe I did a bad calculation. Even being an Engineer, simple screw up happen. I'm figuring by the time I get home from work today the floor should be able to be walked on. I'll start moving stuff on the weekend and start the process over for the other side.
I was on the wall about using antislip on the top coat. I actually picked up some sharkgrip from Shermin Williams. I was planning on mixing it in before speading the bondtite but forgot until I was in the process of rolling. I was going to broadcast it like the chips at that point but the wife talked me out of it. With the amount of chips I applied, you can tell the floor has a bit of texture to the surface and I think it will be fine. If I think it's to slick, I'll do the sharkgrip on the other side of the garage, but I doubt I will.
I forgot to mention my adventure in filling to expansion joint with I flex. It was my bonehead moment of the weekend. I mixed up a batch of 16oz and poured it out. I went to mix a second batch and the hardener didn't want to pour out as easy. Well the bottom of the hardener can was filled with the filler/grout stuff. I didn't stir it before use. So like a mad man scooped out as much of the fist batch as I could (about 50%) and put it back in the cup. In a second cup I mixed up a second batch with the filler this time then mixed them together and reapplied. I got the joint mostly filled but not level with the floor which is why I didn't coat past it with this side of the garage. The I-flex did harden up quite a bit but will still take a slight fingernail impression. If this isn't right I've already resigned myself to having to cut it out and buy a new kit of I-flex.
Well now that you bored out of your mind here's some pics.
Here's the full album
http://s160.photobucket.com/albums/t162/tojan19/Epoxy floor/
